I’ve been using Copilot Cowork since March, and the biggest lesson is simple: stop treating it like a chat box.
Give it a real goal.
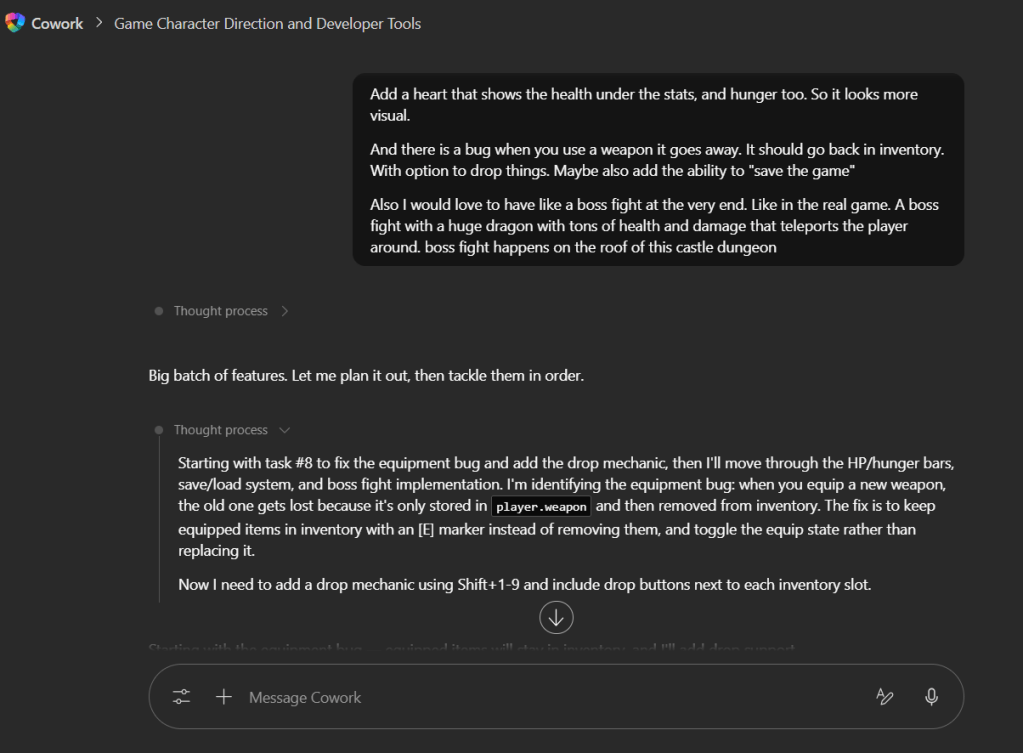
The /goal skill is where Cowork gets serious. When you point it at the right files, context, assets, and instructions, it can move from “give me ideas” to “go figure this out, build the plan, show me the sources, and wait for approval.”
Each prompt will include the use case, the exact prompt, the expected result, and the follow-up prompts you can use to push Cowork further.
- Prompt #1 — Create an Organization Branding Kit
- Prompt #2: Find Copilot-Only Automation Use Cases from Work IQ
Prompt #1 — Create an Organization Branding Kit
Use case
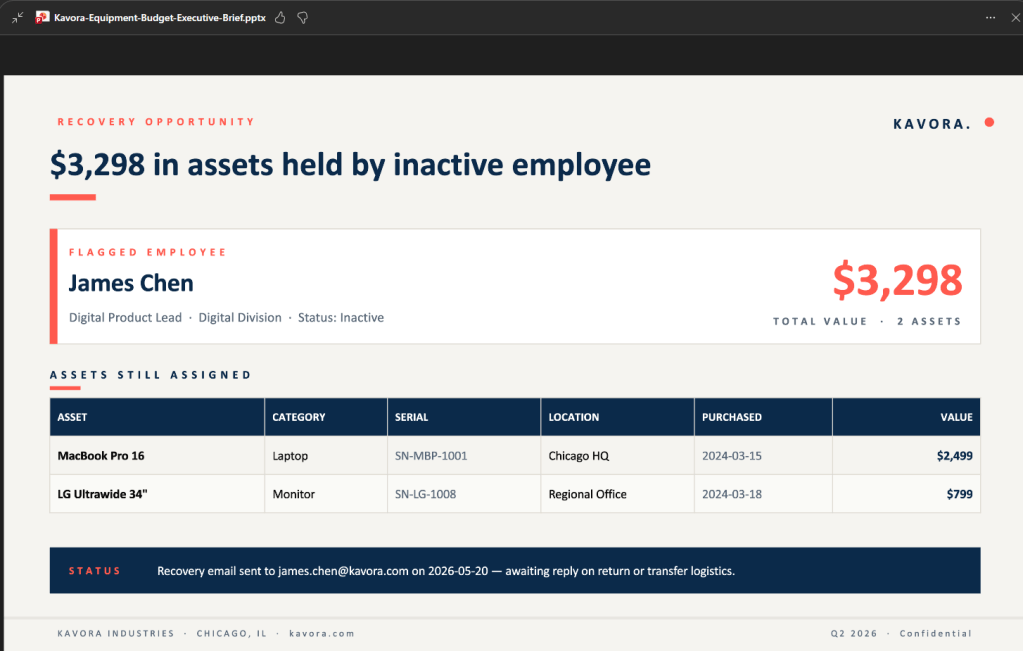
Use this when you want Copilot Cowork to pull together a practical branding kit for an organization using available internal context, public website branding, existing files, logos, icons, and PowerPoint decks.
This is useful when the organization already has branding scattered across folders, decks, documents, images, and websites, but there is no clean source of truth.
The goal is simple: get Cowork to discover what already exists first, then build the branding kit from real assets instead of guessing.
The /goal prompt
/goal Create a complete branding kit for [Organization Name].Use all available context you can access, including internal files, shared documents, PowerPoint decks, Word documents, PDFs, images, logos, icons, and the organization’s public domain: [Website URL].Your first job is discovery.Look for:- Existing logos and icon files- PNG and JPEG image files containing official logos, icons, or brand graphics- PowerPoint decks that appear to be templates or close to templates- Sales decks, pitch decks, marketing decks, one-pagers, proposals, product sheets, and internal documents- Existing colors, fonts, layouts, screenshots, visual patterns, and repeated design styles- Website branding, tone, product language, and positioning from the public domainAsset handling guardrails:- Do not recreate, redraw, regenerate, restyle, or reimagine any existing logo or icon.- Use the actual existing image assets when they are available.- Prefer the original PNG or JPEG files for logos, icons, and other brand images.- If multiple versions exist, identify the best available source file and note the others.- Preserve the original appearance of logos and icons, including proportions, colors, spacing, and transparency.- Do not generate substitute logos or substitute icons.- If an official asset cannot be found, clearly mark it as missing and recommend that it be provided.- If an asset is unclear, low quality, duplicated, or inconsistent, flag it instead of attempting to remake it.Do not invent brand rules. If something is not clearly available, mark it as “recommended” instead of “confirmed.”Create a practical branding kit that includes:1. Brand overviewSummarize the organization’s visual identity, positioning, tone, and audience.2. Logo guidanceIdentify the available logo and icon assets, especially the PNG and JPEG files, and recommend how they should be used across slides, documents, social posts, and web assets.3. Color paletteExtract or infer the main brand colors from existing assets. Include hex codes when possible. Separate confirmed colors from recommended supporting colors.4. Typography guidanceIdentify any fonts used in existing materials if possible. If the fonts are unclear, recommend a clean Microsoft-friendly font stack that matches the brand.5. Presentation styleReview existing PowerPoint decks and identify the best deck or slides to use as the closest template. Explain what makes it the best starting point.6. Slide design rulesCreate clear rules for title slides, section dividers, content slides, screenshots, diagrams, callout slides, and closing slides.7. Icon and image styleDefine the icon style, image style, screenshot style, and visual treatment the organization should use consistently, based only on existing assets and patterns you find.8. Voice and toneDefine how the organization should sound in external content, internal content, sales material, and social posts.9. Reusable asset recommendationsList the assets that should be created next, including PowerPoint template, Word template, social post template, proposal template, one-page product sheet, and icon set.10. Gaps and questionsList anything missing, unclear, inconsistent, or worth confirming before the branding kit becomes official.Before creating the final branding kit, show me:- The files and sources you found- Which logo and icon image files you found, especially PNG and JPEG assets- Which PowerPoint deck is the best starting point- Any assumptions you are making- Any missing or questionable assets- The proposed structure for the final branding kitWait for my approval before creating the final output.
Expected result
Cowork should search the available context, identify the real brand assets, review existing decks and documents, and build a branding kit grounded in what already exists.
The important part is that it should separate confirmed brand rules from recommended brand rules.
- Confirmed means Cowork found evidence in the files, website, images, decks, or documents.
- Recommended means Cowork is filling a gap based on the closest available context.
That distinction matters because branding work can go sideways fast when the AI starts inventing things. The prompt forces Cowork to find the source material first, flag gaps, and wait for approval before creating the final output.
The guardrails around logos and icons are also important. Cowork should use the actual image files where possible. It should not recreate or redesign official assets.
How to extend / prompt more
Once Cowork creates the first version of the branding kit, keep driving it with follow-up prompts like these:
Add this <logo.png> as the main logo for the branding kit. Use the actual image file. Do not recreate, redraw, or modify the logo.
Use this <icon.png> as the primary app or product icon. Keep the original proportions, colors, and transparency.
Using this brand kit, generate a new Word template I can use for general letter headings.
Using this brand kit, create a Word proposal template with a cover page, section headings, body styles, callout sections, and a closing page.
Using this brand kit, create a PowerPoint template structure with a title slide, section divider, agenda slide, content slide, screenshot slide, quote or callout slide, and closing slide.
Use this existing <presentation.pptx> as the closest visual reference and create a cleaner template based on its style.
Create a one-page brand cheat sheet for employees that shows the logo usage, colors, fonts, tone, and common do and don’t rules.
Create a social post template guide using this branding kit for LinkedIn and X.
Create a reusable prompt I can paste into Cowork any time I want it to generate on-brand content for this organization.
Create a list of missing brand assets I should upload next, including logo formats, icons, PowerPoint templates, Word templates, screenshots, and product images.
Create a lightweight version of this branding kit for sales, delivery, and support teams.
Review this generated template against the branding kit and tell me what is off-brand before I use it.
Final note
This is where Copilot Cowork starts to become more than a chat experience.
You are giving it a goal, pointing it at real organizational context, adding guardrails, and forcing it to work from actual assets.
That is how you get better output.
Prompt #2: Find Copilot-Only Automation Use Cases from Work IQ
This prompt is designed for Copilot Cowork when you want to look across your Microsoft 365 work patterns and find practical automation opportunities that can be handled with Copilot first.
The key constraint is important:
The first three use cases must be possible using only Copilot.
No Power Automate. No Azure. No custom code. No developer work.
Then the prompt asks for one bonus use case where Power Automate is allowed, but only if the workflow truly needs a trigger, system action, approval, notification, or reliable automation beyond what a prompt can do.
This is a strong Frontier grace period test because it helps you answer a very practical question:
What recurring work can we improve with Copilot alone before we start building anything heavier?
What this /goal does
- Looks for recurring work patterns across Microsoft 365
- Identifies repeated meeting prep, follow-ups, updates, summaries, and content work
- Shortlists possible Copilot-only automation use cases
- Selects the top 3 practical use cases
- Builds setup blueprints for each one
- Drafts scheduled prompts, Cowork skill drafts, /goal workflows, or Copilot Chat prompts
- Adds one bonus Power Automate use case where automation is actually justified
The /goal prompt
/goalAnalyze my Work IQ and Microsoft 365 work patterns to identify the top Copilot-only automation use cases.Purpose:I want you to look deeply at my available Microsoft 365 work context and Work IQ signals to find the best recurring work patterns that can be improved using only Microsoft 365 Copilot and Copilot Cowork.This should not be a generic brainstorm.I want practical use cases that can be implemented with Copilot capabilities only, such as:- Microsoft 365 Copilot scheduled prompts- Copilot Cowork skills- Copilot Cowork /goal workflows- Microsoft 365 Copilot Chat prompts- Copilot agents where availableFor the first 3 use cases, do not require Power Automate, Azure, custom code, external connectors, or developer work.After the top 3 Copilot-only use cases, include a 4th bonus use case where Power Automate is allowed.Primary goal:Find the top 3 recurring work patterns that can be improved using only Copilot, then create a practical setup plan for each one.Then identify one additional use case where Power Automate would be the better option.Important guardrails:- Do not force Power Automate into the first 3 use cases- Do not recommend custom code- Do not recommend Azure Functions- Do not recommend complex integrations- Do not recommend external tools- Do not create anything unless I approve- Do not schedule anything unless I approve- Do not send emails- Do not post in Teams- Do not modify files- Do not create automations- Clearly separate Copilot-only use cases from the Power Automate use case- Base recommendations on real work patterns where possible- If Work IQ signals are limited, use available Microsoft 365 context such as meetings, emails, chats, files, recurring collaboration patterns, and repeated tasks- Be practical- Recommend the lightest approach that solves the problemStep 1: Create a work planBefore starting, create a short work plan.Explain:- What Microsoft 365 work context you will analyze- What Work IQ signals you will look for- How you will identify repeated work patterns- How you will decide whether something can be handled with Copilot only- How you will decide whether something needs Power Automate- What outputs you will createThen proceed.Step 2: Analyze Work IQ and Microsoft 365 work patternsReview available work signals and look for recurring patterns such as:- Repeated meeting prep- Repeated meeting follow-up- Weekly status updates- Recurring stakeholder updates- Repeated executive summaries- Repeated project updates- Repeated customer updates- Repeated inbox triage- Repeated action item tracking- Repeated document drafting- Repeated research tasks- Repeated content creation- Repeated review workflows- Recurring decisions that need summaries- Recurring risks that need monitoring- Work that happens before meetings- Work that happens after meetings- Work that requires pulling context from multiple Microsoft 365 sources- Work that could run on a schedule- Work that could be standardized with a skill- Work that could be delegated to Cowork- Work that should stay lightweight in Copilot ChatCreate a short summary of the main patterns you found.Step 3: Create a shortlist of Copilot-only candidatesCreate a shortlist of at least 10 possible Copilot-only use cases.For each candidate, include:- Use case name- Work pattern it is based on- Why it matters- Who benefits- Frequency- Business value- Time savings potential- Complexity- Data sensitivity- Best Copilot capability- Why this can be done with Copilot only- Why it does not need Power AutomateThe best Copilot capability should be one of:- Microsoft 365 Copilot scheduled prompt- Copilot Cowork skill- Copilot Cowork /goal workflow- Microsoft 365 Copilot Chat prompt- Copilot agent, where available- Combination of Copilot capabilities onlyStep 4: Select the top 3 Copilot-only use casesRank the candidates and select the top 3 use cases that can be implemented with Copilot only.Score each candidate from 1 to 5 for:- Business value- Frequency- Time savings- Ease of setup- User adoption likelihood- Scheduled prompt fit- Cowork skill fit- Cowork /goal fit- Governance risk- Data sensitivity- RepeatabilityFor each top 3 use case, explain:- Why it made the top 3- Why it is more valuable than the other candidates- Why it can be handled with Copilot only- Why Power Automate is not required- Whether the best approach is a scheduled prompt, Cowork skill, /goal workflow, Copilot Chat prompt, or combinationStep 5: Build the setup blueprint for each Copilot-only use caseFor each of the top 3 Copilot-only use cases, create a complete setup blueprint.Include:- Use case name- Business problem- Work pattern evidence- Main users- Trigger or schedule- Required context- Microsoft 365 sources needed- Recommended Copilot capability- Setup steps- Prompt text- Expected output- Human review points- Governance notes- What success looks like- What could go wrong- What should not be automated- How to test it- How to improve it after testingStep 6: Draft the actual Copilot assetsFor each top 3 use case, draft the actual Copilot setup assets.If it should be a scheduled prompt, include:- Scheduled prompt name- Recommended schedule- Why that schedule makes sense- Full scheduled prompt text- Expected output- Who should review it- What the user should do with the output- Guardrails- What the scheduled prompt should not doIf it should be a Copilot Cowork skill, include:- Skill name- Skill purpose- When users should use it- What the skill should ask the user- What context it needs- What steps it should follow- What outputs it should create- What it should never do- How it should handle uncertainty- Approval points- Validation checklistIf it should be a Copilot Cowork /goal workflow, include:- Goal name- Goal purpose- Full /goal prompt- Expected outputs- Why Cowork is the right fit- Approval points- How to avoid unnecessary credit usageIf it should stay in Microsoft 365 Copilot Chat, include:- Prompt name- Full prompt text- When to use it- When not to use it- Expected output- How to reuse itStep 7: Add one Power Automate bonus use caseAfter the top 3 Copilot-only use cases, identify one additional use case where Power Automate is actually justified.This should be a workflow where:- A real trigger is needed- A system action needs to happen automatically- A record needs to be created or updated- An approval needs to be routed- A notification needs to be sent- A process needs reliability beyond a prompt- Copilot alone is not enoughFor the Power Automate use case, include:- Use case name- Why Copilot alone is not enough- Why Power Automate is justified- Trigger- Core flow steps- Inputs- Outputs- Approvals- Error handling- Where Copilot fits- Where Cowork fits- Governance notes- What should stay manual- What should be tested firstStep 8: Compare the top 4Create a comparison table with:- Use case- Copilot-only or Power Automate- Best tool- Why this tool fits- Setup effort- Business value- Risk- Data sensitivity- User adoption likelihood- First test to runStep 9: Final outputAt the end, give me:- Executive summary- Work IQ pattern summary- Top 10 Copilot-only candidate list- Top 3 Copilot-only use cases- Why those 3 won- Full setup blueprint for each top 3 use case- Scheduled prompt drafts- Cowork skill drafts- Cowork /goal drafts- Copilot Chat prompt drafts- One Power Automate bonus use case- Comparison table- Rollout recommendations- Governance concerns- What should be tested first- What should not be automated yet- Assumptions- Data gaps- Confidence levelFinal instruction:Be strict.The first 3 use cases must be possible with Copilot only.Do not sneak Power Automate into the first 3.Only the 4th bonus use case can use Power Automate.I want the strongest practical Copilot-only use cases, not flashy demos.
Why this prompt works?
This prompt forces Cowork to stay practical.
The first three use cases must be possible with Copilot only, so the output should focus on things like scheduled prompts, Cowork skills, /goal workflows, Copilot Chat prompts, and agents where available.
Then the fourth use case gives you a clean escalation path for Power Automate when the process actually needs a trigger, approval, notification, record update, or reliable system action.
That is the real value: start with Copilot, then only move to automation when the work pattern justifies it.