If your like me, you test your Flows over and over again. This results in sending unwanted emails, creating items in SharePoint or Dataverse, Creating files on OneDrive or SharePoint. Every time you test your Flow, these actions inside our Flow get executed and cause unwanted behavior when Testing.
Wouldn’t it be nice if we can Test our Flows without executing these actions? Guess what we can! And its very easy to do. Check this out!
Scenario
For example, I have a Flow that Create a new row in Dataverse, and then send an email to the person who created the new row. That is fine, but what happens when we have other actions in our Flow that we want to test to make sure they are correct. I may want to test the Flow multiple times if I am doing some data manipulation, but this will result in Creating multiple unwanted rows (records) in Dataverse, as well as send emails every time.
We can clean up the testing process easily.
How?
We can utilize a feature called Static Result.
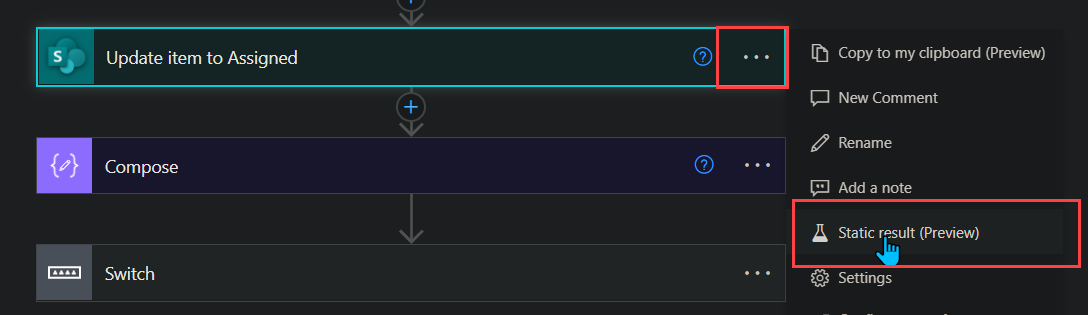
First click the 3 dots on the action, and select Static Results.
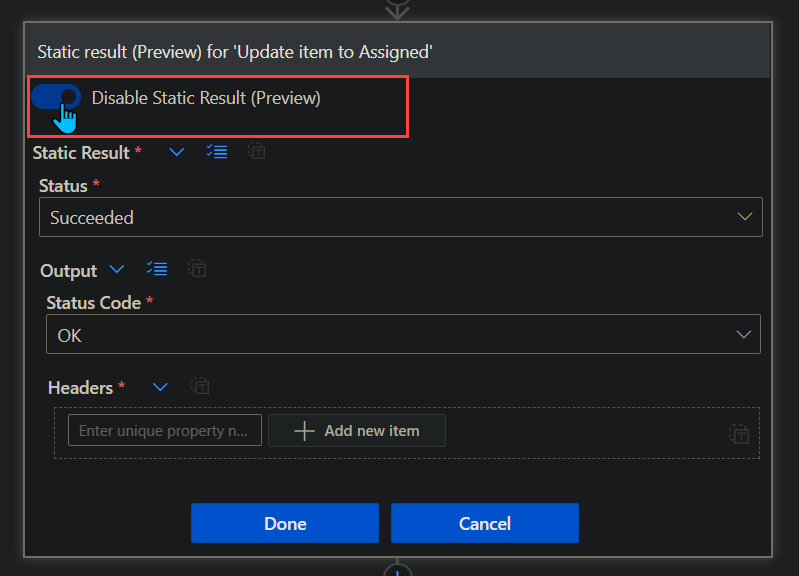
Next we can configure the static results. For easy example click the radio button to enable, select your Status, and the Status Code.
Click Done.
Now the action will have a yellow beaker, indicating that the action is using Static results.
Things to note: – Static Result are in ‘Preview’ so it could change at any time – Not all actions will be able to use them – If the option is greyed out, and you’re certain the action is able to use it, save the Flow and re open
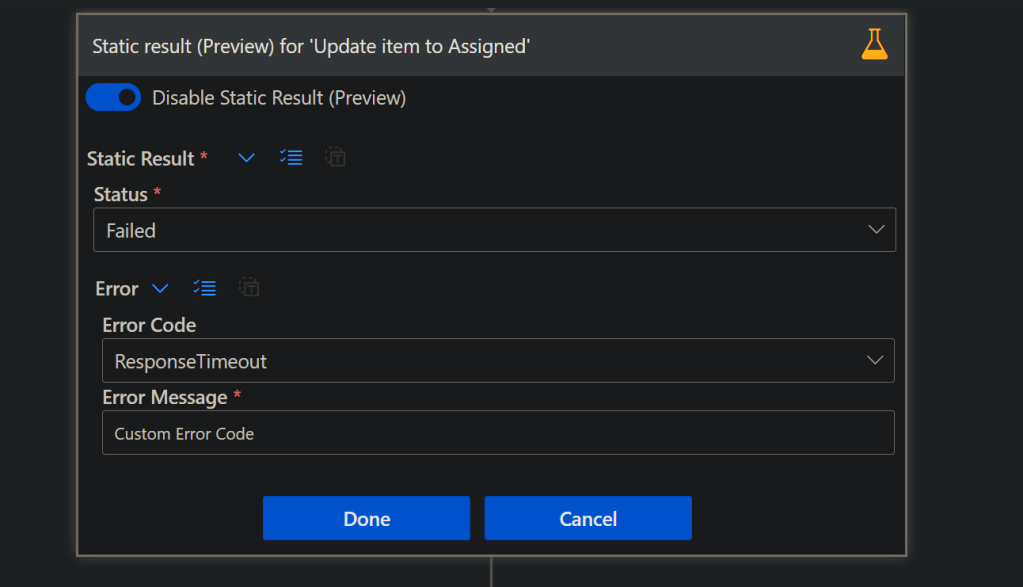
This is only the beginning, as you can create a custom failed response, or create any result you want. This can help troubleshooting and testing certain scenarios.
REMEMBER!! To turn off static results when you want to execute the actions like normal.
Examples
Some examples on when to use static results:
Flow runs without sending emails
Flow runs without Approvals needed
Flow runs that need to test errors on certain actions
I have used this feature for awhile now, and noticed not many know about it. It’s so useful in many testing scenarios. Just remember to disable the static results once your done testing!
If you have any questions or want to add anything please leave a comment and like this post! Thank you!
Is your Condition not working as expected? The problem is when we use a Condition action inside Power Automate, we cannot see the “equation” that is being evaluated when looking into the run.
The problem affects how we can troubleshoot, the following solution will show what is happening inside the Condition action during the run.
Scenario
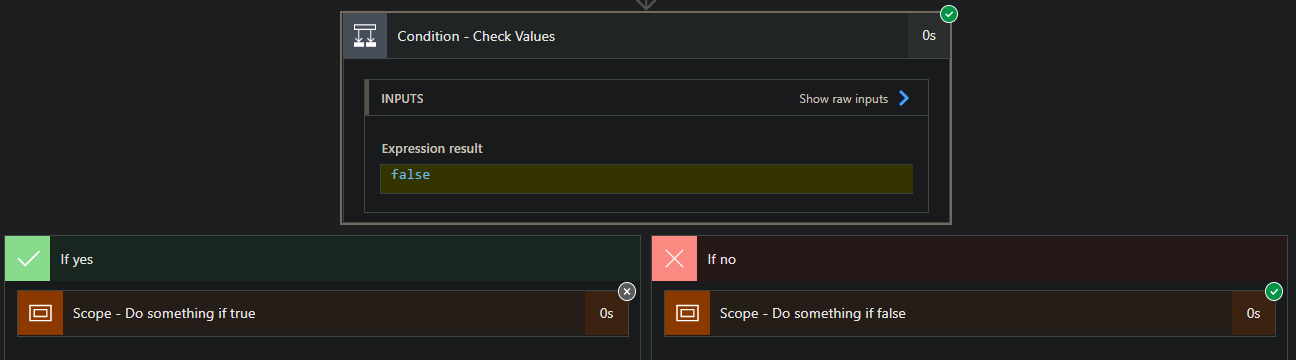
In this scenario, I am checking: If one value is greater than a second value
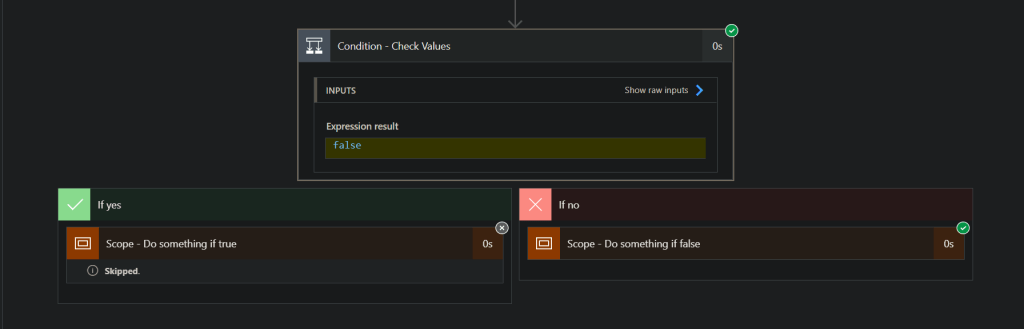
Now during a test run, I expect to see this condition true, but in my run it is always showing false and going in the If no branch.
The big problem is though, I cannot see what the values being evaluated look like. Take a look below
Clicking on the “Show raw inputs” is also not helpful..
Solution
So what is this quick and easy solution to see the condition results? A simple ‘Compose‘ action.
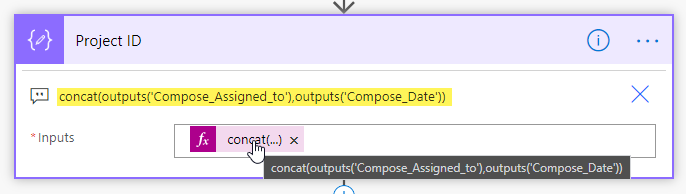
Lets take a look: First add a Compose under your Condition
Next copy the values that are in the Condition to the Compose. My Compose now looks like this:
Now make sure the Compose is above your Condition. I am just dragging the Condition below the Compose
Next, we can run the Flow again, and see what the Compose can tell us:
Yikes! We can see our 2 values that are being evaluated are both 15. And 15 is not greater than 15. This is why its returning false.
My Thoughts
In my opinion, this should be already visible inside the Condition action. To get this feature added to Power Automate, we can vote on this feature. Head over to the Community Forum and vote for this idea.
I needed to check if an HTML table had data or not. Usually when I need to check I have two expressions I go to first.
empty()
length()
I tried using empty() and found that the HTML table even when empty, is not truly empty. I then tried length() and found that when the HTML table is empty there is still a length of 30.
The Scenario
I have some data that is used to track different devices that can be loaned out. The data has properties like, Type of device, Serial Number, Etc.
I want to put this array of data inside a HTML table and send it out on an email. The problem is, my data might be empty, as only available devices will show up in my data.
I need to check if the HTML table is empty, if it is empty: If True: Send email with HTML table If False: Send email without HTML table
The Flow
For this Flow, I will be using an Array Variable to simulate my data coming in from another system. I will call this Variable ‘Data‘. The HTML table action will be added underneath. You will need to determine if you want to use ‘Custom columns‘ or ‘Automatic columns‘ This can be done in the advanced options in the HTML action:
My ‘Data‘ Variable is empty at the moment. This is what we want for our first run, we want to get the length of the HTML table when its empty.
Next add a ‘Compose‘ action, and use the expression length(), pass in the HTML table as the parameter. For example, my expression looks like:
length(body('Create_HTML_table'))
Now run the Flow with no Data in the HTML table, and check your Compose action to see what the length is. In my case it is 30
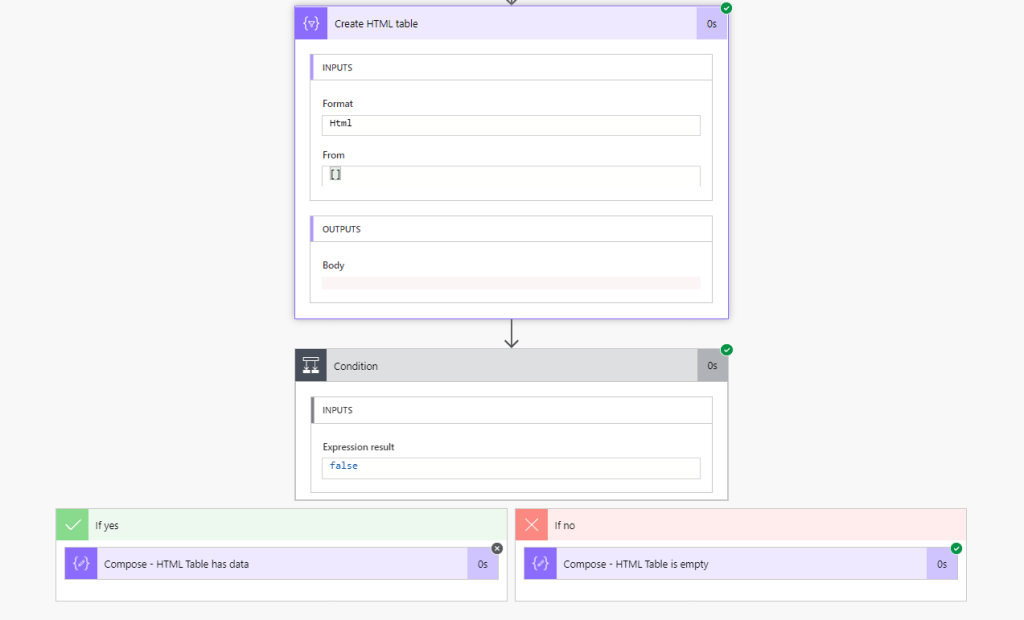
Now we can add a If Condition to check if the length is greater than 30
** TIP ** I am passing in the Compose action into the condition, this allows me to see what the outputs of the Compose action before it gets evaluated inside the condition. This is extremely useful for troubleshooting
Conclusion
The Flow will go into the ‘If yes’ block if the HTML table has data
The Flow will go into the ‘If no’ block if the HTML table is empty
Of course checking the Data Variable itself for length could work way better. This example is mainly for data that can come in that could have loads of junk. For example: An HTTP API could bring in no data, but still have other information attached like, headers, status code, version. In this case we can only do conditional checks on the HTML table, since our Data variable will always have something being passed in.
When a Flow fails, sometimes we want to capture and send that message out, to a user, support team, or teams channel. In this demo we will go through the steps to capture any error messages from a failed run.
In this post, I wanted to share some of the tips and tricks that I have learnt and came across. Some of these tips I will cover the basic fundamentals so you can start using them to help you build you Flows with less pain and more fun!
1. Compose
Compose actions, are one of my favorite actions to use. They are so robust and can display pretty much anything. Compose can be found under Data Operation > Compose
1.1
Add a Compose action before a Condition to check what values are being evaluated. In this example, my condition is saying: If length of value is greater than 0 I add a Compose action before the condition, with the same value I am using in the condition. This allows me to check the run and see the value being evaluated Example:
1.2
If Flow is spitting out errors about a wrong data type or you keep getting unexpected values – Since Compose can hold just about any data type. We can add one and check what the value is in run history.
1.3
Compose actions are great for doing expressions – We can add a Compose action and do expressions in the input, instead of writing the expression directly inside another action. This is handy if you need to do multiple expressions, or error checking.
2. Meaningful Names
There is nothing worse than leaving the default names for all your actions. This can be confusing, which can cause errors which could have been avoidable. This tip is going off tip #1.
2.1
The picture below shows a bunch of Compose actions Left: Default names used – Makes it very hard to know which action is what Right: Custom names used – Changing the names to something meaningful allows actions to be easily found and referenced.
2.2
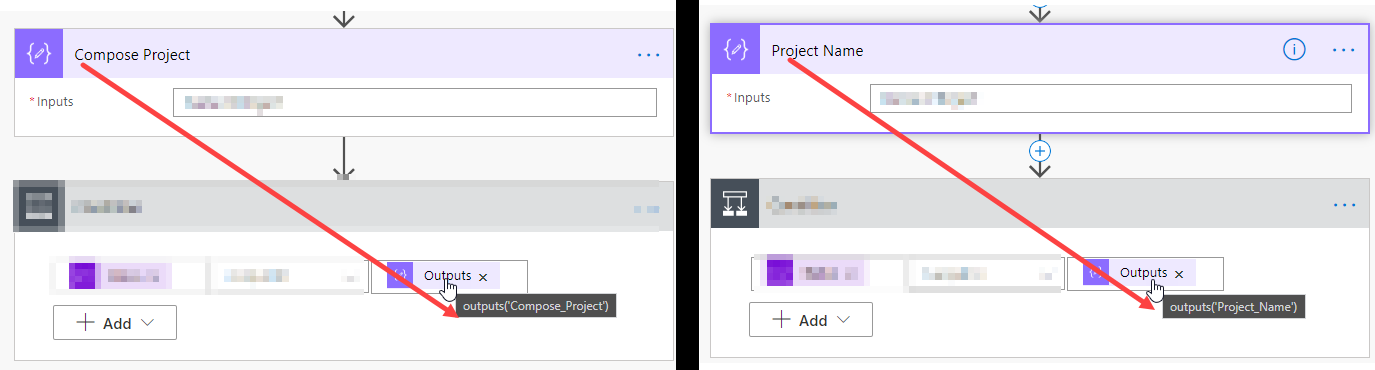
For awhile now, Power Automate has had a limitation with renaming actions that were being referenced in other places. That has since changed. We can now rename action that are being referenced in other actions! For example: The left picture shows the Compose action named ‘Compose Project’ and is being referenced by the condition below. Changing the Compose action name to ‘Project Name’ also changes the name in the referenced condition, which is shown in the right picture.
—–NOTE —– Limitations still exist.. The reference will not be updated if the action is in a expression OR inside a Loop. And will throw an error of: Template Validation Failed. So it is always best to rename actions right away —————
2.3
When using Expressions, to better understand and show others what is going on. Comments are great for this. For example, if using a complex expression I like to copy the expression and put into a comment of that action:
3. Scopes
Scopes are handy, they can be used for grouping actions together. In this guide I will show how to use scopes to group actions together. There are many advanced techniques that scopes can be used for, but for this demo I will be showing the very basics. Scopes can be found under Condition > Scope
I will add 2 scopes, one for Users, and one for Accounts To add actions in the scope, Click and Drag the action into the scope
Drag the actions in so the order of the actions remain the same. For example, I put the Scope above the List Records action so I could drag the List records in first than the For each loop next
This concept will help us in the following tips
4. Parallel Branches
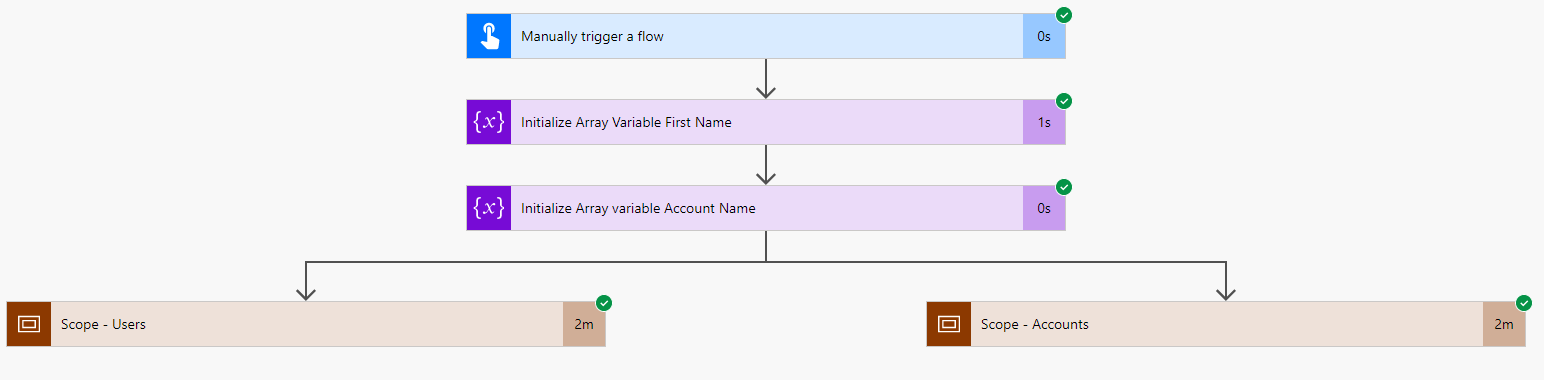
All Flows run from top to bottom in a single order fashion. If we split the actions to run side by side (parallel) This would drastically improve performance. In this scenario I have Two(2) CDS List records, and Two(2) Apply to each loops
List Records – Users Apply to each – To Append(add) all First names into a single variable List Records – Accounts Apply to each – To Append(add) all Account names to a single variable
Here is what the Flow looks like:
Running the Flow, we can see it takes about 4 minutes
Before we create a parallel branch we first must put the actions inside a Scope, this is to allow us to drag the actions around without getting the
This action cannot be dragged above actions it depends on. Error
Refer to Tip# 3 for details on Scopes
Now lets have these 2 different Scopes run in parallel branches First we want to click the ‘+’ icon where we want to add the branch, next click Add parallel branch
In this example, I am adding a parallel branch above both Scopes
Our screen will look like this:
Next we need to Click and Drag one of the scopes to the new branch
Once the Scope is in the branch we can click the X on the Choose an action tab
Now lets run thew Flow again: As the picture below shows, the Flow now only takes 2 minutes to run, cutting our run time by half, that’s insane!
Imagine our run normally taking 30 minutes, now only taking 15, just from a simple step
Tip# 5 will make our Flow run even faster!!
5. Concurrency
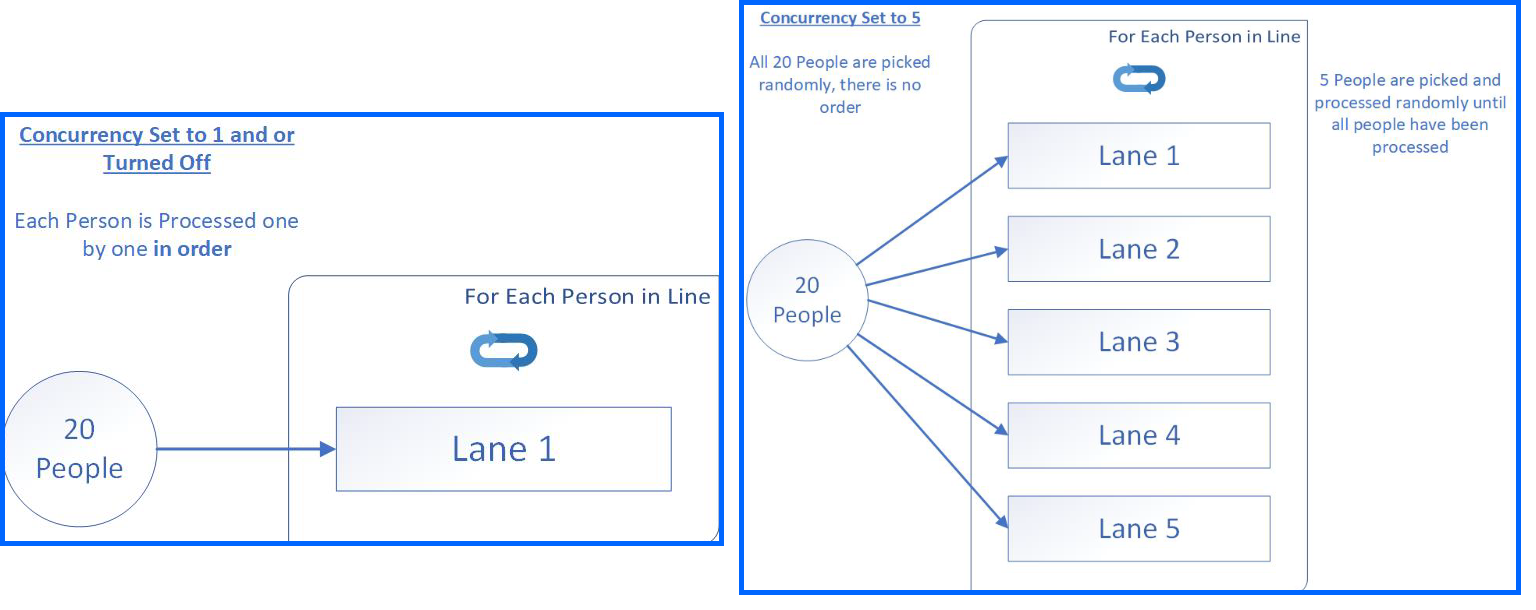
What is it? By default loops run one after another. Concurrency can make loops run in parallel. To better understand this, we can think about a grocery store. In this scenario:
People = Value that is going into Apply to each loop Lanes/Cashier = Concurrency Control Number
There are 20 people waiting in line at the store. There is 1 lane/cashier open. Since the cashier can only take one person at a time, this process can be lengthy. Now with Concurrency turned on, things are a bit different. Lets say we set Concurrency to 5. This means 5 lanes/cashiers will be open. This is great! But there is a catch..
When Concurrency is enabled, there is no more line. All 20 people are processed randomly.
Concurrency can be applied to all Apply to each loops — As well as Triggers!
To enable Concurrency:
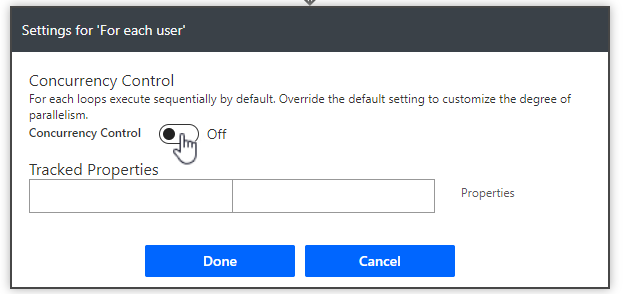
First, click the 3 dots on the Apply to each action Next, click settings
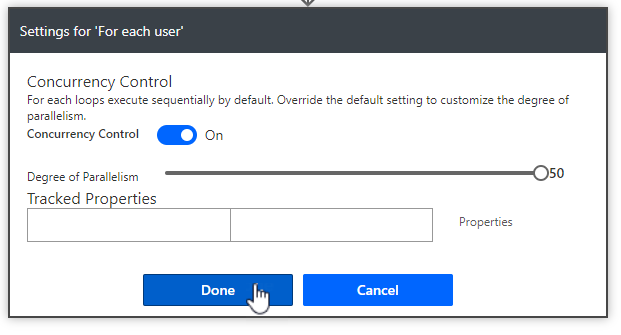
Next, choose the value for Concurrency and click Done
For this Demo, I am setting Concurrency to 50. Please be aware of API limit calls and 429 errors. If you get these errors while flow is running. Decrease the Degree of Parallelism
Now lets see this in action! I set Concurrency to 50 on both my Apply to each loops from the last Tip. As a recap, the last time we ran the Flow, it took 2 minutes to run.
Results: About 5 seconds!
The Run time is about 5 Seconds. Since we used a Parallel branch the total run time is the longest duration of our Parallel branches
This drastically improves performance.
Conclusion / Key Take Notes
Use a Compose action to check values and outputs, that you normally cannot see, Like in a If Condition
Compose actions can store almost any data type. When in doubt.. Use a Compose
When using expressions, try using them in a Compose, this can make troubleshooting much easier
Always use meaningful names for all your actions. Doing this will save loads of time later on, when needing to use dynamic content
Comment, comment, and more comments. All actions allow for comments. This will help support teams troubleshoot your Flow, as well as your future self, if you have to make any updates later on
When using expressions, copy the expression and paste into the actions comments section.
Use Scopes to group actions together.
To speed up performance, use parallel branches to enable actions to run side by side
Enable Concurrency control on Apply to each loops to drastically increase performance
Remember enabling Concurrency control randomizes the order the loop iterations run in. So if you’re expecting a certain order processing to happen, do not enable
These are some of the tips and tricks I wish I knew sooner. I hope at least one of these tips and ticks have helped someone. Thanks for reading!
Basically, we want to be able to control if we want an error. At this time Flow does not let you easily throw an error.
There is a Terminate action which is awesome, I use it in every Flow or Logic App I create. The Terminate Action will terminate the Run immediately. Terminate will not allow other actions to execute, even if the ‘Configure Run After’ is set to Failed, Skipped.
This can be a headache trying to implement a way to easily Fail an action. While allowing the Flow to continue running the ‘Configure Run After’.
Setup
We will use a Try – Catch method. Basically we will use ‘Scope’ actions to house different parts of our actions. You can think of ‘Scopes’ like a way to organize your Flow. Add them into your Flow just like any other Action.
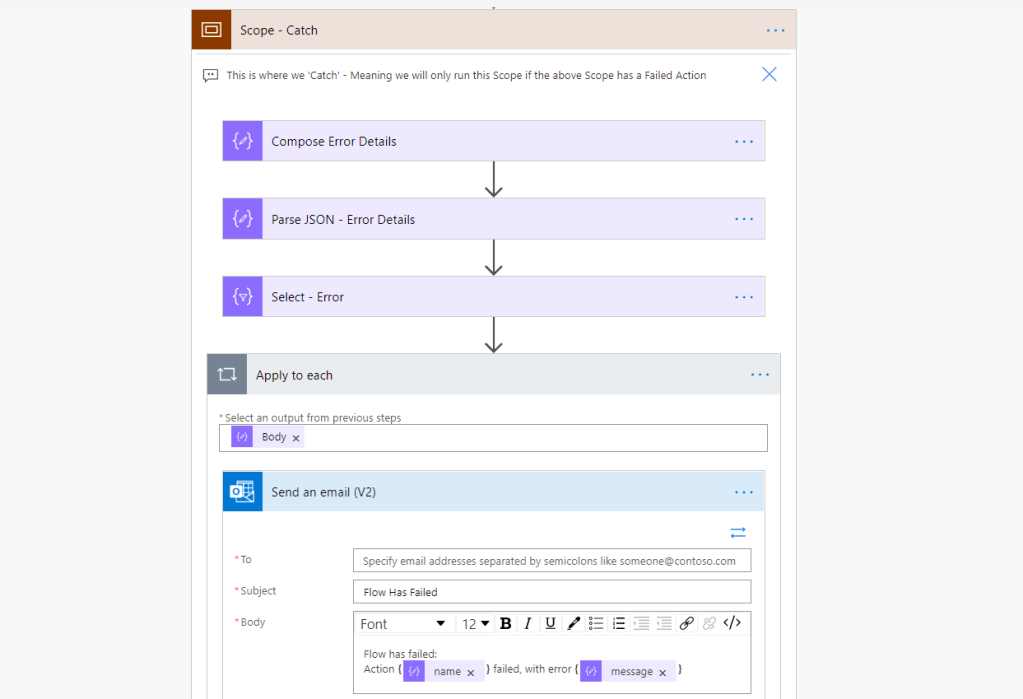
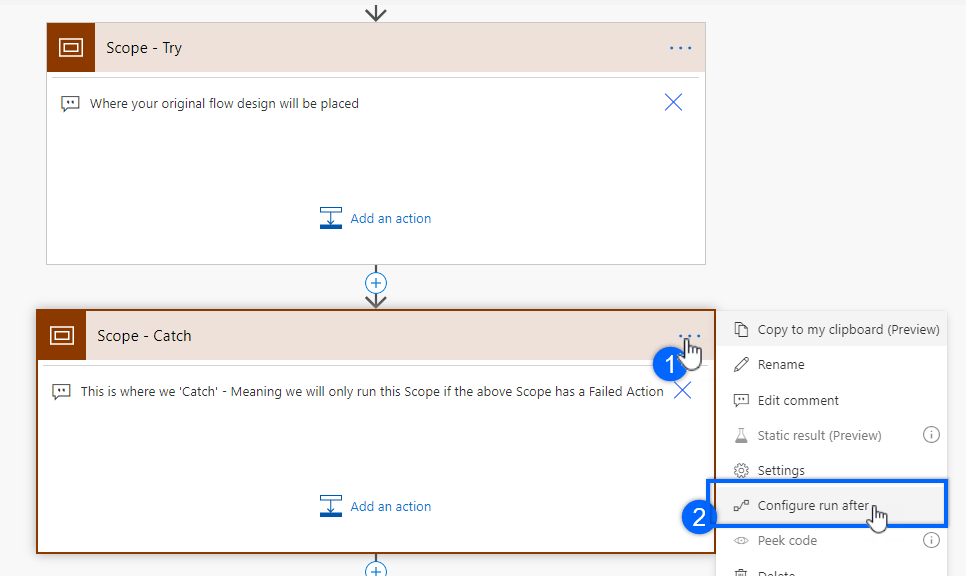
Try – Where your original flow design will be placed. Catch – This is where we ‘Catch’ – Meaning we will only run this Scope if the above Scope has a Failed Action
First add a ‘Initialize variable‘, define the type as Boolean, and call this variable Exception. Next add two(2) ‘Scopes’
Next we want to only run the Catch Scope, if the Try scope has failed. To do this, simply click the Three(3) dots on the Action and click ‘Configure run after’
Now deselect ‘is successful’ and select the ‘has failed’, and ‘has skipped’ checkbox. Click Done
Next, to trigger an error in the Try Scope, add a ‘Set Variable‘, and select the Boolean from above.
Now, inside the value use the expression null.
The Set Variable should look like this now:
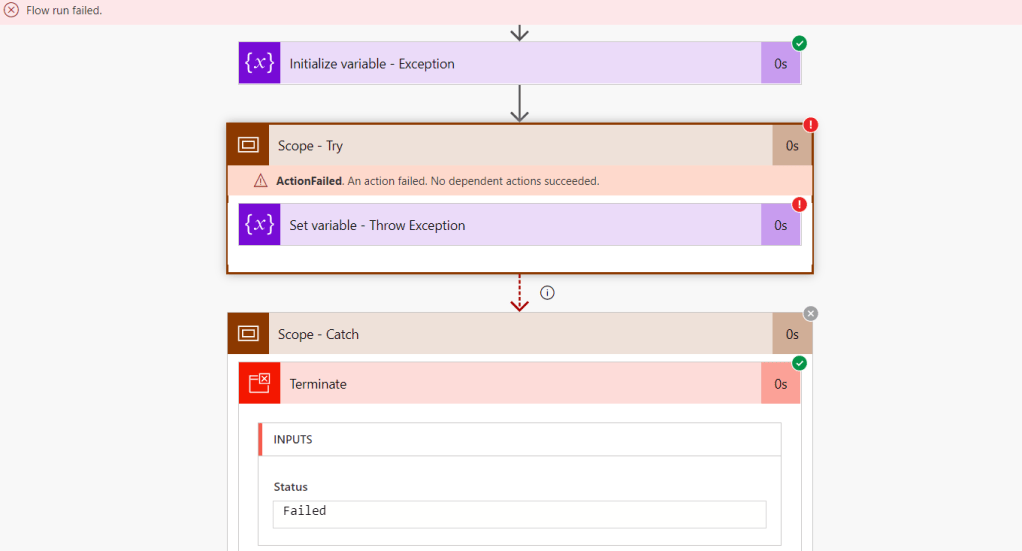
Since our Catch block will run if Try fails, our run will show as Successful. We can change this by adding a ‘Terminate’ action
Add any other error handling you wish inside the Catch scope, some examples include:
Email to Support that Flow has failed
Different type of business processing
Delete a record
Rename a record
Service Bus – dead lettering
TIP: When adding other actions inside the Catch scope make sure to make the Terminate action last
Here is a Test run:
Conclusion
This is a great method for executing an error, Its fast and simple, and can be used many times in the same Flow. Thanks for reading!