I have learnt this method from John Liu. I have pointed so many people, and community users to John’s blog when they run into this Excel connector limitation. I have found multiple people thinking its too complicated, or confusing, because the method works with Graph API to get the File ID.
So this blog will be a very easy guide to follow and hopefully will be able to get your Flow being able to use a dynamic filename. If you have any questions or problems with this guide or other Power Automate related questions, reach out to me on Twitter.
New Update – Easy Way 2021
The following video explains a way easier way to do this, no API, no messy File ID’s. Check it out!
Things to Know
To make this even easier, we will be having the Excel file that be stored into a SharePoint Document Library. We can also use the SharePoint HTTP call action to better build our REST call more easily.
* We will still need the Excel file to have a table defined *
Getting Started
First we will create a new SharePoint Document Library for the files, or use an existing document library.
Next, we want to have one Excel file in the Library to start, so we can make sure this is working. Here is what mine looks like:

Overview of The Flow
For the Flow, I am using the SharePoint action ‘Send an HTTP request to SharePoint‘. This action uses MS Graph in the background, but makes it a lot easier to construct a API call.
First we will use a simple call to SharePoint using the ‘Send an HTTP request to SharePoint‘ action to get all the Document Libraries for our site.
Than use the output of that action to find the Document Library Drive ID.
This is how we navigate through the SharePoint site, we want to do this until we are in the folder of our Excel File.
Lets Build that Flow
First we add ‘Send an HTTP request to SharePoint‘ action

In the SharePoint HTTP action, use the following:
– Site Address: If your SharePoint site does not show up in the drop down, click use ‘Enter custom value’ and type the homepage of your site
– Method: GET
– Uri: _api/v2.0/drives/
– Headers: accept application/json

Now trigger the Flow to get the Output of the HTTP request.

I am using Visual Studio Code to paste the Output into, its free, and easy to use.
If you have lots of Document Libraries, you may want to use a Find feature and search for the Document Library name. For this demo I will be searching Excel Files.
We need to look for a specific ‘id’ inside the output

Copy this ‘id‘,we can use this value to navigate inside that Document Library in our HTTP request. Our new URI should looks something like:_api/v2.0/drives/b!MJxrwkJ2FUGanaxoijg0eZmnU9iP4aJJsidrZJQNlsBAb-8VLzYJRbD9CKmJa0j8

Now we need to add /root:/ to the end of our URI

We are almost complete! We now need to specify the path to our file. Here are some examples:
If file is directly in the Document Library(No Folders) – Just add the filename with the extension_api/v2.0/drives/b!MJxrwkJ2FUGanaxoijg0eZmnU9iP4aJJsidrZJQNlsBAb-8VLzYJRbD9CKmJa0j8/root:/MyNewExcelFile.xlsx
If file is in a folder – Add the folder name, than the Excel file with the extension
* NOTE: If folder name has spaces, than use %20 instead of a space *
Folder name = Historical Files_api/v2.0/drives/b!MJxrwkJ2FUGanaxoijg0eZmnU9iP4aJJsidrZJQNlsBAb-8VLzYJRbD9CKmJa0j8/root:/Historical%20Files/MyOldExcelFile.xlsx
Mine is not in a folder so I will be using the first one. Now to make the file dynamic, I will be using a Compose action to store the Filename. So in my HTTP Request I will be using my Compose action with the Filename and extension at the end. My example will look like this:

Now test the Flow to validate the HTTP request is valid. The output should have some references to the file, like the name of the file, size, created date time, and last modified date time. My output looks like this:

Next, to get the file ID, we use a Compose action with an expression.
Add a Compose action, inside the Compose we will use the HTTP request Body dynamic content in a expression:
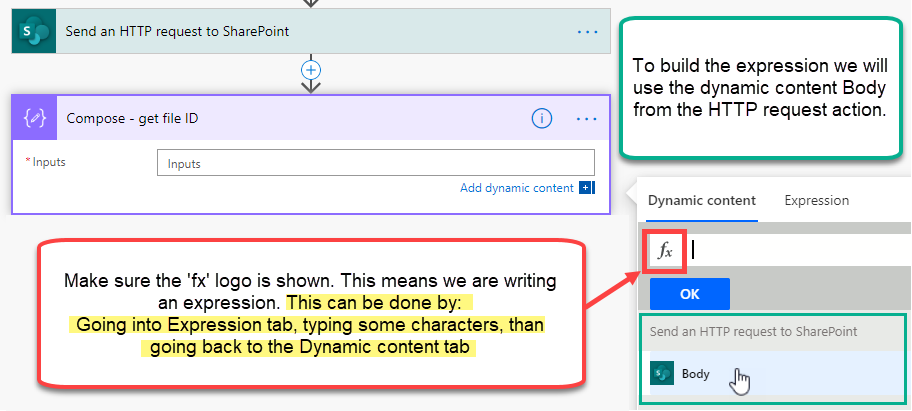
With the fx logo present on the dynamic content tab. Click the Dynamic content Body. Now we use JSON path to grab the file ID.
This is done by adding a ?['id'] to the end of the expression. My expression looks like this:
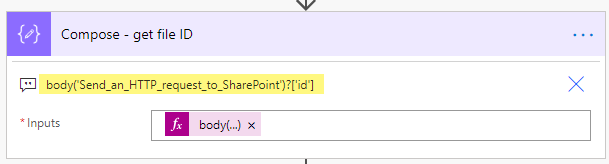
body('Send_an_HTTP_request_to_SharePoint')?['id']
You can copy my expression, just make sure to change the Send_an_HTTP_request_to_SharePoint to your HTTP request action name
Next add an Excel Get tables action. Use the outputs from the Compose – get file ID for the File

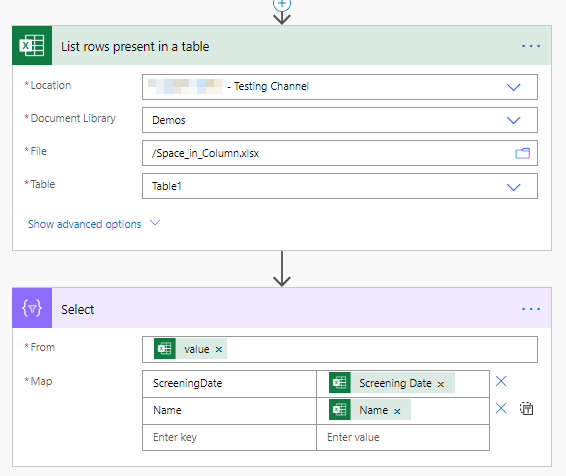
Now add an Excel List rows present in table action.
File: Use the outputs from Compose – get file ID action (same as we did for Get Tables)
Table: Click Enter custom value. Use this expression to get the first table namefirst(body('Get_tables')?['value'])?['id']
Power Automate has been updated the new expression to get the tables is:first(outputs('Get_tables')?['body/value'])['id']
** Same as before. Get_tables is my action name **

Success!!

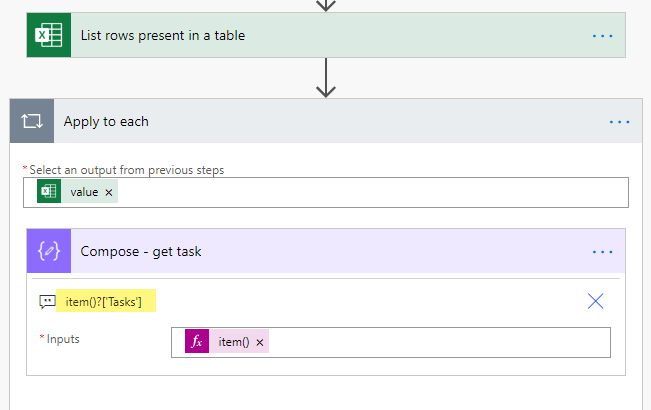
Now, sometimes the Dynamic content of the Excel columns wont be there now. You can easily grab any column you like using the item() expression. For example I have a column named Tasks so my expression will beitem()?['Tasks']
Conclusion
Being able to use a Dynamic filename in the Excel connector can be tricky. But I am hoping with this guide, anyone who needs this business requirement can easily follow this, and get it done.
Again I wanted to give a shout out to John Liu. I originally learnt this method from his blog, which can be found here:
http://johnliu.net/blog/2019/5/workarounds-needed-to-use-the-excel-connector-in-microsoft-flow
Thanks for reading. If you have any questions or problems with this guide or other Power Automate related questions, reach out to me on Twitter.