The scenario here is to enable row level security within the concepts of Dataverse inside a Model-Driven App. Important to note, this can be applied to Canvas or Model-driven apps.
For example: I have a Sale Commission table which is connected to a Model-Driven App. One of the columns is a choice called Store.
The concept is; we only want users to see records from their own respective stores. This concept seems straight forward and easy.. After some digging and reading documentation and asking some friends in understanding this model. I found a way to do this. So here it is!
We are creating a Business unit for each “Store” in this example. Creating business units in the Power Platform Admin center:
In the Admin center, select your environment.
Select the Settings cog in the top.
Under Users + permissions.
Select Business units.
Showing step 4. Clicking Business units
Click New, and create as many business units as you need.
In this example, I am creating 3. One for each store.
Showing all business units that have been created
Create security role
We want to create a security role. This is a role to give access to the custom tables we have for Dataverse, as well as privileges for Business unit. This will allow users to append different Business units to new records.
While still in the Admin center;
Click See all under Security roles.
Admin center showing the security role option
Click, New role or edit an existing role.
When editing the role click the Custom Entities tab.
Find your table that users will be interacting with. In this example, its Sale Commission table.
Set this table to: Read = Business unit Create = Parent child business unit
Showing the Sale commission permission
Next, click the Business Management tab.
Set the Business Unit table to: Read = Parent child business unit Write = Parent child business unit Append To = Parent child business unit
Showing the Business Unit permissions
Click Save and Close.
Assign security role
Now we need to assign the security role to users based on the Business unit. To do that follow the steps:
While in the Admin center;
Click See all under Users.
Select a user to assign the Business unit role to.
Click Manage roles.
Notice that we can change the Business unit the Security role can be assigned under.
Showing the new option to select Security roles under each Business unit
In this example, I am assigning the role under each Business unit to give permissions.
Select the Business unit and assign the role.
User
Roles assigned + Business unit
Adele
Sales Contributor in MainStore-BU
Alex
Sales Contributor in NorthStore-BU Sales Contributor in DowntownStore-BU
Showing a table of permissions
Based on the table above.
Adele can see all records part of the Main store
Alex can see all records in NorthStore and Downtown Stores
Click Save.
Create Business rule
Now that the feature has been enabled and configured, we still need to change the Owning Business Unit field based on the selected store. There are many ways to do this, but for this example, I will be using a Business rule.
To configure a Business rule;
Navigate to your solution, or where the table (Sale Commission) is in Power Apps.
Select the table, and click Forms.
Select the form that users will be using when creating records.
Once the form is opened, add the Owning Business Unit field, and select it
Once selected, click Business rules on the right pane.
Click New business rule.
Give the rule a meaningful name.
In the default condition, in the properties tab mine looks like this:
Business rule condition 1
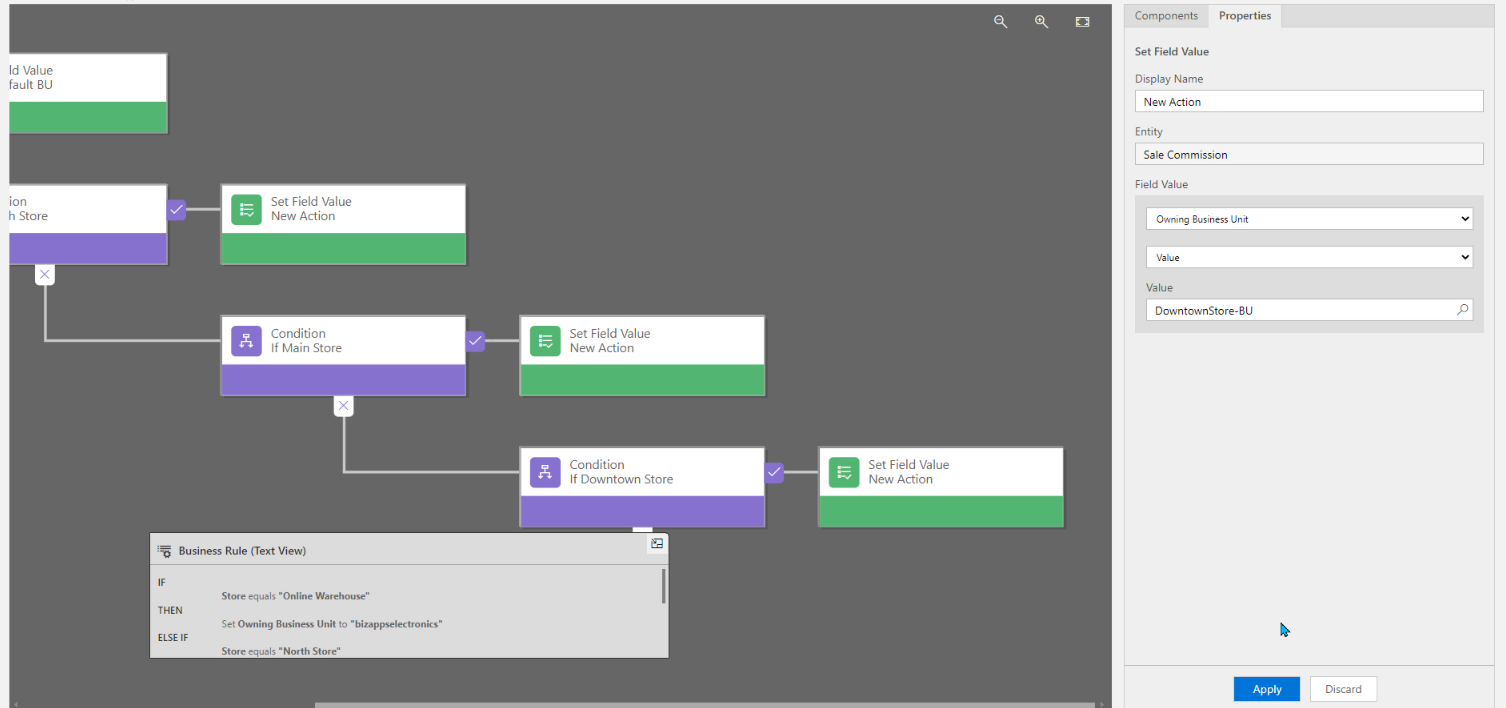
For the rule, I am going to add a Condition to the “is false” and continue to do this for each Business unit / Store I want to check. Here is what mine looks like after adding all the conditions:
All conditions added to Rule
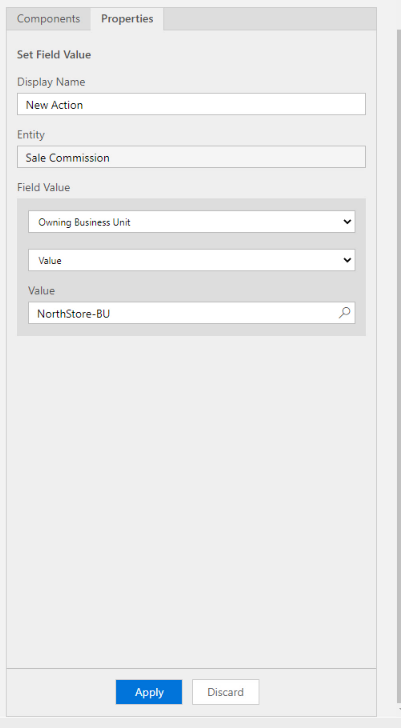
Next we need to Set the values of the business unit based on the store.
In the components tab, add a Set Field Value action to all the “Is true” paths.
With the Set Field Value selected, click on the Properties tab.
Select Owning Business Unit for Field and the right Value. Example for the NorthStore:
Set Field Value properties for North Store
Do this for all the Conditions. Mine looks like this:
Completed Business Rule
After you’re done, click Validate.
If validation is good, click Save.
After saved, click Activate.
That’s it. Done!! Now when a user selects the Store, it will automatically change the Owning Business Unit.
Form view of Owning Business Unit changing based on Store selected.
You may have run into an issue when creating Power Apps that needs to submit data to SharePoint, Dataverse, etc. But did not want to give everyone in the app access to these. The problem is, Power Apps uses the connections of the user using the app, meaning if the app writes to a SharePoint List, the user will need Read/Write access. The same goes for Power Automate if we try to send the data to Power Automate from Power Apps, it still uses the users connection who triggered the Flow. How can we get around this? Read below!
If you block the HTTP Request connector via data loss prevention (DLP), child flows are also blocked because child flows are implemented using the HTTP connector. Work is underway to separate DLP enforcement for child flows so that they are treated like other cloud flows.
You must create the parent flow and all child flows directly in the same solution. If you import a flow into a solution, you will get unexpected results. Call Child Flows – Power Automate | Microsoft Docs
Prerequisites
The Flows must be created inside the same Solution, so a Dataverse database must be configured on the Power Platform Environment
The Scenario
In this scenario, I will be showing how a user can use Power Apps to create items in a SharePoint List without being a member of the Site. This will allow us to use a specific Service Account to create the data in SharePoint without giving the user in the app any permission at all!
First we will build the Child Flow, then Parent Flow, and lastly customize the Power App
Child Flow
Inside your Solution create a new Cloud Flow.
For our trigger we use a Manual Button, and add the data we are expecting from Power Apps to put inside our SharePoint List (In my example I am only bringing in one field for Title)
Next, I add a Create Item action for my SharePoint List, and add the Parameters from the trigger inside the action.
Lastly, I add a ‘Respond to PowerApp or flow’ action, I create an Output called Success, and some details about what was created.
Child Flow
Make sure to use the Connection you want users of the App to use for the SharePoint Create item action.
Save and go back to the Flow dashboard screen (where you see the Details and run history screen).
There will be a Card on the right side called ‘Run only users’ click Edit
Run only users
Under Connections Used, switch ‘Provided by run-only user’ to the connection you want to be used by users of the App (They wont have access to this Connection outside this Flow)
Run only user
Click Save,
Now onto the Parent Flow
Parent Flow
Go back to the Solution and Create another Cloud Flow.
For our trigger we use the PowerApps button trigger.
As best practice, create Variables for your data that is coming from Power Apps. Don’t forget to name them, as this will be the parameter name in Power Apps, Use the ‘Ask in PowerApps‘ dynamic content for your variable values.
Next we use a action called ‘Run a Child Flow’ (If you do not see this action, your Flow was not created inside a Solution) Add the parameters (these were the input parameters from the last Flow that we just created).
Lastly, add ‘Respond to a PowerApp or flow’ action. For this demo I am adding the parameter ‘Success’ this is from the child Flow.
Click Save.
Power App
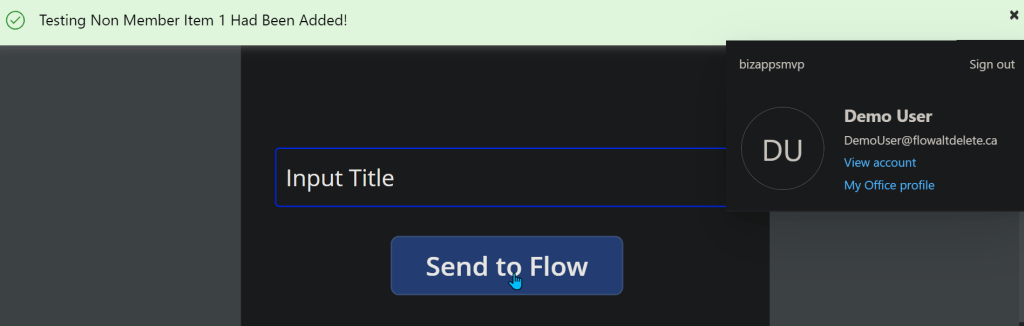
Now onto the Power App, I am going to create a simple Power App with 1 TextInput for Title, and a Button to Pass the data to Power Automate. Here are my controls for reference:
TextInput_Title Button_SendToFlow
For the Button: 1. Add the Flow to the button by clicking on the Button, 2. Clicking Action tab on top of page, 3. Clicking Power Automate 4. Select the Flow
Next add the parameters for the Flow, in my case I am adding the TextInput_Title.Text
Now, I want to add a Notification that the Item has been added, which will confirm my Flow has Run correctly. Ill be using the ‘Success’ Output parameter from the Flow for this.
To add this, I put my Flow run inside a Variable inside Power Apps. Ill call my variable Results, and IO add this to the OnSelect property of the Button where my Flow is:
Now I use the ‘Notify’ function to notify the user of the item being created, I add this after the semicolon. So my function looks like this in the end:
Deploying Power Automate Flows can be a headache if you have to manually change values inside the Flow for each environment. You also run the risk of missing a value.
This post will go in depth on using Environment variables inside solutions to allow certain values to be used in different environments. I will be using Two(2) environments for this demo: Dev, and Test
This demo will utilize the data type ‘JSON’, this will save loads of time.
Terms / Glossary
Here are some familiar terms that will help in this post: Default Value = The value that you’re expecting after you deploy the Flow. This will be our Test environment values
Current Value = The value that overrides the Default Value. This will be our Dev environment values
Parameters = These are just values. For example 2 + 2. Each 2 is a parameter of the addition expression (+)
** Note: I Have created this guide to be as simple as possible, If you name everything as I do, you will be able to copy and paste all my expressions directly into your Flow **
The Scenario
My Flow posts a message into Microsoft Teams group. When deploying the Flow into different environments, I want to change the Teams content like:
Team Name
Channel ID
Subject
Usually after deploying, we can go in to the Flow and manually change the values. This can cause errors, especially if we forget to change some values after deploying (I may have done this a few times).
Getting Parameter Values
It is important to note that not all Action values can be parameterized. Follow the steps below to see if the values can be parameterized:
Teams Example: My Teams action, I want to parameterize the Team Name, Channel ID, and Subject. For this I add the Action, and select the values as needed.
Now with the information filled in, click the 3 dots ‘. . .’ on the action, and click ‘Peek Code’.
Dev Parameters
In the ‘Peek code’ view, we can see the different parameters and the values that this action uses in the background. Copy these values into notepad or code editor for use later. I have created a simple JSON to be placed in my Environment Variable later on.
I will be using the Env value for my Subject in the teams message
For example: Team = 1861402b-5d49-4850-a54b-5eda568e7e8b Channel = 19:be3759762df64d94a509938aa9962b29@thread.tacv2 Subject = Message From Dev Environment
To test that we can use custom values as parameters, we want to grab these values from above and insert them into the ‘Teams Post a message’ action as custom value, than run the Flow
Mine looks like this now:
Now run the Flow to make sure everything works as expected using the Custom values
Now that we know Custom values work for the inputs/parameters for the action. We now want to get the values for the other environment. Remove the custom values from the inputs and choose the correct value that we want to point to when this Flow is deployed to another environment. For example:
Again we do a ‘Peek code’ to get the parameter IDs that this action uses
Test Parameters
Copy these values into notepad or a code editor for use later. Now we have two sets of values, one for Dev, and one for Test. I have created a simple JSON to be placed in my Environment Variable later on.
I will be using the Env value for my Subject in the teams message
Make sure the Two(2) JSONs have the same structure. We will be using the data to populate the Environment Variables in the following steps
Creating Environment Variables
Environment variables can only be created inside a solution, there are multiple ways you or your organization may want this set up.
In this demo I have created a Publisher in CDS called ‘param’, this will better define the parameters that we create inside the solution. (this is optional) The default CDS publisher could also be used.
Create a solution inside Power Automate. Click Solutions on the left navigation menu, Than click ‘New Solution’ on the top on menu, and fill the information out
Once the solution is created, Click ‘New’ > Environment variable
Now fill in the information like the screenshot below.
Note, I will be using the Data Type as JSON. I use this for simplicity, as I have more than one value I want to add. Also we can use the Parse JSON action in Flow to reference each value separately. You can use any Data Type you like
Now we populate the values we want to use per environment, the way we do this is fill in the Default Value, and the Current Value.
Default Value = The values we want for the other environment, in this case Test Current Value = The values we want to use for this environment, in this case Dev
Once the values are pasted in click ‘Save’
Creating The Flow
I will be creating the Flow inside the solution that the Environment Variable is in from above. Inside the solution click ‘New’ > Flow
For the demo I will use a Manual trigger, than add Two(2) ‘Initialize Variable’ actions
Initialize variable – Schema Name Name: schemaName Type: String Value: Put the Name of the environment variable in the value (This can be found on the main screen of the solution under Name column)
Initialize variable – Parameters Name: parameters Type: String Value: Leave blank for now, this variable will store either the Default Value or Current Value, based on which environment we are in
Next add a ‘Scope’ action to hold all the actions that will get the parameters
I renamed my ‘Scope’ to Load Parameters.
NOTE: You can copy and paste my filter query as long as you kept the same name as I did. When you see the @ in Power Automate, this allows you to call expressions without having to go into the expression tab. If you want to build the expression yourself, I will include the syntax under each picture of the List Records actions and on
Inside the Scope, add Two(2) ‘Common Data Service Current Environment – List Records’ actions.
1) List records – Parameter Definitions Entity name: Environment Variable Definitions Filter Query: schemaname eq ‘@{variables(‘schemaName’)}’
schemaname eq ‘YOUR ENVIRONMENT VARIABLE NAME’
2) List records – Parameter Current Values Entity name: Environment Variable Values Filter Query: environmentvariabledefinitionid_value eq ‘@{first(outputs(‘List_records-_Parameter_Definitions’)?[‘body/value’])?[‘environmentvariabledefinitionid’]}’
Under the ‘If condition‘ add a ‘Parse JSON‘ Name: Parse JSON – Parameters Content: @{variables(‘parameters’)} Schema: To generate your schema, Click the ‘Generate from sample’ button, than paste in the JSON that you used for Default Value
We are done with the parameter scope now..
Using The Parameters
I will be adding a Teams Action ‘Post a message‘ I will use the dynamic content from my ‘Parse JSON‘ action.
Triggering the Flow, I expect the Dev values to be used (Current Value)
Here is the Teams message:
Next we will export and import into a different Environment which will use different parameters (Default Value)
Export And Import – Deployment
Overview of this sections steps: 1. Remove Current Value from Environment variable 2. Publish Solution 3. Export Solution 4. Import Solution 5. Authorize any Connections 6. Enable Flow 7. Trigger / Test
Remove Current Value from Environment variable
Inside the Solution click on the Environment variable, under Current Value click the 3 dots ( . . . ) Select Remove from this solution
This will only remove the values from this solution. The Current Values will still be in CDS and can also be added back into this solution if needed by clicking Add existing under Current Value
Publish Solution
Inside your solution, click ‘Publish all customization’
Export Solution
Once published click ‘Export’
Export as ‘Managed’ or ‘Unmanaged’ Choose either or based on your needs.
Import Solution
Switch to your other Environment, and click Solutions tab. Click ‘Import’
Choose your Zip file from your Export, and follow instructions by clicking ‘Next’
Authorize any Connections
Once the solution is imported successfully, you may need to authorize any connections inside the Flow. This can be done by clicking on the Flow from inside your solution, and clicking ‘Sign in’ on all actions > Click ‘Save’
Enable Flow
Now enable / turn on the Flow
Trigger / Test
Trigger the Flow to confirm the values are coming over as correct (Default Value).
Test Env – Using Default Value as expected
Now in Teams our message has been posted in a different team chat, different channel, and with the ‘Test’ text in the subject line
We will be adding a Security Role / Field Security Profile to users in CDS. For this demo, our scenario will be grabbing all the users from a Office365 group and assigning them a certain Security Role / Field Security Profile.
The source of the users can be from anywhere: – MS Form – SharePoint – Array inside the Flow – Excel Table – AAD Group / Office365 Group
Prerequisites
We will be using the Common Data Service Current Environment connector. This means that our Flow, MUST be created inside a Solution.
You will need appropriate permissions to be able to assign Security Roles and Profiles to
Steps
INFORMATION: This Flow will work the exact same to add Field Security Profiles instead of Security Roles. The only changes you have to make are in the List records – Get Security Role, and the Relate records – Security Role to User. The changes are listed in the captions of those images.
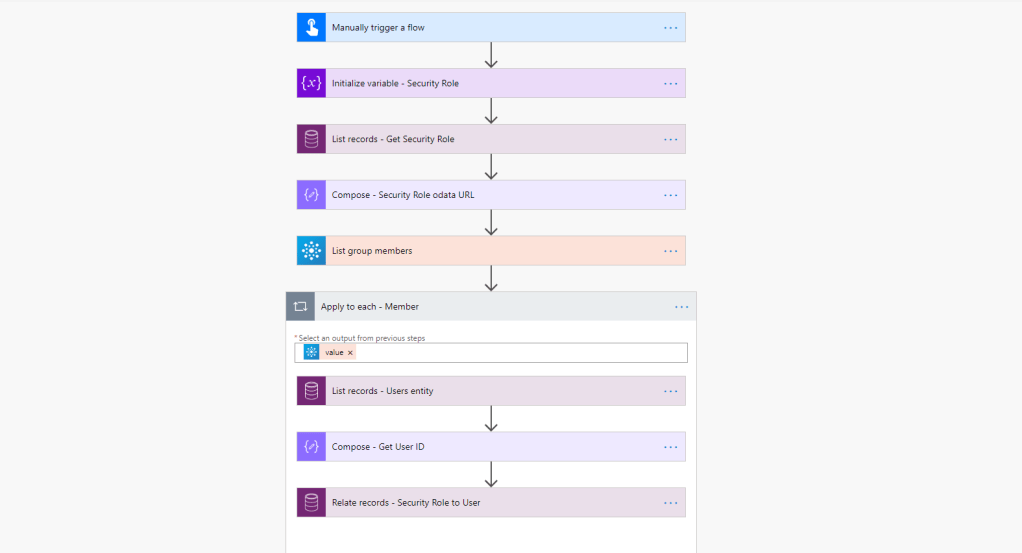
We use a Variable to store the name of the Security Role we want to add to the users. Than use a List records action on the Entity Security Roles In our Filter Query we will use: name eq ‘ ‘ Since we are using a variable to store the name of the Security Role, we pass this into the Filter Query
Field Security Profile = Change Entity name to Field Security Profile
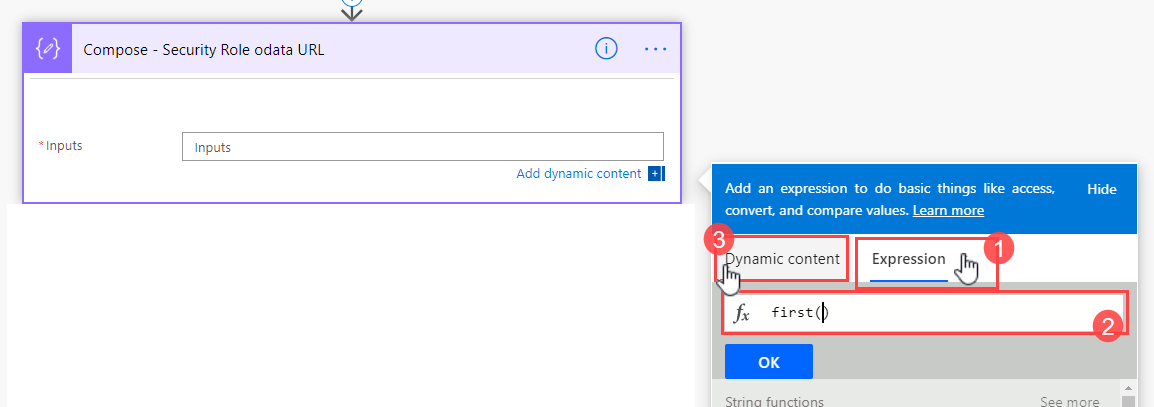
Next, add a Compose action, to get the Odata URL. This URL is how we will add the Security Role to the User later on.
1) Inside the Compose action select Expression tab 2) Use the expression first() 3) Click back to Dynamic content tab
We use first() to get the first value in the CDS List records action. This allows us to bypass the Apply to each loop that Flow creates for us
4) In the ( ) select the Dynamic content value from the List records action
TIP: Make sure you see the fx logo in the text box, this indicates we are using an expression
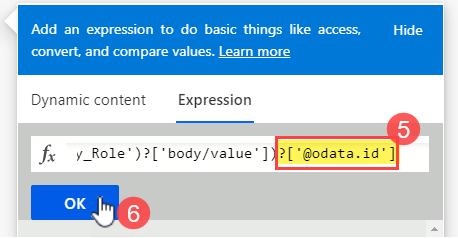
5) At the end of the expression add:
?['@odata.id']
6) Click OK
7) Confirm the expression saved correctly by hovering your mouse over the expression
Next, use any data source / connector that meets your needs to get the emails of your users that you want to add – In this example I am using Office365 List group members
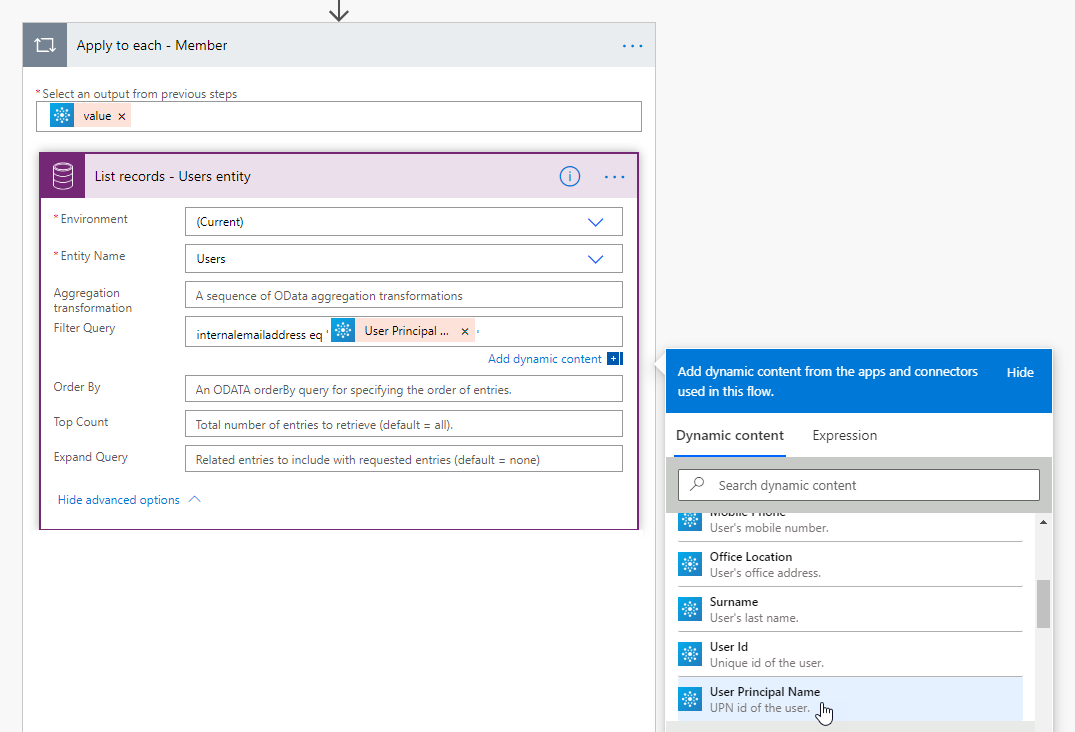
Add an Apply to each loop – So we can loop through each email and assign the Security Role
Inside the Apply to each loop, add a List records action on the Users entity Filter Query = internalemailaddress eq ‘ ‘ Add your dynamic content that has the email address for the user to add inside the ‘ ‘
Next, add a Compose action – to store the User ID (Unique ID) We use the same technique as mentioned above, using first() and the field name Add this to the end of your expression
?['systemuserid']
systemuserid = the field name in CDS that stores the Unique value for each user. This value is used as a lookup guid. So we can relate the records to this guid
Still inside the Loop: Add a Relate Records action.. This is one of the actions inside the Common Data Service Current Environment Connector. Entity Name: Users Item ID: The Compose – Get User ID Outputs Relationship: Select ‘Security Role – systemuserroles_association’ from the drop-down URL: The Compose – Security Role odata URL
Field Security Profile = Change Relationship Dropdown to — Field Security Profile – systemuserprofiles_association
Your action should look like this:
Conclusion
Adding Security roles or Field Security Profiles, can be a long and tedious process. You can add this Flow to a MS form and have users fill out what roles they need.