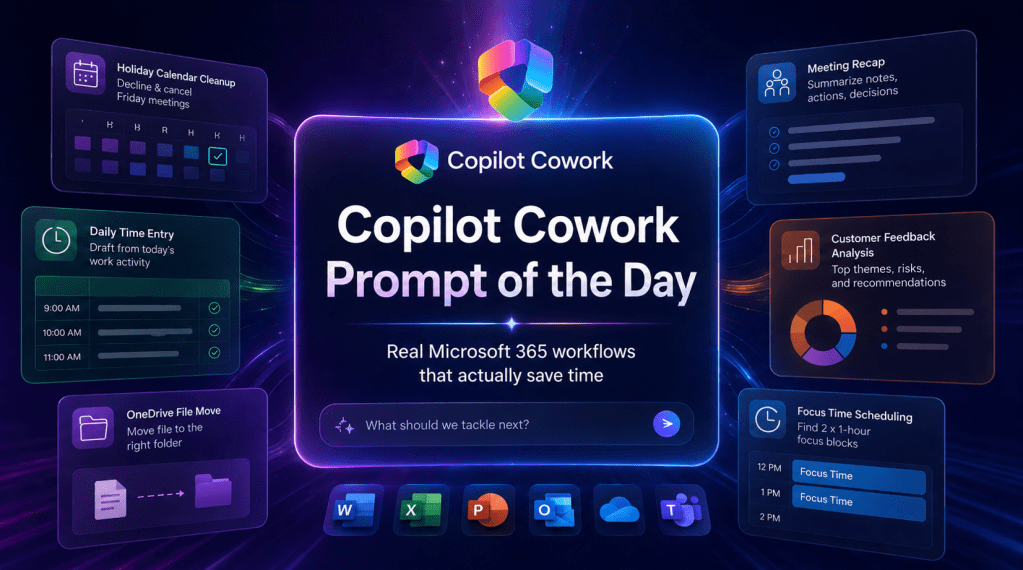
Copilot Cowork Prompt of the Day: Real Microsoft 365 Workflows That Actually Save Time
I have been testing Copilot Cowork across real work patterns inside Microsoft 365: meetings, calendar cleanup, files, time entries, customer feedback, follow-ups, and workspace history.
The pattern is becoming clear.
The strongest Copilot Cowork prompts do not just ask for an answer. They assign a business outcome. They define the source of truth. They set guardrails. They tell Cowork what finished work should look like.
That is where this gets serious.
Below is a practical prompt library based on my Copilot Cowork Prompt of the Day posts across X and LinkedIn. I grouped them by scenario so the examples are easier to scan, reuse, and adapt.
Note: Some examples use demo companies, files, customers, and project names. Replace those with your own Microsoft 365 content, folders, meetings, and business context.
Table of Contents
Calendar and Focus Management
Calendar work looks simple until it eats your day. Declining meetings, cancelling organizer-owned events, protecting focus time, and finding clean openings are perfect examples of work that should be delegated.
These prompts show Cowork acting like a real calendar operator, not a passive chatbot.
Decline and Cancel Holiday Meetings
The situation
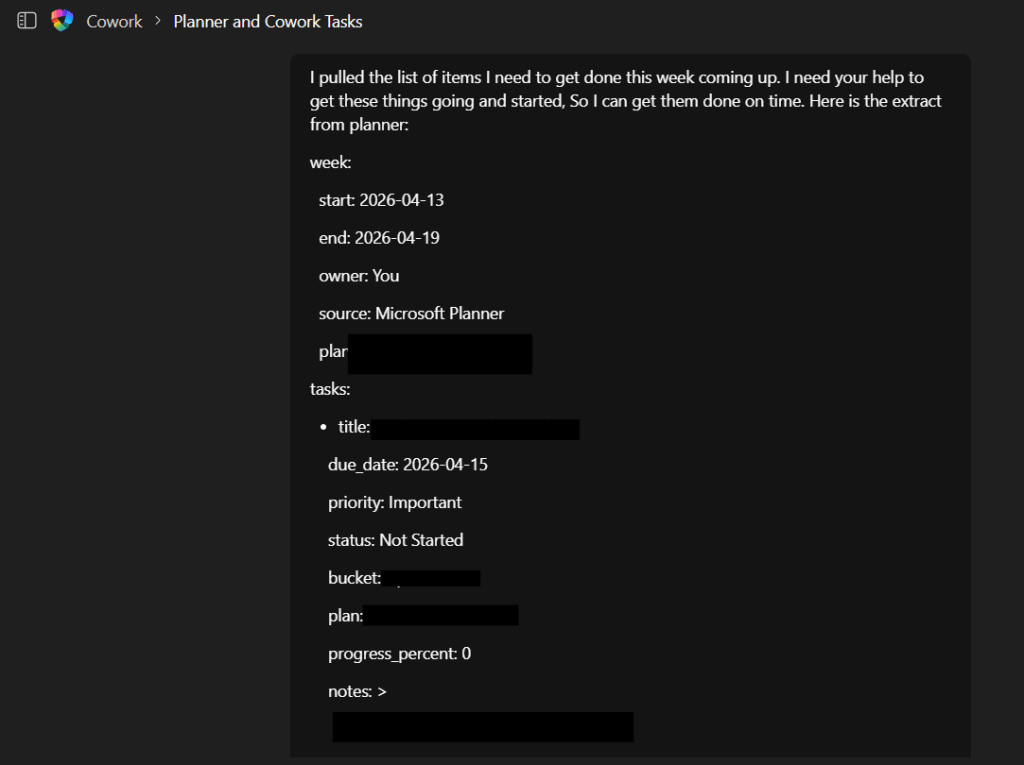
Friday is a holiday. Your calendar still has meetings. Some meetings were created by other people. Some meetings may be yours. You need everything cleaned up properly.
The important part is the distinction between declining and cancelling. If you are only an attendee, Cowork should decline the meeting. If you are the organizer, Cowork should cancel it and send a note so attendees know why it disappeared.
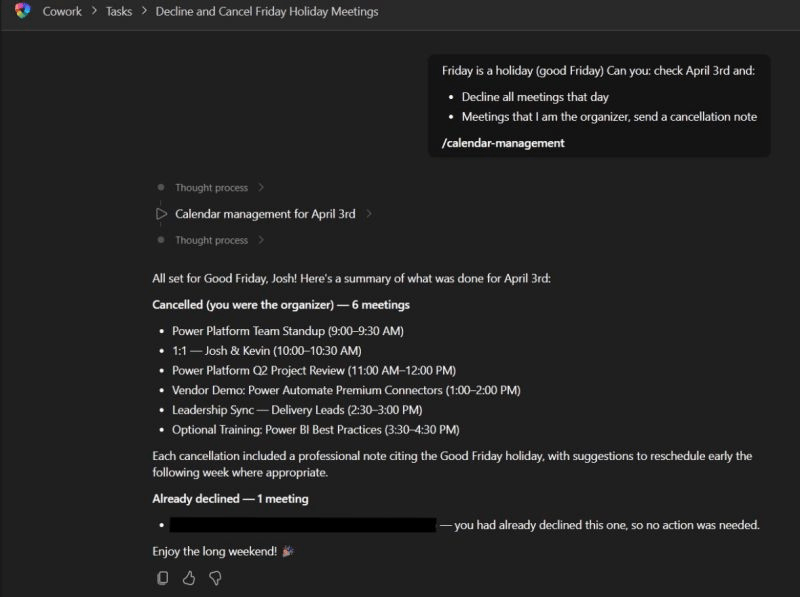
The prompt
[Day] is a holiday. Check [Date].- Decline every meeting.- If I’m the organizer, cancel it and send a note.Use /calendar-management
What Cowork should do
- Check the target date.
- Find every meeting on that day.
- Decline meetings where you are an attendee.
- Cancel meetings where you are the organizer.
- Send a professional cancellation note where needed.
- Summarize what changed.
This is the kind of task that burns attention. The value is not only the minutes saved. The real value is that Cowork understands the difference between attendee action and organizer responsibility.
Cancelling a meeting you own sends a different signal than declining a meeting someone else owns.
How I would tighten the prompt
For a production-style version, I would add the wording for the cancellation note directly into the prompt.
Friday is a company holiday. Check April 3rd in my calendar.For every meeting that day:- If I am only an attendee, decline the meeting.- If I am the organizer, cancel the meeting.- For cancelled meetings, send this note: “April 3rd is a holiday, so I’m cancelling this meeting. Please reschedule for the following week if still needed.”After you finish, send me a summary grouped by declined meetingsand cancelled meetings.Use /calendar-management
Create Focus Time from Your Phone
The situation
This one is simple. That is why it matters.
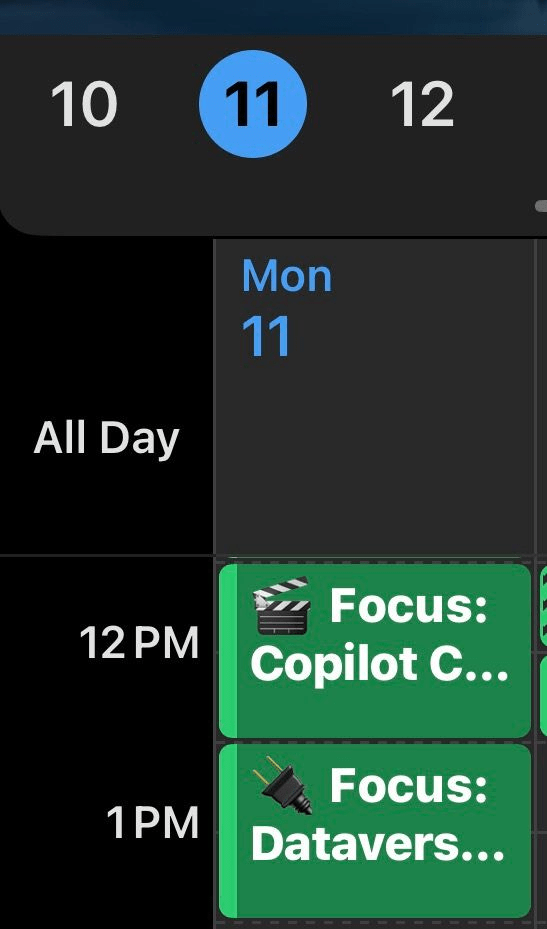
I used the iOS app from bed and told Cowork to find two separate one-hour focus blocks for Monday morning. Cowork checked my calendar, found the openings, and created both events.
No desktop. No calendar hunting. No dragging blocks around half asleep.
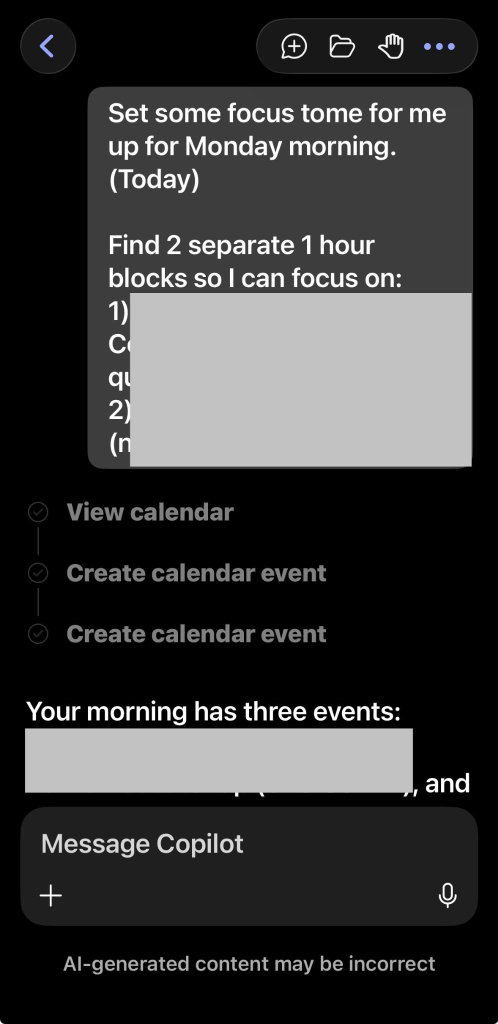
The prompt
Set some focus time for me up for Monday morning.Find 2 separate 1 hour blocks so I can focus on:1) <Task>2) <Task>
What Cowork should do
- Review your Monday morning calendar.
- Find two separate one-hour openings.
- Create calendar events for each focus block.
- Name each block clearly based on the task.
- Add useful context where available.
Focus time only helps if it actually lands on the calendar. A lot of people know what they need to work on, then lose the day to meetings, messages, and context switching.
This turns focus protection into a command.
That is the kind of small task agents should crush first. Scheduling. Calendar juggling. Protecting time. Removing the coordination mess.
How I would tighten the prompt
I would add preferred working hours, meeting buffer rules, and event details.
Set up 2 separate 1-hour focus blocks for Monday morning.Focus areas:1) <Task 1>2) <Task 2>Rules:- Only schedule between 8:00 AM and 12:00 PM.- Do not overlap existing meetings.- Leave at least 15 minutes between meetings and focus blocks where possible.- Use clear calendar titles: “Focus: <Task>”.- Add a short note to each event with the goal for that focus block.After scheduling, tell me the times you picked.
Time Entry and Work Reporting
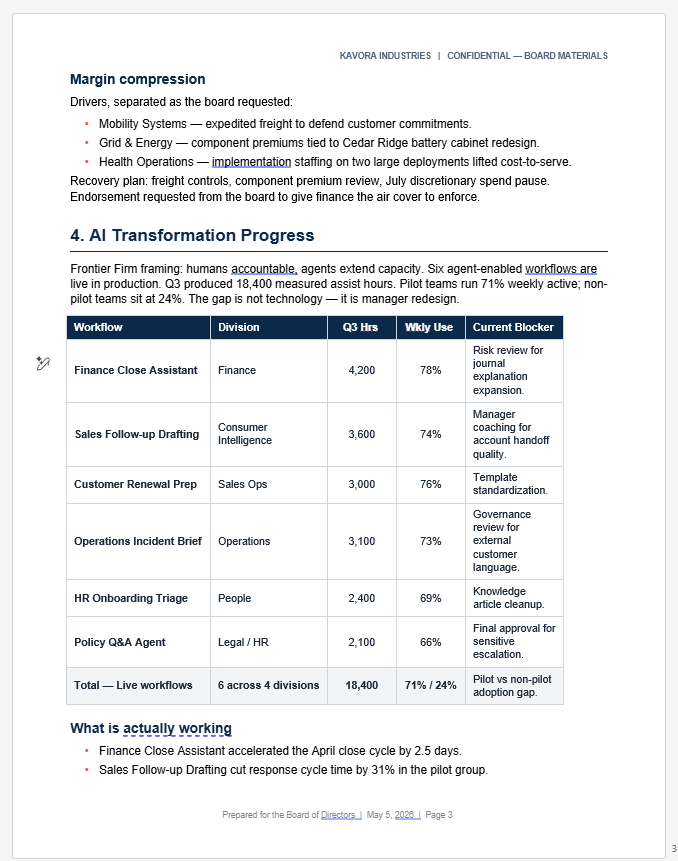
Time entry is one of the best Cowork use cases because the evidence already exists across Microsoft 365. Meetings, chats, emails, files, edits, and shared work all tell the story of the day.
The hard part is turning that messy activity trail into believable time-entry comments that a human can review.
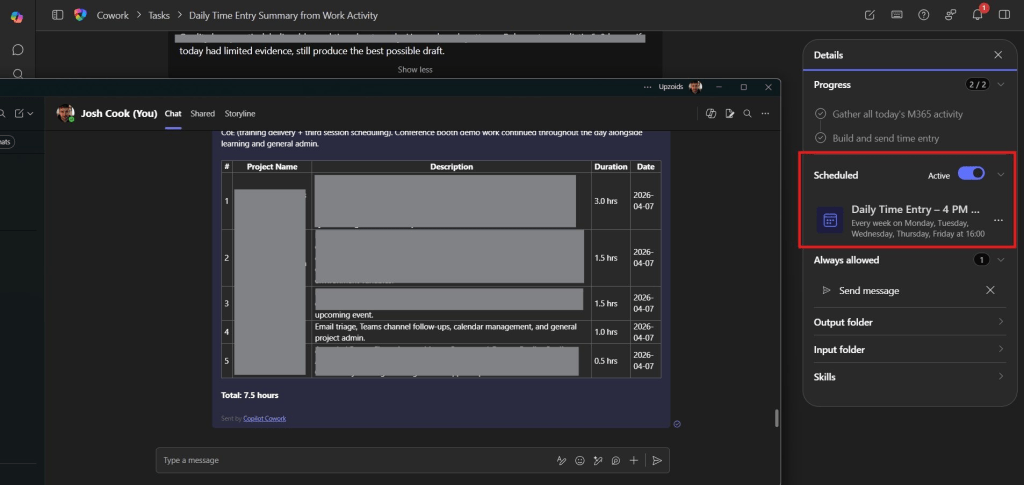
Build a Daily Time Entry Summary from Microsoft 365 Activity
The situation
This prompt asks Cowork to review the day’s Microsoft 365 activity and produce a structured time-entry draft. The goal is not perfect accounting. The goal is a practical, honest draft that can be reviewed and corrected quickly.
The real power is that Cowork is not only looking at meetings. It is asked to look across calendar activity, Teams chats, email, files, transcripts, meeting notes, and other signals.
The prompt
Review ALL of MY Microsoft 365 work activity from TODAY in[your timezone] and build a realistic, structured daily time entrysummary.Then send it as a [direct Teams message / Email].Use every available signal from today:- calendar meetings- transcripts and recaps- meeting chats- Teams chats and channel messages- emails- files opened, edited, or shared- any other work activity signalsRules:1. Only use today in my local timezone.2. Look across all evidence, not just meetings.3. Infer the best-fit project, client, internal initiative, or businessdevelopment category.4. Map work to a project whenever possible.5. If unclear, use: Business Development, Internal Operations,Practice Development, Admin, or Learning / Enablement.6. Consolidate fragmented activity into meaningful work blocks.7. Target a full day close to 8.0 hours.8. Acceptable total range: 6.0-8.0 hours.9. Accuracy first, then use reasonable consolidation to close gaps.10. Do not invent fake meetings, deliverables, or project names.11. If evidence is weak, make the best possible mapping, but keepdescriptions honest.12. Avoid over-fragmenting. Prefer fewer, stronger entries.13. Write descriptions like real time-entry comments, not AI summaries.14. Keep descriptions concise but useful.15. Group short related activities under the same project.16. If there is clear prep or follow-up around meetings, emails,chats, or docs, include that under the relevant project when evidencesupports it.17. Capture business development work where relevant:sales support, proposal work, internal planning, networking,demos, enablement, certifications, or content creation.Format the Teams message as HTML:- Bold heading: Daily Time Entry Draft – [YYYY-MM-DD]- Bold "Summary:" plus a 1-2 line plain-text summary- HTML table: # | Project Name | Description | Duration | Date- One row per entry, ordered largest to smallest- Duration in decimal hours, e.g. 3.0 hrs or 0.5 hrs- Bold "Total: X.X hours" at the bottomQuality bar: practical, believable, timesheet-ready.Use real work patterns. Balance to 6-8 hours.If today has limited evidence, still produce the best possible draft.
What Cowork should do
- Build a workday view from Microsoft 365 evidence.
- Classify activity into projects, clients, or internal categories.
- Consolidate short fragments into stronger time-entry rows.
- Keep the wording practical and timesheet-ready.
- Send the finished draft as a Teams message.
This is a serious consulting and professional services scenario.
Timesheets fail when people are forced to reconstruct their day from memory. Cowork can inspect the activity trail and give you a draft while the day is still fresh.
You still review it. You still own it. Cowork reduces the blank-page problem.
Important guardrails
The guardrails are the real prompt design lesson here.
- Do not invent fake meetings, deliverables, or project names.
- Keep weak evidence honest.
- Prefer fewer, stronger entries.
- Write like a real time-entry comment.
That is how you keep this useful without letting the agent drift into fantasy work logs.
Meeting Intelligence and Follow-Up
Meetings create a lot of residue: transcripts, AI notes, chats, files, agendas, decisions, action items, and follow-up messages.
The problem is that the value disappears when nobody turns that residue into something clean.
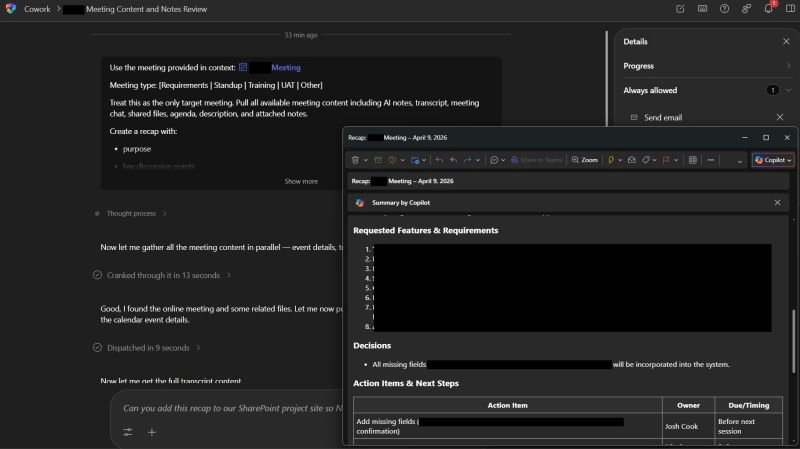
Create a Meeting Recap and Send It to Attendees
The situation
This prompt gives Cowork one target meeting and asks it to pull all available meeting content. The output is a structured recap and a concise email to attendees.
The prompt also changes the recap style based on the meeting type. A requirements session should not be summarized the same way as a standup or UAT meeting.
The prompt
Use the meeting provided in context: <Meeting>. Meeting type: [Requirements | Standup | Training | UAT | Other] Treat this as the only target meeting. Pull all available meeting contentincluding AI notes, transcript, meeting chat, shared files, agenda,description, and attached notes. Create a recap with: - purpose - key discussion points - decisions - action items - owners - due dates - follow-ups Adapt the recap based on the meeting type: - Requirements: needs, requested features, pain points, constraints,open requirements - Standup: progress, blockers, next steps - Training: what was taught, guidance shared, takeaways, resources - UAT: what was tested, issues found, defects, next steps for fixes orretesting - Other: use the most appropriate structure If anything is unclear or missing, state that clearly instead of guessing. Then draft and send a concise, professional recap email to all attendees.
What Cowork should do
- Use only the meeting provided in context.
- Pull available transcript, recap, chat, files, agenda, and notes.
- Build a recap that matches the meeting type.
- Call out missing or unclear details.
- Send a concise recap email to attendees.
The most useful meeting recap is not a generic summary. It captures the operating details that move work forward: decisions, owners, due dates, and follow-ups.
This prompt also handles one of the biggest issues with AI meeting summaries: context control. It tells Cowork to treat the provided meeting as the only target meeting.
How I would tighten the prompt
For client-facing work, I would add a review step before sending.
Use the meeting provided in context: <Meeting>.Meeting type: [Requirements | Standup | Training | UAT | Other]Treat this as the only target meeting. Pull all available meeting contenincluding AI notes, transcript, meeting chat, shared files, agenda,description, and attached notes.Create a recap with:- Purpose- Key discussion points- Decisions- Action items- Owners- Due dates- Follow-upsAdapt the recap based on the meeting type.If anything is unclear or missing, state that clearly instead of guessing.Draft a concise, professional recap email to all attendees,but do not send it until I review and approve it.
Customer Feedback and Leadership Deliverables
This is the most advanced scenario in the set.
The assignment is not just “summarize feedback.” The assignment is to turn scattered customer signals into a leadership-ready action package.
That means Cowork has to analyze, prioritize, create deliverables, flag weak evidence, and prepare different outputs for different audiences.
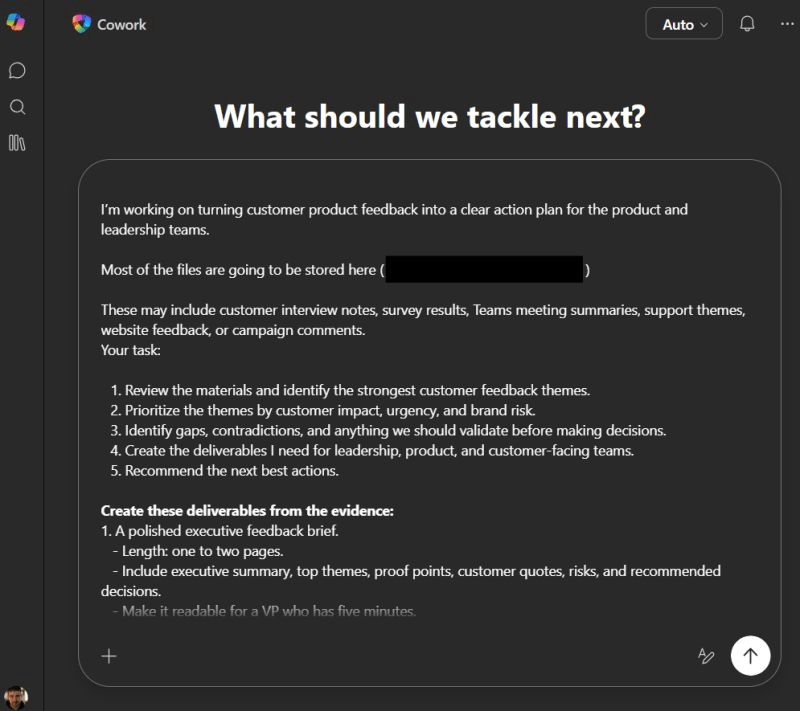
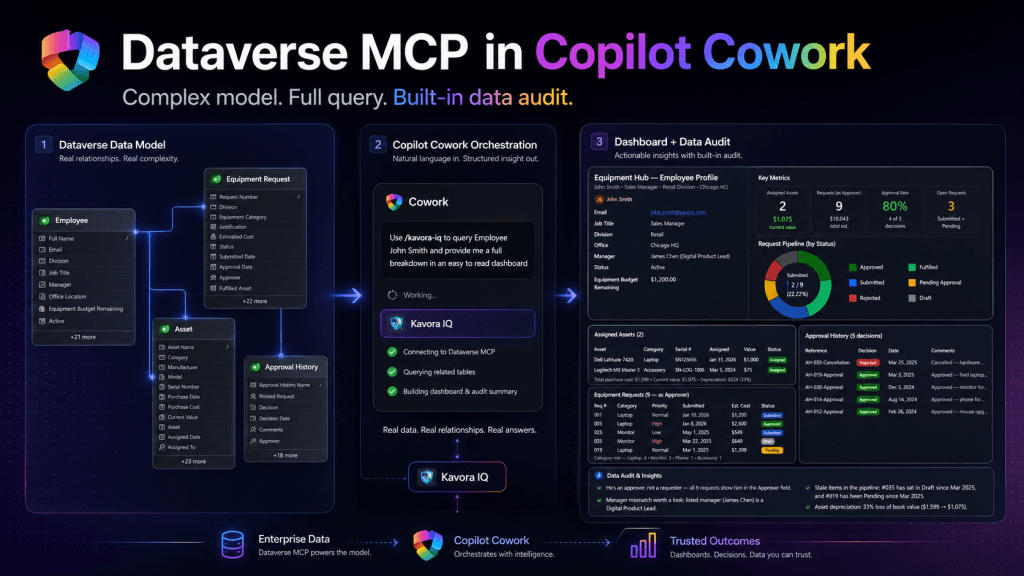
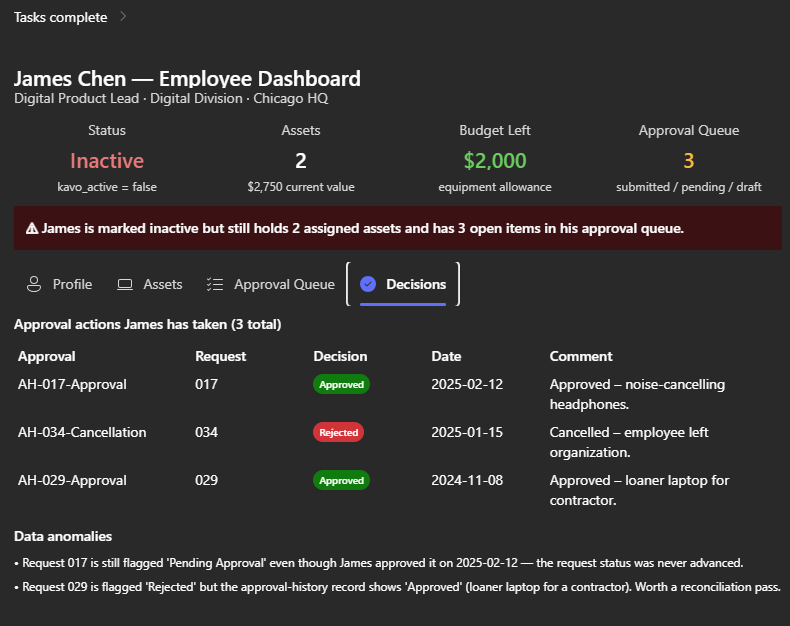
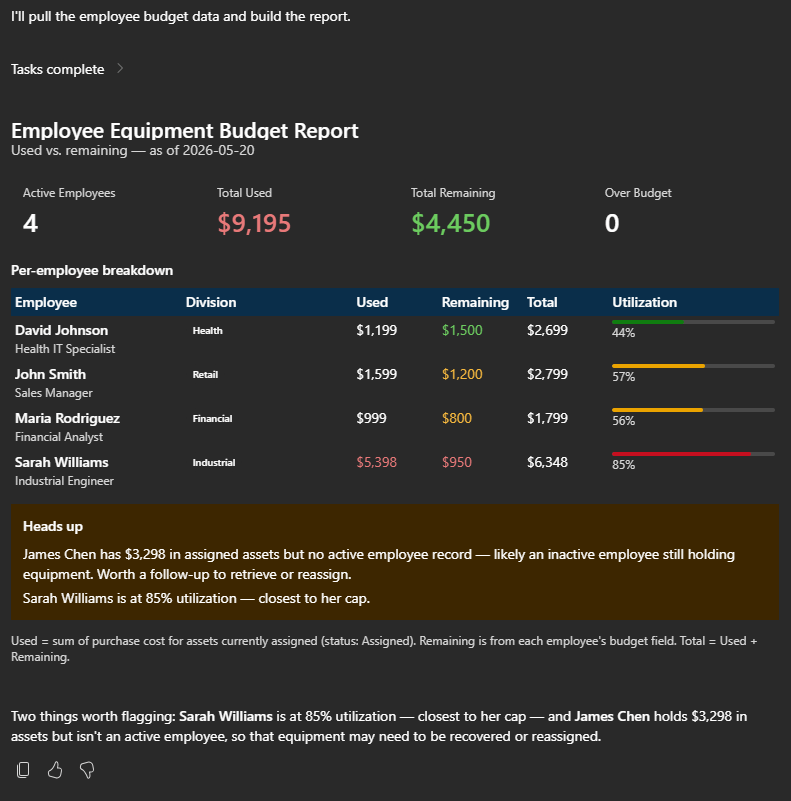
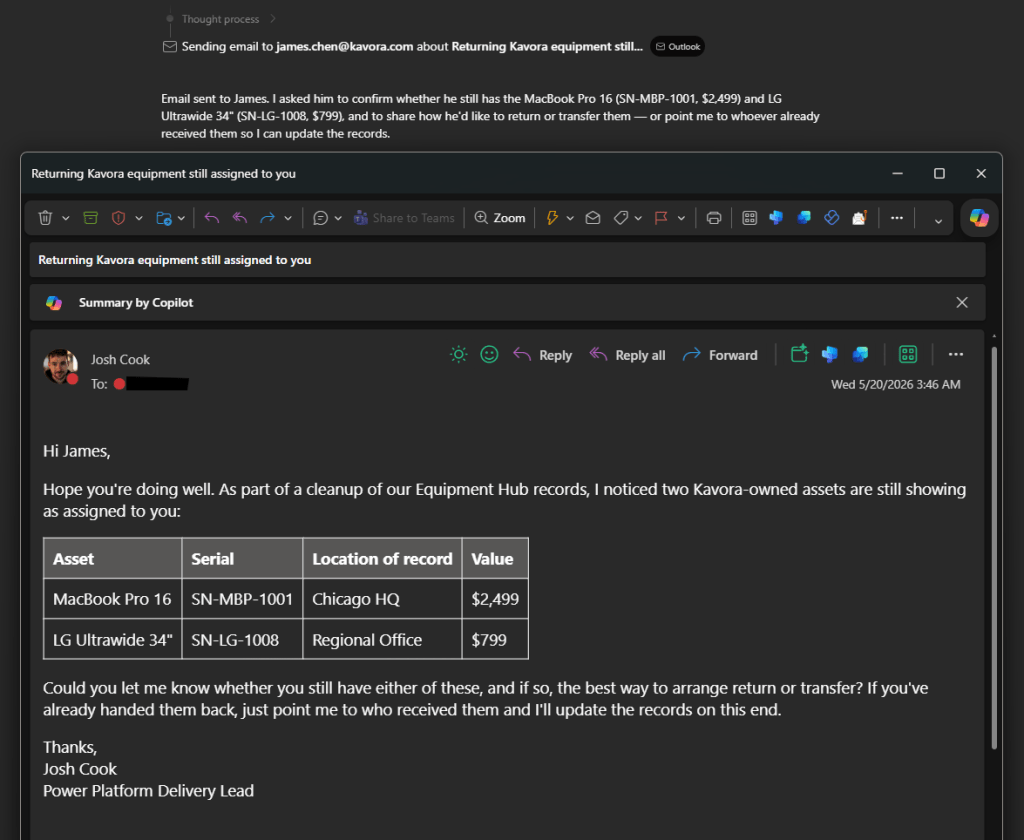
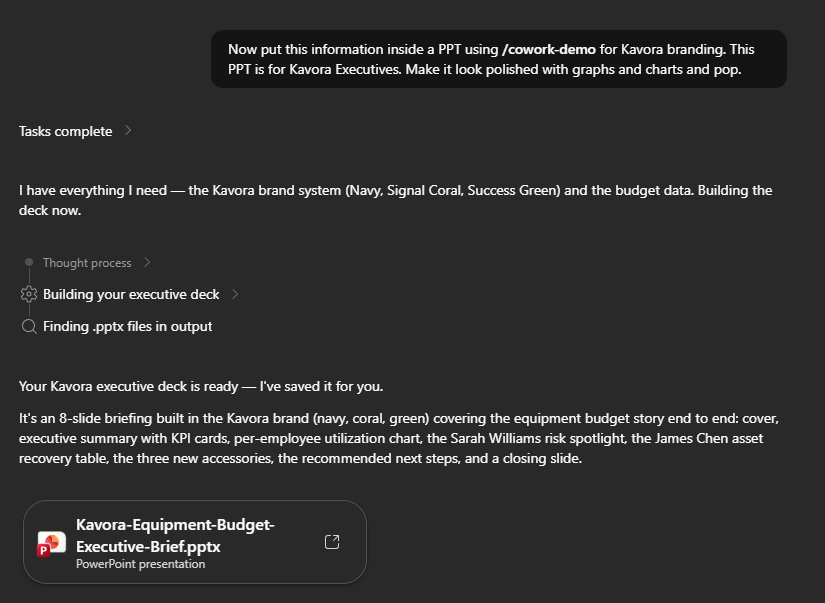
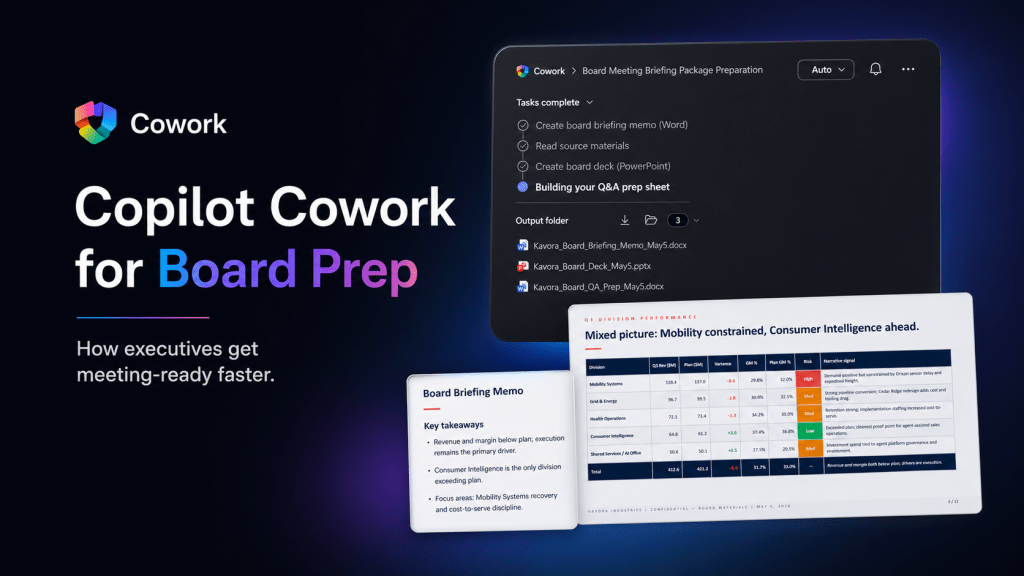
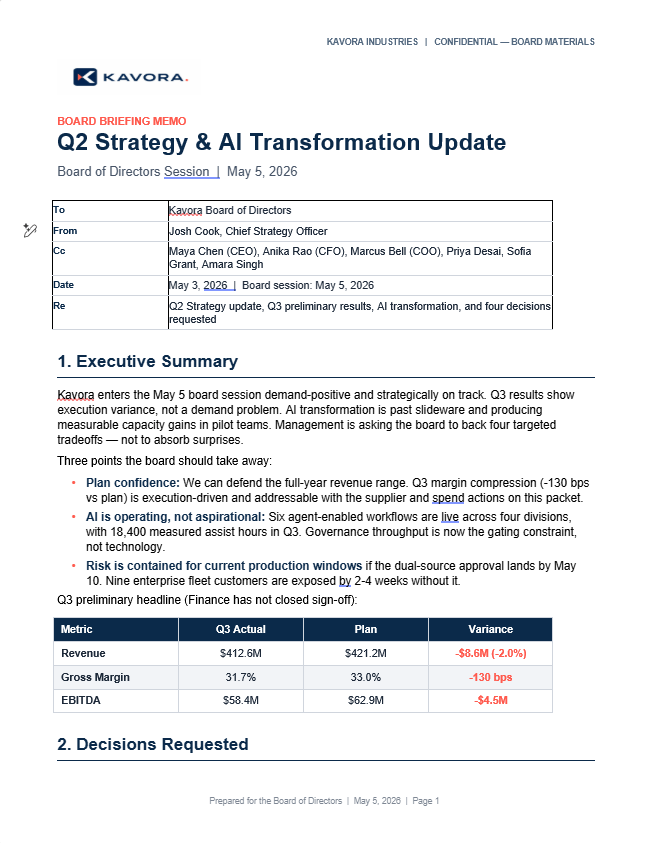
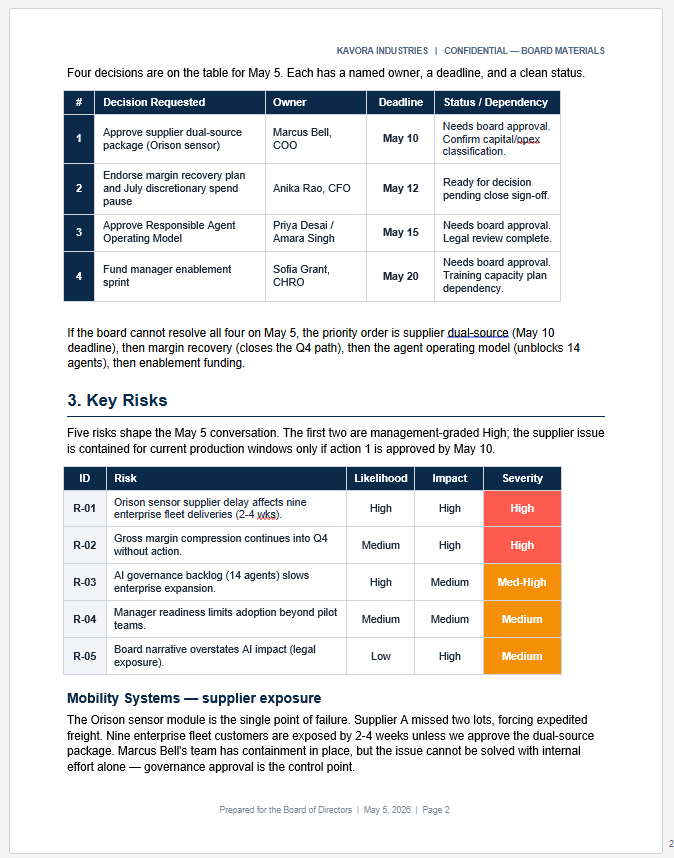
Turn Customer Feedback into a Product Action Plan
The situation
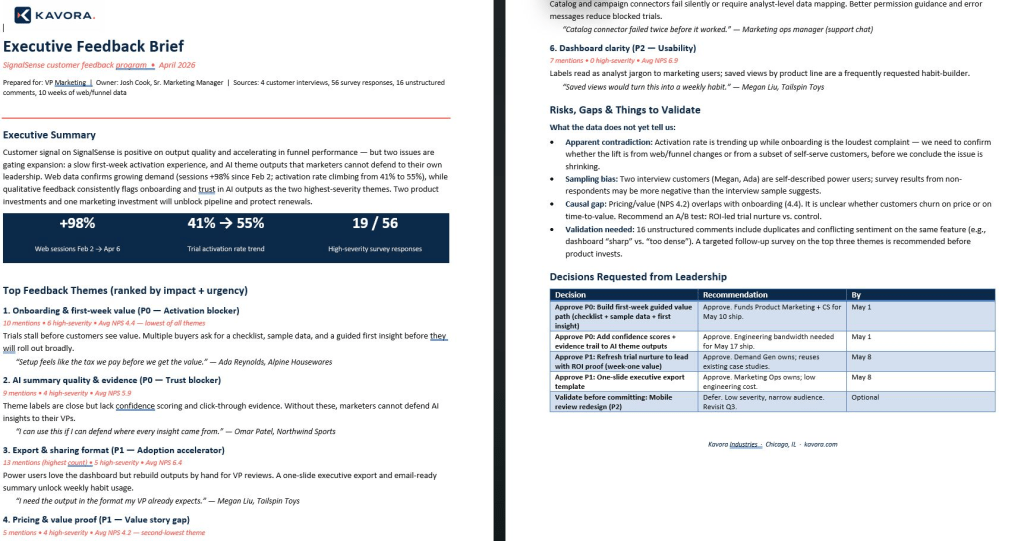
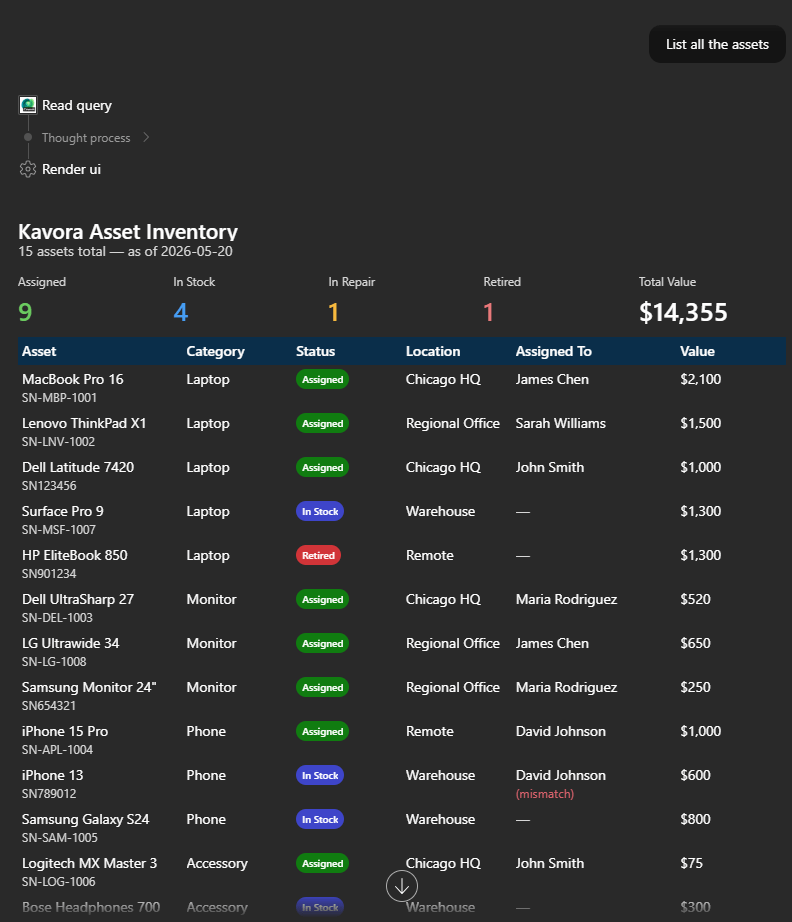
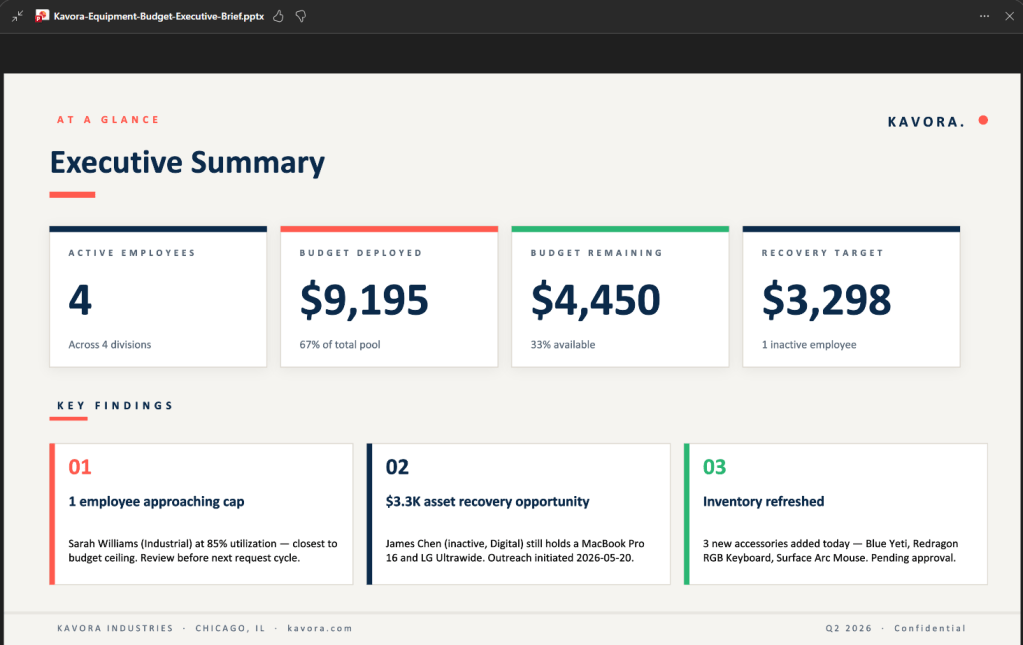
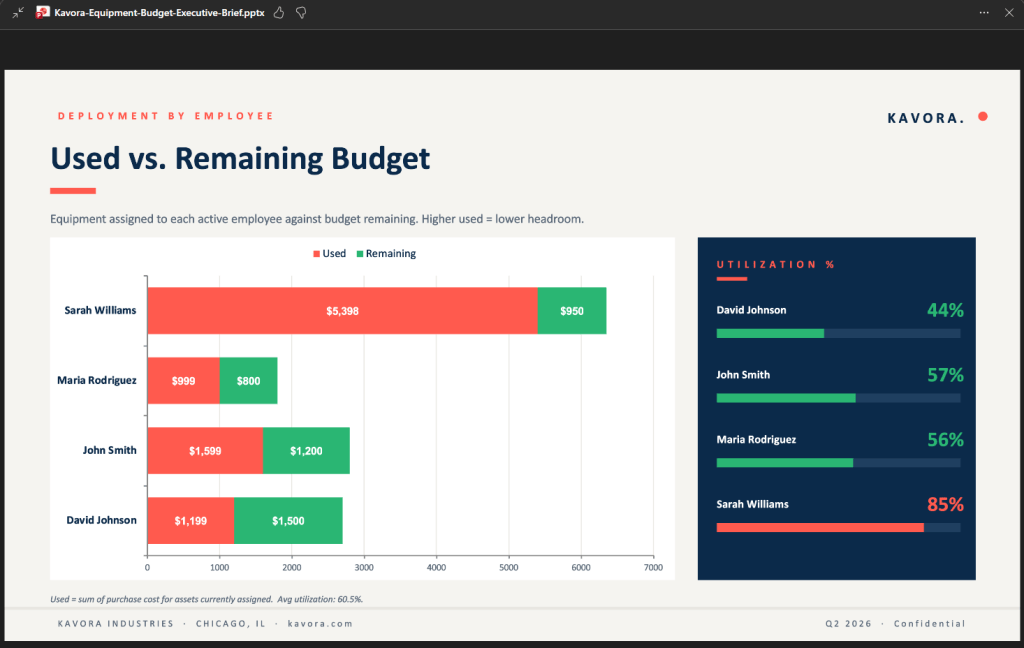
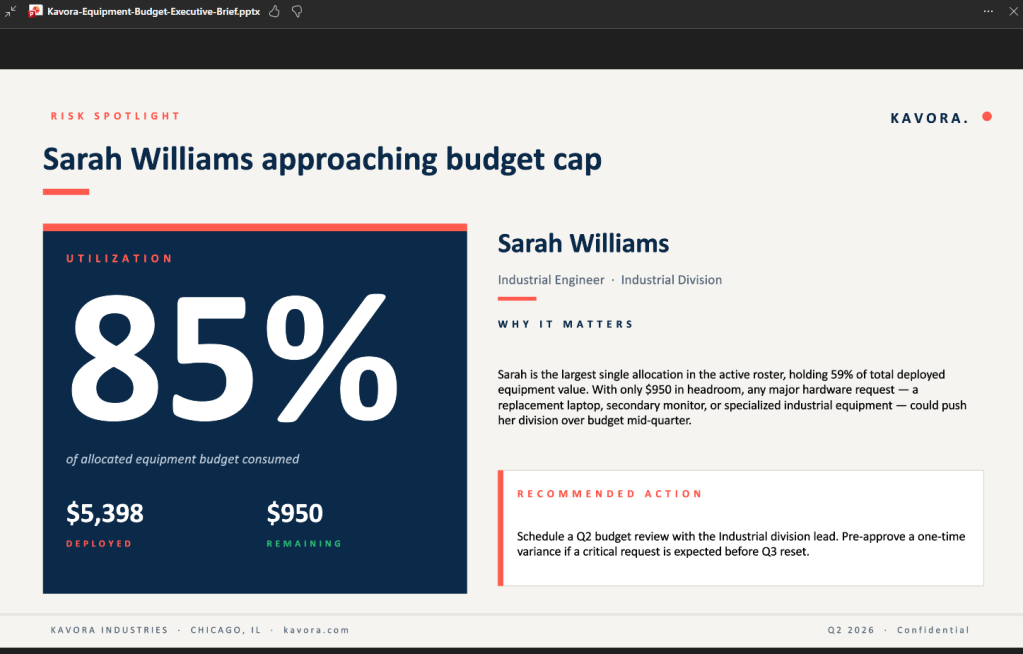
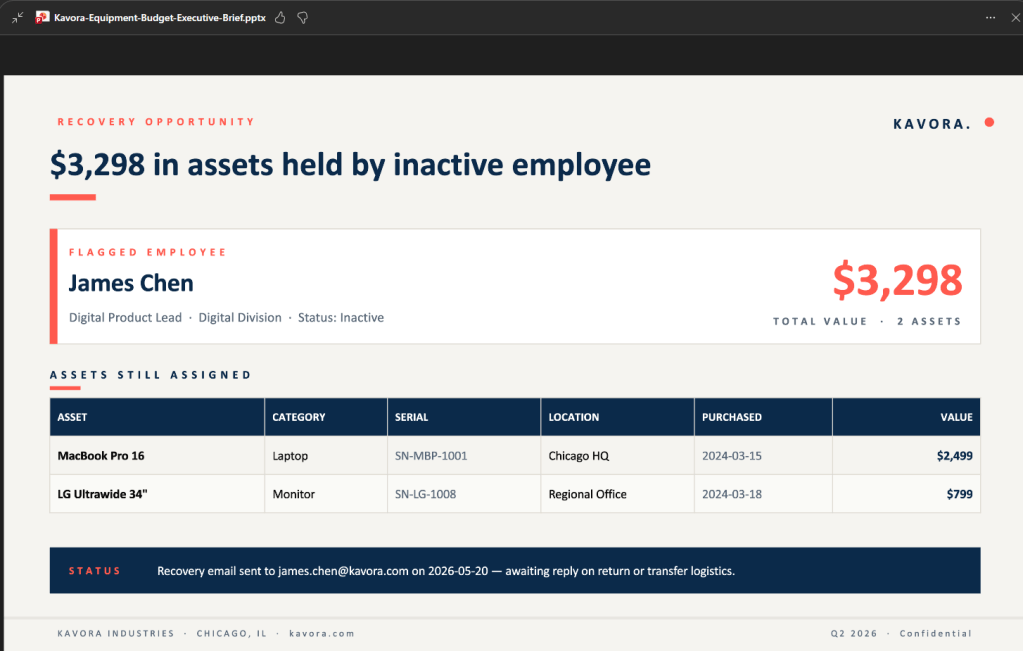
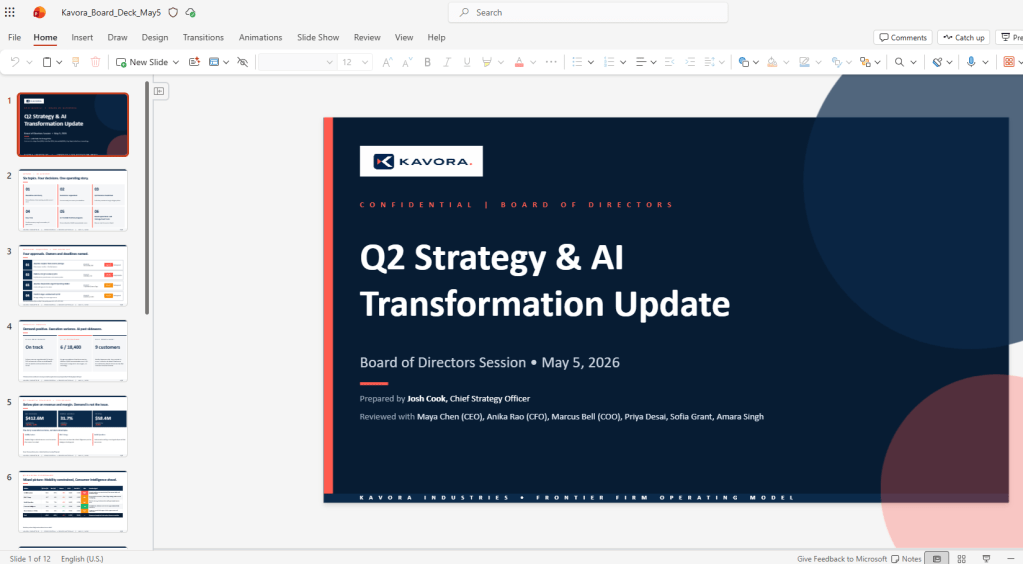
Kavora’s marketing department has customer feedback scattered across interviews, surveys, comments, web signals, and meeting notes.
Leadership needs the real story:
- What customers are saying.
- What matters most.
- What needs action.
- What needs human judgment before the team moves.
For the demo, the input files were:
- Customer interview notes
- Product feedback survey and web signal export
- Source customer comments
- Marketing leadership request and context email
The Cowork assignment was to review the feedback, find the strongest themes, rank them by impact and urgency, flag gaps or contradictions, then build the deliverables a marketing team would actually need.
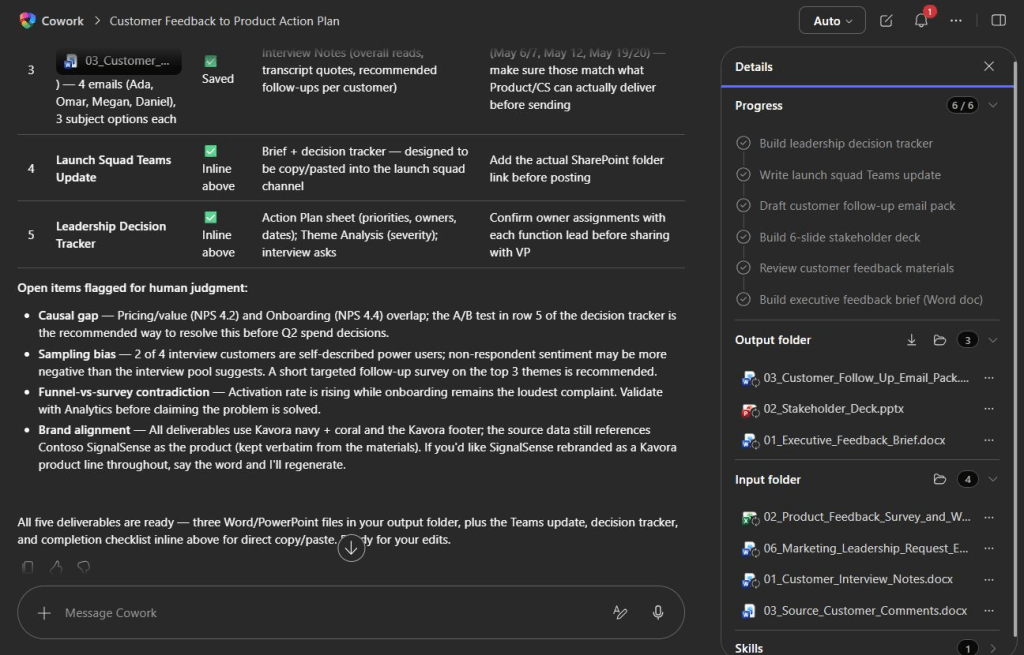
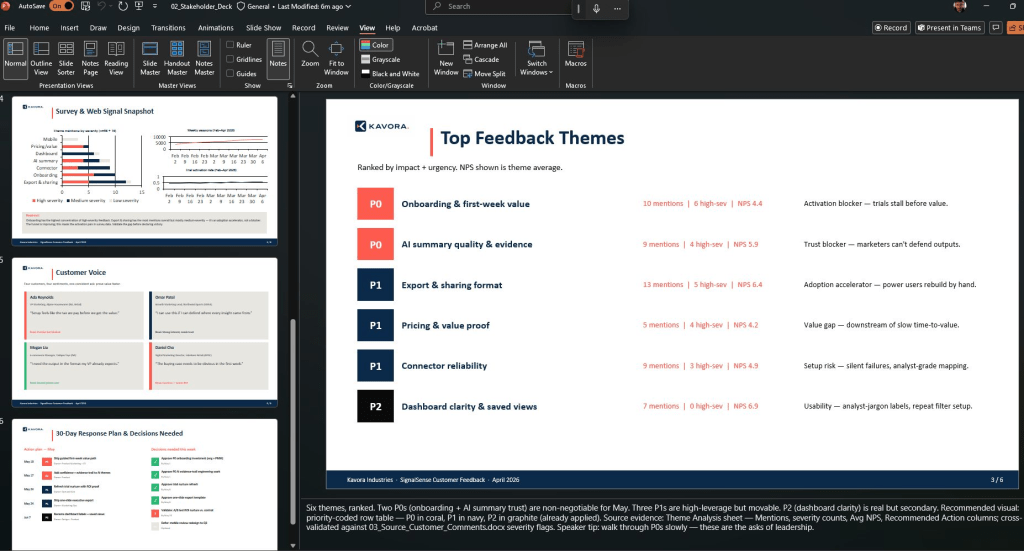
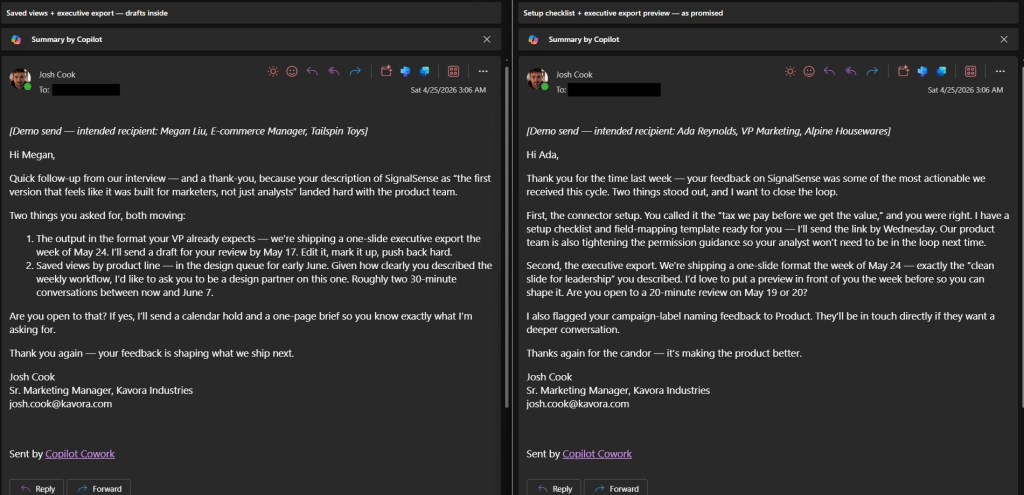
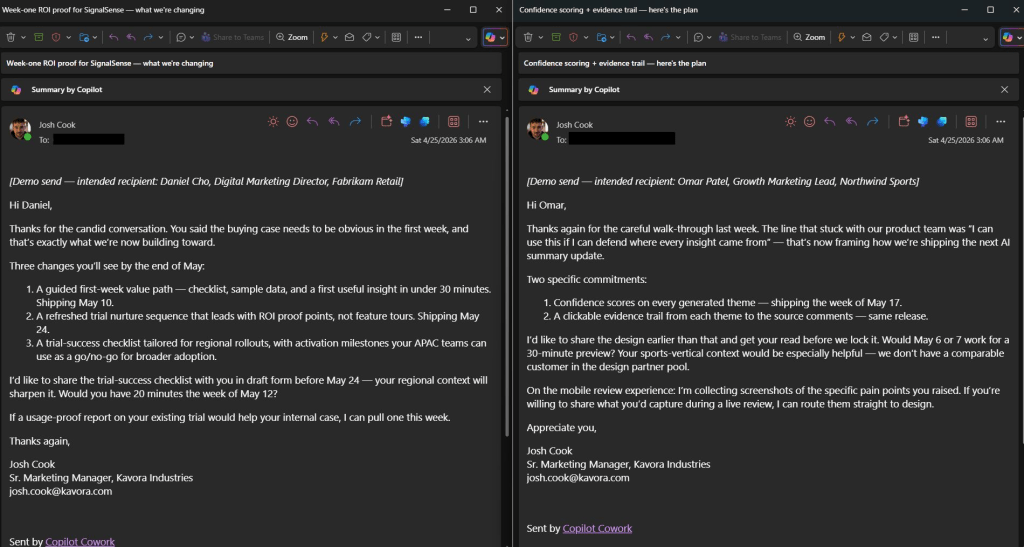
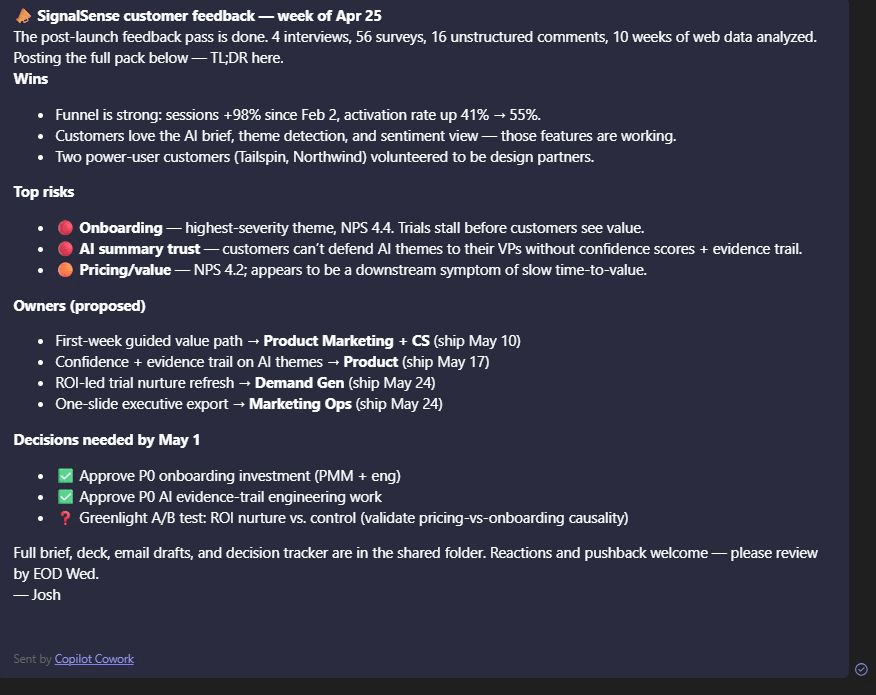
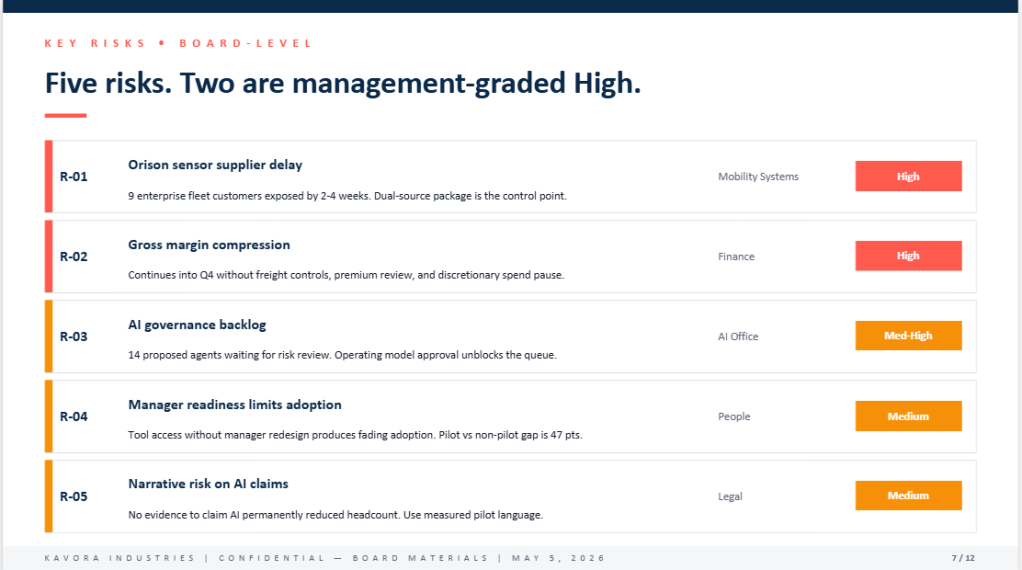
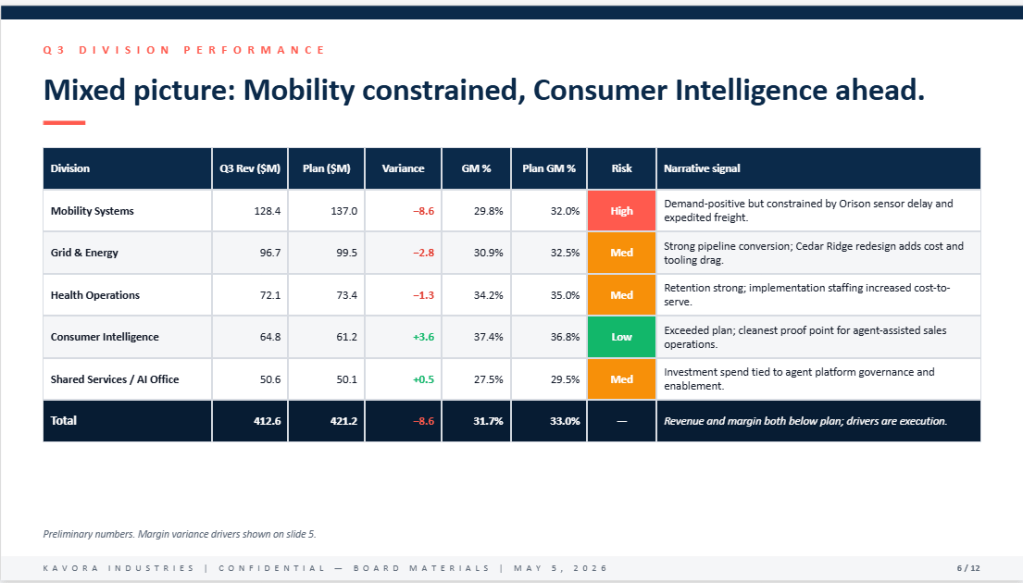
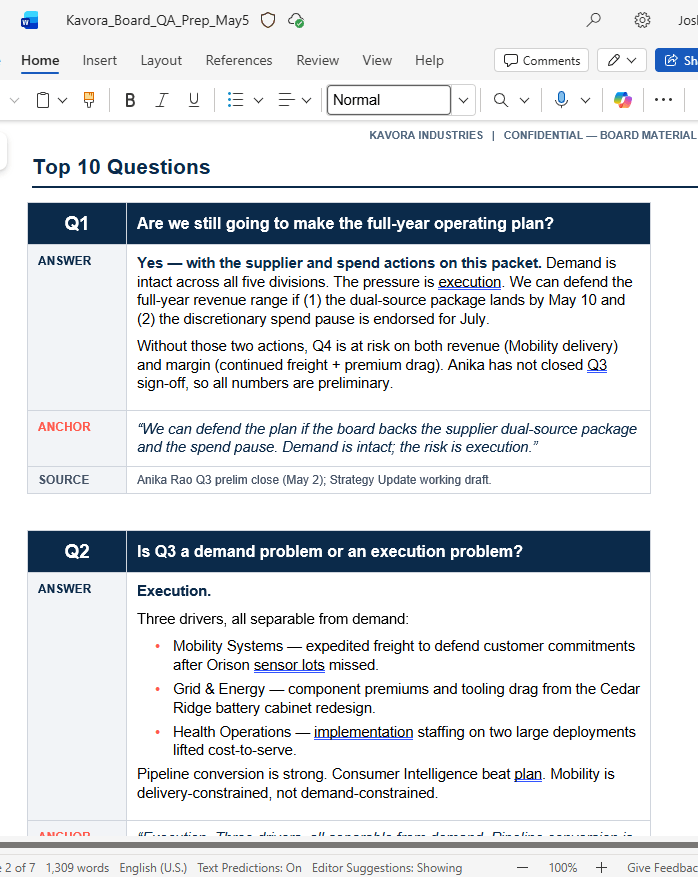
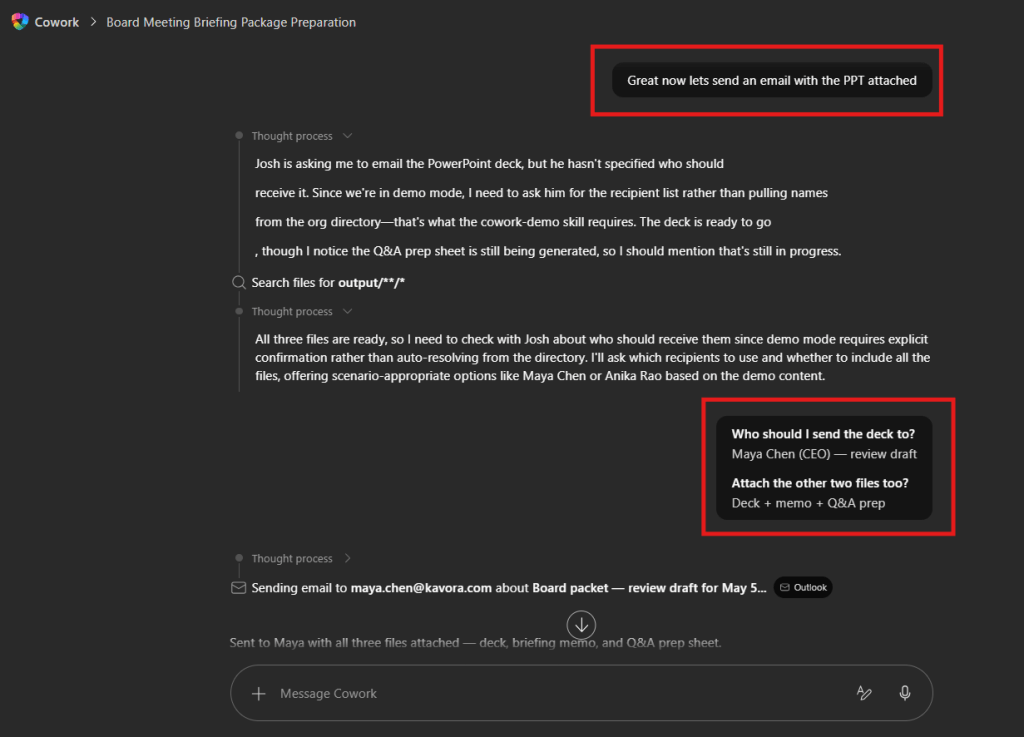
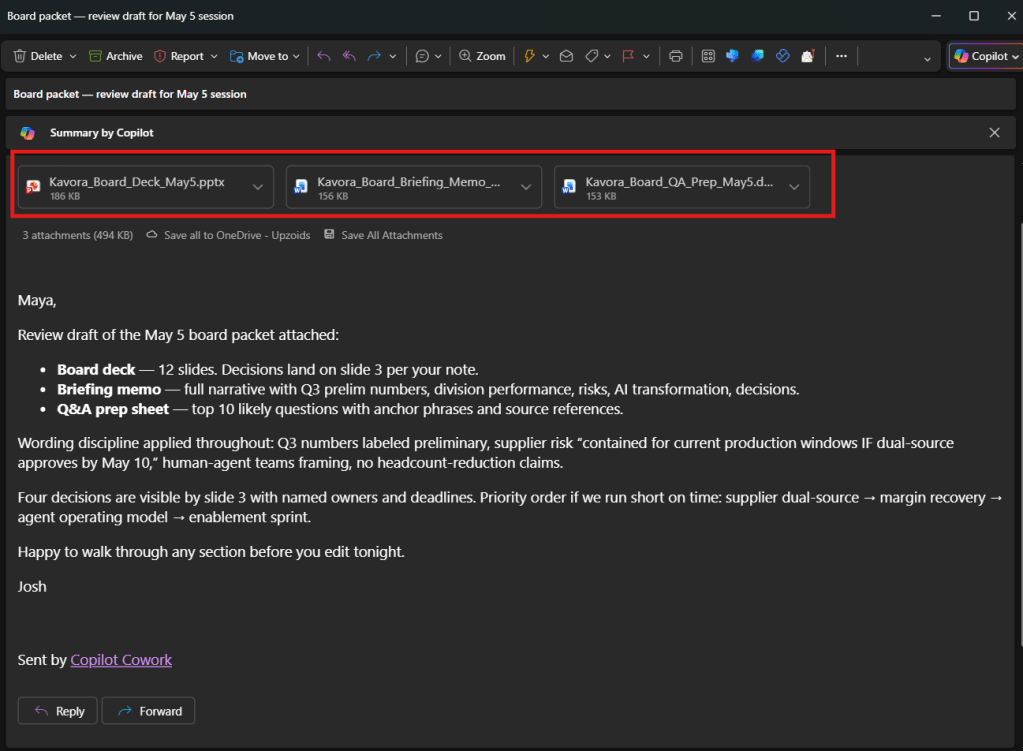
Copilot Cowork turning scattered customer feedback into a brief, deck, emails, Teams update, and decision tracker.
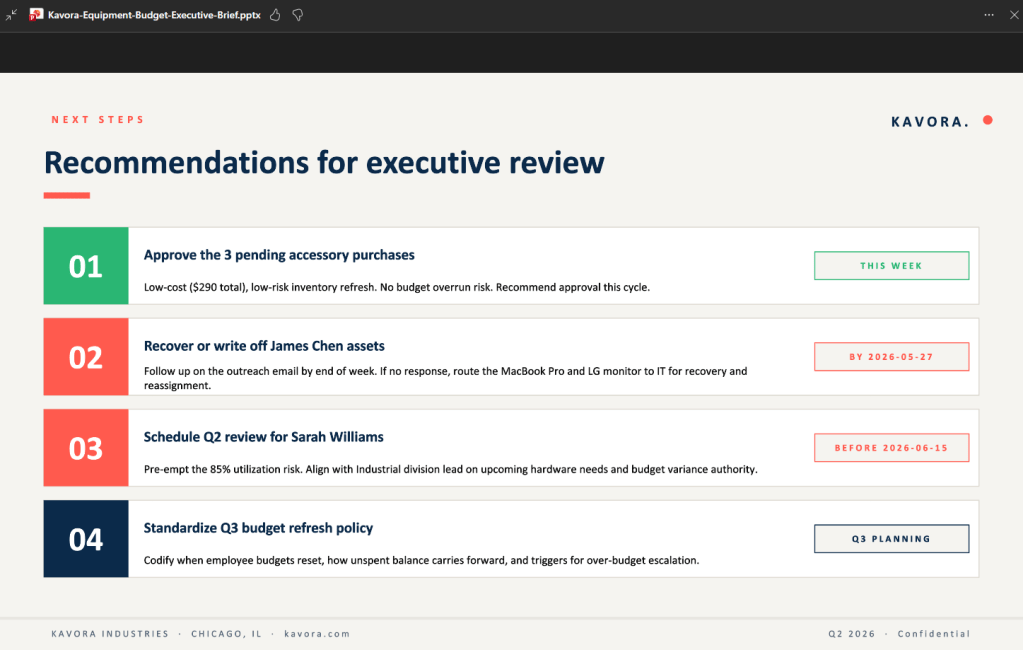
The expected outputs
- Executive feedback brief
- Stakeholder-ready presentation deck
- Customer follow-up email pack
- Launch squad Teams update
- Leadership decision tracker
The prompt
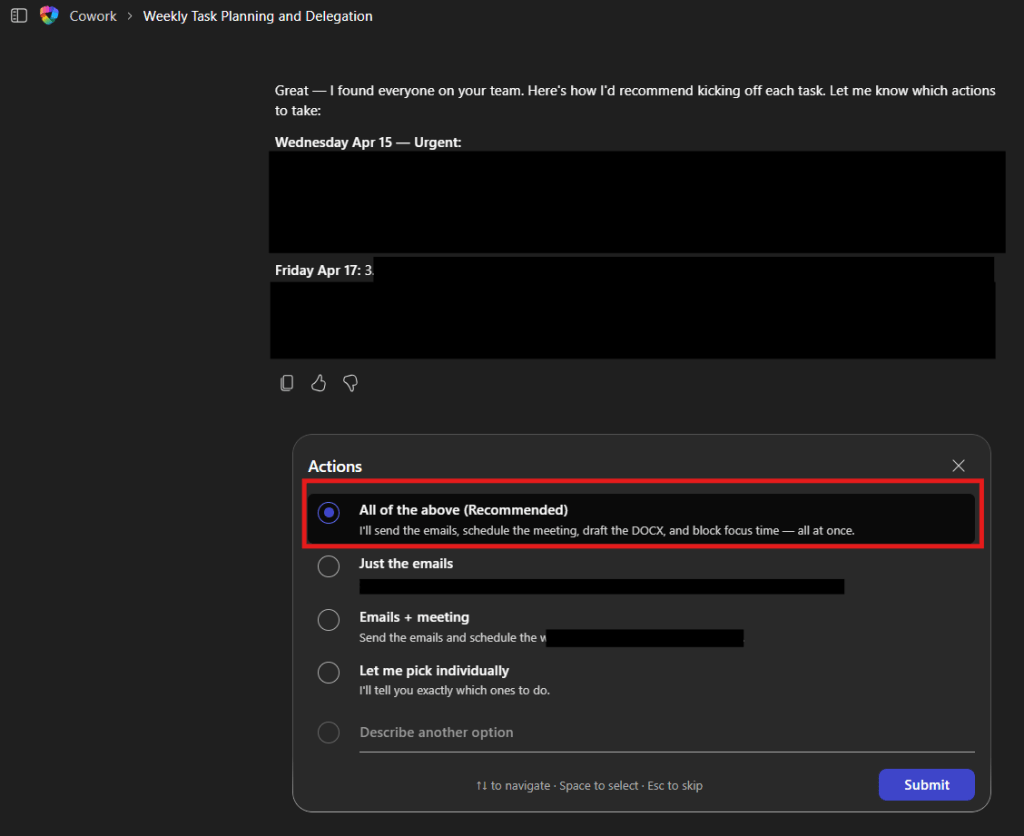
Act as my marketing operations lead.Goal:I’m working on turning messy customer product feedback into a clearaction plan for product, marketing, and leadership teams.Sources:Use the attached files and project folder as the source of truth.These may include customer interview notes, survey results,web/funnel data, Teams meeting summaries, support themes,website feedback, campaign comments, and leadership request emails.Task:1. Review the materials and identify the strongest customer feedbackthemes.2. Prioritize the themes by customer impact, urgency, revenue risk, andbrand risk.3. Pull proof points from the source material, including customerquotes, survey signals, and web/funnel trends.4. Identify gaps, contradictions, sampling bias, or anything that needsvalidation before decisions are made.5. Recommend the next best actions for product, marketing,customer success, and leadership.Produce:• A polished executive feedback brief • A stakeholder-ready presentation deck • A customer follow-up email pack • A Teams update for the launch squad • A leadership decision tracker with priorities, owners, and dates Guardrails:• Separate facts from recommendations • Do not invent evidence • Call out assumptions clearly • Flag anything that needs human review • Make the outputs ready for me to review, edit, and share
What Cowork should do
- Review all supplied source material.
- Find repeated customer themes.
- Rank themes by impact, urgency, revenue risk, and brand risk.
- Pull quotes and proof points from the evidence.
- Flag contradictions, bias, gaps, and validation needs.
- Create separate deliverables for leadership, product, launch teams, and customer follow-up.
The best part of this prompt is the deliverable design. It does not stop at analysis. It asks for the assets the business actually needs:
- A brief for executives.
- A deck for stakeholders.
- Email drafts for customers.
- A Teams update for the launch squad.
- A decision tracker for leadership.
That is the difference between “tell me what the files say” and “help me move the business forward.”
The human review layer
This prompt gets the review model right. It tells Cowork to separate facts from recommendations and flag assumptions.
That matters because customer feedback can be messy. You can have contradictory signals, loud power users, small samples, weak survey patterns, or feedback that sounds urgent but needs validation.
The agent can organize the evidence. The human still owns the judgment.
How I would tighten the prompt
I would add a scoring model so the ranking is easier to audit.
When ranking feedback themes, score each theme from 1-5 across:- Customer impact- Urgency- Revenue risk- Brand risk- Evidence strengthThen calculate a priority recommendation of P0, P1, or P2.For every theme, include:- Evidence used- Customer quote or signal- Recommended owner- Recommended next action- What needs human validation before action
File and Workspace Operations
Some of the best agent use cases are boring. That is the point.
Moving files, finding folders, reviewing previous sessions, and organizing workspace context are small tasks by themselves. Across a week, they become attention tax.
Move a File in OneDrive
The situation
I downloaded a zip file on my phone, uploaded it to OneDrive, and told Cowork to move it into the right demo folder.
No laptop. No desk. No clicking through folders.
Cowork found the file, found the destination folder, and moved it.
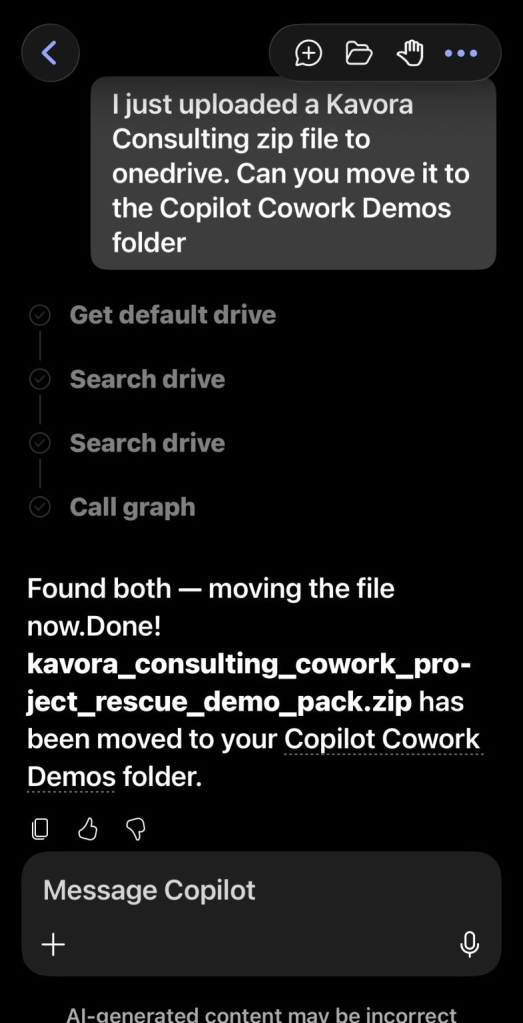
The prompt
I just uploaded a <file or folder> to OneDrive.Can you move it to the Copilot Cowork Demos folder
What Cowork should do
- Search OneDrive for the uploaded file or folder.
- Search OneDrive for the destination folder.
- Move the item.
- Confirm the exact file or folder that was moved.
This is the kind of work nobody wants to do. It is small enough to feel annoying and common enough to keep stealing attention.
Agents should handle the annoying little tasks first.
Find the file. Find the folder. Move it. Confirm it.
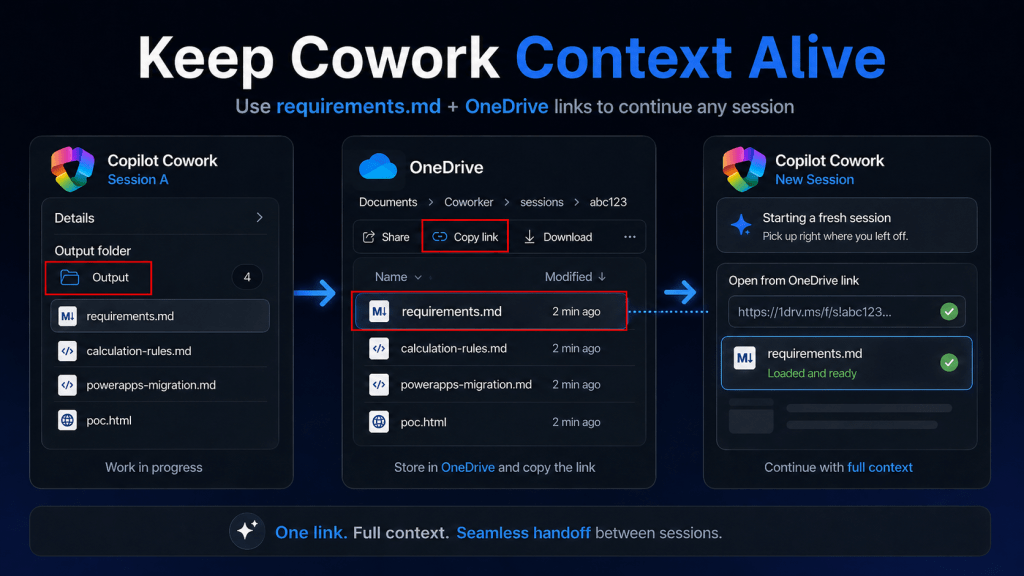
Review Past Cowork Sessions
The situation
This is a fun one for understanding the workspace Cowork builds around your work.
The prompt asks Cowork to look across previous sessions and tell you what you have built together, then pick its favorite session.
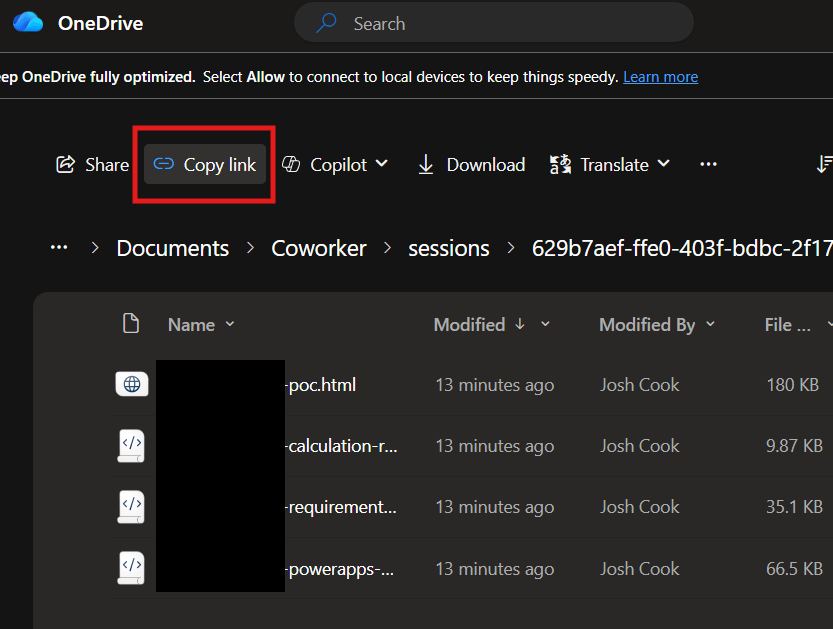
Your Cowork sessions are stored in:
Documents > Coworker > sessions
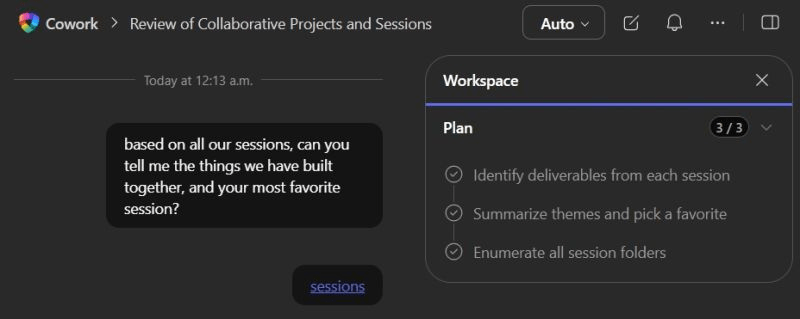
The prompt
based on all our sessions, can you tell me the things we have builttogether, and your most favorite session?
What Cowork should do
- Enumerate previous session folders.
- Identify deliverables created in each session.
- Summarize patterns across the work.
- Pick a favorite session and explain why.
This shows Cowork as more than a one-off task runner. It can review the body of work created across sessions and help you understand what has been built.
That becomes useful when you are building demos, content, project assets, templates, or repeatable internal workflows.
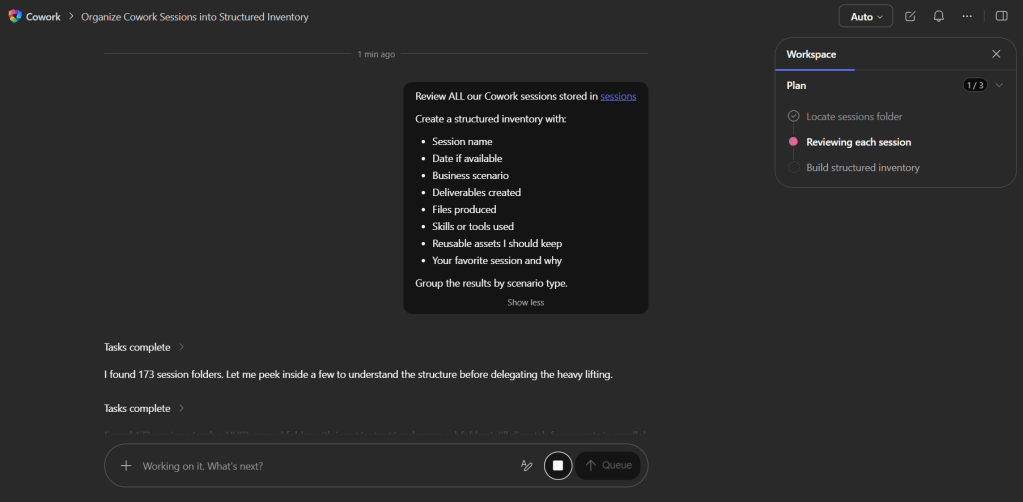
How I would tighten the prompt
I would ask for the output in a reusable inventory format.
Review all our Cowork sessions stored inDocuments > Coworker > sessions.Create a structured inventory with:- Session name- Date if available- Business scenario- Deliverables created- Files produced- Skills or tools used- Reusable assets I should keep- Your favorite session and whyGroup the results by scenario type.
The Prompt Design Pattern
After testing these scenarios, the pattern is obvious.
A strong Copilot Cowork prompt usually needs these parts:
1. Assign the role
Example
Act as my marketing operations lead.
This gives Cowork a working frame. A calendar assistant, marketing operations lead, project coordinator, meeting analyst, or time-entry assistant will make different choices.
2. Define the business goal
Example
I’m working on turning messy customer product feedback into a clearaction plan for product, marketing, and leadership teams.
The goal keeps Cowork focused on the outcome instead of wandering through the source material.
3. Name the source of truth
Example
Use the attached files and project folder as the source of truth.
This matters because Cowork may have access to a lot of context. You need to tell it what evidence matters.
4. Add rules and guardrails
Example
Do not invent evidence.Call out assumptions clearly.Flag anything that needs human review.
Guardrails keep the work usable. They also make the output safer to review, edit, and share.
5. Specify the finished output
Example
Produce:- A polished executive feedback brief- A stakeholder-ready presentation deck- A customer follow-up email pack- A Teams update for the launch squad- A leadership decision tracker with priorities, owners, and dates
Do not make Cowork guess what “done” means. Define the deliverables.
6. Keep human review in the loop
Example
Make the outputs ready for me to review, edit, and share.
This is the right operating model. Cowork can create the draft, organize the work, and prepare the package. You still make the judgment call.
Final Thought
Copilot Cowork gets interesting when you stop treating it like a chat box and start treating it like a worker with an assignment.
The best prompts are direct. They give Cowork the goal, the evidence, the rules, and the expected output.
That is how you move from “write me a summary” to:
- Clean up my calendar.
- Protect my focus time.
- Draft my time entries.
- Summarize the meeting and follow up.
- Turn customer feedback into an action plan.
- Move the file where it belongs.
- Review the work we have already built.
Small tasks. Big tasks. Same lesson.
Give the agent clear work. Keep the guardrails tight. Review the output like a professional.
That is where Copilot Cowork starts to feel like real capacity.


