Building Power Virtual Agents (PVA) in Microsoft Teams is fast, easy, fun, and powerful, especially when we add Power Automate to the mix. A couple questions come up:
1. After the bot is build, how do we edit the Flows? Do we have to go into the PVA bot inside of Microsoft Teams?
2. Where are the Flows stored?
The Answer
The answer to the above questions, can be simplified into one response.
All Flows built inside the Teams environment for PVA chatbots are stored in the Teams environment under the Default Solution. Now.. How do we get there?
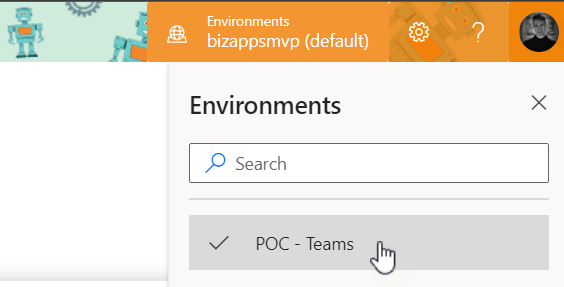
Sign in, and select the environments menu in the top right and choose the Environment that correlates to your Teams name where you built the Bot. My Microsoft Team name is ‘POC – Teams‘
Next navigate to the Solutions tab on the left, and select ‘Default Solution‘
Once inside the ‘Default Solution‘ we can see many different types of artifacts. To narrow this list down: On the top right of the page there is a dropdown with different types. Select ‘Flow‘
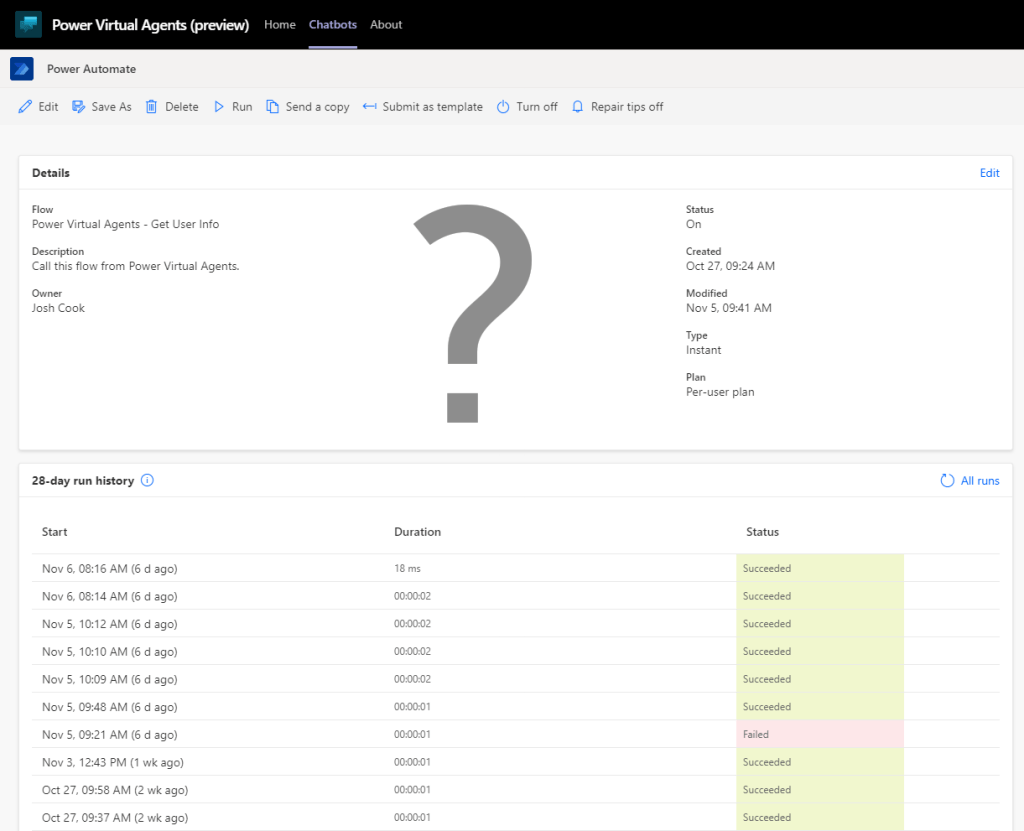
That’s it. Now we can see all the Flows inside this Teams Environment.
Want to learn how to get user info from Office365 to use in Power Virtual Agents? Check out my blog on the flow you see above Get User Info
Limitations
There are some limitations: – There is no way to import a Flow into this Environment
– When using the Save As feature, the Flow is saved outside of the Solution, thus cannot be used for your PVA Bot in Teams
– When modifying the Flows Inputs and Outputs you will have to remove the Flow action inside of PVA to properly refresh.
Conclusion
If you need help with anything Power Platform related, check out the community sites:
Deploying Power Automate Flows can be a headache if you have to manually change values inside the Flow for each environment. You also run the risk of missing a value.
This post will go in depth on using Environment variables inside solutions to allow certain values to be used in different environments. I will be using Two(2) environments for this demo: Dev, and Test
This demo will utilize the data type ‘JSON’, this will save loads of time.
Terms / Glossary
Here are some familiar terms that will help in this post: Default Value = The value that you’re expecting after you deploy the Flow. This will be our Test environment values
Current Value = The value that overrides the Default Value. This will be our Dev environment values
Parameters = These are just values. For example 2 + 2. Each 2 is a parameter of the addition expression (+)
** Note: I Have created this guide to be as simple as possible, If you name everything as I do, you will be able to copy and paste all my expressions directly into your Flow **
The Scenario
My Flow posts a message into Microsoft Teams group. When deploying the Flow into different environments, I want to change the Teams content like:
Team Name
Channel ID
Subject
Usually after deploying, we can go in to the Flow and manually change the values. This can cause errors, especially if we forget to change some values after deploying (I may have done this a few times).
Getting Parameter Values
It is important to note that not all Action values can be parameterized. Follow the steps below to see if the values can be parameterized:
Teams Example: My Teams action, I want to parameterize the Team Name, Channel ID, and Subject. For this I add the Action, and select the values as needed.
Now with the information filled in, click the 3 dots ‘. . .’ on the action, and click ‘Peek Code’.
Dev Parameters
In the ‘Peek code’ view, we can see the different parameters and the values that this action uses in the background. Copy these values into notepad or code editor for use later. I have created a simple JSON to be placed in my Environment Variable later on.
I will be using the Env value for my Subject in the teams message
For example: Team = 1861402b-5d49-4850-a54b-5eda568e7e8b Channel = 19:be3759762df64d94a509938aa9962b29@thread.tacv2 Subject = Message From Dev Environment
To test that we can use custom values as parameters, we want to grab these values from above and insert them into the ‘Teams Post a message’ action as custom value, than run the Flow
Mine looks like this now:
Now run the Flow to make sure everything works as expected using the Custom values
Now that we know Custom values work for the inputs/parameters for the action. We now want to get the values for the other environment. Remove the custom values from the inputs and choose the correct value that we want to point to when this Flow is deployed to another environment. For example:
Again we do a ‘Peek code’ to get the parameter IDs that this action uses
Test Parameters
Copy these values into notepad or a code editor for use later. Now we have two sets of values, one for Dev, and one for Test. I have created a simple JSON to be placed in my Environment Variable later on.
I will be using the Env value for my Subject in the teams message
Make sure the Two(2) JSONs have the same structure. We will be using the data to populate the Environment Variables in the following steps
Creating Environment Variables
Environment variables can only be created inside a solution, there are multiple ways you or your organization may want this set up.
In this demo I have created a Publisher in CDS called ‘param’, this will better define the parameters that we create inside the solution. (this is optional) The default CDS publisher could also be used.
Create a solution inside Power Automate. Click Solutions on the left navigation menu, Than click ‘New Solution’ on the top on menu, and fill the information out
Once the solution is created, Click ‘New’ > Environment variable
Now fill in the information like the screenshot below.
Note, I will be using the Data Type as JSON. I use this for simplicity, as I have more than one value I want to add. Also we can use the Parse JSON action in Flow to reference each value separately. You can use any Data Type you like
Now we populate the values we want to use per environment, the way we do this is fill in the Default Value, and the Current Value.
Default Value = The values we want for the other environment, in this case Test Current Value = The values we want to use for this environment, in this case Dev
Once the values are pasted in click ‘Save’
Creating The Flow
I will be creating the Flow inside the solution that the Environment Variable is in from above. Inside the solution click ‘New’ > Flow
For the demo I will use a Manual trigger, than add Two(2) ‘Initialize Variable’ actions
Initialize variable – Schema Name Name: schemaName Type: String Value: Put the Name of the environment variable in the value (This can be found on the main screen of the solution under Name column)
Initialize variable – Parameters Name: parameters Type: String Value: Leave blank for now, this variable will store either the Default Value or Current Value, based on which environment we are in
Next add a ‘Scope’ action to hold all the actions that will get the parameters
I renamed my ‘Scope’ to Load Parameters.
NOTE: You can copy and paste my filter query as long as you kept the same name as I did. When you see the @ in Power Automate, this allows you to call expressions without having to go into the expression tab. If you want to build the expression yourself, I will include the syntax under each picture of the List Records actions and on
Inside the Scope, add Two(2) ‘Common Data Service Current Environment – List Records’ actions.
1) List records – Parameter Definitions Entity name: Environment Variable Definitions Filter Query: schemaname eq ‘@{variables(‘schemaName’)}’
schemaname eq ‘YOUR ENVIRONMENT VARIABLE NAME’
2) List records – Parameter Current Values Entity name: Environment Variable Values Filter Query: environmentvariabledefinitionid_value eq ‘@{first(outputs(‘List_records-_Parameter_Definitions’)?[‘body/value’])?[‘environmentvariabledefinitionid’]}’
Under the ‘If condition‘ add a ‘Parse JSON‘ Name: Parse JSON – Parameters Content: @{variables(‘parameters’)} Schema: To generate your schema, Click the ‘Generate from sample’ button, than paste in the JSON that you used for Default Value
We are done with the parameter scope now..
Using The Parameters
I will be adding a Teams Action ‘Post a message‘ I will use the dynamic content from my ‘Parse JSON‘ action.
Triggering the Flow, I expect the Dev values to be used (Current Value)
Here is the Teams message:
Next we will export and import into a different Environment which will use different parameters (Default Value)
Export And Import – Deployment
Overview of this sections steps: 1. Remove Current Value from Environment variable 2. Publish Solution 3. Export Solution 4. Import Solution 5. Authorize any Connections 6. Enable Flow 7. Trigger / Test
Remove Current Value from Environment variable
Inside the Solution click on the Environment variable, under Current Value click the 3 dots ( . . . ) Select Remove from this solution
This will only remove the values from this solution. The Current Values will still be in CDS and can also be added back into this solution if needed by clicking Add existing under Current Value
Publish Solution
Inside your solution, click ‘Publish all customization’
Export Solution
Once published click ‘Export’
Export as ‘Managed’ or ‘Unmanaged’ Choose either or based on your needs.
Import Solution
Switch to your other Environment, and click Solutions tab. Click ‘Import’
Choose your Zip file from your Export, and follow instructions by clicking ‘Next’
Authorize any Connections
Once the solution is imported successfully, you may need to authorize any connections inside the Flow. This can be done by clicking on the Flow from inside your solution, and clicking ‘Sign in’ on all actions > Click ‘Save’
Enable Flow
Now enable / turn on the Flow
Trigger / Test
Trigger the Flow to confirm the values are coming over as correct (Default Value).
Test Env – Using Default Value as expected
Now in Teams our message has been posted in a different team chat, different channel, and with the ‘Test’ text in the subject line