Tag: llm

  • Copilot Cowork Dataverse Plugin Setup

    Copilot Cowork Dataverse Plugin Setup

    I finally got Dataverse MCP working inside Copilot Cowork as a custom plugin.

    This guide walks through the setup in a way I wish I had when I started.

    The goal is simple:

    • Register an app in Entra
    • Enable Dataverse MCP for your Power Platform environment
    • Create the OAuth registration in Teams Developer Portal
    • Build a Copilot Cowork plugin that points to your Dataverse MCP endpoint
    • Deploy it
    • Give Cowork enough schema context to understand your Dataverse tables

    If you are a low-code builder, the confusing part is not Dataverse.

    The confusing part is the setup across multiple portals.

    You will touch Entra, Power Platform admin center, Teams Developer Portal, the plugin manifest, and Copilot Cowork.

    That sounds worse than it is. You just need to know which value goes where.

    I have a video going over the same steps as the blog:

    1. What we are building
    2. Before you start
    3. The setup order
    4. Step 1: Create the App Registration
      1. Add the Dataverse MCP permission
      2. Add the redirect URI
    5. Step 2: Configure the Power Platform environment
      1. Add the allowed MCP client
      2. Capture the Dataverse URL
    6. Step 3: Create the OAuth registration in Teams Developer Portal
      1. Base URL
      2. Authorization endpoint
      3. Token endpoint
      4. Scope
      5. Client ID and secret
    7. Step 4: Build the plugin
      1. Import Plugin Builder skill
      2. Build Dataverse Plugin with Template
    8. Step 5: Deploy the plugin
      1. Connect Plugin
    9. Step 6: Create a schema-aware skill
    10. Step 7: Test with a real scenario
    11. Example prompts:
      1. List records
      2. Add records
      3. Details on a record
      4. Build Dashboard
      5. Create report
      6. Send Email with context
      7. Create PPT with context + Brand
    12. Common mistakes
      1. Mistake 1: Mixing up the IDs
      2. Mistake 2: Wrong MCP URL
      3. Mistake 3: Wrong OAuth scope
      4. Mistake 4: Testing with a user that cannot access the data
      5. Mistake 5: Re-uploading the same version
    13. Download the checklist
    14. Official docs
    15. Final take

    What we are building

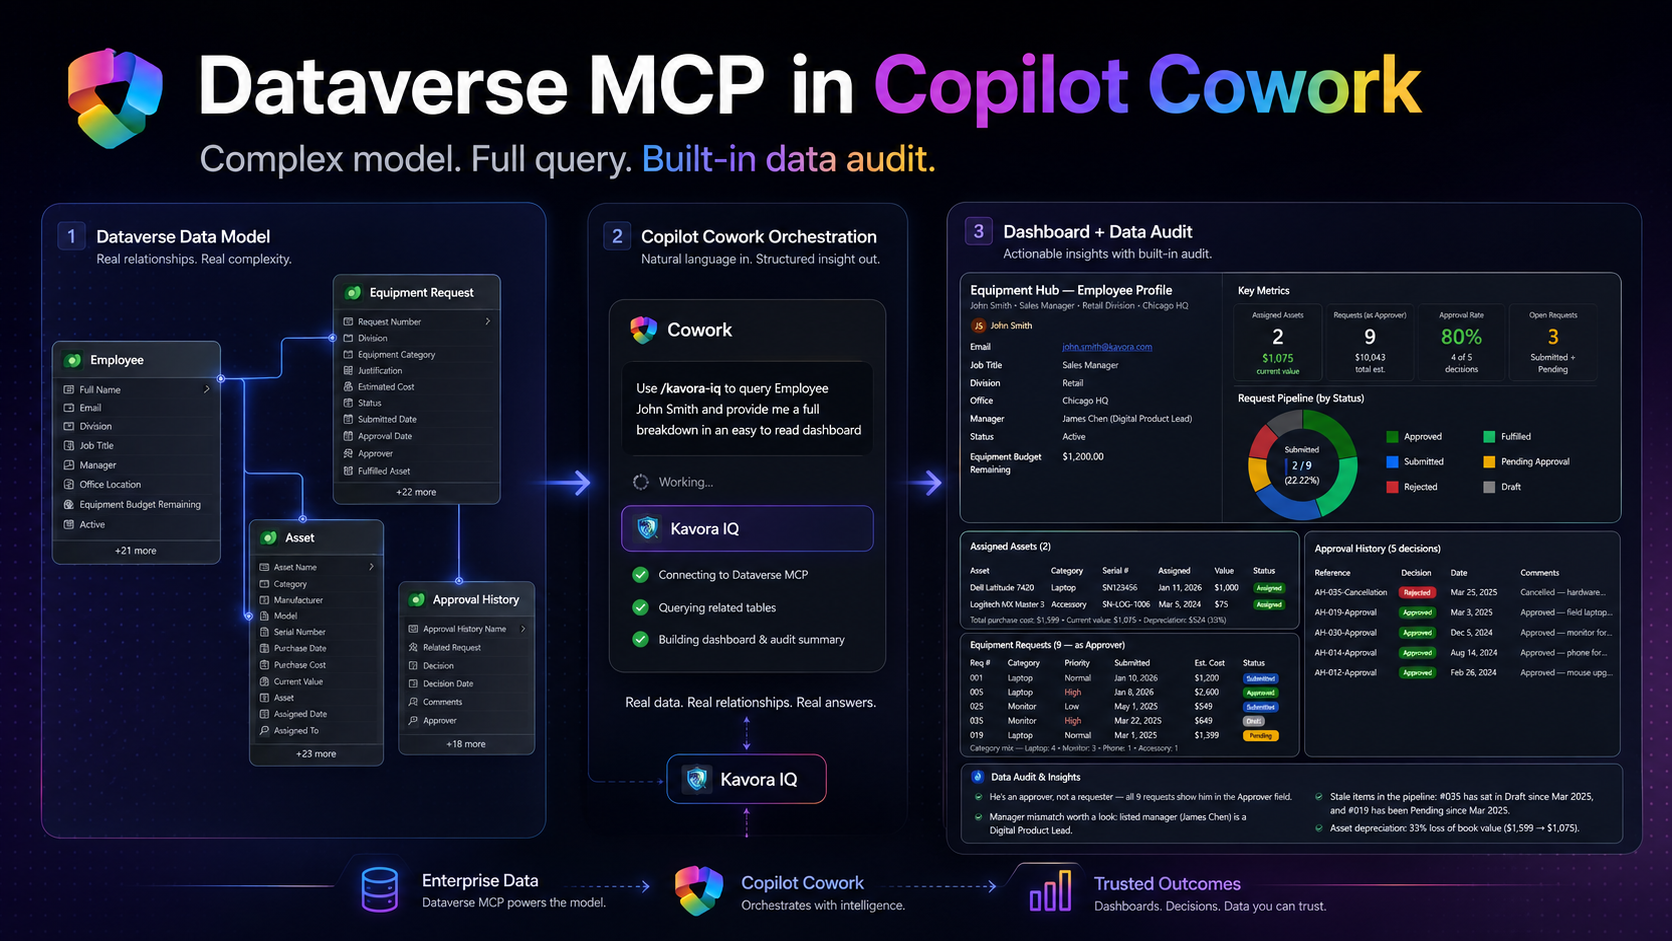
    We are building a Copilot Cowork plugin that connects to the Dataverse MCP endpoint.

    Once installed, Cowork can use that plugin to query Dataverse through MCP.

    The basic flow looks like this:

    1. User asks Copilot Cowork a question
    2. Cowork uses the custom plugin
    3. The plugin points to the Dataverse MCP endpoint
    4. Dataverse returns the data
    5. Cowork uses schema guidance to make sense of the tables
    6. Cowork returns a useful answer, summary, dashboard, or audit notes

    I recommend keeping this setup in two parts:

    • The plugin: gives Cowork access to the Dataverse MCP connector
    • The schema skill: tells Cowork which Dataverse tables, columns, relationships, and rules matter

    That split makes the setup easier to maintain.

    If your schema changes, you can update the schema skill without rebuilding and redeploying the entire plugin package.

    Before you start

    You will need:

    I created a checklist for this because the setup has a few values that are easy to mix up.

    The setup order

    This is the order I recommend:

    1. Create the App Registration
    2. Configure the Power Platform environment
    3. Create the OAuth registration in Developer Portal
    4. Build the plugin
    5. Deploy the plugin
    6. Create the schema skill
    7. Test everything in Copilot Cowork

    Do not start with the plugin manifest.

    Get the identity, environment, and OAuth pieces ready first. The manifest is much easier once you already have the right values.

    Step 1: Create the App Registration

    Start in Microsoft Entra.
    https://entra.microsoft.com/

    Create an app registration that will be used for the Dataverse MCP connection.

    Capture these values:

    • Tenant ID
    • Application / Client ID
    • Client secret
    • Secret expiry date

    You will use the Client ID more than once, so copy it somewhere safe.

    Add the Dataverse MCP permission

    In the app registration, add the required API permission for Dataverse MCP.

    1. Open the app registration
    2. Go to API permissions
    3. Select Add a permission
    4. Select Microsoft APIs
    5. Select Dynamics CRM
    6. Add the permission:
    mcp.tools

    Grant admin consent if your tenant requires it.

    Add the redirect URI

    1. For the OAuth flow, add this redirect URI if your setup requires it:
    https://teams.microsoft.com/api/platform/v1.0/oAuthRedirect

    Important: the Application / Client ID is not the same as the OAuth registration ID you will create later.

    Keep those two values separate.

    Step 2: Configure the Power Platform environment

    Next, configure the Power Platform environment that contains your Dataverse data.

    You need the Dataverse environment to allow MCP clients.

    Open Power Platform admin center and go to the target environment.

    1. Open Power Platform admin center
    2. Go to Manage
    3. Select Environments
    4. Open your target environment
    5. Open Settings
    6. Go to Product
    7. Open Features
    8. Find the Dataverse MCP setting
    9. Allow MCP clients to interact with Dataverse MCP server
    10. Only check the GA version of the MCP server > Click Save

    The exact wording may change because this area is still moving, but the goal is the same: allow MCP clients for that environment

    Add the allowed MCP client

    Now add your Entra Application / Client ID as an allowed MCP client for the environment.

    1. Click “Go to Advanced Settings” link under Step 2
    2. Click +New > fill in the details like this:
      – Name: Cowork Dataverse MCP – <env name>
      – Unique Name: new_CoworkDataverseMCP<envName>
      – Application Id: Paste your application Id from the App Registration you created in section 1
      – Is Enabled: Yes
    3. Click Save & Close

    That part matters.

    The value you add here is the Entra Application / Client ID.

    Also make sure the allowed MCP client is enabled.

    If this step is wrong, the plugin can look fine but still fail when Cowork tries to use Dataverse.

    Before leaving the admin center, grab the Environment URL.

    Capture the Dataverse URL

    You need your Dataverse Org URL

    It looks like this:

    https://yourorg.crm.dynamics.com

    The MCP server URL is the same URL with /api/mcp added to the end.

    https://yourorg.crm.dynamics.com/api/mcp

    Step 3: Create the OAuth registration in Teams Developer Portal

    Now open Teams Developer Portal.
    ( https://dev.teams.microsoft.com/ )

    Create an OAuth client registration for the plugin.

    This registration stores the OAuth configuration and gives you the OAuth registration ID that your plugin manifest will reference.

    In the OAuth registration, you will enter values from the Entra app and your Dataverse environment.

    1. Click Tools > OAuth client registration
    2. + New OAuth client registration

    Base URL

    Use your Power Platform Environment URL

    https://<yourorg>.crm.dynamics.com

    Restrict usage by Teams app: select Any Teams app (for now, since we don’t have a Teams app ID yet)

    Authorization endpoint

    Use your Tenant ID in this format:

    https://login.microsoftonline.com/{tenantId}/oauth2/v2.0/authorize

    Token endpoint

    Use your Tenant ID in this format:

    https://login.microsoftonline.com/{tenantId}/oauth2/v2.0/token

    Scope

    The scope should use your Dataverse Org URL.

    Use this format:

    https://yourorg.crm.dynamics.com/.default offline_access

    Example:

    https://kavoracrm.crm.dynamics.com/.default offline_access

    Client ID and secret

    Use the Client ID and secret from the Entra app registration you created earlier.

    After saving the OAuth registration, copy the OAuth registration ID.

    You will use that value in the plugin manifest as the connector referenceId.

    Important: the OAuth registration ID goes into the plugin manifest.

    Step 4: Build the plugin

    For this approach, the plugin should stay focused on the Dataverse MCP connector.

    To make this even easier, I created a Cowork-Plugin skill to assist in building the Plugin with a template.

    Import Plugin Builder skill

    1. Download my /cowork-plugin-builder skill
    2. In Copilot Cowork > attach the skill and prompt: Add this skill
    3. After import refresh your browser

    Build Dataverse Plugin with Template

    We will use the skill you just imported to help build the plugin.

    1. Inside Copilot Cowork craft a prompt and add the cowork-plugin-builder skill
    2. Add these details or Copilot Cowork will ask you for these values
      (NOTE: If your using the Checklist app I created to track progress, click the Copy setup summary. Paste this into the prompt as well)

    Prompt to use:

    /cowork-plugin-builder to build a Dataverse plugin using this template:‌
    Organization name:
    Connector display name:
    description:
    Tenant ID:
    Client ID:
    Org URL:
    MCP URL:
    OAuth registration ID:
    OAuth scope:
    Connector referenceId:

    Fill in everything you can.

    I created a Dataverse-style icon with a Cowork badge so the plugin is easy to recognize when it appears in Cowork.
    (Included in the template)

    When Copilot Cowork is done, you should receive a zip file.

    Download the zip file.

    Step 5: Deploy the plugin

    After the package is ready, deploy it to a test user or test group first.

    1. M365 Admin Center > Agents > All agents > Upload custom app > pick dataverse-<pluginname>.zip
    2. Publish to users: add yourself first
    3. Install (optional): add yourself so it auto-appears
    4. Accept permissions > Review & finish
    • Apply Template (default should be fine)
    • Review Permissions (should be none, since permissions are done through the App registration)
    • Publish

    Keep the first deployment small.

    Connect Plugin

    1. Open a fresh Copilot Cowork session
    2. Click + > Manage Plugins
    3. Click … Browse Plugins
    4. Find the Plugin > Click Add
    5. Scroll down and click Connect

    Start with a simple prompt like this:

    Use the <Plugin name> to confirm you can access the Dataverse MCP server.

    Important: when you change the plugin package, update the version before uploading again.

    Also start a fresh Cowork session after deployment changes.

    Otherwise, you can end up testing against a stale session and thinking the plugin is broken.

    Step 6: Create a schema-aware skill

    This is the step that makes the plugin more useful.

    The plugin gives Cowork access to Dataverse.

    The schema skill helps Cowork understand what to do with that access.

    In the schema skill, give Cowork the details it needs to query your model properly.

    • Table logical names
    • Table purpose
    • Primary columns
    • Lookup columns
    • Relationships between tables
    • Status fields
    • Rules for what matters
    • Data-quality checks
    • Example prompts

    We can use this skill to create a personal skill to query certain tables, etc.

    In the example, I ask Copilot Cowork what tables are used in a certain Model-Driven App.
    Prompt:

    What tables are apart of Kavora Equipment Hub
    /dataverse-schema-

    Copilot Cowork responds with a tables and logical names.
    Next I ask for all the logical columns for those tables.
    (NOTE: This will help Copilot Cowork query your data quicker)

    My follow-up prompt:

    Yes pull all logical columns.
    I want to build a skill around these tables and data.
    Name the Skill Kavora Equipment IQ

    Then Copilot Cowork drafted the skill for me.
    I reviewed it and said “Looks good”

    Copilot Cowork built the skill

    Step 7: Test with a real scenario

    Now run an actual test.

    Do not only ask Cowork to connect.

    Ask it to use the Dataverse model.

    A good test should include:

    • One known record
    • At least one related table
    • At least one lookup relationship
    • Some output Cowork needs to organize
    • A data-quality check or business rule

    Example prompts:

    List records

    use /<skill you just built>
    List all the <table>

    Add records

    use /<skill you just built>
    can you add 3 more <assets>
    1. Blue Yeti mic, Regional Office, value (you look this up in USD)‌
    2. Red dragon Keyboard (RGB), lookup value, put in the HQ
    3. Surface Arc Mouse, lookup price, put in HQ

    Details on a record

    use /<skill you just built>
    list all the <table> who <condition>

    Build Dashboard

    use /<skill you just built>
    give me a full dashboard of <record>.
    Surface all details relating to <record>

    Create report

    use /<skill you just built>
    now create a report with each <Employee>
    on what they have left VS what they have used for budget

    Send Email with context

    use /<skill you just built>
    Email <James chen> asking about the <assets>

    Create PPT with context + Brand

    (NOTE: the branding is a separate skill not included in the plugin)

    use /<skill you just built>
    Now put this information inside a PPT
    using </branding-skill> for Kavora branding.
    This PPT is for Kavora Executives.
    Make it look polished with graphs and charts and pop.

    This is where the setup starts paying off.

    Cowork can query the data, follow relationships, and return a useful answer instead of forcing you to manually pull everything together.

    Common mistakes

    Mistake 1: Mixing up the IDs

    There are two important IDs:

    • Entra Application / Client ID: used in Power Platform as the allowed MCP client
    • OAuth Registration ID: used in the plugin manifest as the referenceId

    If you paste the wrong one in the wrong place, the setup will fail.

    Mistake 2: Wrong MCP URL

    The MCP URL should look like this:

    https://yourorg.crm.dynamics.com/api/mcp

    Watch for missing /api/mcp.

    Mistake 3: Wrong OAuth scope

    The scope should use your Dataverse Org URL:

    https://yourorg.crm.dynamics.com/.default offline_access

    Mistake 4: Testing with a user that cannot access the data

    Make sure the user testing the plugin has access to the Dataverse tables you are querying.

    Mistake 5: Re-uploading the same version

    If you change the package, update the version number before uploading again.

    Download the checklist

    I built a simple HTML checklist for this setup.

    It lets you track the values, check off steps, auto-fill the scope from your Dataverse URL, and generate the connector snippet.

    Download the Dataverse MCP Connector for Copilot Cowork setup checklist

    Official docs

    Final take

    NOTE: When you have tested and validated you can connect to Dataverse. You will want to add the Teams App ID from the Agent Plugin we deployed and add it to the Teams Developer OAuth Registration.

    1. Go to Teams Admin center > Teams apps > Manage apps
    2. Find your Plugin you deployed > Copy the App ID
    3. Go back to Teams Developer Portal and open the OAuth registration tool that was created
    4. Paste the App ID into the “Restrict usage by Teams app” field as an Existing Teams app

    This setup is still early, and there are rough edges.

    But once it works, the direction is obvious.

    Dataverse already has the business model.

    Copilot Cowork gives users a work surface.

    The MCP connector connects the two.

    Add a schema-aware skill, and Cowork can start working through real Dataverse data in a way that feels practical for actual business scenarios.

    That is the part worth paying attention to.

    Let me know what other Plugins you want to see in Copilot Cowork.

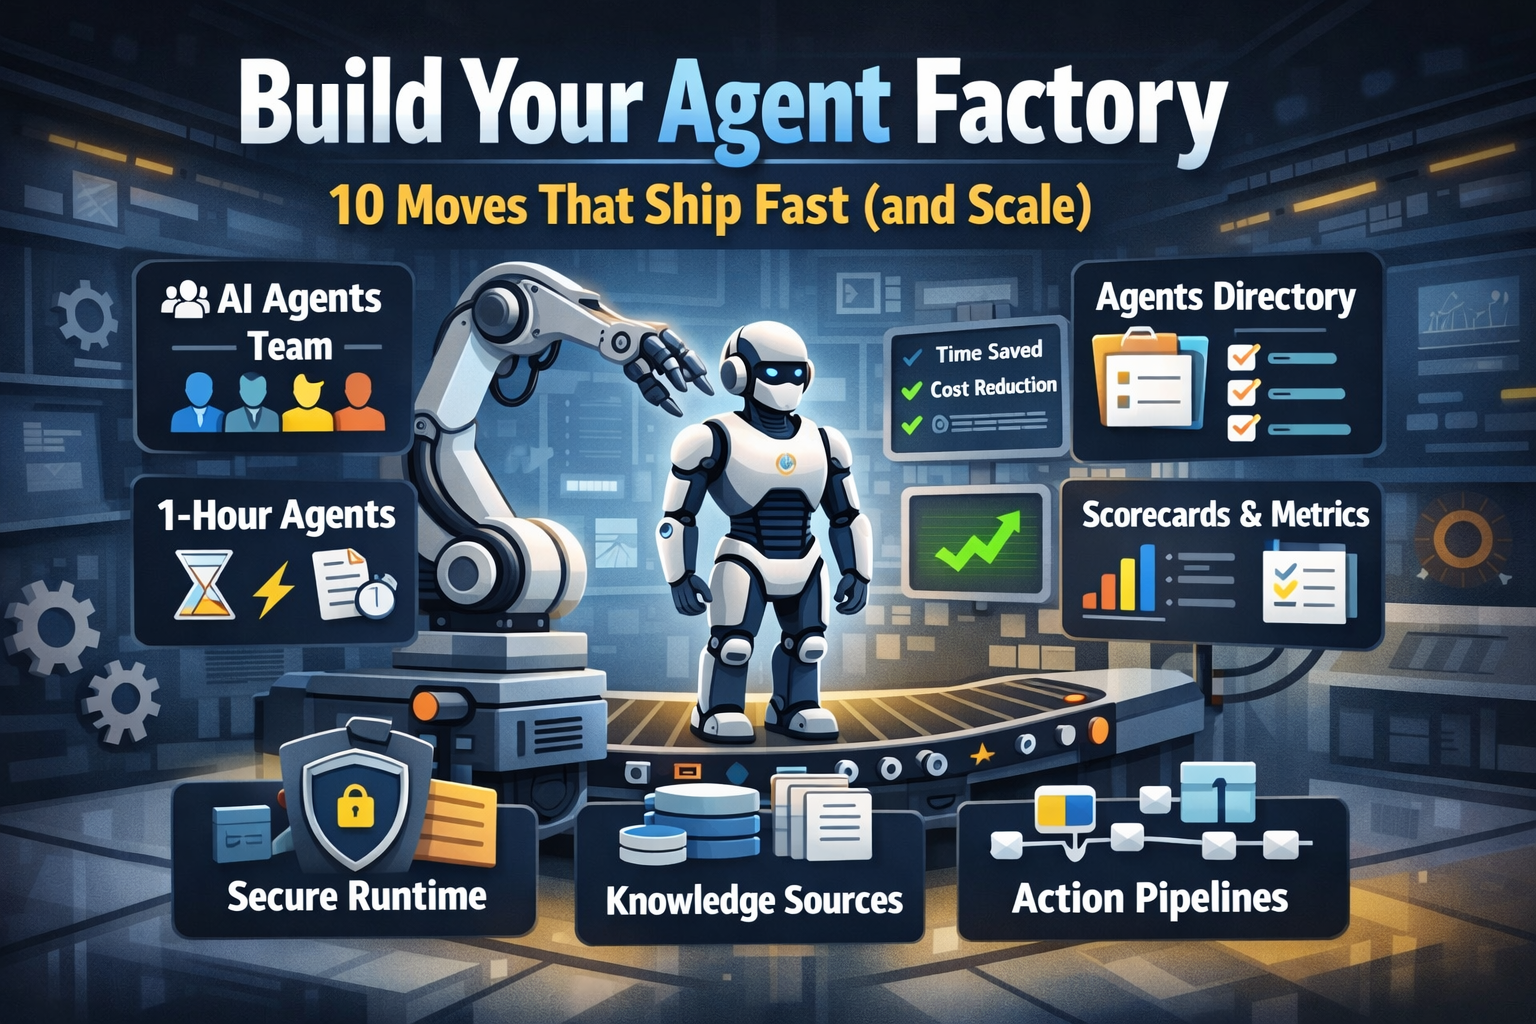
  • Build Your Agent Factory: 10 Moves That Ship Fast (and Scale)

    Build Your Agent Factory: 10 Moves That Ship Fast (and Scale)

    Build Your Agent Factory: 10 Moves That Ship Fast (and Scale)

    Agents at scale. Not POCs.

    Here’s the playbook I’d hand any exec or builder who wants working agents in production—without turning the org into a science fair.

    1) Stand up an AI Agents Workforce

    What it is: A small cross-functional crew with authority to hunt repetitive work and ship agents.

    Who’s in:

    • 1 product owner
    • 1 engineer (Copilot Studio/Power Automate)
    • 1 data person
    • 1 security/governance lead
    • 1 domain SME.

    Ship this week: Write a one-page charter with scope, decision rights, and a 30-day roadmap (first 5 agents + metrics).

    2) Win with horizontals first, then go vertical

    Horizontals (1-hour wins): drafting, summarizing, policy Q&A, meeting notes to actions, form-fill helpers.

    Verticals (outsized ROI): pick 1–2 per business unit where there’s money, risk, or SLA pain.

    Guardrail: don’t start with the hardest workflow; start where you can close the loop and measure value inside two weeks.

    3) Make an Agents Directory the front door

    Why: Ideas die in email. A directory turns “we should build X” into spec and governance.

    Minimum intake fields:

    • use case name
    • goal
    • users
    • decision rights
    • data sources + who owns it
    • tools
    • PII/sensitivity
    • KPIs
    • business owner
    • risk level
    • rollout plan.

    Outcome: Every request auto-generates a lightweight PRD (goal, inputs, outputs, metrics, guardrails) and a yes/no gate.

    4) Create the 1-Hour Agent template

    Template anatomy:

    Goal + success criteria Input schema (what the user provides) Tools (actions/connectors) and permissions Knowledge sources (files, sites, indexes) Safety rules (allowed/blocked actions, escalation) Evaluation set (10–20 test prompts with expected outcomes) Deploy script (Dev → Test → Prod)

    Rule: If a use case can’t fit this page, it’s not a 1-hour agent—park it for later.

    5) Tie every agent to a visible scorecard

    Metrics to publish: time saved, cost avoided, error rate, CO₂/efficiency (where relevant), user satisfaction.

    Simple formula: monthly users × average minutes saved × loaded cost = value.

    Make it public internally: green/red status, owner, last review, next improvement.

    6) Run on a secure, managed agent runtime

    Non-negotiables: identity passthrough, content safety, audit logs, tool call restrictions, data boundary controls, environment isolation.

    Practical tip: standardize a “sensitive sources” policy and block tools by default; allow case-by-case.

    7) Split the stack to move fast without breaking things

    Experience layer: Copilot Studio for UX, channels, and connectors.

    Agent runtime/orchestration: managed agent service for threads, tool calls, safety, and evaluations.

    Why it works: builders ship quickly at the edge; platform team keeps shared guardrails, monitoring, and upgrades stable.

    8) Mix knowledge + action (or you’ll stall)

    Knowledge: structured grounding (SharePoint/Fabric/Search), doc versioning, citations-on by default.

    Action: flows/Logic Apps, Graph, line-of-business APIs; always ship with a dry-run mode first.

    Design pattern: Answer → show sources → propose actions → execute on approval. When confidence is high and stakes are low, allow auto-execute.

    9) Keep humans in the loop—by design

    HITL patterns that work:

    Shadow mode (observe only) → suggest mode → execute with approval → auto-execute.

    Confidence thresholds where low confidence routes to a human. Escalation logic when guardrails trip or data is missing.

    UX rule: one click to approve, one click to undo.

    10) Plan to scale on day one

    Pipelines: Dev → Test → Prod with approvals and rollback.

    Evals: pre-ship test set per agent; weekly drift checks; quarterly red-team.

    Ops: central logging, cost dashboards, incident playbook.

    Program ritual: a quarterly “Agent Backlog Day” to harvest new ideas and retire underperformers.

    Starter Architecture (fast and boring)

    Experience: Copilot Studio (web, Teams, M365, chat, plugins)

    Actions: Power Automate/Logic Apps + custom APIs

    Knowledge: SharePoint/Fabric/AI Search with retrieval policies

    Runtime: managed agent service for tool orchestration, identity, safety

    Observability: evaluations, telemetry, and a simple agent scorecard per app

    Security: Entra ID RBAC, private endpoints, DLP, approval gates

    Prompts and policies that save you pain

    Prompt contract (keep it in the repo): role, goals, inputs, allowed tools, forbidden actions, decision rights, escalation, output format, citation rules.

    Data contract: what sources are permitted, freshness expectations, sensitivity tags.

    Failure modes: what the agent must do when unsure (ask for clarification, route to human, or stop).

    Anti-patterns I keep seeing

    • Starting with an “AI strategy deck” instead of shipping 3 agents.
    • Agents that answer but can’t act—users stop coming back.
    • No owner, no scorecard, no sunset date.
    • Canary-testing in production without a rollback plan.
    • Letting one giant use case block 20 small wins.

    Your first week mapped

    Day 1: Form the team and publish the charter.

    Day 2: Launch the Agents Directory (intake + PRD autogeneration).

    Day 3–4: Build two 1-hour agents (drafting + policy Q&A) with eval sets.

    Day 5: Ship to a pilot group with scorecards visible. Book the first backlog day.


  • Maximize Efficiency with GPT-5 Router-Optimized Prompts

    Maximize Efficiency with GPT-5 Router-Optimized Prompts

    This prompt pack is around general use, if you would like a more focused pack focused on a specific industry or scenario, comment below.

    Below you will find the prompt pack in 3 formats

    Word doc download:

    Markdown download (word press wont let me upload markdown file so I have uploaded to my GitHub for download: FlowAltDelete/GPT-5-Router-Optimized-Universal-Prompt-Pack

    If you don’t want to download, I have also put the prompt pack below

    GPT‑5 Router‑Optimized Universal Prompt Pack (v1.1)

    What this is: A field‑tested, router‑aware prompt pack tuned for GPT‑5.
    How to use: Paste the Router Boost Header 2.0 above any task below, then use the upgraded prompt. Each item includes a fast audit (strengths, gaps, tuning) so you know why it works.


    Router Boost Header 2.0 (paste above any prompt)

    Task: [one sentence describing “done”].
    Context/Grounding: [paste facts/links/notes]. Cite sources if summarizing; don’t invent.
    Constraints: audience=[…], tone=[…], length=[…], locality=[region/laws], non‑negotiables=[…].
    Output Contract: [exact format/schema; if JSON, include a schema].
    Tool Grants: You may use internal reasoning, code execution, and structured output. Do not expose chain‑of‑thought; return only the final results.
    Mode: Choose fast for simple tasks, deep for complex ones; state the choice on one line before the output.
    Self‑Check: Validate constraints, factuality (vs. sources), and format before returning. If JSON, ensure it parses.
    Failure Policy: If blocked or context is thin, list missing info and ask 3 sharp questions; otherwise proceed with explicit assumptions labeled “Assumptions.”

    Tip: Keep the header short in production—only include fields that matter. If you need determinism, ask for “low‑randomness; no lateral riffs.”


    Universal GPT‑5 Prompt Pack v1.1**

    Below: for each prompt

    • Use when: best fit.
    • Strengths: what’s good already.
    • Gaps: what to tighten for GPT‑5.
    • Router tuning: small switches that improve results.
    • Upgraded prompt: copy/paste ready.
    • (Optional) Strict JSON variant: when you need machine‑readable output.

    1) Executive Summary (Any Topic)

    Use when: You need crisp, executive‑level clarity in 30–90 seconds.
    Strengths: Forces prioritization; covers timing and action.
    Gaps: Can drift into fluff; doesn’t enforce one‑line bullets; missing “evidence”.
    Router tuning: Demand one‑line bullets with bold labels; add “evidence” blip; enforce count.

    Upgraded prompt

    Create exactly **5 one‑line bullets** summarizing [topic/brief].
    Each bullet starts with a bold label: **What matters**, **Why now**, **Risks**, **Decision**, **Next actions**.
    Add ≤12 words per bullet. Include 1 source or metric if available.
    Mode: [fast/deep]. Return as a simple bullet list—no preamble.
    

    Strict JSON variant

    Return valid JSON:
    { "what_matters": "...", "why_now": "...", "risks": "...", "decision": "...", "next_actions": "..." }
    

    2) Research Plan (Adversarial)

    Use when: You must test a claim/feature beyond happy‑path.
    Strengths: Calls for metrics, data, adversarial tests.
    Gaps: No threat model; no instrument plan; no stop/continue math.
    Router tuning: Introduce threat model + falsification criteria; add power checks.

    Upgraded prompt

    Design an **adversarial research plan** to evaluate [claim/feature]. Include:
    1) Objectives & hypotheses (null + alt); 2) Success metrics & thresholds; 3) Threat model (abuse, edge cases);
    4) Data to collect (fields, sample size/power);
    5) Protocols (A/B, holdout, offline evals);
    6) Adversarial tests & red‑team scripts;
    7) Stop/continue rule with math;
    8) Reporting template (tables/plots).
    Mode: [fast/deep]. Output as a numbered outline.
    

    3) Decision Memo

    Use when: A one‑pager to choose among options.
    Strengths: Options, costs, risks, reversibility, rec.
    Gaps: No owner/date format; no “evidence” box; weak contingency.
    Router tuning: Add RACI owner/date; add 30/60/90 follow‑ups.

    Upgraded prompt

    Write a one‑page decision memo for [choice]. Include:
    - Context (1 para) with constraints & evidence;
    - Options (3): summary, costs (one‑time/run), risks, reversibility;
    - Recommendation: **one** choice with rationale;
    - Owner + Decision date; 30/60/90‑day checkpoints;
    - Contingency triggers & rollback plan.
    Mode: [fast/deep]. Keep ≤400 words.
    

    4) Project Plan One‑Pager

    Use when: Turn messy notes into plan.
    Strengths: Scope, milestones, owners, risks, comms, RAID.
    Gaps: No critical path; RAID often hand‑wavy.
    Router tuning: Add dates & simple Gantt list; RAID as compact table.

    Upgraded prompt

    From these notes: [paste], produce a one‑page plan with:
    1) Scope (in/out);
    2) Milestones (name, owner, date) in order;
    3) Critical path (1‑3 bullets);
    4) Comms cadence (who, channel, freq);
    5) RAID summary table (Risk/Assumption/Issue/Dependency → owner, impact, mitigation);
    6) Acceptance criteria (bullet list).
    Mode: [fast/deep]. Keep it skimmable.
    

    5) Meeting → Decisions

    Use when: Converting raw notes to what matters.
    Strengths: Decisions & actions separation.
    Gaps: No owners on decisions; action status taxonomy missing.
    Router tuning: Add decision owner + rationale; status enum.

    Upgraded prompt

    Convert these notes: [paste] into:
    A) **Decisions** list (decision, owner, rationale, date);
    B) **Actions** table {owner, step, due, status ∈ [New, In‑Progress, Blocked, Done]}.
    Mode: [fast/deep]. No commentary, just the two sections.
    

    Strict JSON variant

    { "decisions": [ { "decision": "", "owner": "", "rationale": "", "date": "" } ],
      "actions": [ { "owner": "", "step": "", "due": "", "status": "New|In-Progress|Blocked|Done" } ] }
    

    6) Cold Email Trio

    Use when: 3‑touch outbound sequence.
    Strengths: Problem → proof → ask. Short.
    Gaps: ICP nuance; weak personalization; missing CTA micro‑asks.
    Router tuning: Insert first‑line personal hook; vary asks.

    Upgraded prompt

    Write **3 cold emails** for [offer] to [ICP].
    Email 1: name the **patterned pain**; end with a 10‑min micro‑ask.
    Email 2: social proof/insight (number/metric), 1 sentence case study.
    Email 3: crisp ask with 2 time options.
    Each ≤120 words, 5‑7 sentences, no fluff. Include a {First‑line personalization} placeholder.
    Mode: [fast/deep].
    

    7) LinkedIn Authority Post

    Use when: Thought leadership for execs + builders.
    Strengths: Structure, framework, prompt.
    Gaps: Risk of buzzwords; no proof.
    Router tuning: Require 1 mini‑case and 1 number.

    Upgraded prompt

    Write a LinkedIn post on [topic] for execs + builders:
    - 3 punchy paragraphs (≤60 words each);
    - 1 mini‑framework (3 bullets, named);
    - 1 thought prompt (1 line);
    - Include one concrete number or example; avoid buzzwords.
    Mode: [fast/deep]. No hashtags unless asked.
    

    8) X Post (Bold, No Hashtags)

    Use when: High‑signal micro‑take.
    Strengths: Tight character limit, bold stance.
    Gaps: Might overrun chars; no proof token.
    Router tuning: Enforce count; include 1 fact word/number.

    Upgraded prompt

    Write one confident X post on [insight/news]. ≤240 chars.
    Format: HOOK — TAKEAWAY. Include **one** concrete fact or number.
    No hashtags. No emoji at the end. Mode: [fast/deep].
    

    9) YouTube Kit

    Use when: Fast ideation + structure.
    Strengths: Titles, open, chapters.
    Gaps: Title length drift; missing viewer promise.
    Router tuning: Enforce title count/length; add “who it’s for.”

    Upgraded prompt

    For a video on [topic], produce:
    - **10 titles** (<60 chars);
    - A two‑sentence cold open that states who it’s for and the promise;
    - Chapter list with timestamps (estimate) and outcomes per chapter.
    Mode: [fast/deep]. No clickbait lies.
    

    10) Content Angle Generator

    Use when: Topic expansion without repetition.
    Strengths: Rich buckets.
    Gaps: Duplicates; vague angles.
    Router tuning: Enforce uniqueness + sample headline.

    Upgraded prompt

    List **25 distinct content angles** for [niche/product] across:
    how‑to, contrarian, teardown, story, data, tutorial, tool, myth vs fact.
    For each: 1‑line angle + a sample headline. No repeats. Mode: [fast/deep].
    

    11) Product Spec from Idea

    Use when: Move from idea to v1.
    Strengths: Users, JTBD, metrics, scope.
    Gaps: Test plan vague; acceptance criteria missing.
    Router tuning: Add measurable acceptance + de‑scoping rules.

    Upgraded prompt

    Turn this idea into a lean product spec:
    - Users & JTBD; key use cases;
    - Success metrics (leading/lagging) with targets;
    - V1 scope (must/should/could) and out‑of‑scope;
    - Acceptance criteria (measurable);
    - Test plan (happy path, edge, abuse).
    Mode: [fast/deep]. ≤500 words.
    

    12) UX Critique

    Use when: Actionable UI improvements.
    Strengths: Issues + fixes.
    Gaps: Evidence often light; microcopy not tested.
    Router tuning: Severity scale + before/after microcopy.

    Upgraded prompt

    Critique the UX of [flow/screen]. Deliver:
    - 10 issues with severity ∈ {P0, P1, P2}, evidence, and concrete fix;
    - A before→after microcopy table (3–5 rows);
    - One quick win and one deeper redesign note.
    Mode: [fast/deep].
    

    13) CSV Data Brief

    Use when: Shape an analysis plan before coding.
    Strengths: Questions → steps → visuals.
    Gaps: Schema ambiguity; data checks missing.
    Router tuning: Add sanity checks + exact chart types.

    Upgraded prompt

    Given CSV schema: [columns], produce:
    1) 5 decision‑driven questions;
    2) Validation checks (types, nulls, outliers);
    3) Analysis steps;
    4) Exact visuals/tables to produce (chart type, axes, groupings).
    Mode: [fast/deep]. No code unless asked.
    

    14) Code from Spec

    Use when: From spec to runnable core.
    Strengths: Architecture, snippets, tests, edges.
    Gaps: Env assumptions; complexity unbounded.
    Router tuning: Pin language/runtime; include complexity notes.

    Upgraded prompt

    Given this spec: [paste], provide:
    - Architecture diagram (text) and key components;
    - Core code snippets in [language/runtime] with minimal deps;
    - Tests (unit/integration) and fixtures;
    - Failure/edge cases + graceful handling;
    - Complexity & trade‑offs section.
    Mode: [fast/deep]. Keep idiomatic.
    

    15) Code Review + Refactor

    Use when: Improve safety & clarity with a plan.
    Strengths: Smells, hotspots, steps, tests.
    Gaps: Lacks risk scoring; migration path unclear.
    Router tuning: Add impact x effort; phased plan.

    Upgraded prompt

    Review this code: [paste]. Deliver:
    - Findings by category (correctness, security, perf, clarity);
    - Hotspots with complexity signals;
    - Refactor plan in small, safe steps with tests;
    - Risk/Impact vs Effort matrix (P0/P1/P2);
    - Before/after snippet for 1 key function.
    Mode: [fast/deep].
    

    16) Strict JSON Every Time

    Use when: Machine‑readable output required.
    Strengths: Clear schema.
    Gaps: No parser check; no enum constraints.
    Router tuning: Include enums & validation note.

    Upgraded prompt

    Return **only valid JSON** for [task]. Schema:
    {
      "title": "string",
      "summary": "string",
      "risks": ["string"],
      "actions": [ { "owner": "string", "step": "string", "eta": "YYYY-MM-DD" } ],
      "metrics": ["string"]
    }
    No prose. Validate keys, types, and date format before returning.
    

    17) SOP / Checklist

    Use when: Repeatable, low‑variance execution.
    Strengths: Steps + gates + recovery.
    Gaps: Timing windows; roles not explicit.
    Router tuning: Add roles & time boxes.

    Upgraded prompt

    Draft a step‑by‑step SOP for [process]. Include:
    - Prereqs & roles;
    - Steps with time boxes;
    - Quality gates with pass/fail checks;
    - Common failure recovery & escalation ladder.
    Mode: [fast/deep]. Output as a checklist.
    

    18) Positioning & ICP

    Use when: Sharpen message‑market fit.
    Strengths: ICP, pains, alts, value prop, messages, pitch.
    Gaps: Jobs vs pains; proof tokens missing.
    Router tuning: Add JTBD & proof lines.

    Upgraded prompt

    Define positioning for [product]. Provide:
    - ICP traits (firmographic + behavioral);
    - JTBD and top pains (ranked);
    - Alternatives (do‑nothing included);
    - Value proposition (benefit + proof);
    - 3 key messages;
    - 3‑line elevator pitch.
    Mode: [fast/deep].
    

    19) Competitive Teardown

    Use when: Side‑by‑side clarity.
    Strengths: Features, UX, pricing, moat, switching costs, objections.
    Gaps: Buyer role nuance; evidence weak.
    Router tuning: Add role lens + cite artifacts.

    Upgraded prompt

    Compare [your product] vs [competitor] for [buyer role]. Cover:
    - Features & UX (table);
    - Pricing (typical deal sizes/TCO);
    - Moat & switching costs;
    - Buyer objections + crisp replies;
    - Evidence links (docs, screenshots) if available.
    Mode: [fast/deep].
    

    20) Policy First Draft (Non‑Legal)

    Use when: First pass policy with clarity.
    Strengths: Rules, examples, do/don’t, escalation.
    Gaps: No scope/authority; review cadence missing.
    Router tuning: Add scope, owner, review cadence.

    Upgraded prompt

    Draft a **non‑legal** first‑pass policy for [topic]. Include:
    - Scope & definitions; policy owner;
    - Rules with examples; do/don’t lists;
    - Compliance checks & escalation path;
    - Exceptions process;
    - Review cadence and change log placeholder;
    - Legal review placeholder.
    Mode: [fast/deep].
    

    21) 7‑Day Learning Plan

    Use when: Focused upskilling in a week.
    Strengths: Daily objectives, resources, practice, quiz.
    Gaps: Entry level varies; no capstone.
    Router tuning: Add diagnostic + capstone.

    Upgraded prompt

    Build a 7‑day learning plan for [skill/exam]. Include:
    - Day 0 diagnostic (what to skip/focus);
    - Daily objectives, resources (≤3/day), and practice tasks;
    - Daily self‑quiz (5 Qs) with expected answers;
    - Day 7 capstone task with rubric.
    Mode: [fast/deep].
    

    22) Negotiation Prep

    Use when: Plan the conversation before the room.
    Strengths: Goals, walk‑away, BATNA, concessions, questions, opening.
    Gaps: Counter‑plays; objection map missing.
    Router tuning: Add opponent map + scripts.

    Upgraded prompt

    Create a negotiation brief for [deal]. Include:
    - Goals; walk‑away; BATNA;
    - Concession strategy (give/get);
    - Questions to surface interests;
    - Opening script;
    - Objection map with counters;
    - Opponent/alignment map (roles, power, interests).
    Mode: [fast/deep].
    

    23) Landing Page Copy

    Use when: Write conversion‑first copy.
    Strengths: Section list, direct tone.
    Gaps: Segment nuance; FAQ weak.
    Router tuning: Add segment option + proof elements.

    Upgraded prompt

    Write a landing page for [offer]. Sections:
    - Headline + subhead (clear promise);
    - Value bullets (3–6) with outcomes;
    - Proof (logos, testimonial lines, metrics);
    - CTA (primary + secondary);
    - FAQ (5–7 Qs).
    Optional: provide a variant for [segment].
    Mode: [fast/deep].
    

    24) Automation Blueprint

    Use when: Design automations with ROI.
    Strengths: Triggers, steps, data, errors, alerts, ROI.
    Gaps: SLAs; run‑costs; auditability.
    Router tuning: Add SLAs, idempotency, and cost model.

    Upgraded prompt

    Propose automations for [workflow]. Include:
    - Triggers & prerequisites;
    - Steps with systems & data sources;
    - Error handling (retries, dead‑letter, idempotency);
    - Alerts/observability (what, who, channel, thresholds);
    - SLAs & run‑cost model;
    - ROI estimate (baseline vs future, payback).
    Mode: [fast/deep].
    

    Bonus: Mini Switches You Can Add Anywhere

    • “Low‑randomness, no lateral riffs.” For deterministic outputs.
    • “Use a verification pass: compare output vs. constraints, fix before returning.”
    • “If citing, append a short sources list with titles + links.”
    • “Label assumptions explicitly if context is thin.”
    • “Return a ‘How to use this output’ note in one line.”

    Final Notes

    • Keep the Router Header lean; the power comes from clear Output Contracts and tight constraints.
    • Prefer JSON when downstream automation is needed; prefer skimmable bullets when humans are the primary consumer.
    • If you need extra toughness, combine “adversarial” and “self‑check” lines.

    Changelog v1.1 (this doc): Added threat models, self‑check, enum statuses, strict JSON variants, SLAs/costs for automation, and decision‑date/owner fields for memos.