I finally got Dataverse MCP working inside Copilot Cowork as a custom plugin.
This guide walks through the setup in a way I wish I had when I started.
The goal is simple:
- Register an app in Entra
- Enable Dataverse MCP for your Power Platform environment
- Create the OAuth registration in Teams Developer Portal
- Build a Copilot Cowork plugin that points to your Dataverse MCP endpoint
- Deploy it
- Give Cowork enough schema context to understand your Dataverse tables
If you are a low-code builder, the confusing part is not Dataverse.
The confusing part is the setup across multiple portals.
You will touch Entra, Power Platform admin center, Teams Developer Portal, the plugin manifest, and Copilot Cowork.
That sounds worse than it is. You just need to know which value goes where.
I have a video going over the same steps as the blog:
- What we are building
- Before you start
- The setup order
- Step 1: Create the App Registration
- Step 2: Configure the Power Platform environment
- Step 3: Create the OAuth registration in Teams Developer Portal
- Step 4: Build the plugin
- Step 5: Deploy the plugin
- Step 6: Create a schema-aware skill
- Step 7: Test with a real scenario
- Example prompts:
- Common mistakes
- Download the checklist
- Official docs
- Final take
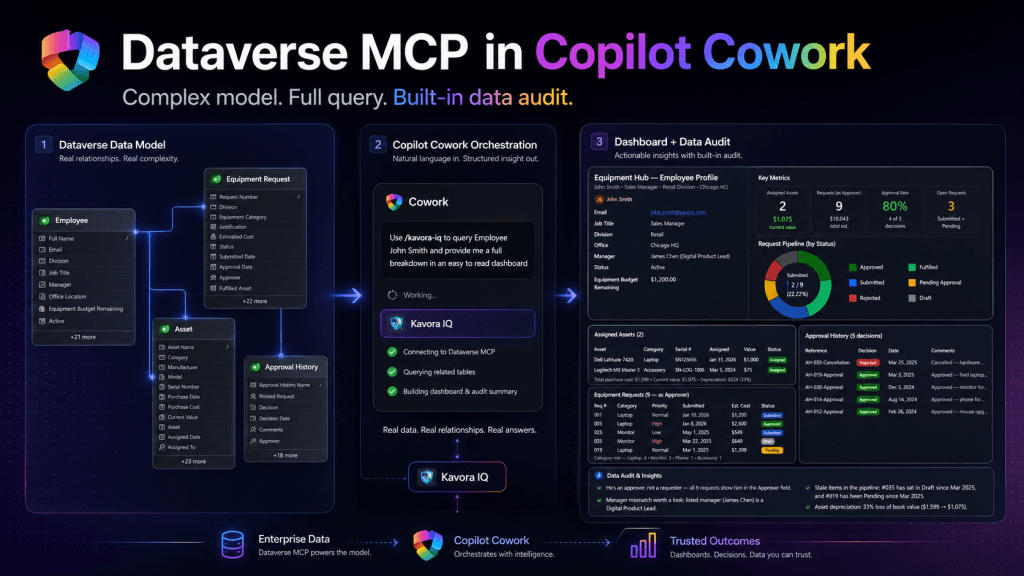
What we are building
We are building a Copilot Cowork plugin that connects to the Dataverse MCP endpoint.
Once installed, Cowork can use that plugin to query Dataverse through MCP.
The basic flow looks like this:
- User asks Copilot Cowork a question
- Cowork uses the custom plugin
- The plugin points to the Dataverse MCP endpoint
- Dataverse returns the data
- Cowork uses schema guidance to make sense of the tables
- Cowork returns a useful answer, summary, dashboard, or audit notes
I recommend keeping this setup in two parts:
- The plugin: gives Cowork access to the Dataverse MCP connector
- The schema skill: tells Cowork which Dataverse tables, columns, relationships, and rules matter
That split makes the setup easier to maintain.
If your schema changes, you can update the schema skill without rebuilding and redeploying the entire plugin package.
Before you start
You will need:
- A Power Platform environment with Dataverse
- Access to Power Platform admin center
- Access to create or use an Entra app registration
- Access to Teams Developer Portal
- Permission to deploy or test a Copilot Cowork plugin
- A Dataverse table or set of tables you want Cowork to query
- You should also have a simple place to track setup values.
- Download: Cowork-plugin-builder.personal-skill.zip
- Download: dataverse-mcp.cowork-template.zip
- Download: Dataverse MCP Cowork Setup Checklist.html
I created a checklist for this because the setup has a few values that are easy to mix up.
The setup order
This is the order I recommend:
- Create the App Registration
- Configure the Power Platform environment
- Create the OAuth registration in Developer Portal
- Build the plugin
- Deploy the plugin
- Create the schema skill
- Test everything in Copilot Cowork
Do not start with the plugin manifest.
Get the identity, environment, and OAuth pieces ready first. The manifest is much easier once you already have the right values.
Step 1: Create the App Registration
Start in Microsoft Entra.
https://entra.microsoft.com/
Create an app registration that will be used for the Dataverse MCP connection.

Capture these values:
- Tenant ID
- Application / Client ID
- Client secret
- Secret expiry date
You will use the Client ID more than once, so copy it somewhere safe.
Add the Dataverse MCP permission
In the app registration, add the required API permission for Dataverse MCP.
- Open the app registration
- Go to API permissions
- Select Add a permission
- Select Microsoft APIs
- Select Dynamics CRM
- Add the permission:
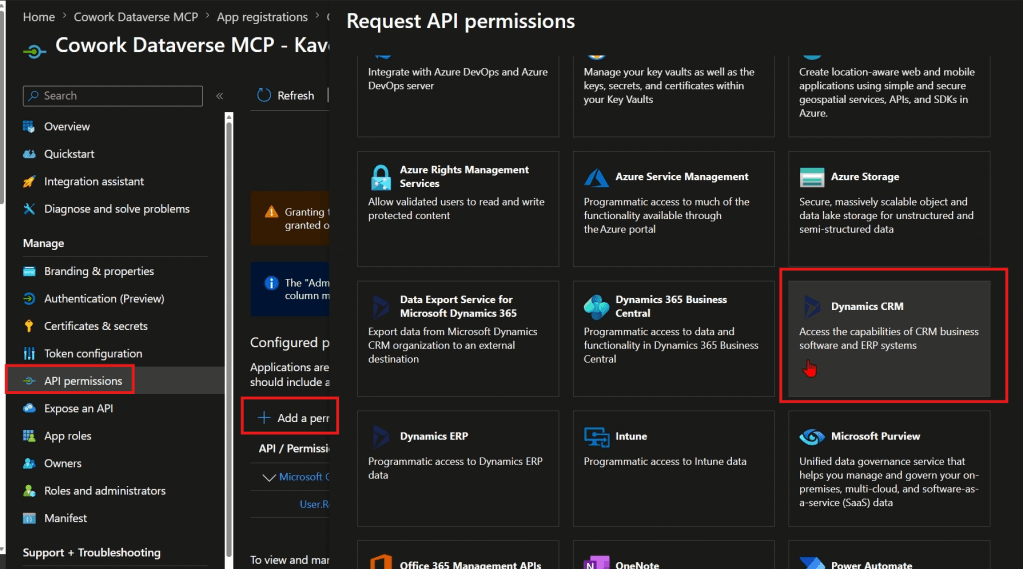
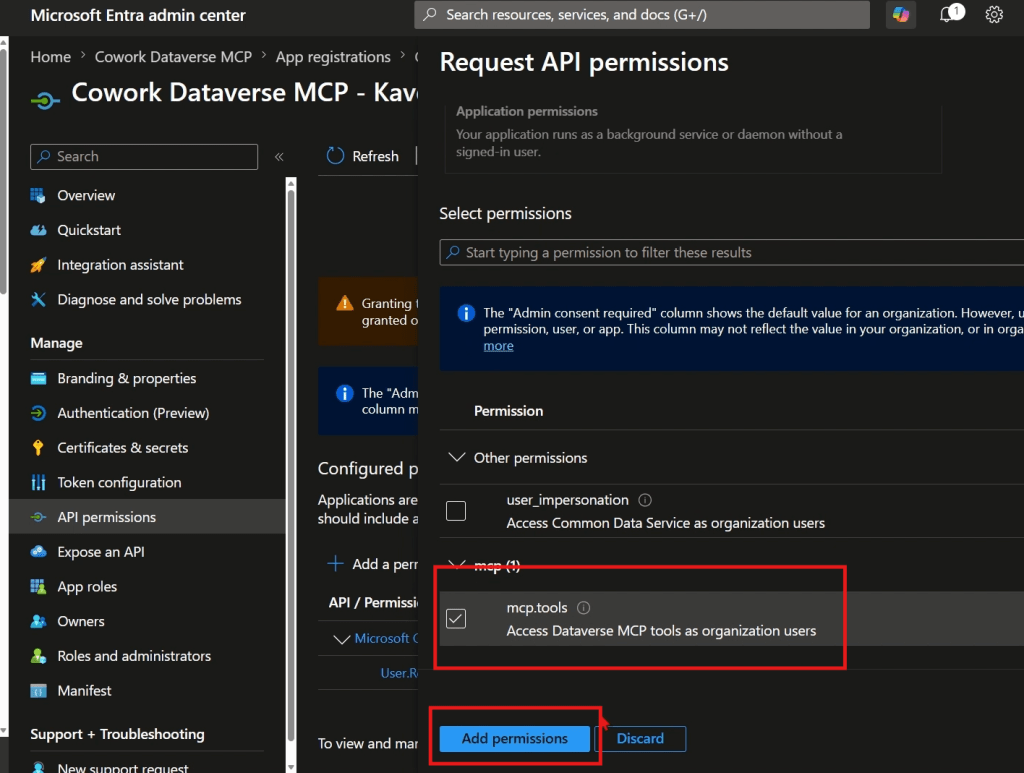
mcp.tools
Grant admin consent if your tenant requires it.
Add the redirect URI
- For the OAuth flow, add this redirect URI if your setup requires it:
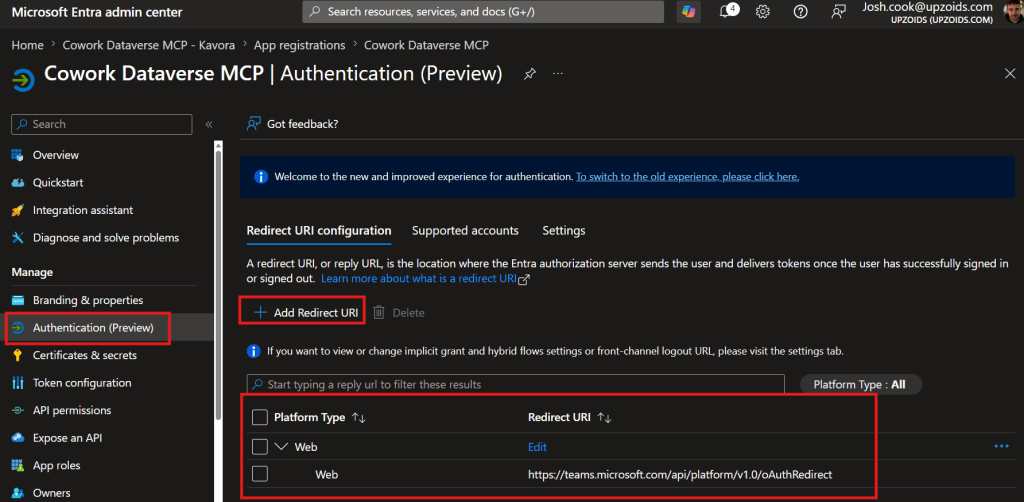
https://teams.microsoft.com/api/platform/v1.0/oAuthRedirect
Important: the Application / Client ID is not the same as the OAuth registration ID you will create later.
Keep those two values separate.
Step 2: Configure the Power Platform environment
Next, configure the Power Platform environment that contains your Dataverse data.
You need the Dataverse environment to allow MCP clients.
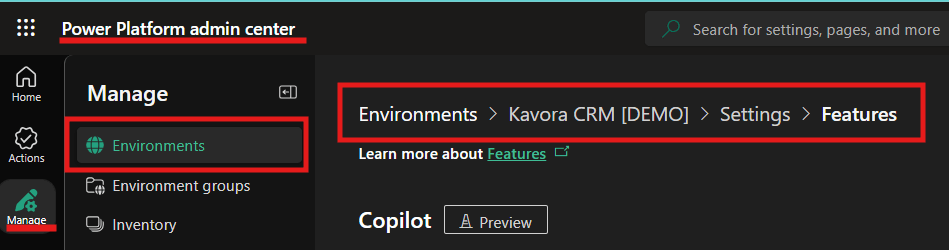
Open Power Platform admin center and go to the target environment.
- Open Power Platform admin center
- Go to Manage
- Select Environments
- Open your target environment
- Open Settings
- Go to Product
- Open Features
- Find the Dataverse MCP setting
- Allow MCP clients to interact with Dataverse MCP server
- Only check the GA version of the MCP server > Click Save
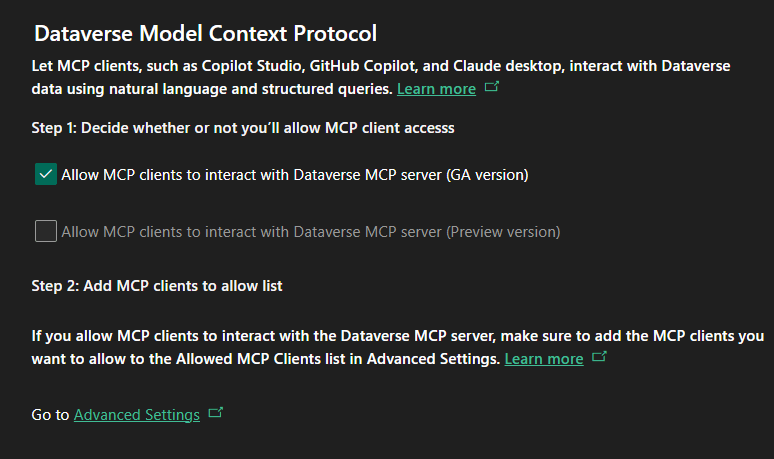
The exact wording may change because this area is still moving, but the goal is the same: allow MCP clients for that environment
Add the allowed MCP client
Now add your Entra Application / Client ID as an allowed MCP client for the environment.
- Click “Go to Advanced Settings” link under Step 2
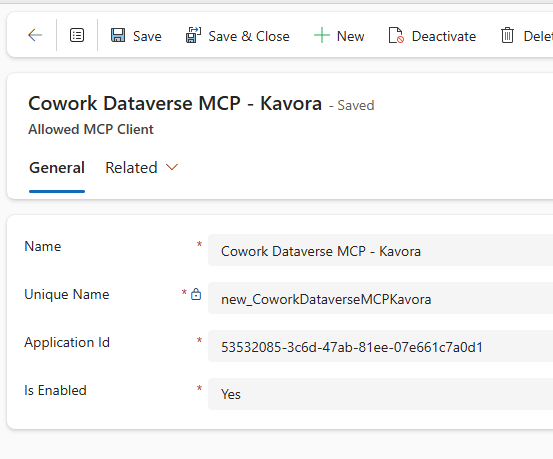
- Click +New > fill in the details like this:
– Name: Cowork Dataverse MCP – <env name>
– Unique Name: new_CoworkDataverseMCP<envName>
– Application Id: Paste your application Id from the App Registration you created in section 1
– Is Enabled: Yes - Click Save & Close
That part matters.
The value you add here is the Entra Application / Client ID.
Also make sure the allowed MCP client is enabled.
If this step is wrong, the plugin can look fine but still fail when Cowork tries to use Dataverse.
Before leaving the admin center, grab the Environment URL.
Capture the Dataverse URL
You need your Dataverse Org URL
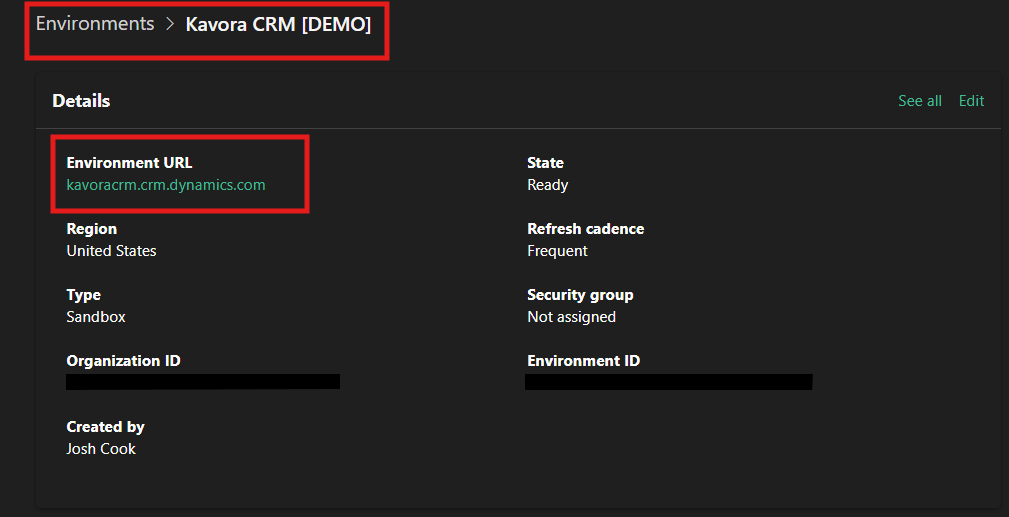
It looks like this:
https://yourorg.crm.dynamics.com
The MCP server URL is the same URL with /api/mcp added to the end.
https://yourorg.crm.dynamics.com/api/mcp
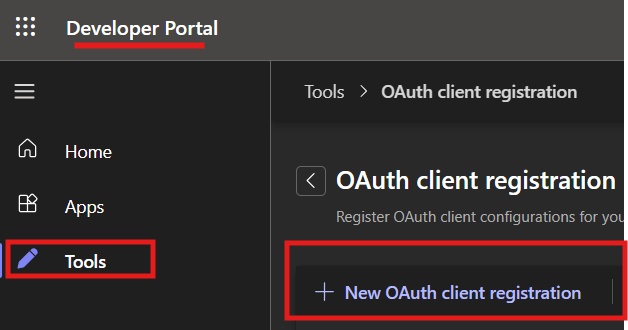
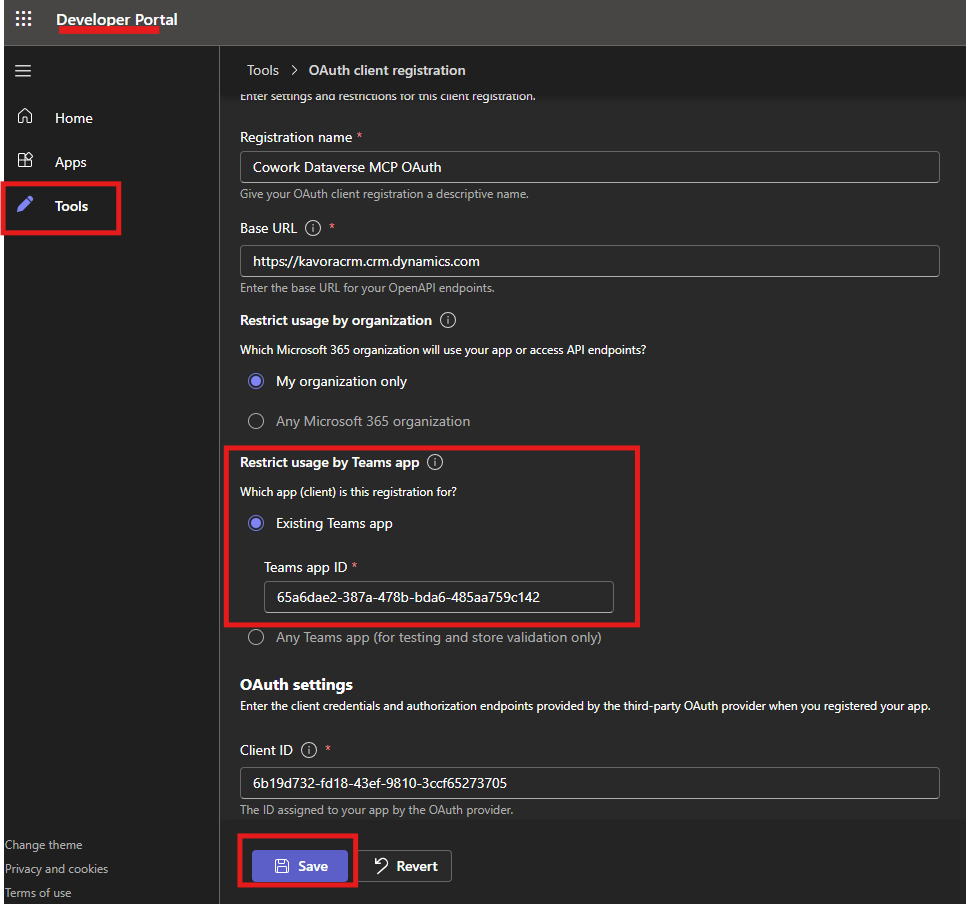
Step 3: Create the OAuth registration in Teams Developer Portal
Now open Teams Developer Portal.
( https://dev.teams.microsoft.com/ )
Create an OAuth client registration for the plugin.
This registration stores the OAuth configuration and gives you the OAuth registration ID that your plugin manifest will reference.
In the OAuth registration, you will enter values from the Entra app and your Dataverse environment.
- Click Tools > OAuth client registration
- + New OAuth client registration
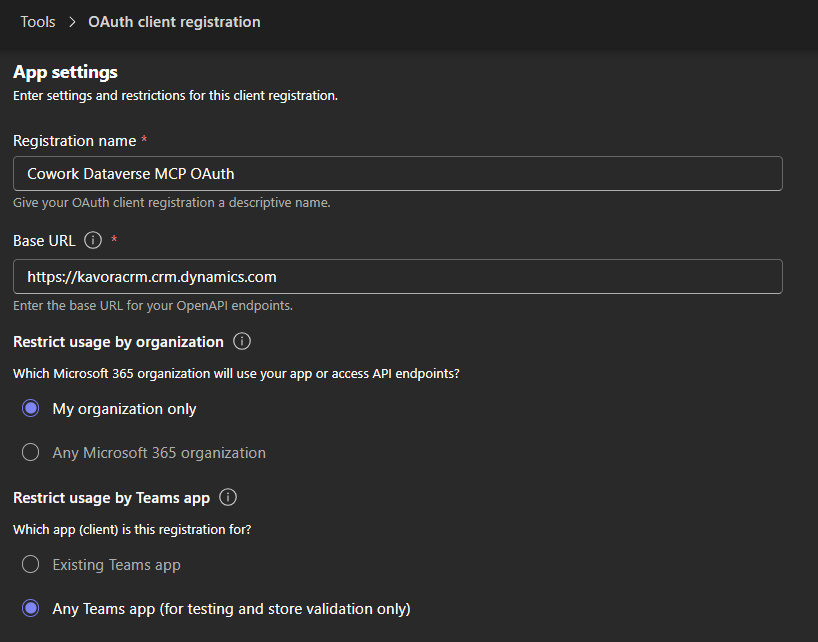
Base URL
Use your Power Platform Environment URL
https://<yourorg>.crm.dynamics.com
Restrict usage by Teams app: select Any Teams app (for now, since we don’t have a Teams app ID yet)
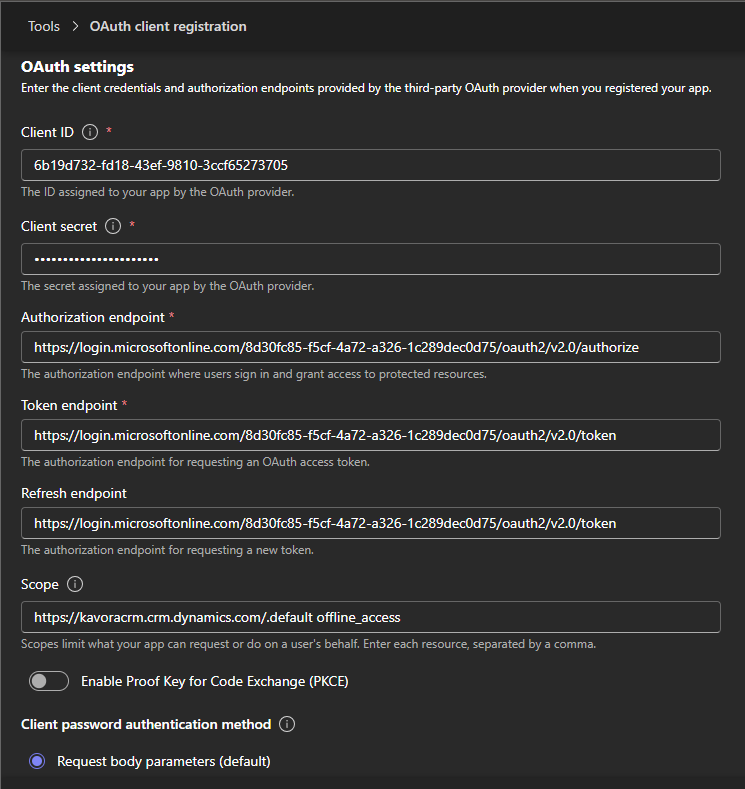
Authorization endpoint
Use your Tenant ID in this format:
https://login.microsoftonline.com/{tenantId}/oauth2/v2.0/authorize
Token endpoint
Use your Tenant ID in this format:
https://login.microsoftonline.com/{tenantId}/oauth2/v2.0/token
Scope
The scope should use your Dataverse Org URL.
Use this format:
https://yourorg.crm.dynamics.com/.default offline_access
Example:
https://kavoracrm.crm.dynamics.com/.default offline_access
Client ID and secret
Use the Client ID and secret from the Entra app registration you created earlier.
After saving the OAuth registration, copy the OAuth registration ID.
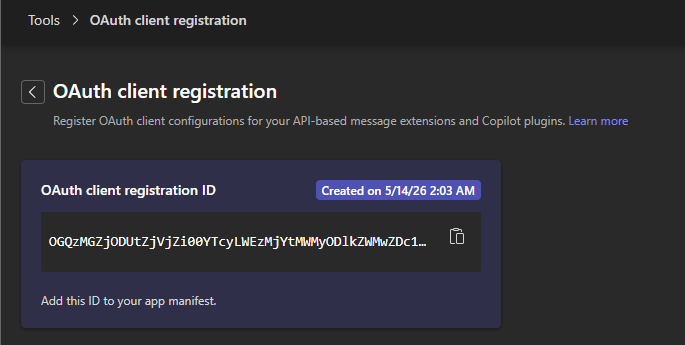
You will use that value in the plugin manifest as the connector referenceId.
Important: the OAuth registration ID goes into the plugin manifest.
Step 4: Build the plugin
For this approach, the plugin should stay focused on the Dataverse MCP connector.
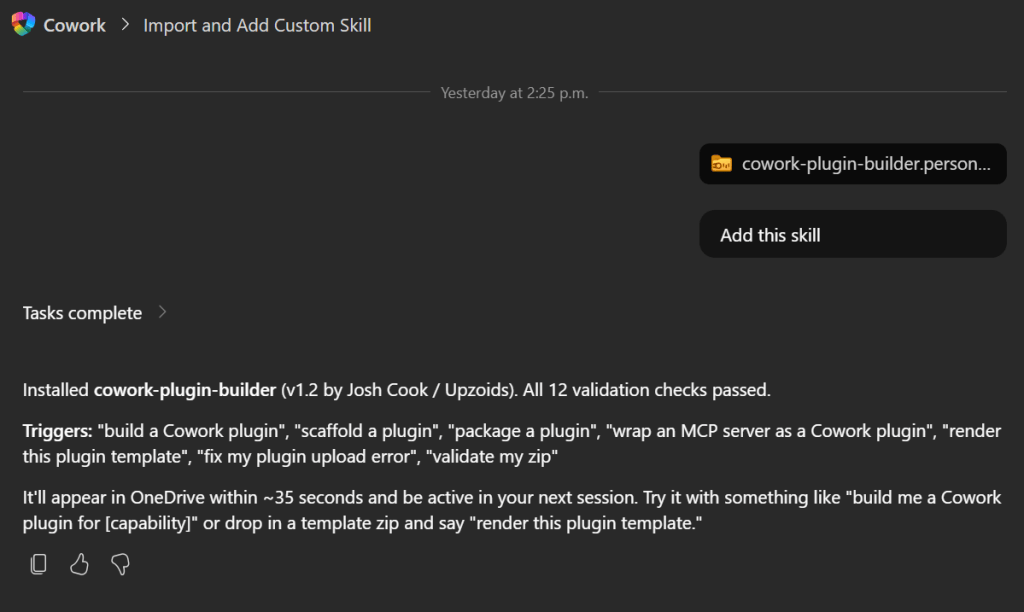
To make this even easier, I created a Cowork-Plugin skill to assist in building the Plugin with a template.
Import Plugin Builder skill
- Download my /cowork-plugin-builder skill
- In Copilot Cowork > attach the skill and prompt: Add this skill
- After import refresh your browser
Build Dataverse Plugin with Template
We will use the skill you just imported to help build the plugin.
- Inside Copilot Cowork craft a prompt and add the cowork-plugin-builder skill
- Add these details or Copilot Cowork will ask you for these values
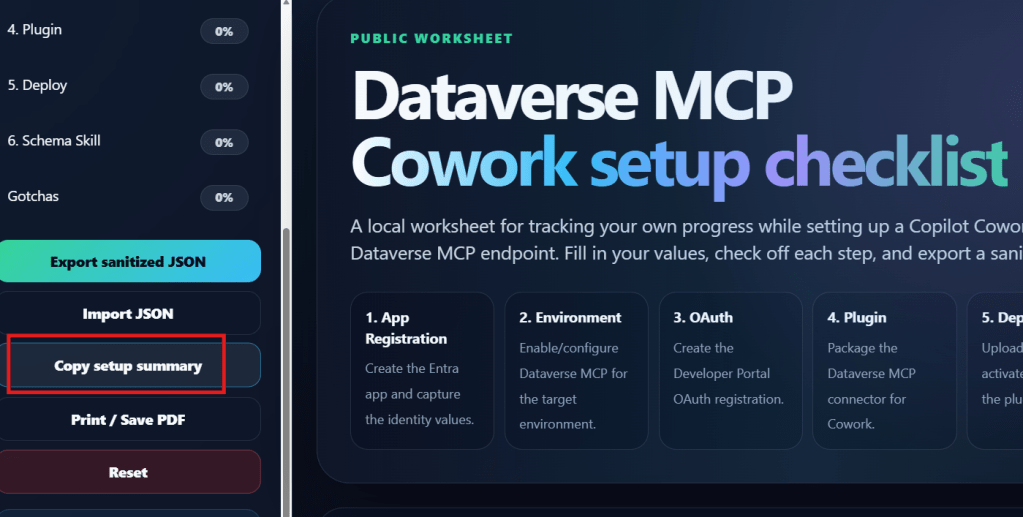
(NOTE: If your using the Checklist app I created to track progress, click the Copy setup summary. Paste this into the prompt as well)
Prompt to use:
/cowork-plugin-builder to build a Dataverse plugin using this template:Organization name: Connector display name: description: Tenant ID: Client ID: Org URL:MCP URL:OAuth registration ID:OAuth scope: Connector referenceId:
Fill in everything you can.
I created a Dataverse-style icon with a Cowork badge so the plugin is easy to recognize when it appears in Cowork.
(Included in the template)
When Copilot Cowork is done, you should receive a zip file.
Download the zip file.
Step 5: Deploy the plugin
After the package is ready, deploy it to a test user or test group first.
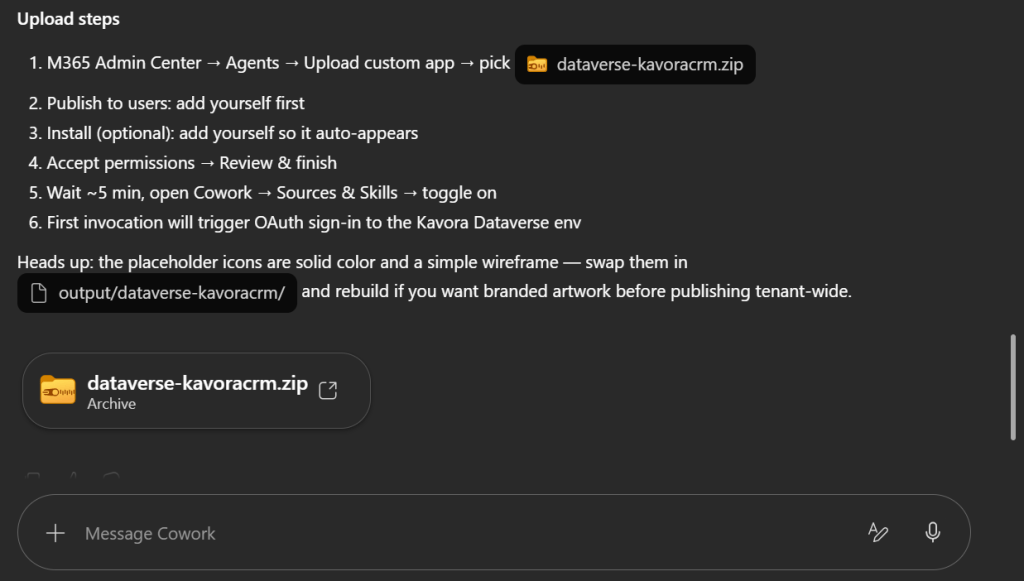
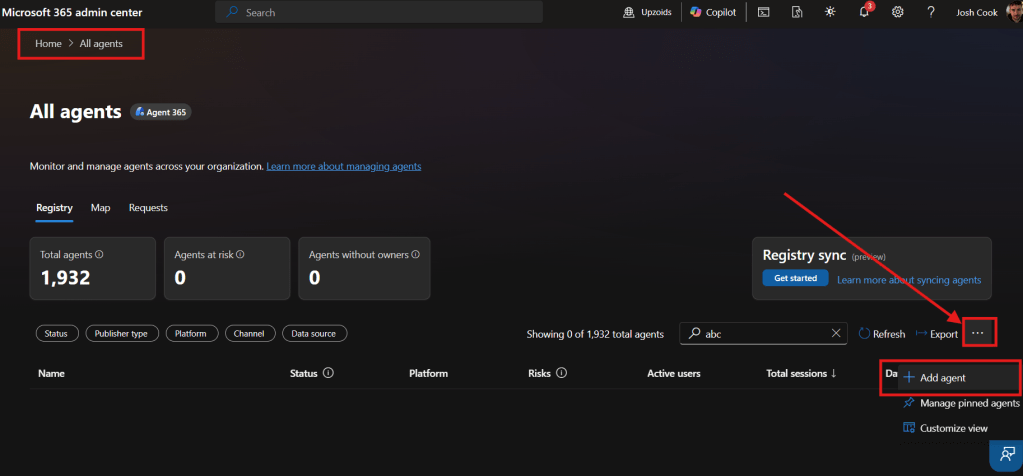
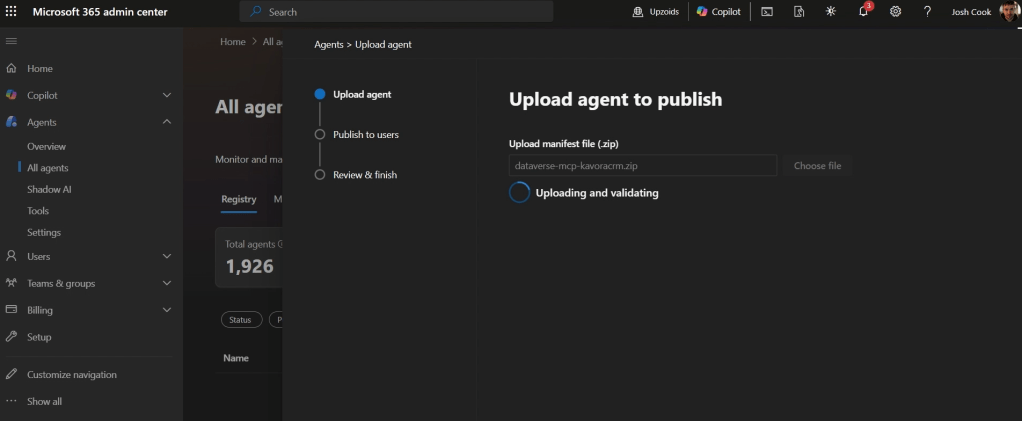
- M365 Admin Center > Agents > All agents > Upload custom app > pick dataverse-<pluginname>.zip
- Publish to users: add yourself first
- Install (optional): add yourself so it auto-appears
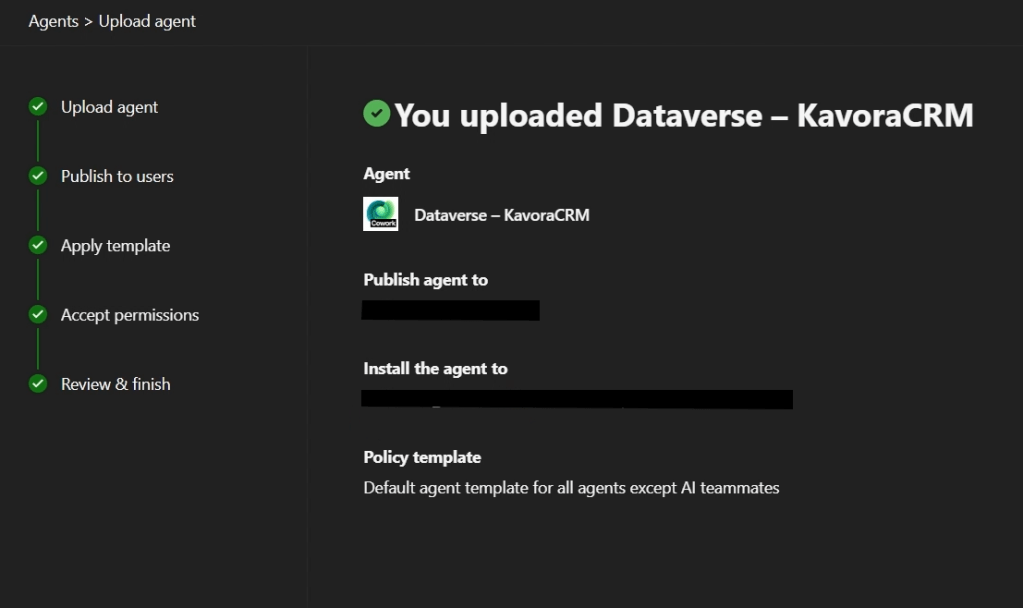
- Accept permissions > Review & finish
- Apply Template (default should be fine)
- Review Permissions (should be none, since permissions are done through the App registration)
- Publish
Keep the first deployment small.
Connect Plugin
- Open a fresh Copilot Cowork session
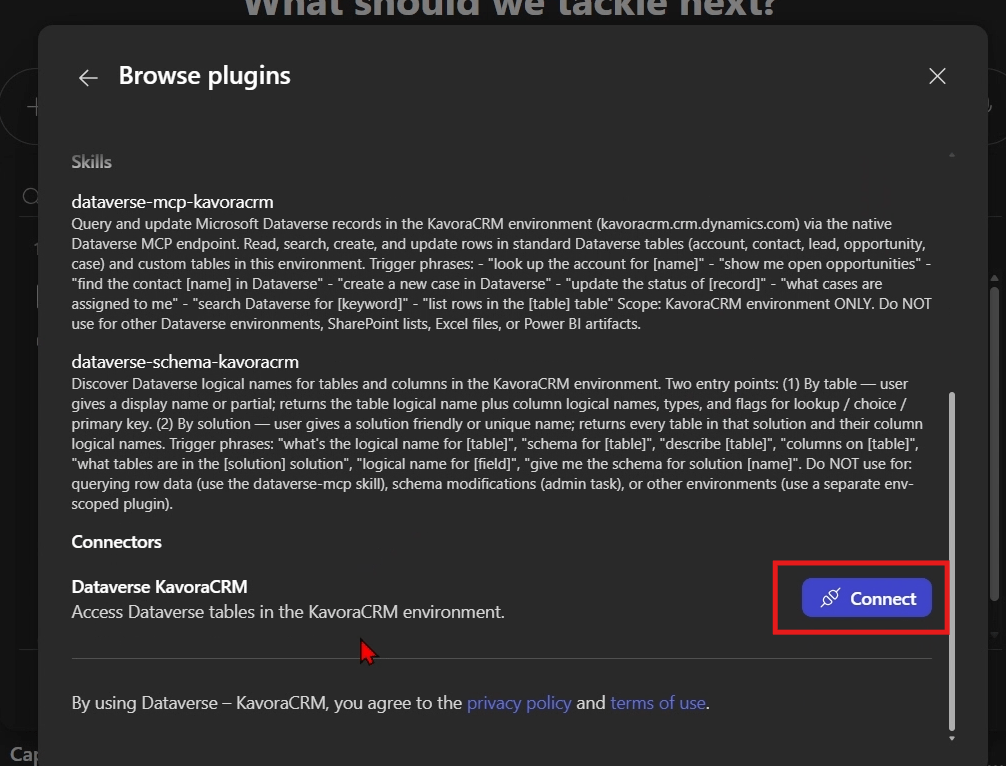
- Click + > Manage Plugins
- Click … Browse Plugins
- Find the Plugin > Click Add
- Scroll down and click Connect
Start with a simple prompt like this:
Use the <Plugin name> to confirm you can access the Dataverse MCP server.
Important: when you change the plugin package, update the version before uploading again.
Also start a fresh Cowork session after deployment changes.
Otherwise, you can end up testing against a stale session and thinking the plugin is broken.
Step 6: Create a schema-aware skill
This is the step that makes the plugin more useful.
The plugin gives Cowork access to Dataverse.
The schema skill helps Cowork understand what to do with that access.
In the schema skill, give Cowork the details it needs to query your model properly.
- Table logical names
- Table purpose
- Primary columns
- Lookup columns
- Relationships between tables
- Status fields
- Rules for what matters
- Data-quality checks
- Example prompts
We can use this skill to create a personal skill to query certain tables, etc.
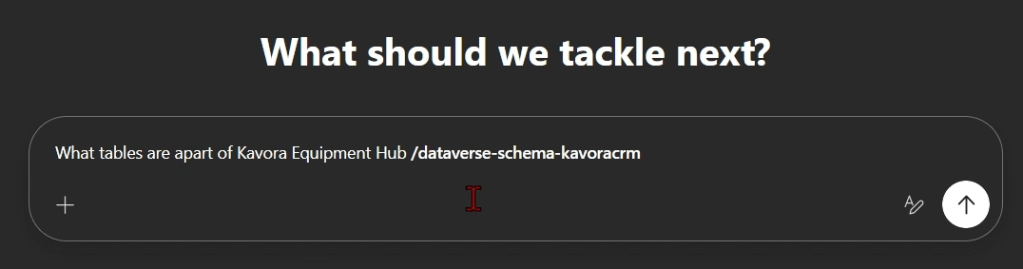
In the example, I ask Copilot Cowork what tables are used in a certain Model-Driven App.
Prompt:
What tables are apart of Kavora Equipment Hub/dataverse-schema-
Copilot Cowork responds with a tables and logical names.
Next I ask for all the logical columns for those tables.
(NOTE: This will help Copilot Cowork query your data quicker)
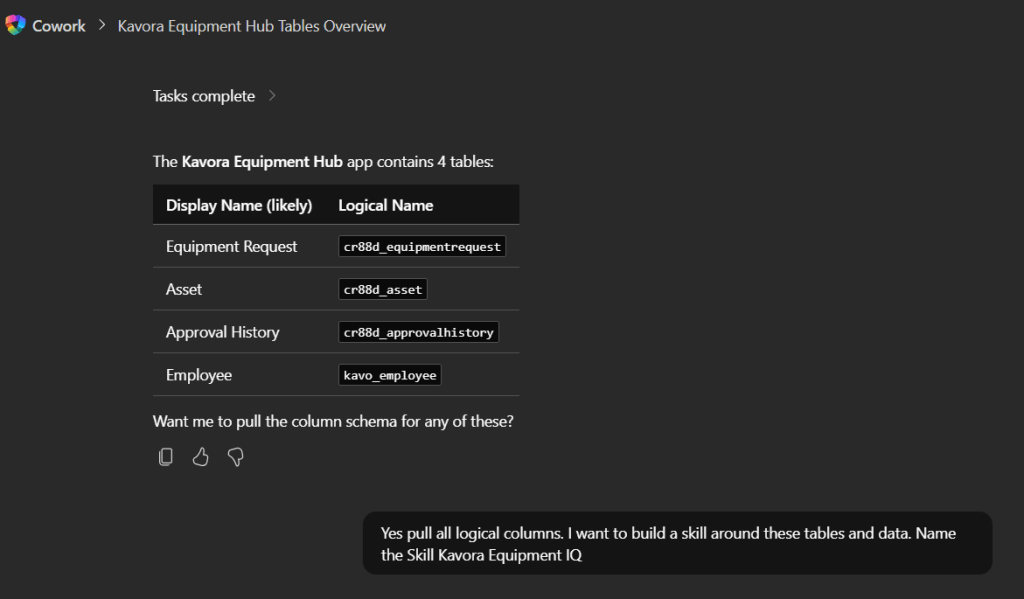
My follow-up prompt:
Yes pull all logical columns.I want to build a skill around these tables and data.Name the Skill Kavora Equipment IQ
Then Copilot Cowork drafted the skill for me.
I reviewed it and said “Looks good”
Copilot Cowork built the skill

Step 7: Test with a real scenario
Now run an actual test.
Do not only ask Cowork to connect.
Ask it to use the Dataverse model.
A good test should include:
- One known record
- At least one related table
- At least one lookup relationship
- Some output Cowork needs to organize
- A data-quality check or business rule
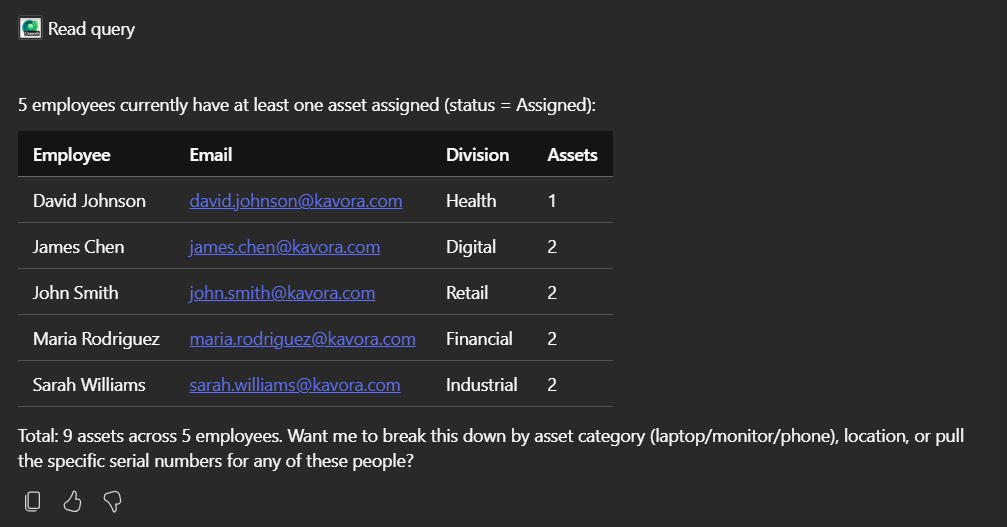
Example prompts:
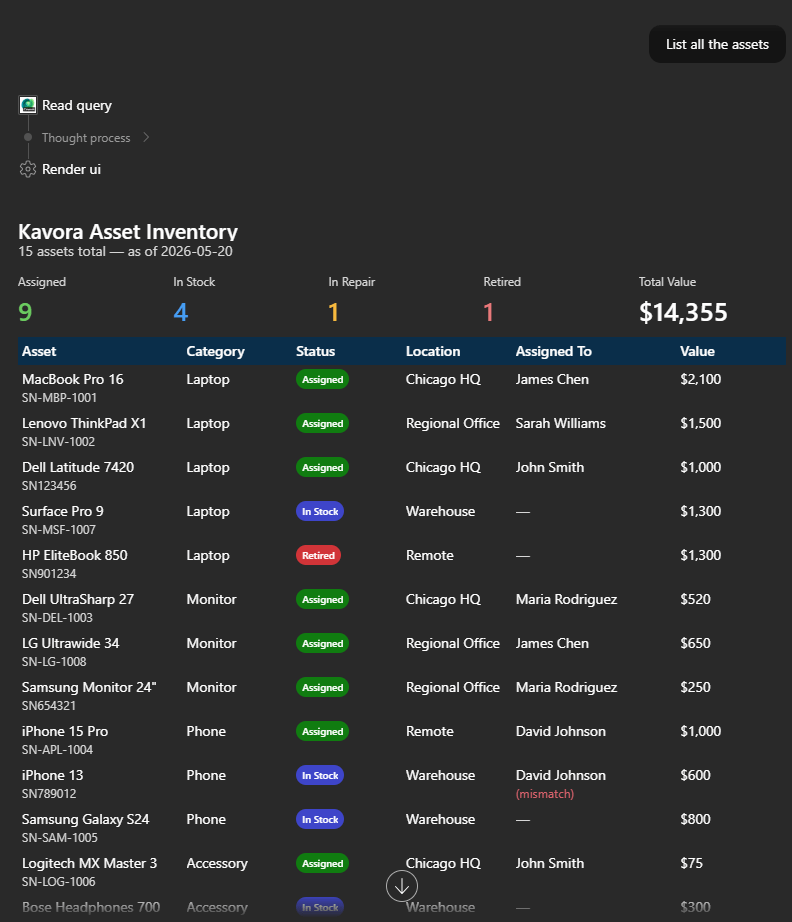
List records
use /<skill you just built>List all the <table>
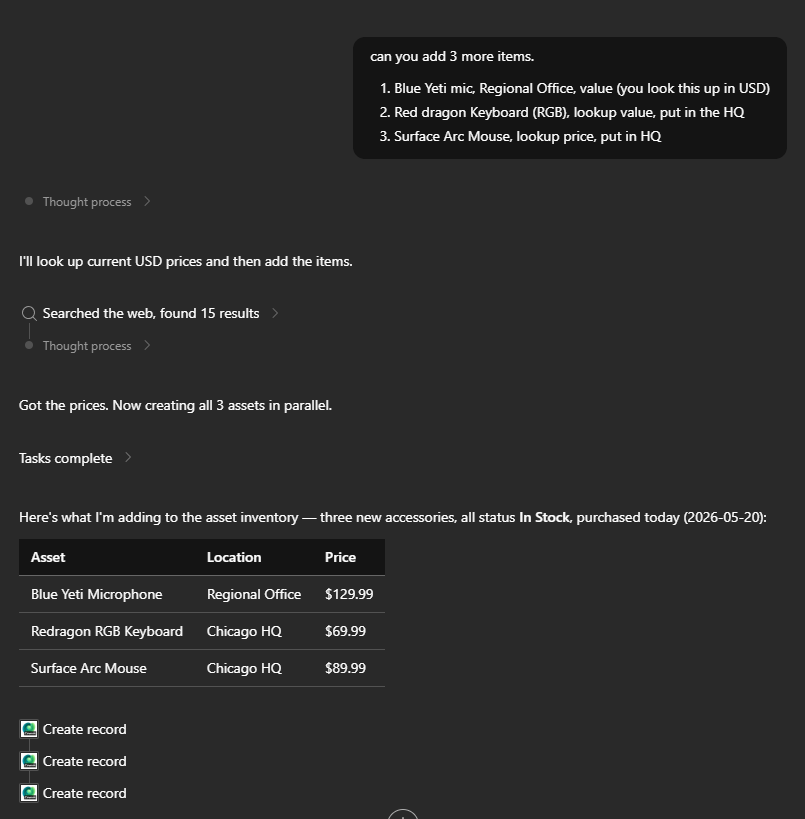
Add records
use /<skill you just built>can you add 3 more <assets>1. Blue Yeti mic, Regional Office, value (you look this up in USD)2. Red dragon Keyboard (RGB), lookup value, put in the HQ3. Surface Arc Mouse, lookup price, put in HQ
Details on a record
use /<skill you just built>list all the <table> who <condition>
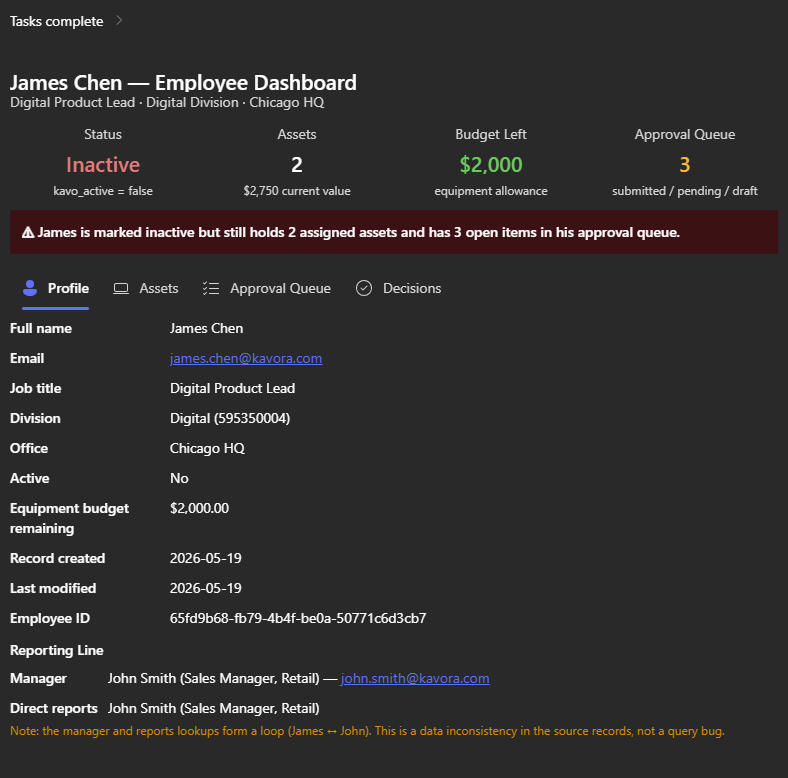
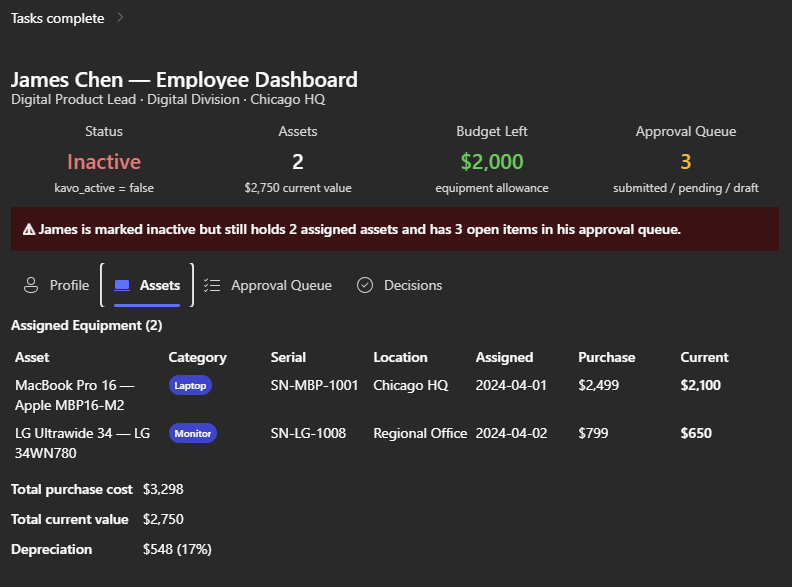
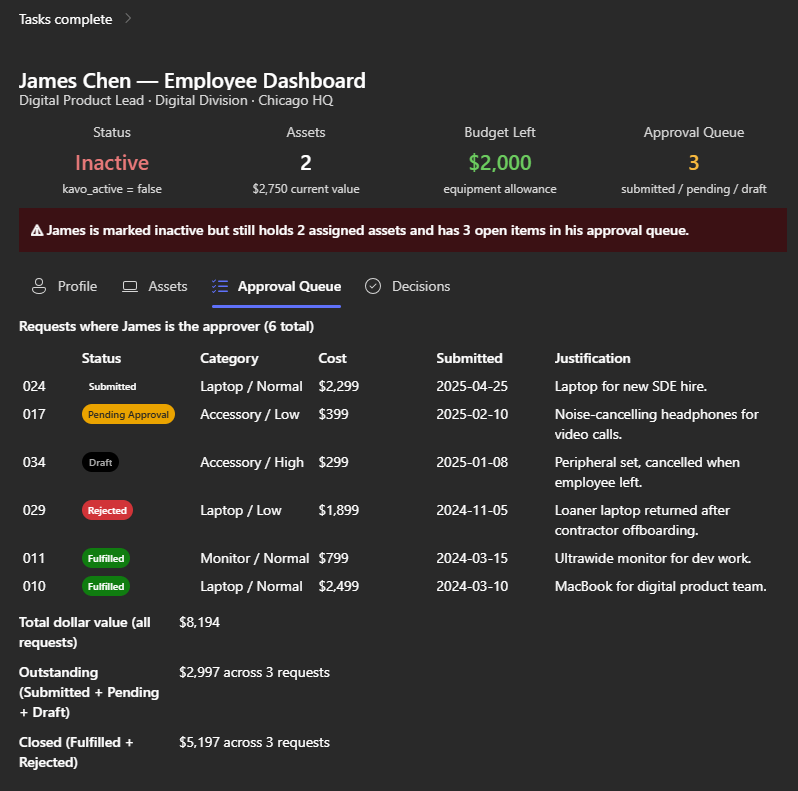
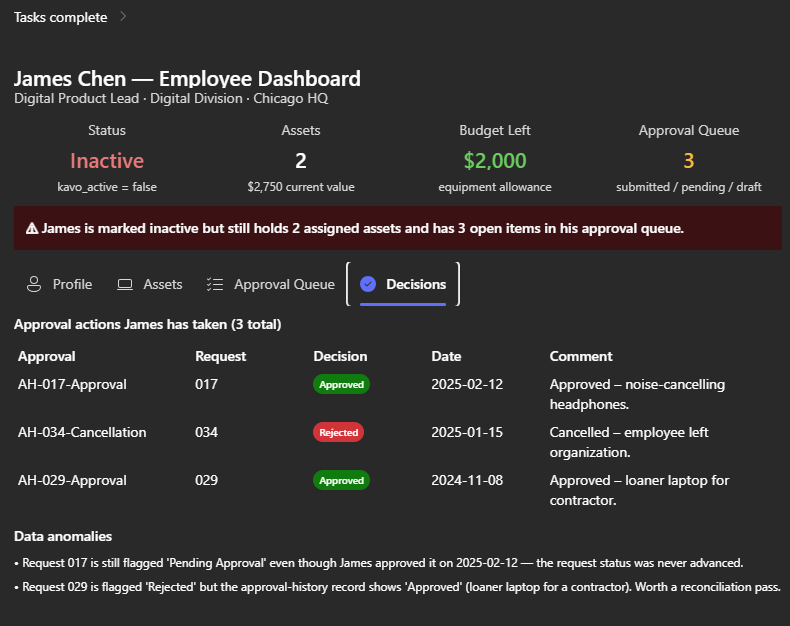
Build Dashboard
use /<skill you just built>give me a full dashboard of <record>.Surface all details relating to <record>
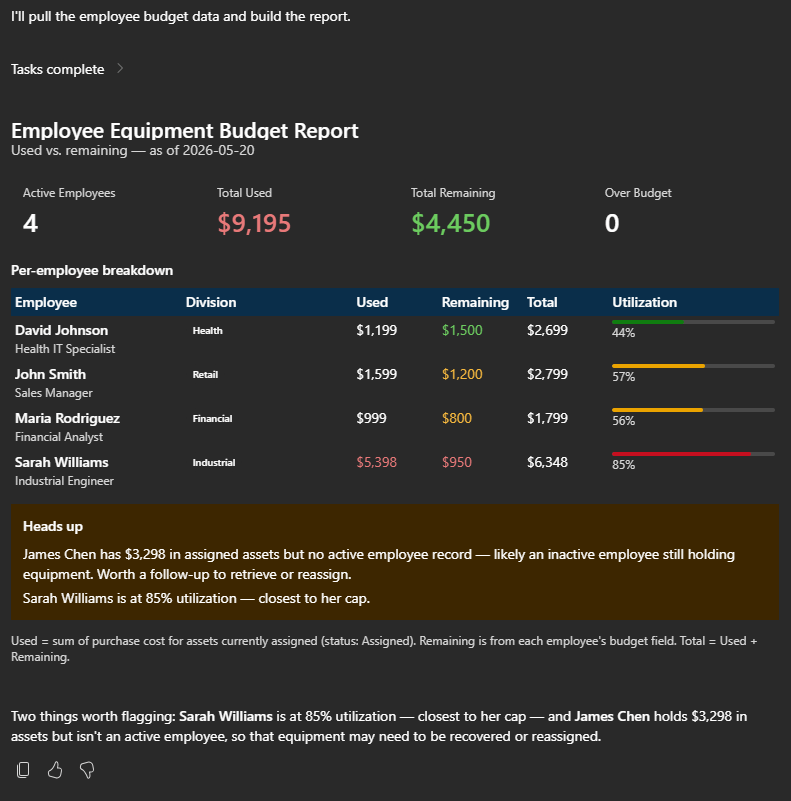
Create report
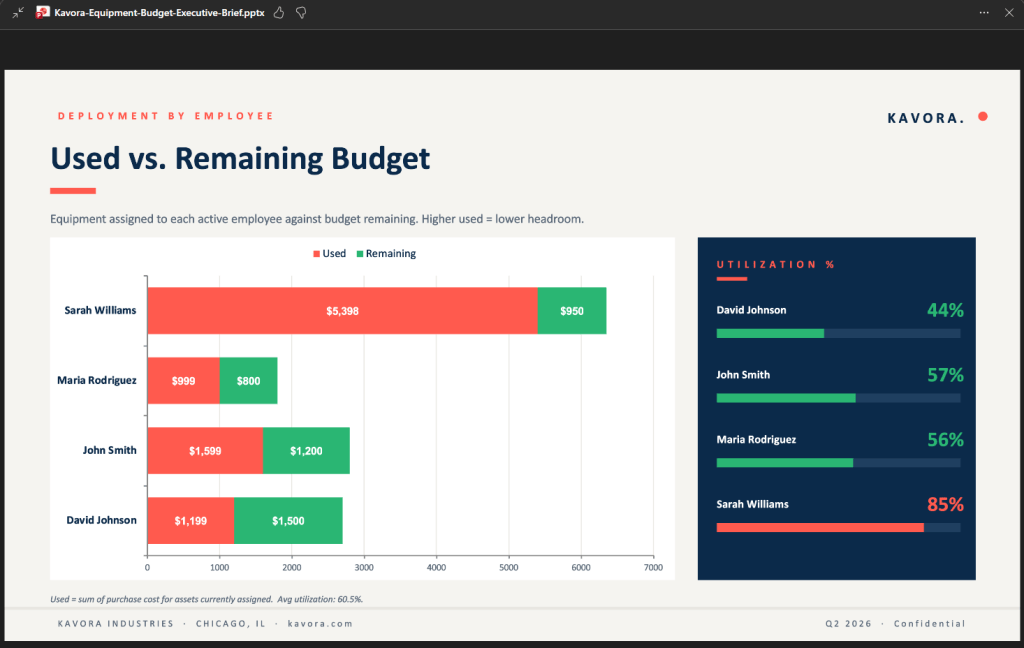
use /<skill you just built>now create a report with each <Employee>on what they have left VS what they have used for budget
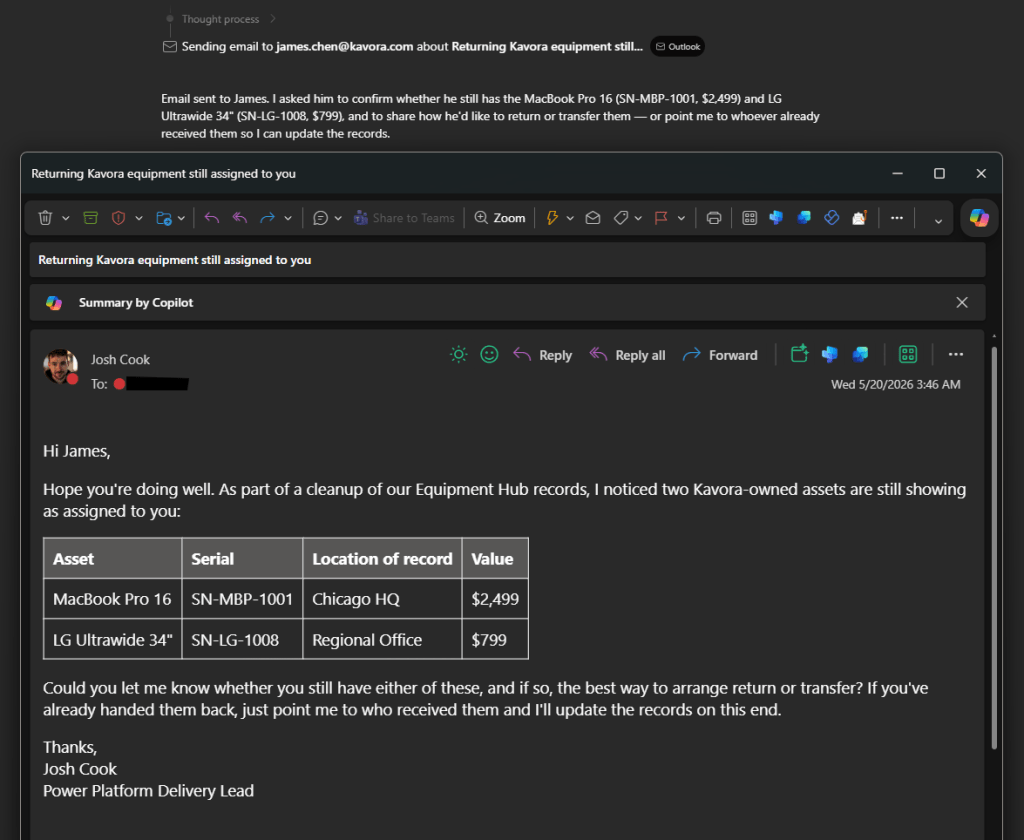
Send Email with context
use /<skill you just built>Email <James chen> asking about the <assets>
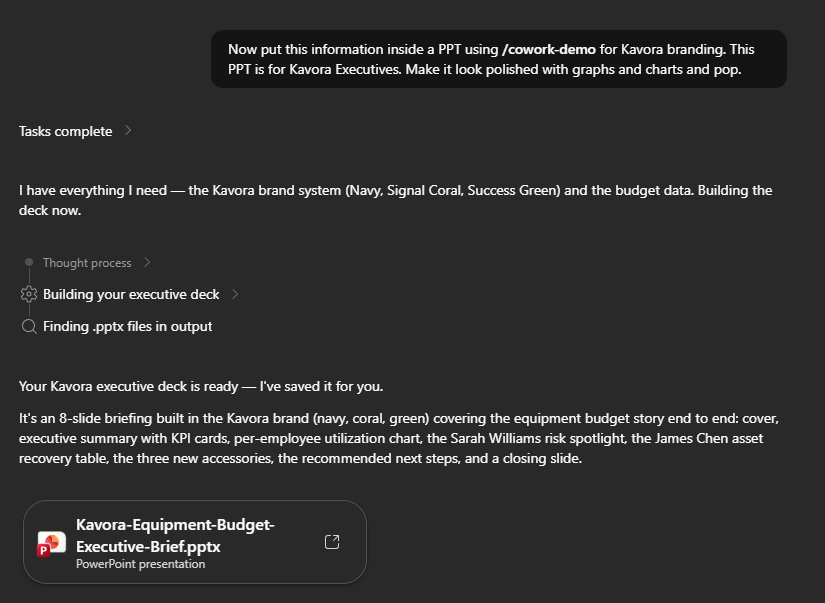
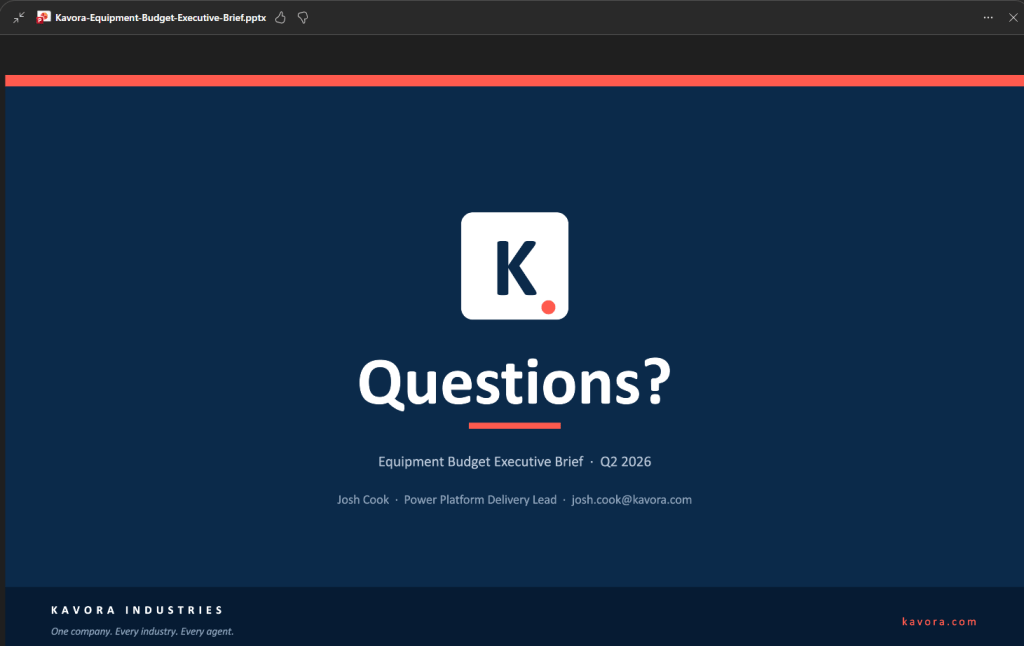
Create PPT with context + Brand
(NOTE: the branding is a separate skill not included in the plugin)
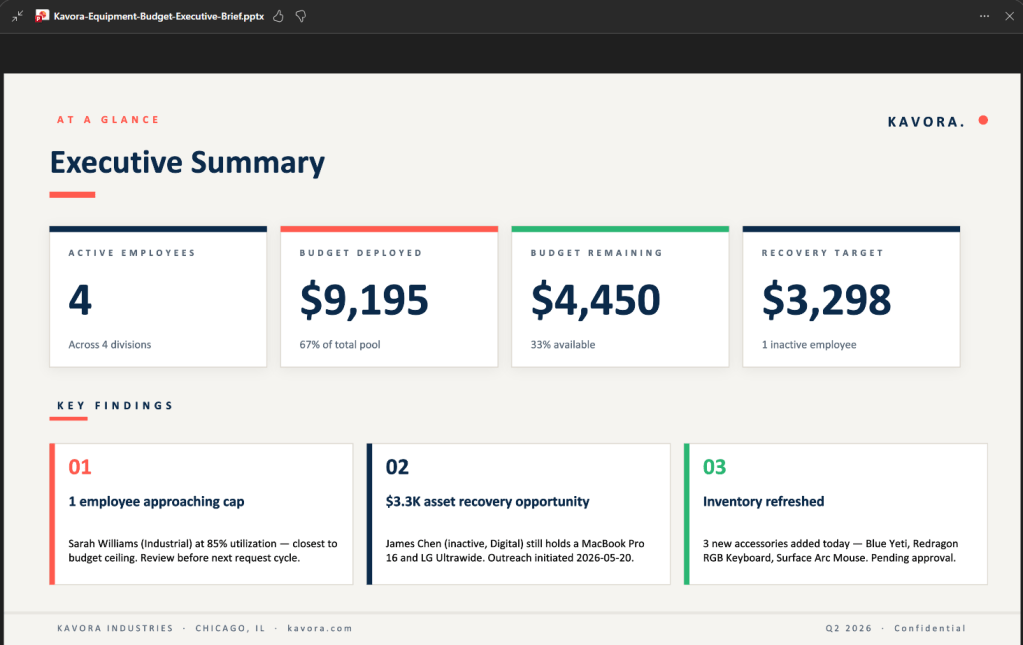
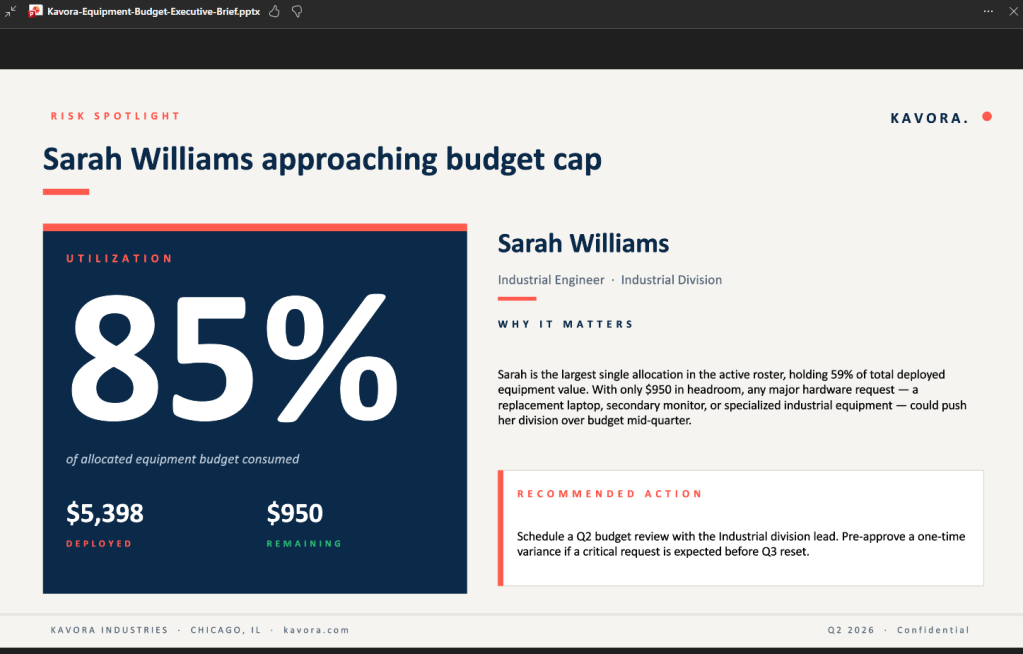
use /<skill you just built>Now put this information inside a PPTusing </branding-skill> for Kavora branding.This PPT is for Kavora Executives.Make it look polished with graphs and charts and pop.
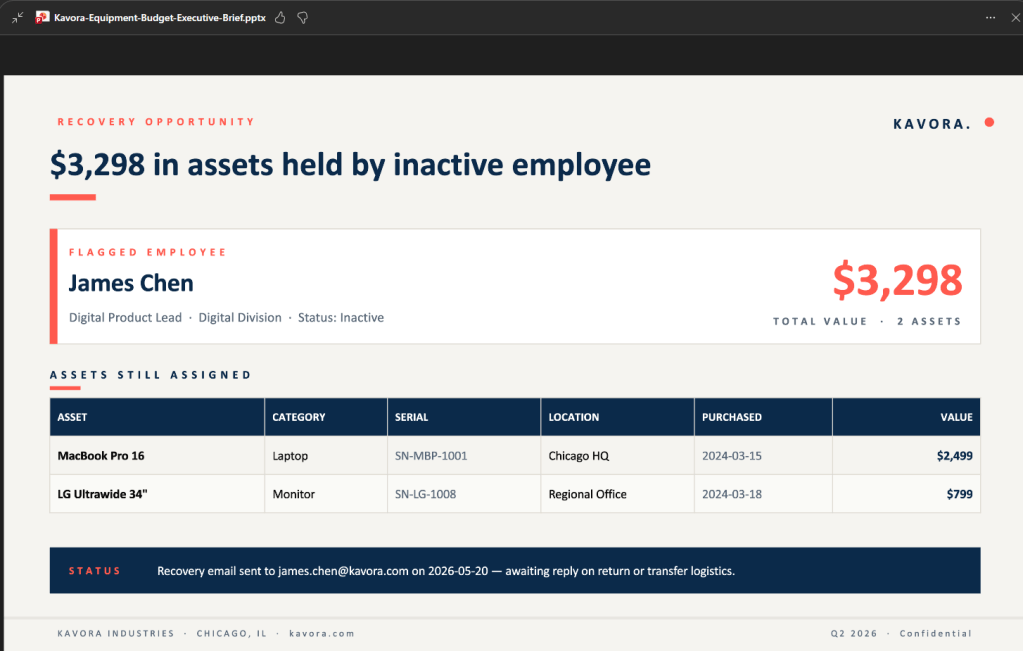

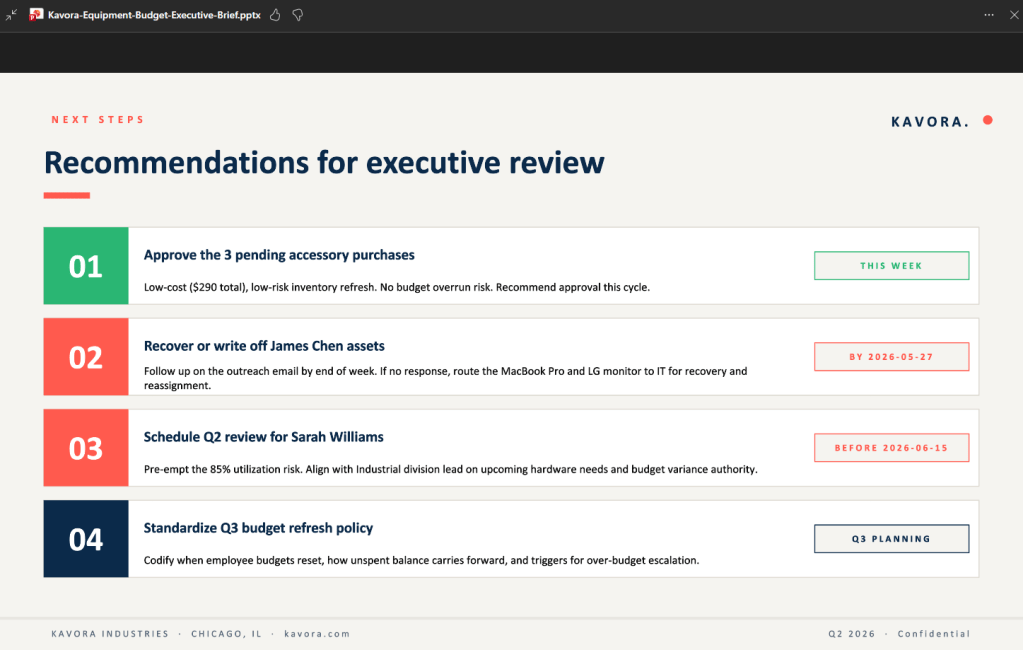
This is where the setup starts paying off.
Cowork can query the data, follow relationships, and return a useful answer instead of forcing you to manually pull everything together.
Common mistakes
Mistake 1: Mixing up the IDs
There are two important IDs:
- Entra Application / Client ID: used in Power Platform as the allowed MCP client
- OAuth Registration ID: used in the plugin manifest as the referenceId
If you paste the wrong one in the wrong place, the setup will fail.
Mistake 2: Wrong MCP URL
The MCP URL should look like this:
https://yourorg.crm.dynamics.com/api/mcp
Watch for missing /api/mcp.
Mistake 3: Wrong OAuth scope
The scope should use your Dataverse Org URL:
https://yourorg.crm.dynamics.com/.default offline_access
Mistake 4: Testing with a user that cannot access the data
Make sure the user testing the plugin has access to the Dataverse tables you are querying.
Mistake 5: Re-uploading the same version
If you change the package, update the version number before uploading again.
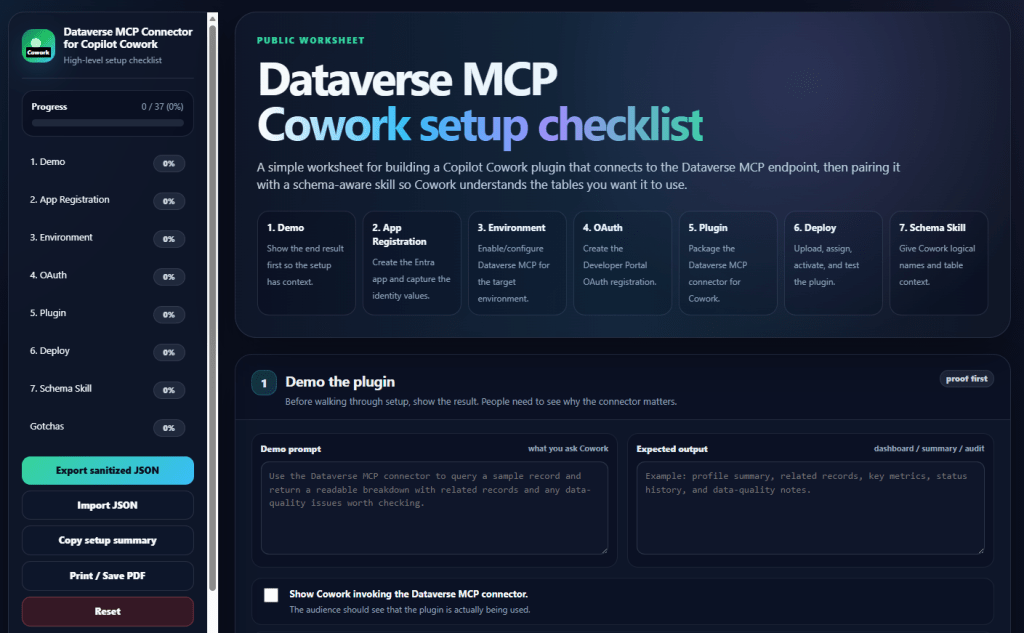
Download the checklist
I built a simple HTML checklist for this setup.
It lets you track the values, check off steps, auto-fill the scope from your Dataverse URL, and generate the connector snippet.
Download the Dataverse MCP Connector for Copilot Cowork setup checklist
Official docs
- Connect to Dataverse with Model Context Protocol
- Connect to Dataverse MCP from non-Microsoft MCP clients
- Configure the Dataverse MCP server for an environment
- Register MCP servers as agent connectors for Microsoft 365
- Configure authentication for MCP and API plugins
Final take
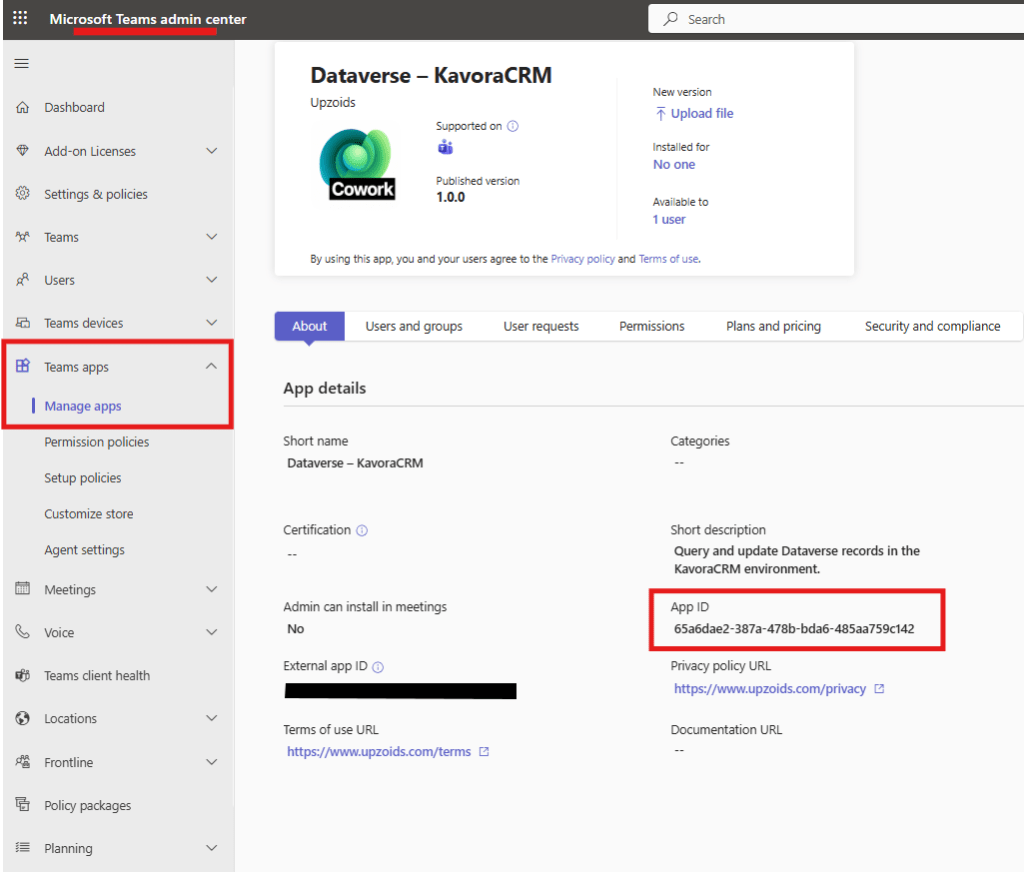
NOTE: When you have tested and validated you can connect to Dataverse. You will want to add the Teams App ID from the Agent Plugin we deployed and add it to the Teams Developer OAuth Registration.
- Go to Teams Admin center > Teams apps > Manage apps
- Find your Plugin you deployed > Copy the App ID
- Go back to Teams Developer Portal and open the OAuth registration tool that was created
- Paste the App ID into the “Restrict usage by Teams app” field as an Existing Teams app
This setup is still early, and there are rough edges.
But once it works, the direction is obvious.
Dataverse already has the business model.
Copilot Cowork gives users a work surface.
The MCP connector connects the two.
Add a schema-aware skill, and Cowork can start working through real Dataverse data in a way that feels practical for actual business scenarios.
That is the part worth paying attention to.
Let me know what other Plugins you want to see in Copilot Cowork.
