Tag: PVA

  • How to Use Regular Expressions in Microsoft Power Virtual Agents With Examples

    How to Use Regular Expressions in Microsoft Power Virtual Agents With Examples

    Regular Expressions in Power Virtual Agents? Sounds like a pretty advanced topic. But it’s actually not that difficult and can save you hours of time if you’re trying to validate user input for things such as credit card numbers, tracking IDs, custom invoice numbers or even IP addresses. In this post we’ll cover some of the basics of Regular Expression syntax so you can get started using them inside Power Virtual Agents.

    Summary

    To utilize regular expressions inside Power Virtual Agents, we must first create a new entity.
    This can be be done by clicking the Entities tab > New entity.

    Now select Regular expression (Regex)

    PVA does a great job in providing some general use case examples.

    The syntax is based on .NET


    RegEx Examples in PVA

    Below you will find some examples you can copy and paste directly into the Pattern for your Regular Expression:

    PatternDescription
    ^(?:(?:25[0-5]|2[0-4][0-9]|[01]?[0-9][0-9]?).){3}(?:25[0-5]|2[0-4][0-9]|[01]?[0-9][0-9]?)$IP Address
    – Looks for X.X.X.X format
    – Each X range in 0-255
    – X length 0-3
    ^4[0-9]{12}(?:[0-9]{3})?$Visa Credit Card numbers
    – Start with a 4
    – Old cards use 13 digits
    – New cards use 16 digits
    ^3[47][0-9]{13}$American Express
    – Starts with 34 OR 37
    – All have 15 digits
     ^(?:5[1-5][0-9]{2}|222[1-9]|22[3-9][0-9]|2[3-6][0-9]{2}|27[01][0-9]|2720)[0-9]{12}$Mastercard
    Starts with either:
    51-55 OR 2221-2720
    – All have 16 digits
    ^(?!0{3})(?!6{3})[0-8]\d{2}-(?!0{2})\d{2}-(?!0{4})\d{4}$Social Security Number
    – SSN are 9 digits
    – Looks for XXX-XX-XXXX format
    – Cannot contain all zeros
    – Cannot begin with 666 OR 900-999
    ^[a-fA-F0-9]{2}(:[a-fA-F0-9]{2}){5}$Mac Address
    – 6 byte hex separated by colon “:” OR dash “-”
    ^((6553[0-5])|(655[0-2][0-9])|(65[0-4][0-9]{2})|(6[0-4][0-9]{3})|([1-5][0-9]{4})|([0-5]{0,5})|([0-9]{1,4}))$Port Number
    – Matches valid port number in computer network
    – 16 bit
    – Ranges from 0-65535
    [A-Z]{2,}-\d+Jira Ticket Number
    – Looks for format Hyphen-separated Jira project key and ticket issue number
    ^(bc1|[13])[a-zA-HJ-NP-Z0-9]{25,39}$Bitcoin Address
    26-35 alphanumeric characters
    – Start with 1 OR 3 OR bc1
    ^[0-9a-fA-F]{8}\b-[0-9a-fA-F]{4}\b-[0-9a-fA-F]{4}\b-[0-9a-fA-F]{4}\b-[0-9a-fA-F]{12}$UUID / {guid}
    – 36 characters
    – 128 bit, represented in 16 octets
    – Looks for format form of  8-4-4-4-12

    Using them in PVA

    Once we create the Entity, and define the pattern for our RegEx. We can now use this validation inside our PVA chat.

    For example, I will test the IP Address pattern

    ^(?:(?:25[0-5]|2[0-4][0-9]|[01]?[0-9][0-9]?).){3}(?:25[0-5]|2[0-4][0-9]|[01]?[0-9][0-9]?)$
    

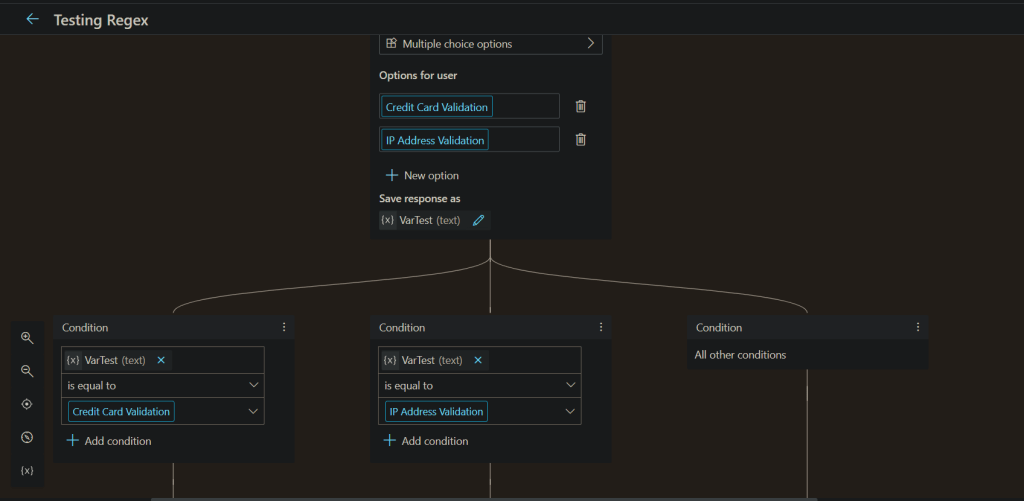
    I have created a topic for testing my RegEx.

    To use the newly created entity, Add a Question, under Identify select your Custom Entity

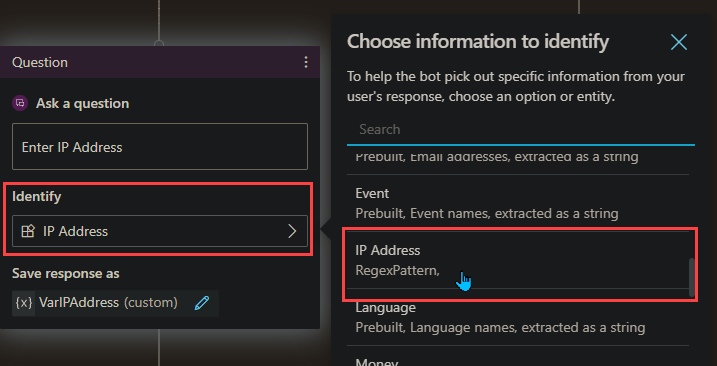
    Under this, I add a message to confirm its valid.
    (Note, the bot will automatically let the user know if the validation does not match)

    Testing the RegEx

    Okay, drumroll….
    The values I will be testing are

    User InputValid?
    192.168.1.1Valid ✔
    127.0.0.1Valid ✔
    999.55.1.5Not Valid ✖
    Not A IP AddressNot Valid ✖

    Conclusion

    Being able to use Regular Expressions inside Power Virtual Agents can be extremely powerful. And with the above list of common patterns, I hope you find value in this post.

    Thank you, and have a great day!

  • Where Are My Flows When Building Power Virtual Agents In Teams

    Where Are My Flows When Building Power Virtual Agents In Teams

    Overview

    Building Power Virtual Agents (PVA) in Microsoft Teams is fast, easy, fun, and powerful, especially when we add Power Automate to the mix. A couple questions come up:

    1. After the bot is build, how do we edit the Flows? Do we have to go into the PVA bot inside of Microsoft Teams?

    2. Where are the Flows stored?

    The Answer

    The answer to the above questions, can be simplified into one response.

    All Flows built inside the Teams environment for PVA chatbots are stored in the Teams environment under the Default Solution.
    Now.. How do we get there?

    Navigate to the Power Automate Web Portal
    Power Automate | Microsoft Power Platform

    Sign in, and select the environments menu in the top right and choose the Environment that correlates to your Teams name where you built the Bot.
    My Microsoft Team name is ‘POC – Teams

    Next navigate to the Solutions tab on the left, and select ‘Default Solution


    Once inside the ‘Default Solution‘ we can see many different types of artifacts. To narrow this list down:
    On the top right of the page there is a dropdown with different types. Select ‘Flow

    That’s it. Now we can see all the Flows inside this Teams Environment.

    Want to learn how to get user info from Office365 to use in Power Virtual Agents? Check out my blog on the flow you see above
    Get User Info

    Limitations

    There are some limitations:
    – There is no way to import a Flow into this Environment

    – When using the Save As feature, the Flow is saved outside of the Solution, thus cannot be used for your PVA Bot in Teams

    – When modifying the Flows Inputs and Outputs you will have to remove the Flow action inside of PVA to properly refresh.

    Conclusion

    If you need help with anything Power Platform related, check out the community sites:

    Power Virtual Agents Community – Power Platform Community (microsoft.com)

    Power Automate community (microsoft.com)

    Power Apps community (microsoft.com)

    Home – Microsoft Power BI Community

  • Getting User Details To Use In Power Virtual Agents (Teams)

    Getting User Details To Use In Power Virtual Agents (Teams)

    Things to Know

    This examples is based on building a Virtual Agent in Microsoft Teams.
    We will be using the ‘Only for teams’ Authentication on the bot.

    Summary

    By default PVA in Teams has some valuable variables handy, like ‘bot.UserDisplayName‘. This is awesome, but what if we want more information about the logged in user?

    This post will show both scenarios, on using the bot.UserDisplayName variable as well as getting all the user details that are stored in Office365 like:
    – Email Address
    – First Name
    – Last Name
    – Job Title
    – Etc.

    We can also use this in the Greetings Topic to address the user by their first name, rather than their display name. (Keep in mind this might affect performance by a couple seconds)

    Contents

    Bot Setup
    Scenario 1 (Display Name)
    Scenario 2 (Office365 Details)
    Conclusion

    Bot Setup

    Once you have your Bot created, make sure the Authentication is set to ‘Only for teams’. To check click
    Manage > Security, Authentication

    For this example we will be using the ‘Only for Teams’ option. This will work for ‘Manual’ as well, but will require additional steps to setup a App Registration in Azure.

    Select ‘Only for Teams’

    Customize Greeting Scenario 1 (DisplayName)

    After enabling the Authentication, you will now have access to Two variables,
    bot.UserDisplayName
    bot.UserId

    Now lets customize our greeting.

    Navigate to ‘Topics’ and select the ‘Greeting’ Topic, this is under ‘System Topics’. Click on the Authoring Canvas button.

    Inside the message under the Trigger, you can customize the greeting message to include the variable bot.UserDisplayName

    Testing this, the Bot now knows my Display Name. This variable can be used in any topic. Which gives the Bot more of a human type feel.

    To get all the user details from Office365, scenario 2 will cover this

    Customize Greeting Scenario 2 (Office365)

    Navigate to ‘Topics’ and select the ‘Greeting’ Topic, this is under ‘System Topics’. Click on the Authoring Canvas button.


    Under the ‘Trigger Phrases’ and select ‘Call an action’. We will now build a new Flow to get the user details we want.

    You will now be navigated to a new screen where you will build your Flow.
    Select the Basic PVA Flow Template

    First give the Flow a meaningful name. Mine is:
    Power Virtual Agents – Get User Info

    Add a Text Input to pass in the Display Name variable

    Next add a ‘Search for users‘ action from office365 connector, and pass in the PVA dynamic value from the trigger

    Now we have all the user details. The results are returned as an Array. To get around this.
    We can add a ‘Get user profile‘ action and pass in the first User Principal Name(UPN)

    We have to use the first() expression, so we don’t get put into an Apply to each loop, my expression:

    first(outputs('Search_for_users_(V2)')?['body/value'])?['UserPrincipalName']
    
    @{first(outputs(‘Search_for_users_(V2)’)?[‘body/value’])?[‘UserPrincipalName’]}

    Lastly in the Return values to PVA action, add all the values you want from ‘Get user profile‘ dynamic content

    Click Save, and close on top right of the screen. Back at the PVA Canvas screen, add your Flow

    Pass in the bot.UserDisplayName variable

    Now we can customize our greeting to only address the user by first name

    As a test I created a Topic called User Details

    Conclusion

    This can be a great way to give your bot more personality. Do keep in mind that this may affect performance.