
The scenario here is to enable row level security within the concepts of Dataverse inside a Model-Driven App. Important to note, this can be applied to Canvas or Model-driven apps.
For example:
I have a Sale Commission table which is connected to a Model-Driven App. One of the columns is a choice called Store.
The concept is; we only want users to see records from their own respective stores. This concept seems straight forward and easy.. After some digging and reading documentation and asking some friends in understanding this model. I found a way to do this. So here it is!
Video Tutorial
Prerequisites
The feature that will help us in this concept is called Matrix data access structure (Modernized Business Units). Click the link to read more into it. But I will articulate what we need to do.
Enable record ownership across business units (preview)
First we need to enable this feature on an environment. Follow the steps below to enable this feature.
- Sign in to the Power Platform admin center, as an admin (Dynamics 365 admin, Global admin, or Microsoft Power Platform admin).
- Select the Environments tab, and then choose the environment that you want to enable this feature for.
- Select Settings > Product > Features.
- Turn On the Record ownership across business units toggle.
- Click Save.

Setup steps
This guide is assuming you have your Dataverse tables built.
We need to setup a few things to get this functionality to work:
Create Business Units
We are creating a Business unit for each “Store” in this example.
Creating business units in the Power Platform Admin center:
- In the Admin center, select your environment.
- Select the Settings cog in the top.
- Under Users + permissions.
- Select Business units.

- Click New, and create as many business units as you need.
- In this example, I am creating 3. One for each store.

Create security role
We want to create a security role. This is a role to give access to the custom tables we have for Dataverse, as well as privileges for Business unit. This will allow users to append different Business units to new records.
While still in the Admin center;
- Click See all under Security roles.

- Click, New role or edit an existing role.
- When editing the role click the Custom Entities tab.
- Find your table that users will be interacting with. In this example, its Sale Commission table.
- Set this table to:
Read = Business unit
Create = Parent child business unit

- Next, click the Business Management tab.
- Set the Business Unit table to:
Read = Parent child business unit
Write = Parent child business unit
Append To = Parent child business unit

- Click Save and Close.
Assign security role
Now we need to assign the security role to users based on the Business unit. To do that follow the steps:
While in the Admin center;
- Click See all under Users.
- Select a user to assign the Business unit role to.
- Click Manage roles.
Notice that we can change the Business unit the Security role can be assigned under.

In this example, I am assigning the role under each Business unit to give permissions.
- Select the Business unit and assign the role.
| User | Roles assigned + Business unit |
|---|---|
| Adele | Sales Contributor in MainStore-BU |
| Alex | Sales Contributor in NorthStore-BU Sales Contributor in DowntownStore-BU |
Based on the table above.
- Adele can see all records part of the Main store
- Alex can see all records in North Store and Downtown Stores
- Click Save.
Create Business rule
Now that the feature has been enabled and configured, we still need to change the Owning Business Unit field based on the selected store. There are many ways to do this, but for this example, I will be using a Business rule.
To configure a Business rule;
- Navigate to your solution, or where the table (Sale Commission) is in Power Apps.
- Select the table, and click Forms.
- Select the form that users will be using when creating records.
- Once the form is opened, add the Owning Business Unit field, and select it
- Once selected, click Business rules on the right pane.
- Click New business rule.
- Give the rule a meaningful name.
- In the default condition, in the properties tab mine looks like this:

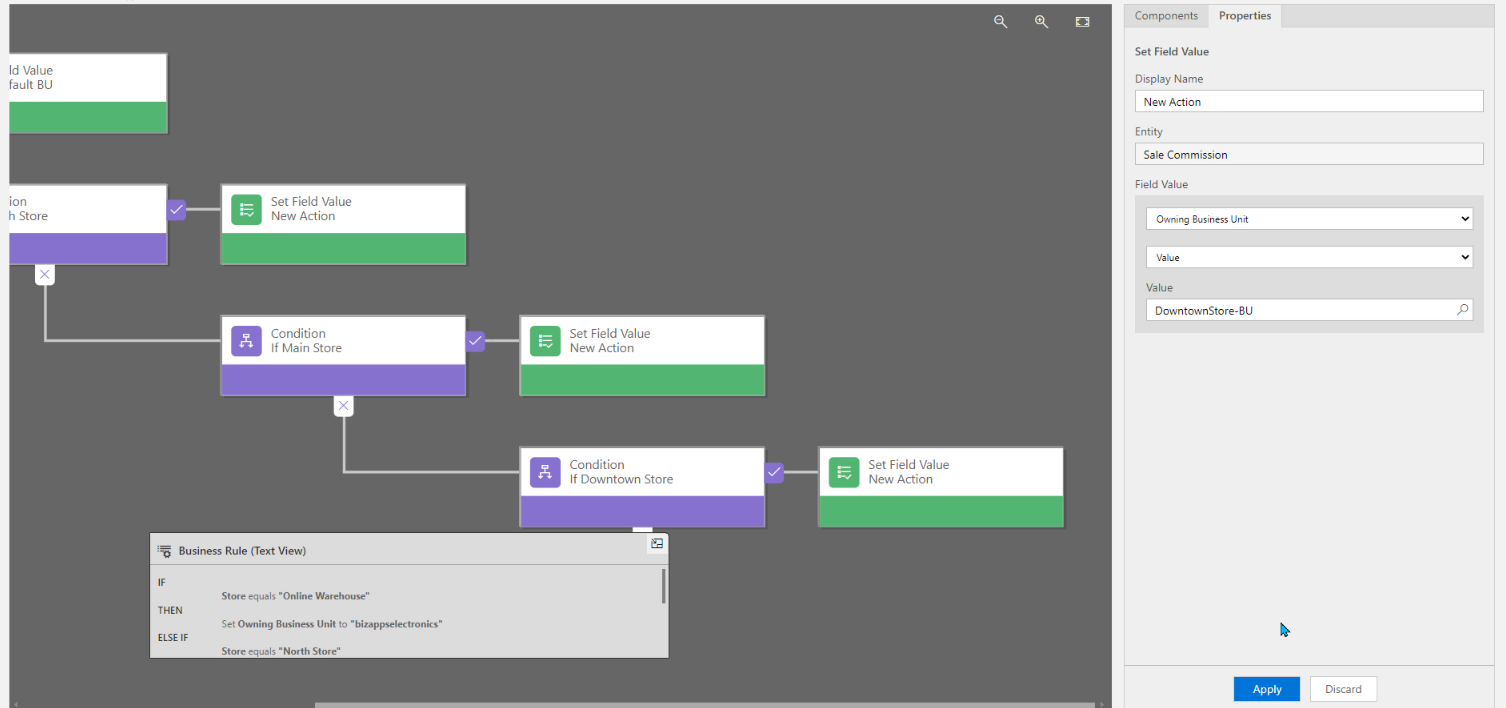
For the rule, I am going to add a Condition to the “is false” and continue to do this for each Business unit / Store I want to check.
Here is what mine looks like after adding all the conditions:

Next we need to Set the values of the business unit based on the store.
- In the components tab, add a Set Field Value action to all the “Is true” paths.
- With the Set Field Value selected, click on the Properties tab.
- Select Owning Business Unit for Field and the right Value. Example for the NorthStore:
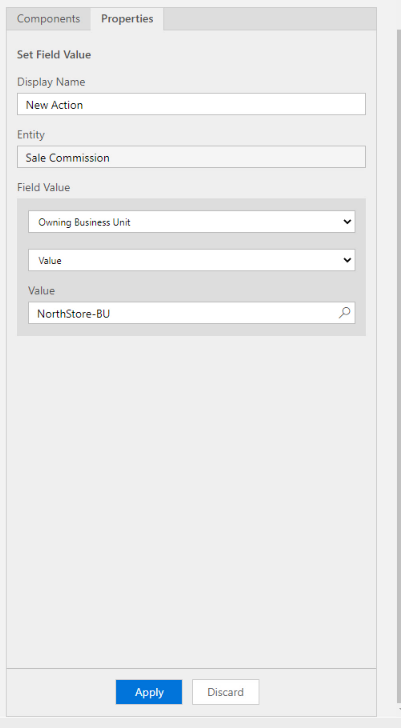
- Do this for all the Conditions. Mine looks like this:
- After you’re done, click Validate.
- If validation is good, click Save.
- After saved, click Activate.
That’s it. Done!!
Now when a user selects the Store, it will automatically change the Owning Business Unit.

