Take a phone number like 4031234567 and turn it to (403)-123-4567 with one simple step!
Scenario
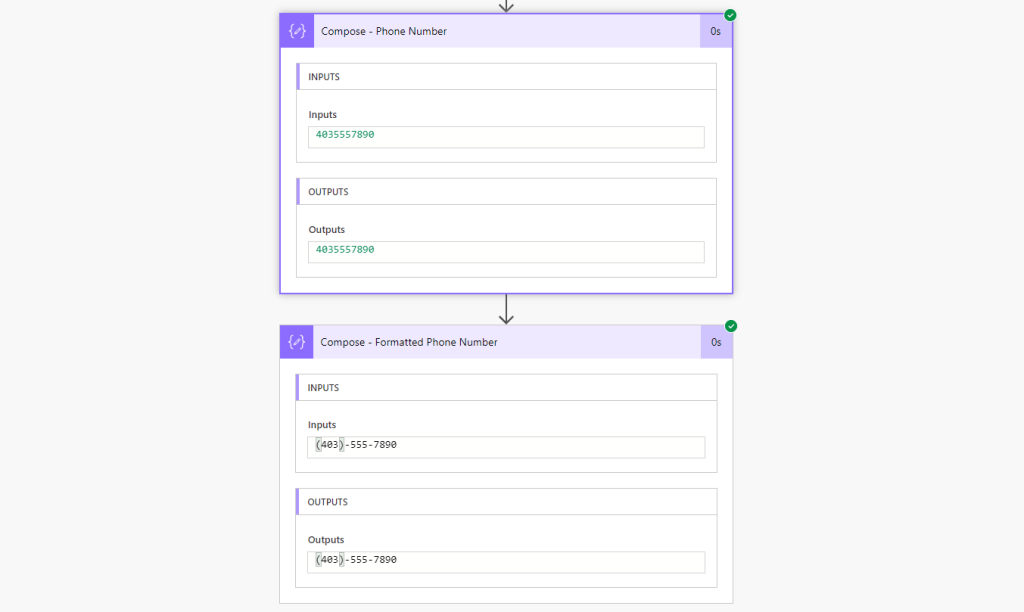
We have a phone number coming in from a secondary system as a integer number. We than want to add some formatting to this to be easily read and look cleaner. For example, a phone number comes in like this: 4035557890 And make it look like (403)-555-7890
Things to Know
Since we add ‘-‘ and ‘( )’ this turns our data type to become an String. Keep this in mind, since you wont be able to pass this into a field in another system that is looking for a Integer value
The Flow
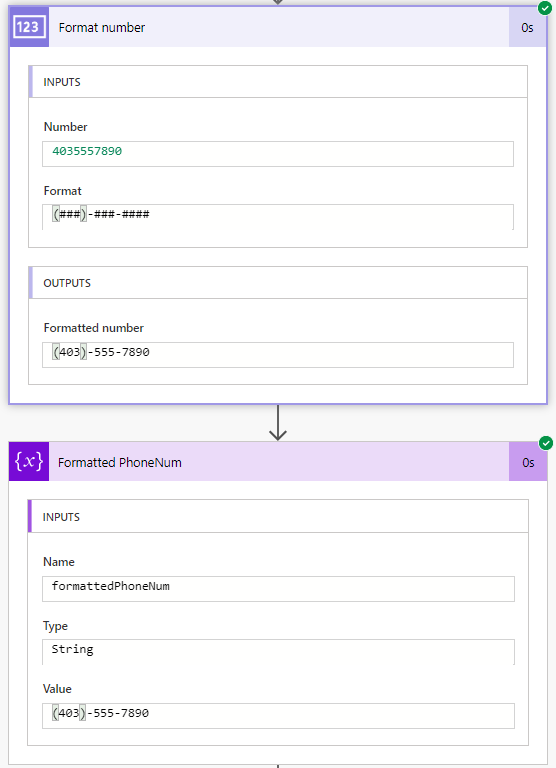
This Flow is very simple. To achieve the formatted number I am using the action ‘Format number’. This is a fairly new connector that is mainly used to format currency values. But we can utilize the format to define any formatting we want
Looking at the above picture, we are passing a Integer phone number into the Format number action. Than we specify the format we want to use by selecting the drop down > clicking ‘Enter custom value‘
End Result!
Conclusion
Since this action is fairly new, I am curious and looking forward to see if the Power Automate team will expand and add more actions like this to make formatting a breeze.
I have learnt this method from John Liu. I have pointed so many people, and community users to John’s blog when they run into this Excel connector limitation. I have found multiple people thinking its too complicated, or confusing, because the method works with Graph API to get the File ID. So this blog will be a very easy guide to follow and hopefully will be able to get your Flow being able to use a dynamic filename. If you have any questions or problems with this guide or other Power Automate related questions, reach out to me on Twitter.
New Update – Easy Way 2021
The following video explains a way easier way to do this, no API, no messy File ID’s. Check it out!
Things to Know
To make this even easier, we will be having the Excel file that be stored into a SharePoint Document Library. We can also use the SharePoint HTTP call action to better build our REST call more easily. * We will still need the Excel file to have a table defined *
Getting Started
First we will create a new SharePoint Document Library for the files, or use an existing document library.
Next, we want to have one Excel file in the Library to start, so we can make sure this is working. Here is what mine looks like:
My example, I have a Document Library called ‘Excel Files’ with a Excel file to start with
Overview of The Flow
For the Flow, I am using the SharePoint action ‘Send an HTTP request to SharePoint‘. This action uses MS Graph in the background, but makes it a lot easier to construct a API call. First we will use a simple call to SharePoint using the ‘Send an HTTP request to SharePoint‘ action to get all the Document Libraries for our site. Than use the output of that action to find the Document Library Drive ID. This is how we navigate through the SharePoint site, we want to do this until we are in the folder of our Excel File.
Lets Build that Flow
First we add ‘Send an HTTP request to SharePoint‘ action
Uses Graph API in the back-end
In the SharePoint HTTP action, use the following: – Site Address: If your SharePoint site does not show up in the drop down, click use ‘Enter custom value’ and type the homepage of your site – Method: GET – Uri: _api/v2.0/drives/ – Headers: accept application/json
Now trigger the Flow to get the Output of the HTTP request.
You can also read and get what you need through the Output Body window
I am using Visual Studio Code to paste the Output into, its free, and easy to use. If you have lots of Document Libraries, you may want to use a Find feature and search for the Document Library name. For this demo I will be searching Excel Files. We need to look for a specific ‘id’ inside the output
Copy this ‘id‘,we can use this value to navigate inside that Document Library in our HTTP request. Our new URI should looks something like: _api/v2.0/drives/b!MJxrwkJ2FUGanaxoijg0eZmnU9iP4aJJsidrZJQNlsBAb-8VLzYJRbD9CKmJa0j8
Now we need to add /root:/ to the end of our URI
We are almost complete! We now need to specify the path to our file. Here are some examples:
If file is directly in the Document Library(No Folders) – Just add the filename with the extension _api/v2.0/drives/b!MJxrwkJ2FUGanaxoijg0eZmnU9iP4aJJsidrZJQNlsBAb-8VLzYJRbD9CKmJa0j8/root:/MyNewExcelFile.xlsx
If file is in a folder – Add the folder name, than the Excel file with the extension * NOTE: If folder name has spaces, than use%20 instead of a space * Folder name = Historical Files _api/v2.0/drives/b!MJxrwkJ2FUGanaxoijg0eZmnU9iP4aJJsidrZJQNlsBAb-8VLzYJRbD9CKmJa0j8/root:/Historical%20Files/MyOldExcelFile.xlsx
Mine is not in a folder so I will be using the first one. Now to make the file dynamic, I will be using a Compose action to store the Filename. So in my HTTP Request I will be using my Compose action with the Filename and extension at the end. My example will look like this:
The Filename, can come from any Dynamic content, I am just using a Compose for the sake of this Demo
Now test the Flow to validate the HTTP request is valid. The output should have some references to the file, like the name of the file, size, created date time, and last modified date time. My output looks like this:
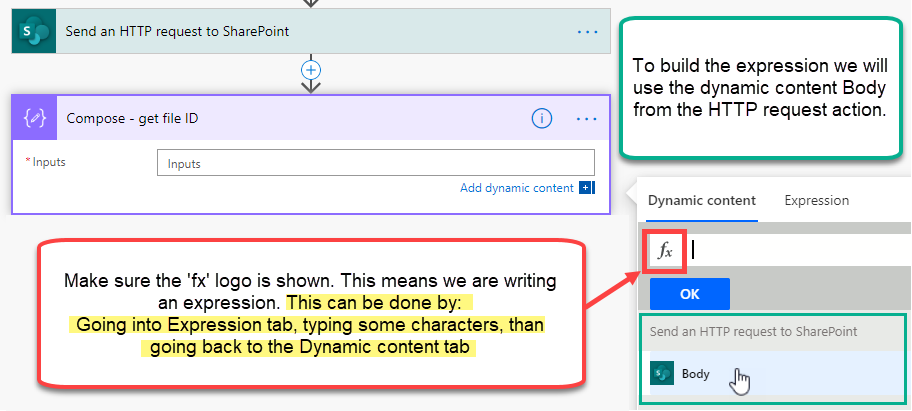
Next, to get the file ID, we use a Compose action with an expression. Add a Compose action, inside the Compose we will use the HTTP request Body dynamic content in a expression:
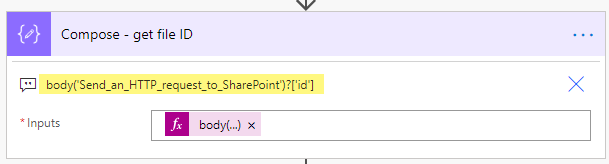
With the fx logo present on the dynamic content tab. Click the Dynamic content Body. Now we use JSON path to grab the file ID. This is done by adding a ?['id'] to the end of the expression. My expression looks like this:
body(‘Send_an_HTTP_request_to_SharePoint’)?[‘id’]
body('Send_an_HTTP_request_to_SharePoint')?['id'] You can copy my expression, just make sure to change the Send_an_HTTP_request_to_SharePoint to your HTTP request action name
Next add an Excel Get tables action. Use the outputs from the Compose – get file ID for the File
Now add an Excel List rows present in table action. File: Use the outputs from Compose – get file ID action (same as we did for Get Tables) Table: Click Enter custom value. Use this expression to get the first table name first(body('Get_tables')?['value'])?['id'] Power Automate has been updated the new expression to get the tables is: first(outputs('Get_tables')?['body/value'])['id'] ** Same as before. Get_tables is my action name **
first(outputs(‘Get_tables’)?[‘body/value’])[‘id’]
Success!!
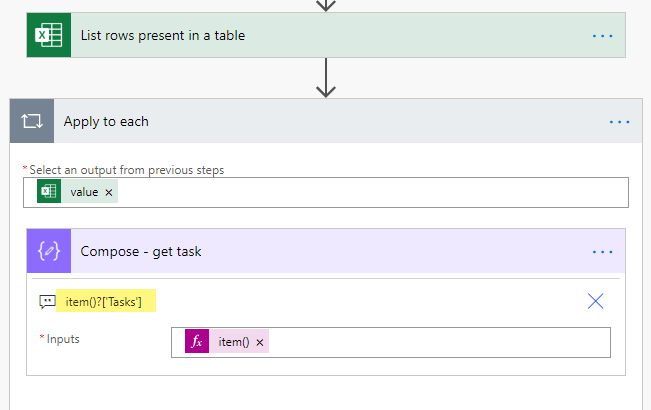
Now, sometimes the Dynamic content of the Excel columns wont be there now. You can easily grab any column you like using the item() expression. For example I have a column named Tasks so my expression will be item()?['Tasks']
item() can only be used inside an Apply to each
Conclusion
Being able to use a Dynamic filename in the Excel connector can be tricky. But I am hoping with this guide, anyone who needs this business requirement can easily follow this, and get it done.
In this post, I wanted to share some of the tips and tricks that I have learnt and came across. Some of these tips I will cover the basic fundamentals so you can start using them to help you build you Flows with less pain and more fun!
1. Compose
Compose actions, are one of my favorite actions to use. They are so robust and can display pretty much anything. Compose can be found under Data Operation > Compose
1.1
Add a Compose action before a Condition to check what values are being evaluated. In this example, my condition is saying: If length of value is greater than 0 I add a Compose action before the condition, with the same value I am using in the condition. This allows me to check the run and see the value being evaluated Example:
1.2
If Flow is spitting out errors about a wrong data type or you keep getting unexpected values – Since Compose can hold just about any data type. We can add one and check what the value is in run history.
1.3
Compose actions are great for doing expressions – We can add a Compose action and do expressions in the input, instead of writing the expression directly inside another action. This is handy if you need to do multiple expressions, or error checking.
2. Meaningful Names
There is nothing worse than leaving the default names for all your actions. This can be confusing, which can cause errors which could have been avoidable. This tip is going off tip #1.
2.1
The picture below shows a bunch of Compose actions Left: Default names used – Makes it very hard to know which action is what Right: Custom names used – Changing the names to something meaningful allows actions to be easily found and referenced.
2.2
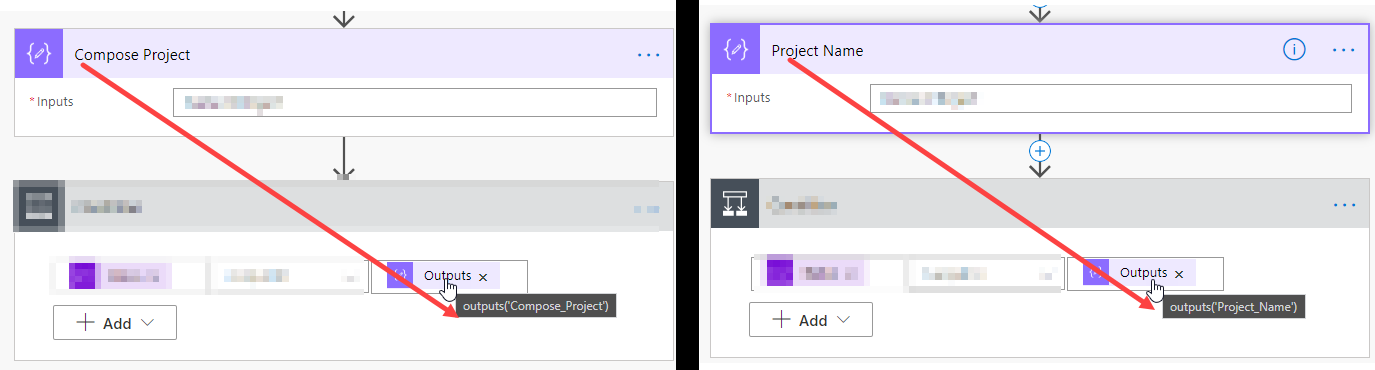
For awhile now, Power Automate has had a limitation with renaming actions that were being referenced in other places. That has since changed. We can now rename action that are being referenced in other actions! For example: The left picture shows the Compose action named ‘Compose Project’ and is being referenced by the condition below. Changing the Compose action name to ‘Project Name’ also changes the name in the referenced condition, which is shown in the right picture.
—–NOTE —– Limitations still exist.. The reference will not be updated if the action is in a expression OR inside a Loop. And will throw an error of: Template Validation Failed. So it is always best to rename actions right away —————
2.3
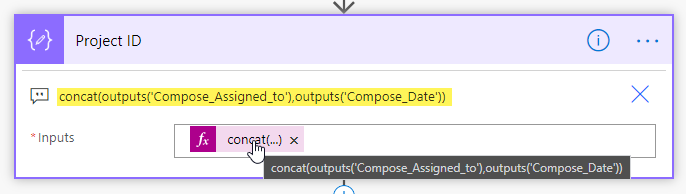
When using Expressions, to better understand and show others what is going on. Comments are great for this. For example, if using a complex expression I like to copy the expression and put into a comment of that action:
3. Scopes
Scopes are handy, they can be used for grouping actions together. In this guide I will show how to use scopes to group actions together. There are many advanced techniques that scopes can be used for, but for this demo I will be showing the very basics. Scopes can be found under Condition > Scope
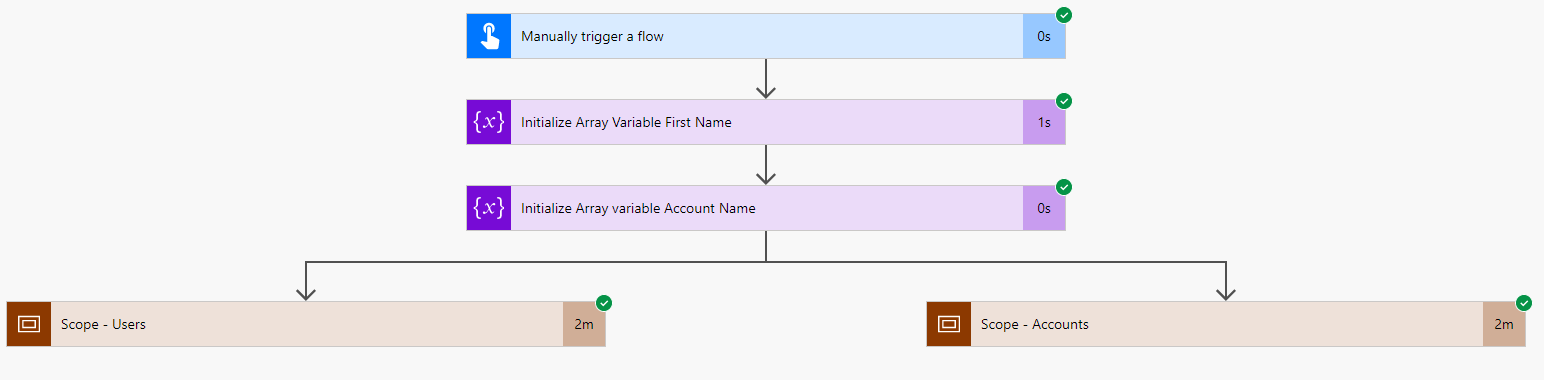
I will add 2 scopes, one for Users, and one for Accounts To add actions in the scope, Click and Drag the action into the scope
Drag the actions in so the order of the actions remain the same. For example, I put the Scope above the List Records action so I could drag the List records in first than the For each loop next
This concept will help us in the following tips
4. Parallel Branches
All Flows run from top to bottom in a single order fashion. If we split the actions to run side by side (parallel) This would drastically improve performance. In this scenario I have Two(2) CDS List records, and Two(2) Apply to each loops
List Records – Users Apply to each – To Append(add) all First names into a single variable List Records – Accounts Apply to each – To Append(add) all Account names to a single variable
Here is what the Flow looks like:
Running the Flow, we can see it takes about 4 minutes
Before we create a parallel branch we first must put the actions inside a Scope, this is to allow us to drag the actions around without getting the
This action cannot be dragged above actions it depends on. Error
Refer to Tip# 3 for details on Scopes
Now lets have these 2 different Scopes run in parallel branches First we want to click the ‘+’ icon where we want to add the branch, next click Add parallel branch
In this example, I am adding a parallel branch above both Scopes
Our screen will look like this:
Next we need to Click and Drag one of the scopes to the new branch
Once the Scope is in the branch we can click the X on the Choose an action tab
Now lets run thew Flow again: As the picture below shows, the Flow now only takes 2 minutes to run, cutting our run time by half, that’s insane!
Imagine our run normally taking 30 minutes, now only taking 15, just from a simple step
Tip# 5 will make our Flow run even faster!!
5. Concurrency
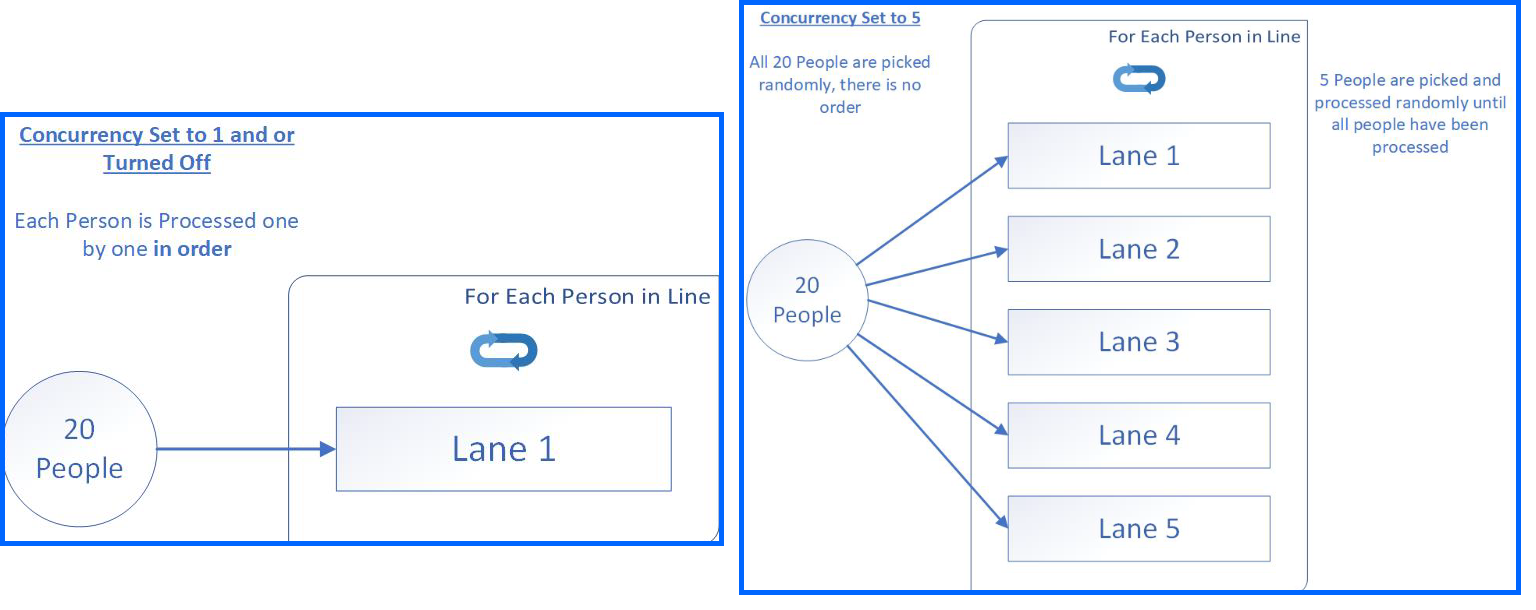
What is it? By default loops run one after another. Concurrency can make loops run in parallel. To better understand this, we can think about a grocery store. In this scenario:
People = Value that is going into Apply to each loop Lanes/Cashier = Concurrency Control Number
There are 20 people waiting in line at the store. There is 1 lane/cashier open. Since the cashier can only take one person at a time, this process can be lengthy. Now with Concurrency turned on, things are a bit different. Lets say we set Concurrency to 5. This means 5 lanes/cashiers will be open. This is great! But there is a catch..
When Concurrency is enabled, there is no more line. All 20 people are processed randomly.
Concurrency can be applied to all Apply to each loops — As well as Triggers!
To enable Concurrency:
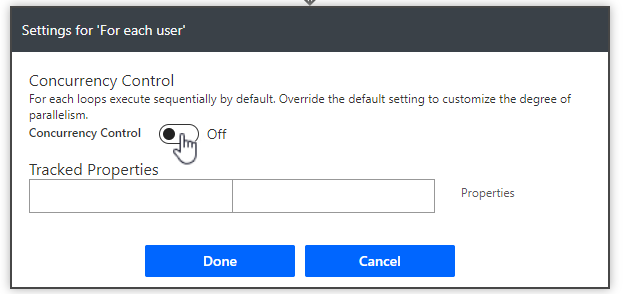
First, click the 3 dots on the Apply to each action Next, click settings
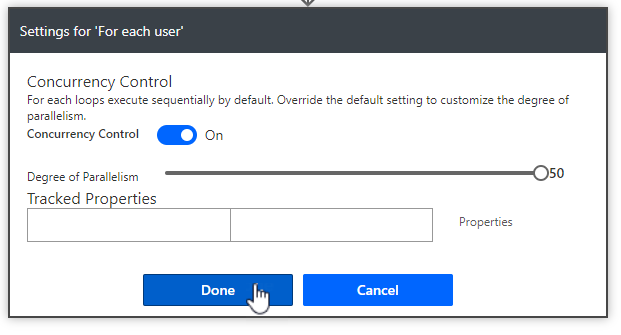
Next, choose the value for Concurrency and click Done
For this Demo, I am setting Concurrency to 50. Please be aware of API limit calls and 429 errors. If you get these errors while flow is running. Decrease the Degree of Parallelism
Now lets see this in action! I set Concurrency to 50 on both my Apply to each loops from the last Tip. As a recap, the last time we ran the Flow, it took 2 minutes to run.
Results: About 5 seconds!
The Run time is about 5 Seconds. Since we used a Parallel branch the total run time is the longest duration of our Parallel branches
This drastically improves performance.
Conclusion / Key Take Notes
Use a Compose action to check values and outputs, that you normally cannot see, Like in a If Condition
Compose actions can store almost any data type. When in doubt.. Use a Compose
When using expressions, try using them in a Compose, this can make troubleshooting much easier
Always use meaningful names for all your actions. Doing this will save loads of time later on, when needing to use dynamic content
Comment, comment, and more comments. All actions allow for comments. This will help support teams troubleshoot your Flow, as well as your future self, if you have to make any updates later on
When using expressions, copy the expression and paste into the actions comments section.
Use Scopes to group actions together.
To speed up performance, use parallel branches to enable actions to run side by side
Enable Concurrency control on Apply to each loops to drastically increase performance
Remember enabling Concurrency control randomizes the order the loop iterations run in. So if you’re expecting a certain order processing to happen, do not enable
These are some of the tips and tricks I wish I knew sooner. I hope at least one of these tips and ticks have helped someone. Thanks for reading!












 Flow Alt Delete - Josh Cook [Microsoft MVP]