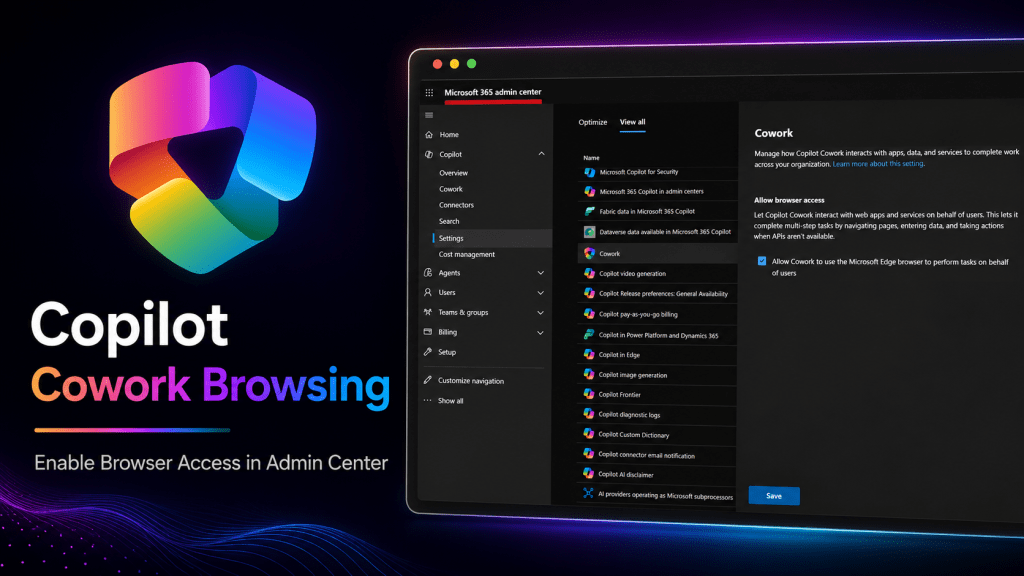
Copilot Cowork browsing is a powerful capability, but there is one admin setting you need to turn on first.
If you want Copilot Cowork to complete browser-based work using Microsoft Edge, browser access must be enabled in the Microsoft 365 admin center.
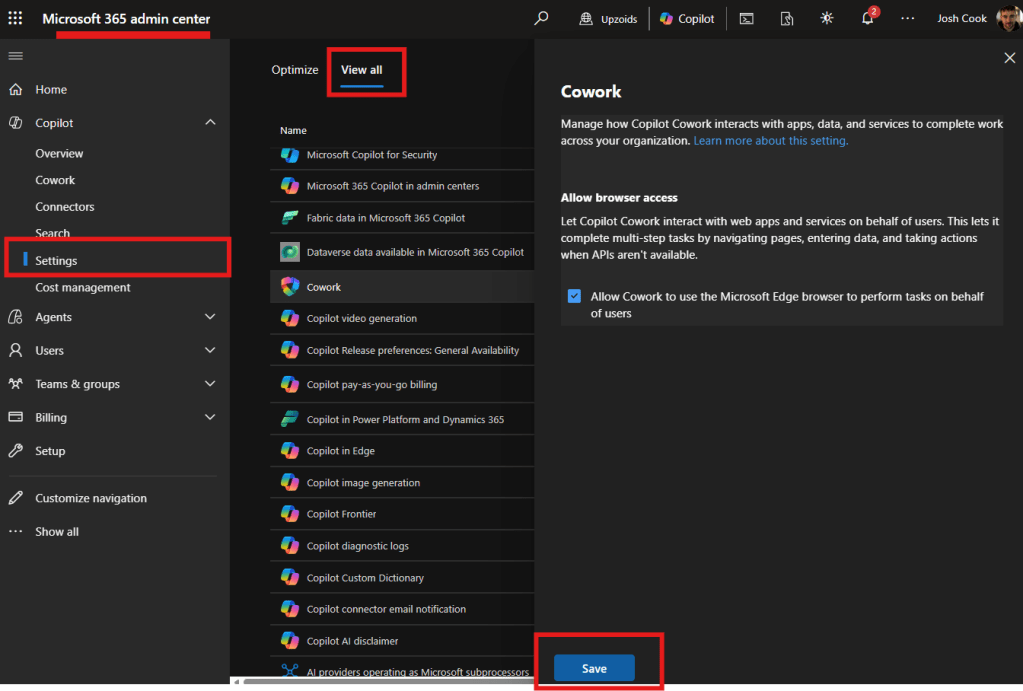
Where to enable Copilot Cowork browsing
Go to the Microsoft 365 admin center and follow these steps:
Open Copilot
Select Settings
Select View all
Find Cowork
Turn on Allow browser access
Select Save
Copilot Cowork browser access setting in the Microsoft 365 admin center.
This setting is off by default.
Once enabled, Copilot Cowork can use Microsoft Edge to interact with web apps and services on behalf of users. That means it can navigate pages, enter data, and complete browser-based tasks when APIs are not available.
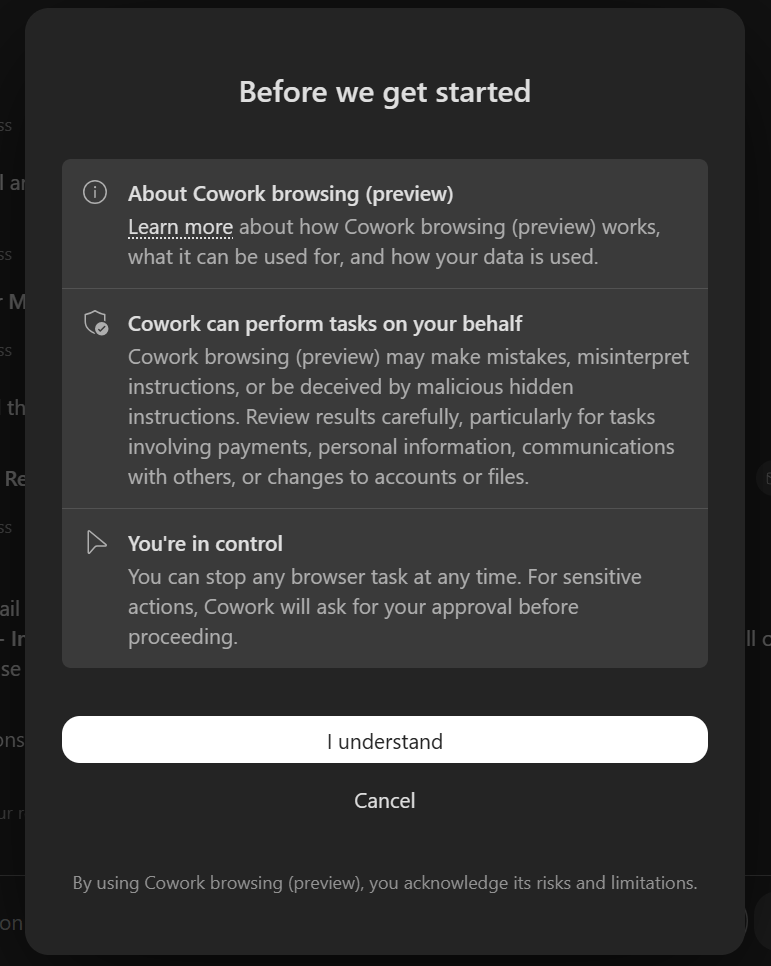
What users see before using browsing
After browsing is available, users still see a confirmation screen before starting. The prompt explains that Cowork browsing is in preview, can perform tasks on the user’s behalf, and may make mistakes or misinterpret instructions.
The confirmation screen users see before starting Copilot Cowork browsing.
This is the right pattern for enterprise use. Admins control whether browser access is available. Users acknowledge the risks before using it. Cowork asks for approval before sensitive actions.
Why this matters
A lot of business work still happens inside web applications that do not have clean APIs, connectors, or automation-friendly interfaces. Browser access gives Copilot Cowork another way to help users complete real work across those systems.
Examples I would test first
The best Copilot Cowork browsing scenarios are the annoying business tasks trapped inside web apps.
Portals. Admin screens. Expense systems. Vendor sites. Internal tools. Places where the work still requires a person to open a browser, navigate pages, enter data, review details, and decide what happens next.
Here are the types of scenarios I would start testing.
1. Expense reports in a web expense system
This is one of the cleanest examples because the work is structured, repetitive, and still needs human review.
Cowork could gather receipt context from Outlook or OneDrive, open the expense system in Edge, fill in the draft expense report, ask for missing details, and stop before submission.
Prompt idea:
File my expense report for last week's trip.
Use receipts from Outlook and OneDrive as the source of truth.
Open the expense portal in Edge and draft the report.
Ask me for anything missing.
Do not submit until I approve the final details.
2. Vendor portal status checks
A lot of finance and operations work happens inside vendor portals. Invoice status, payment status, shipment updates, support tickets, contract renewals, and order details are often sitting behind a web login.
Cowork browsing could open the vendor portal, search for the right invoice or order, capture the current status, and draft a response for the internal team.
Prompt idea:
Check the vendor portal for invoice 10482.
Find the current status, payment date if available, and any open notes.
Summarize what you found.
Then draft a short Teams message to finance with the update.
Do not send it until I review it.
3. Customer portal research
Customer service teams often need to check external portals before replying to a customer. That could mean checking an order, subscription, case, shipment, license, claim, or account record.
This is a strong Cowork browsing scenario because it combines browser work with communication work.
Prompt idea:
Open the customer portal and check the status for customer Contoso.
Look for the latest open request, current status, owner, and next action.
Summarize the findings.
Then draft a customer-ready email response.
Do not send the email until I approve it.
4. HR onboarding portal updates
Onboarding work is full of small browser tasks. Create a profile. Fill out required fields. Check what is missing. Update a checklist. Confirm access requests.
Cowork browsing could help prepare those steps while keeping the human in control for sensitive actions.
Prompt idea:
Open the HR onboarding portal for the new hire listed in this email.
Review what fields are required.
Draft the onboarding profile using the source email and attached documents.
Flag anything missing.
Stop before saving or submitting changes.
5. Municipal or government web form work
This is where I think browsing gets very interesting for public sector and municipal scenarios.
There are still many web forms, portals, service request systems, permit lookups, inspection pages, and public-facing intake tools that require browser-based work.
Cowork browsing could help collect information, check status, prepare form entries, and draft the next action while keeping final submission under human approval.
Prompt idea:
Open the permit status portal and check application PR-2026-0142.
Capture the current status, last update, required action, and any missing documents.
Summarize the result.
Then draft an internal update for the service team.
Do not submit any forms or make changes without approval.
The pattern
The pattern is simple.
Use Cowork for browser tasks that are repetitive.
Use it where the user already has access.
Use it where the work involves checking, entering, preparing, or summarizing information.
Keep human approval in place before anything sensitive is submitted.
I would not start with high-risk demos like payments, account changes, or anything that feels too close to personal data. Start with business workflow examples where the value is obvious and the review step is clean.
Before testing Copilot Cowork browser-based scenarios, check the admin setting first.
One checkbox can completely change what Copilot Cowork is able to do.
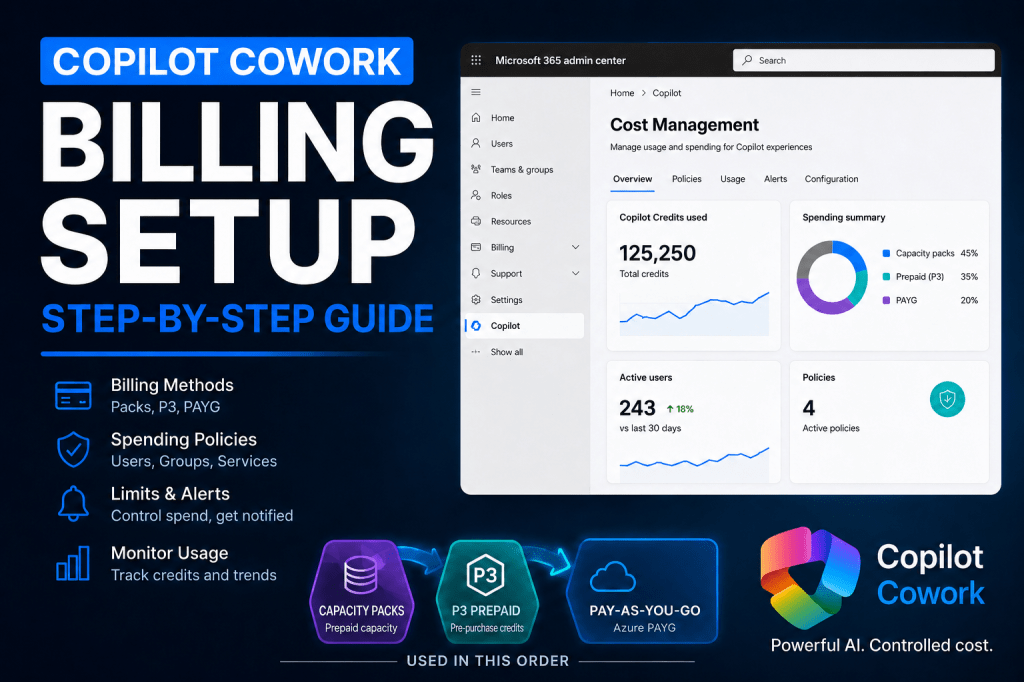
But before you run into the tenant, turn everything on, and let users start throwing goals and long-running tasks at it, you need to understand the billing side.
Copilot Cowork runs on Copilot Credits. That means the admin work is not just, “Can the user access it?” It is also, “Who can spend credits, how much can they spend, which billing method gets charged, and who gets warned before usage goes sideways?”
Turning Copilot Cowork on is easy. Turning it on responsibly is where the real admin work starts.
In this walkthrough, I am setting up Copilot Cowork billing from the Microsoft 365 admin center and showing the choices I would pay attention to before giving users access.
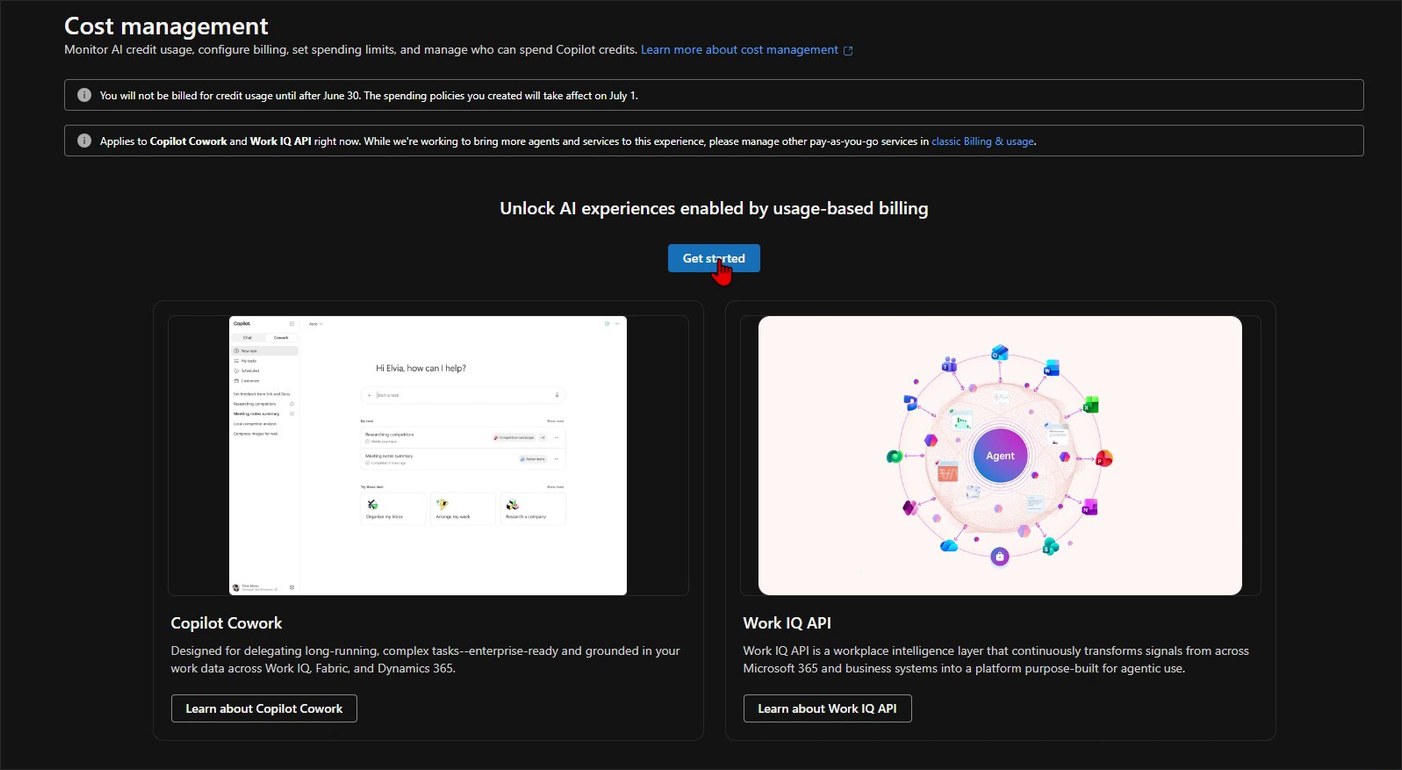
What changed with Copilot Cowork GA
Microsoft announced Copilot Cowork general availability on June 16, 2026. Cowork requires a Microsoft 365 Copilot user subscription license, and Cowork usage is billed separately on a usage basis using Copilot Credits.
That matters because Copilot Cowork is not just another chat surface. It is designed for complex, long-running, multi-tool work. It can retrieve context, call tools, use models, create artifacts, and keep working through a task. All of that value has a meter behind it.
Microsoft’s current Cost Management experience for usage-based billing applies to Copilot Cowork and Work IQ API right now, with more agents and services expected to come into that experience over time.
Cost Management in the Microsoft 365 admin center is where Copilot Cowork and Work IQ API usage-based billing is configured.
Start with the right mental model
Access and consumption are two different things.
Access lets a user get into the experience. Consumption happens when the experience starts doing work. If Cowork runs a goal, uses a model, retrieves context, calls tools, or performs longer-running work, that activity can consume Copilot Credits.
That is why billing policies matter. Without them, you are basically handing out an AI gas card and hoping the bill looks reasonable at the end of the month.
That is not a strategy.
The better approach is billing plus governance. Set the billing method, define the spending policy, decide who is in scope, add limits, configure alerts, and then expand once you understand real usage.
Check your admin roles before you start
If you do not see the option in the admin center, check your role first.
Billing setup and policy governance may not be handled by the same person in a real organization. Your Microsoft 365 admin, AI admin, Power Platform admin, billing admin, and finance owner might all be different people.
That matters because the person configuring the billing method needs the right permissions, and the person managing policy limits and alerts also needs the right permissions. Do not discover that halfway through the rollout call. Get the right people in the room before you begin.
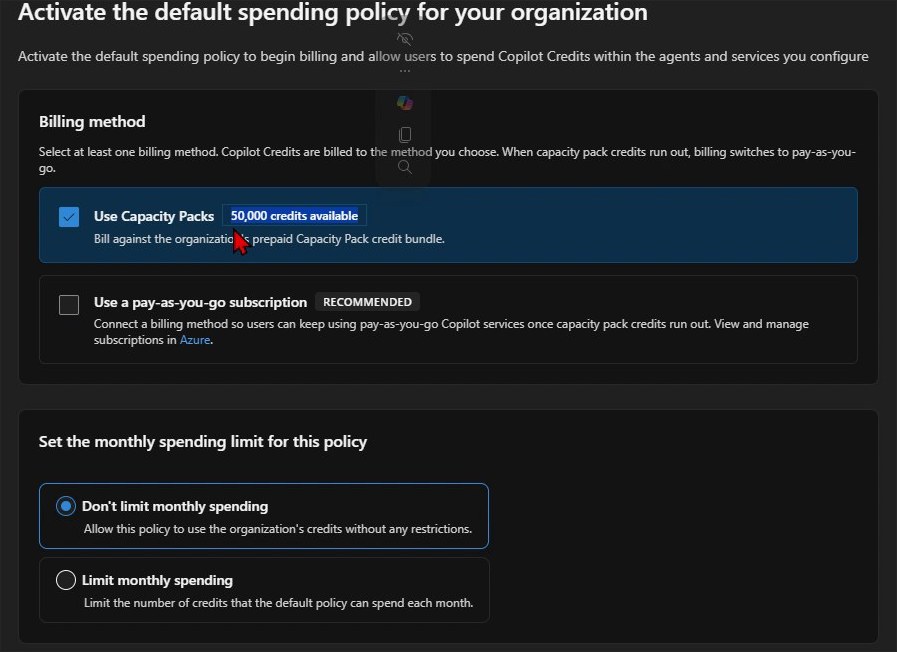
Choose the billing method intentionally
In the setup flow, you may see more than one billing method. In my tenant example, I had Capacity Packs available and also had the option to use a pay-as-you-go subscription.
Capacity Packs let you bill against prepaid Copilot Credit capacity. Pay-as-you-go can keep services running once capacity pack credits run out, but it also means the meter can keep running against the connected subscription.
Neither option is automatically good or bad. The point is to make the choice on purpose.
Select the billing method intentionally. Capacity Packs and pay-as-you-go behave differently when credits run out.
For a personal tenant or a controlled pilot, I would usually start with the most bounded option. For a production rollout where interruption would be a problem, you may choose to include pay-as-you-go, but that decision should involve the billing owner.
What if you have no Copilot Credits?
If your tenant does not already have Copilot Credits available, do not let that push you into an unlimited rollout. Start with pay-as-you-go, but treat it like a metered pilot, not an open tab.
Microsoft lists PayGo for Copilot Cowork at $0.01 per Copilot Credit. That means 25,000 credits would be about $250 if you let usage land entirely on pay-as-you-go.
That is the point where the economics should make you stop and re-check the licensing path. Microsoft lists Copilot Studio credit packs at 25,000 Copilot Credits for $200 per pack per month. So if you expect usage to get anywhere near 25,000 credits in a month, PAYG is no longer just a convenient starter option. It may be more expensive than buying a capacity pack.
The practical setup I would use is this: enable PAYG to get started, set the monthly policy limit at 25,000 credits, turn alerts on well before that point, and review usage before the policy hits the cap.
At 10,000 credits, check whether the pilot group is using Cowork the way you expected.
At 20,000 credits, start the capacity pack conversation because the $200 pack economics are already close.
At 25,000 credits, do not just increase the PAYG limit without a decision. Buy a P3 or Copilot Credit capacity pack if monthly usage is becoming predictable.
PAYG is still useful. It is the fastest way to start when you have no credits, and it is a good safety net for overages. But once usage becomes steady, capacity packs are the cleaner budgeting conversation.
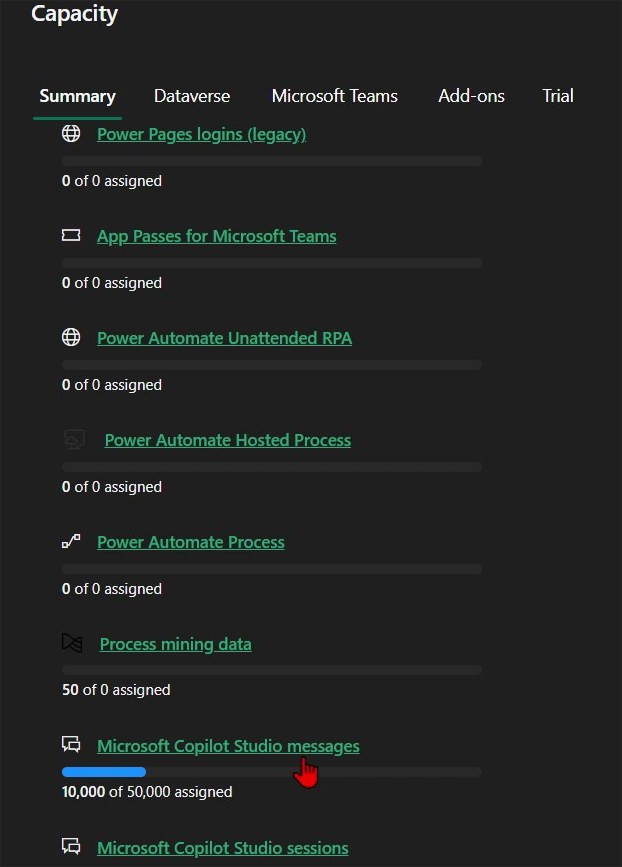
Do not assume the visible credit pool is unused
This is the part admins need to slow down on.
In my example, the Cost Management setup showed 50,000 credits available. But in the Power Platform admin center, 10,000 of those Copilot Studio messages were already allocated to a specific environment.
Before assigning a Cowork policy, check whether Copilot Credits are already supporting other Power Platform or Copilot Studio workloads.
The lesson is simple: do not treat the number in one setup panel as the whole story.
Copilot Credits can support more than one AI workload. If your organization is already using Copilot Studio, Dynamics 365, Power Platform, or other metered AI capabilities, make sure you understand what that credit pool is already expected to cover.
The last thing you want is for a Cowork pilot to burn through credits that another production agent was relying on.
Do not start unlimited
The setup flow gives you the choice to limit monthly spending or leave monthly spending unlimited.
My recommendation for most organizations starting with Copilot Cowork is simple: do not start unlimited.
Launch it like a controlled pilot. Give it a monthly policy budget, watch usage, learn what normal looks like, then increase the limit later if the usage is healthy.
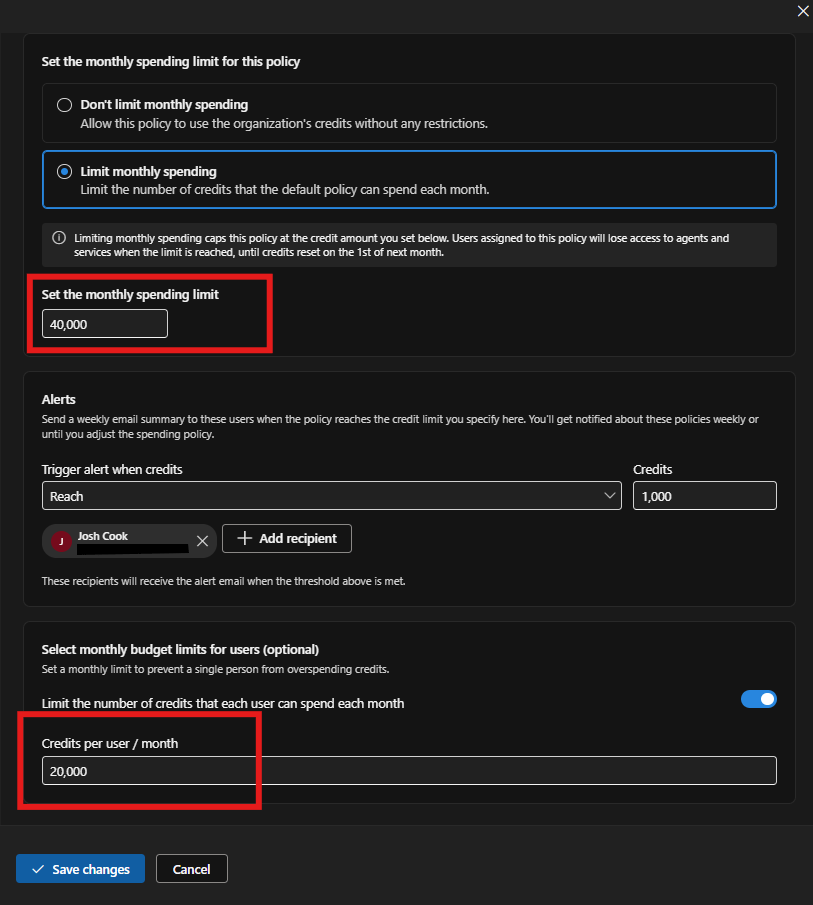
In my example, I set the policy budget to 40,000 credits because I wanted to keep 10,000 credits available for other Copilot Studio usage in the tenant. Your number will be different. The principle is the same.
Set a per-user monthly limit
The per-user monthly spending limit is optional, but I would seriously consider enabling it.
Without a user limit, one person can potentially consume a large chunk of the available credits. They may not be doing anything malicious. They might just be experimenting, running long tasks, testing browser automation, asking for big research outputs, or sending Cowork work that should have stayed in regular Copilot Chat.
That kind of experimentation is a sign adoption is happening. But adoption without guardrails becomes waste.
Set a policy-level monthly budget, consider a per-user monthly limit, and configure alerts before activating the policy.
In the demo tenant, I used a 40,000 credit policy limit and a 20,000 credit per-user limit because the pilot only had two users. That is an example, not a universal recommendation.
The right number depends on how many users are in scope, what tasks they will run, how much existing Copilot Credit capacity is already committed, and how much risk you are willing to tolerate during the first rollout.
Turn alerts on before usage surprises you
Do not wait until the end of the month to learn usage went sideways.
Cost Management lets you define alerts so the right people get notified when usage reaches a threshold. That could be the Microsoft 365 admin, billing owner, finance stakeholder, platform owner, or whoever is accountable for the pilot.
In my example, with a 40,000 credit monthly policy limit, I used a 30,000 credit alert threshold. That gives the owner time to investigate before the policy hits the cap.
This is how you move from reactive admin to proactive admin.
Do not activate for everyone by default
This is the part of the setup that is easy to rush.
If you activate broadly, you may be enabling access across the whole organization depending on how the policy is configured. For some organizations, that might be fine. For most first rollouts, I would not start there.
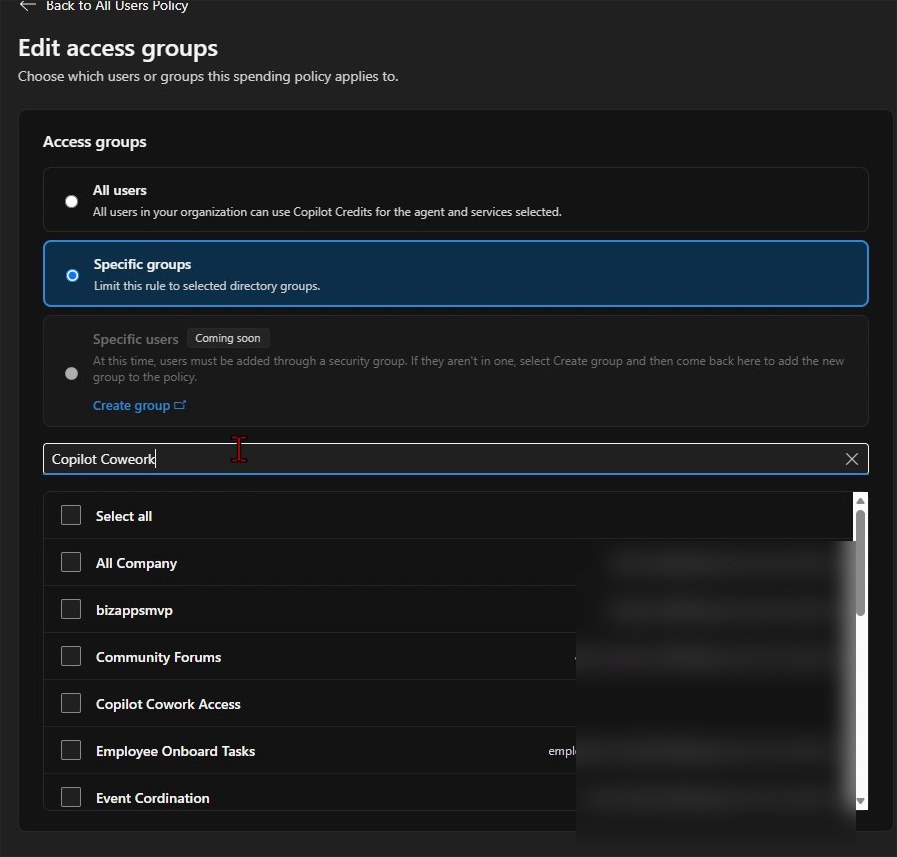
Customize the setup configuration and scope the policy to a security group.
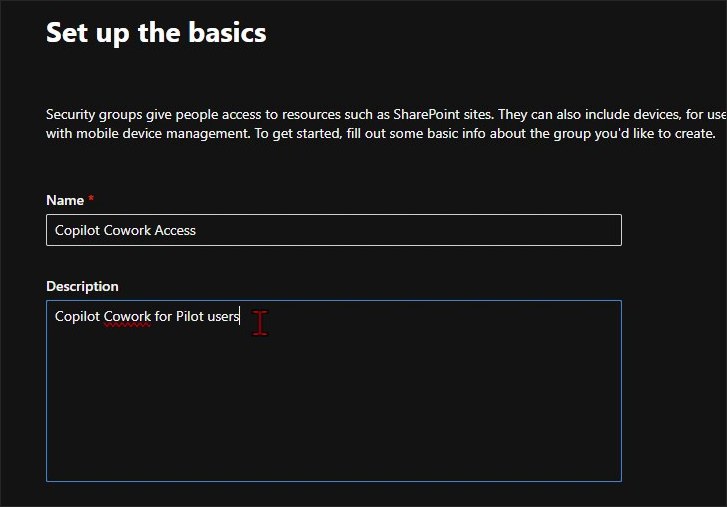
Create a clear security group for the pilot, such as Copilot Cowork Access, instead of starting with the entire tenant.
Use a clear name like Copilot Cowork Access or Copilot Cowork Pilot Users. Add a small group of trusted users first: admins, builders, business champions, finance, operations, or the people who will give you useful feedback.
Think of this like a pilot program. You want people who will use it seriously, report what worked, report what wasted credits, and help you understand whether the budget is realistic.
Scope the policy to specific groups so you know exactly who can consume Copilot Credits through Cowork.
Review the policy before you activate it
Before clicking activate, review the setup like a change request:
Which services are enabled by the policy?
Which billing method will be charged?
Is the monthly spending limit set?
Is the per-user limit set?
Who receives alerts?
What threshold triggers those alerts?
Which users or groups are in scope?
Are other workloads already using the same credit pool?
In my setup, the final shape was:
Billing method: Capacity Packs
Policy monthly limit: 40,000 credits
Per-user monthly limit: 20,000 credits
Alert threshold: 30,000 credits
Access scope: a specific security group for Copilot Cowork access
Again, those are demo values. Do not copy them blindly. Copy the pattern: limit, alert, scope, observe, then scale.
The rollout pattern I would use
If I were rolling out Copilot Cowork in a tenant, I would not start with the whole organization. I would use this pattern:
Confirm the admin roles needed for billing and policy management.
Review existing Copilot Credit usage in Microsoft 365 and Power Platform.
Choose the billing method with the billing owner involved.
Create a bounded monthly spending policy.
Add a per-user limit for the pilot group.
Set alerts before the policy limit is reached.
Create a security group for pilot access.
Add a small number of serious users.
Monitor usage and identify what tasks burn credits.
Increase limits or expand access only after you understand normal usage.
This gives you control. You know who has access, what they can consume, which budget they are under, and when someone needs to pay attention.
That is how you test Copilot Cowork without turning the tenant into a free-for-all.
Final thought
Copilot Cowork is powerful because it can take on real work. But the more real the work gets, the more important the admin controls become.
Cost Management is not the boring part of Copilot Cowork. It is the part that lets you adopt it without surprising finance, burning shared credits, or giving every user an unlimited meter on day one.
Start controlled. Learn the usage. Then scale with confidence.
Many Power Automate users encounter issues with the dateDifference() function when calculating the difference between two dates. The problem arises when the output format varies depending on the duration, causing errors in extracting Days, Hours, Minutes, and Seconds.
This blog provides a robust and easy-to-implement solution that works seamlessly in all scenarios, including durations less than a day. Learn how to use a single expression with conditional logic to avoid these common pitfalls and ensure your date calculations are accurate every time. This is your ultimate fix for handling dateDifference() errors!
Compose action: named StartDate = 2024-12-10T15:58:28
Compose action: named EndDate = 2024-12-10T19:22:20
Compose action: uses dateDifference() expression. see below
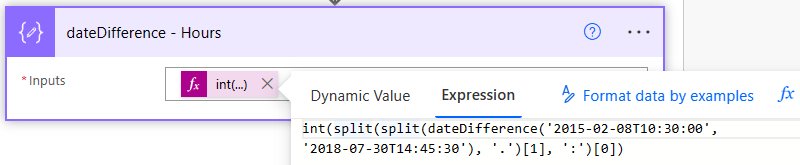
Below is the expression used in the ‘Date Difference’ compose action. It dynamically handles all scenarios—when days are included and when they are not (same with hours and minutes).
The if() function checks if the dateDifference() result contains a . (dot).
If it does, it means the result has a days component (e.g., 1268.04:15:30), so we parse out Days, Hours, Minutes, and Seconds accordingly.
If it does not, it means the result is less than a day (e.g., 12:57:47.2544602), so we treat Days as 0 and parse Hours, Minutes, and Seconds directly from the string.
Result:
This will produce a JSON object like: { "Days": 1268, "Hours": 4, "Minutes": 15, "Seconds": 30 } Or { "Days": 0, "Hours": 12, "Minutes": 57, "Seconds": 47 }
Steps to Access Each Value
If you use the fixed expression directly in a Compose action (e.g., named Date_Difference), you can reference the fields like this:
Days:outputs('Date_Difference')?['Days']
Hours:outputs('Date_Difference')?['Hours']
Minutes:outputs('Date_Difference')?['Minutes']
Seconds:outputs('Date_Difference')?['Seconds']
Use these expressions in subsequent actions (like another Compose, a Condition, or Apply to Each) to reference the specific values.
Download my Flow
You can easily copy and paste actions in Power Automate. Allowing you to copy and paste my example.
We have all been there, we need to check the difference between 2 dates, and if you ever had to implement this you would need to use some crazy mathematical equations using the ticks() expression. But now..
I’m not sure when this expression got added, but we can now use dateDifference() expression instead of using ticks().
The dateDifference() expression is a powerful tool in Power Automate and Logic Apps for calculating the difference between two dates.
Allowing to easily determine the number of days, months, or years between two dates, which can be useful in a variety of scenarios.
The result is in the format of: Days.Hours:Minutes:Seconds
Note:: If the dates passed in have no time interval, the result shows zeros for the hours, minutes, and seconds. We can extract the different parts of the return by using some expressions inside a Compose action, which we will do next.
Extracting the Result
If you need to extract certain parts of the result into the hours, minutes, or even seconds, you can use the split() expression. Below you will find the explanation on the extraction, as well as the exact expressions to use.
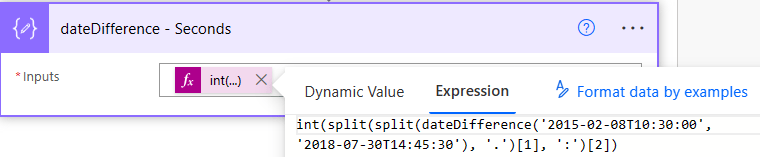
The split() function splits the output of dateDifference() at the period (‘.’) into an array with two elements: days and the rest (hours:minutes:seconds).
The [0] indexer retrieves the first element of the array, which represents the number of days.
The int() function converts the days from a string to an integer.
If your like me, you test your Flows over and over again. This results in sending unwanted emails, creating items in SharePoint or Dataverse, Creating files on OneDrive or SharePoint. Every time you test your Flow, these actions inside our Flow get executed and cause unwanted behavior when Testing.
Wouldn’t it be nice if we can Test our Flows without executing these actions? Guess what we can! And its very easy to do. Check this out!
Scenario
For example, I have a Flow that Create a new row in Dataverse, and then send an email to the person who created the new row. That is fine, but what happens when we have other actions in our Flow that we want to test to make sure they are correct. I may want to test the Flow multiple times if I am doing some data manipulation, but this will result in Creating multiple unwanted rows (records) in Dataverse, as well as send emails every time.
We can clean up the testing process easily.
How?
We can utilize a feature called Static Result.
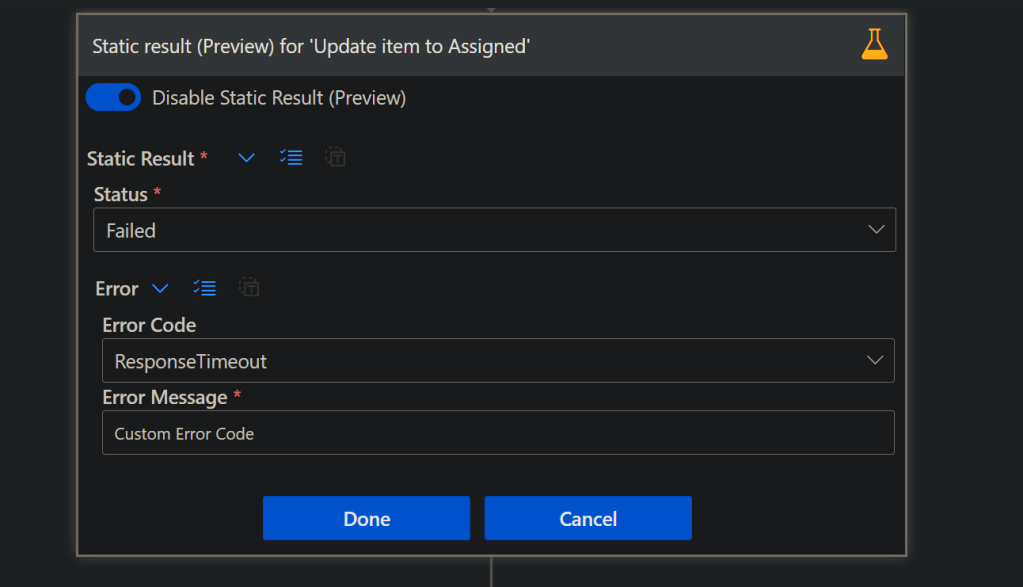
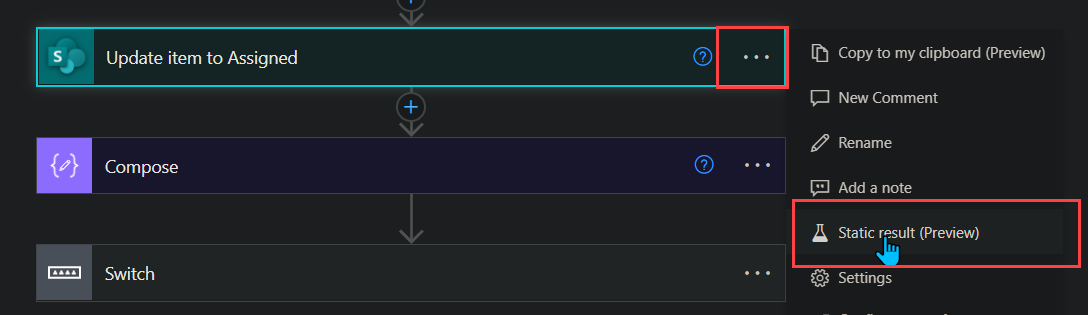
First click the 3 dots on the action, and select Static Results.
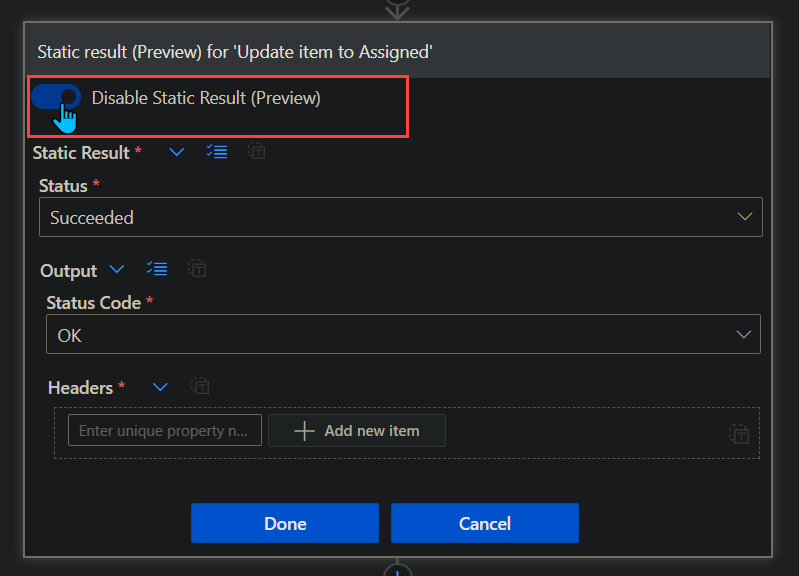
Next we can configure the static results. For easy example click the radio button to enable, select your Status, and the Status Code.
Click Done.
Now the action will have a yellow beaker, indicating that the action is using Static results.
Things to note: – Static Result are in ‘Preview’ so it could change at any time – Not all actions will be able to use them – If the option is greyed out, and you’re certain the action is able to use it, save the Flow and re open
This is only the beginning, as you can create a custom failed response, or create any result you want. This can help troubleshooting and testing certain scenarios.
REMEMBER!! To turn off static results when you want to execute the actions like normal.
Examples
Some examples on when to use static results:
Flow runs without sending emails
Flow runs without Approvals needed
Flow runs that need to test errors on certain actions
I have used this feature for awhile now, and noticed not many know about it. It’s so useful in many testing scenarios. Just remember to disable the static results once your done testing!
If you have any questions or want to add anything please leave a comment and like this post! Thank you!
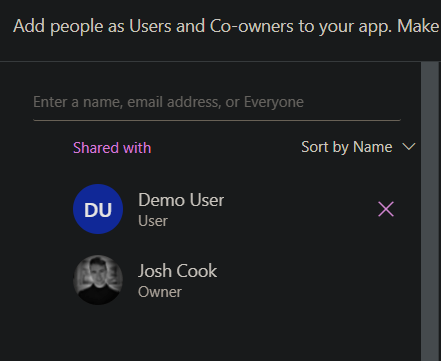
You may have run into an issue when creating Power Apps that needs to submit data to SharePoint, Dataverse, etc. But did not want to give everyone in the app access to these. The problem is, Power Apps uses the connections of the user using the app, meaning if the app writes to a SharePoint List, the user will need Read/Write access. The same goes for Power Automate if we try to send the data to Power Automate from Power Apps, it still uses the users connection who triggered the Flow. How can we get around this? Read below!
If you block the HTTP Request connector via data loss prevention (DLP), child flows are also blocked because child flows are implemented using the HTTP connector. Work is underway to separate DLP enforcement for child flows so that they are treated like other cloud flows.
You must create the parent flow and all child flows directly in the same solution. If you import a flow into a solution, you will get unexpected results. Call Child Flows – Power Automate | Microsoft Docs
Prerequisites
The Flows must be created inside the same Solution, so a Dataverse database must be configured on the Power Platform Environment
The Scenario
In this scenario, I will be showing how a user can use Power Apps to create items in a SharePoint List without being a member of the Site. This will allow us to use a specific Service Account to create the data in SharePoint without giving the user in the app any permission at all!
First we will build the Child Flow, then Parent Flow, and lastly customize the Power App
Child Flow
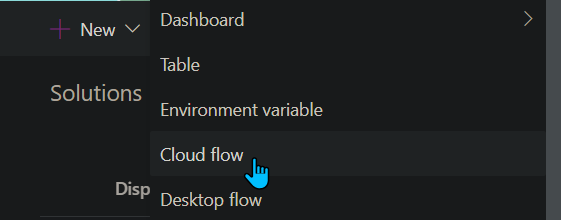
Inside your Solution create a new Cloud Flow.
For our trigger we use a Manual Button, and add the data we are expecting from Power Apps to put inside our SharePoint List (In my example I am only bringing in one field for Title)
Next, I add a Create Item action for my SharePoint List, and add the Parameters from the trigger inside the action.
Lastly, I add a ‘Respond to PowerApp or flow’ action, I create an Output called Success, and some details about what was created.
Child Flow
Make sure to use the Connection you want users of the App to use for the SharePoint Create item action.
Save and go back to the Flow dashboard screen (where you see the Details and run history screen).
There will be a Card on the right side called ‘Run only users’ click Edit
Run only users
Under Connections Used, switch ‘Provided by run-only user’ to the connection you want to be used by users of the App (They wont have access to this Connection outside this Flow)
Run only user
Click Save,
Now onto the Parent Flow
Parent Flow
Go back to the Solution and Create another Cloud Flow.
For our trigger we use the PowerApps button trigger.
As best practice, create Variables for your data that is coming from Power Apps. Don’t forget to name them, as this will be the parameter name in Power Apps, Use the ‘Ask in PowerApps‘ dynamic content for your variable values.
Next we use a action called ‘Run a Child Flow’ (If you do not see this action, your Flow was not created inside a Solution) Add the parameters (these were the input parameters from the last Flow that we just created).
Lastly, add ‘Respond to a PowerApp or flow’ action. For this demo I am adding the parameter ‘Success’ this is from the child Flow.
Click Save.
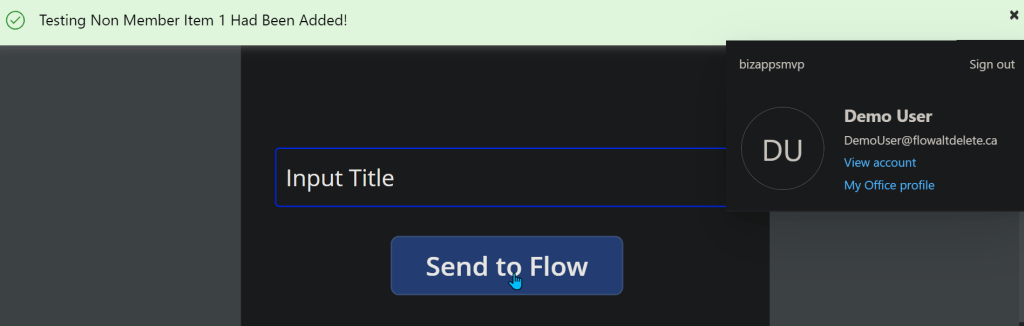
Power App
Now onto the Power App, I am going to create a simple Power App with 1 TextInput for Title, and a Button to Pass the data to Power Automate. Here are my controls for reference:
TextInput_Title Button_SendToFlow
For the Button: 1. Add the Flow to the button by clicking on the Button, 2. Clicking Action tab on top of page, 3. Clicking Power Automate 4. Select the Flow
Next add the parameters for the Flow, in my case I am adding the TextInput_Title.Text
Now, I want to add a Notification that the Item has been added, which will confirm my Flow has Run correctly. Ill be using the ‘Success’ Output parameter from the Flow for this.
To add this, I put my Flow run inside a Variable inside Power Apps. Ill call my variable Results, and IO add this to the OnSelect property of the Button where my Flow is:
Now I use the ‘Notify’ function to notify the user of the item being created, I add this after the semicolon. So my function looks like this in the end:
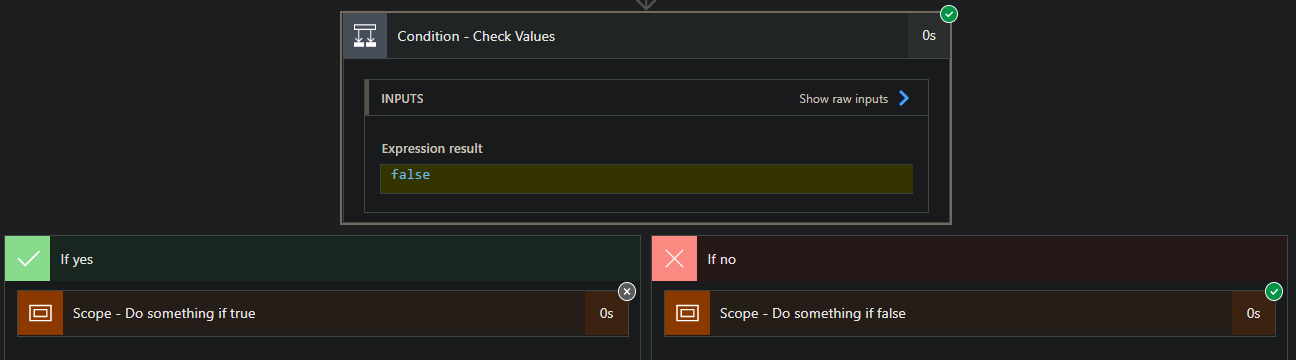
Is your Condition not working as expected? The problem is when we use a Condition action inside Power Automate, we cannot see the “equation” that is being evaluated when looking into the run.
The problem affects how we can troubleshoot, the following solution will show what is happening inside the Condition action during the run.
Scenario
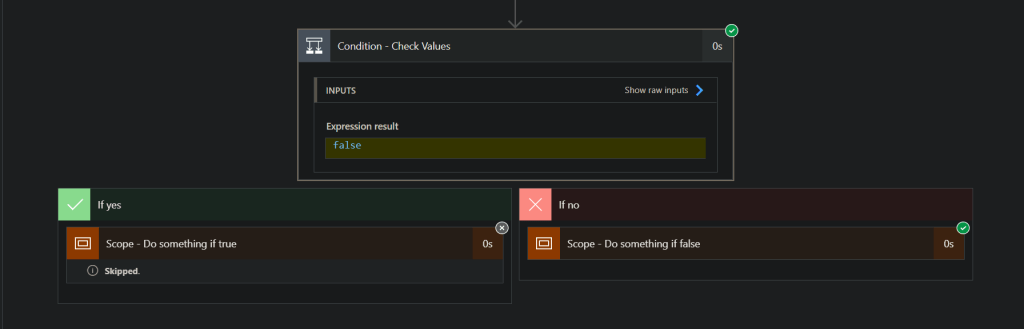
In this scenario, I am checking: If one value is greater than a second value
Now during a test run, I expect to see this condition true, but in my run it is always showing false and going in the If no branch.
The big problem is though, I cannot see what the values being evaluated look like. Take a look below
Clicking on the “Show raw inputs” is also not helpful..
Solution
So what is this quick and easy solution to see the condition results? A simple ‘Compose‘ action.
Lets take a look: First add a Compose under your Condition
Next copy the values that are in the Condition to the Compose. My Compose now looks like this:
Now make sure the Compose is above your Condition. I am just dragging the Condition below the Compose
Next, we can run the Flow again, and see what the Compose can tell us:
Yikes! We can see our 2 values that are being evaluated are both 15. And 15 is not greater than 15. This is why its returning false.
My Thoughts
In my opinion, this should be already visible inside the Condition action. To get this feature added to Power Automate, we can vote on this feature. Head over to the Community Forum and vote for this idea.
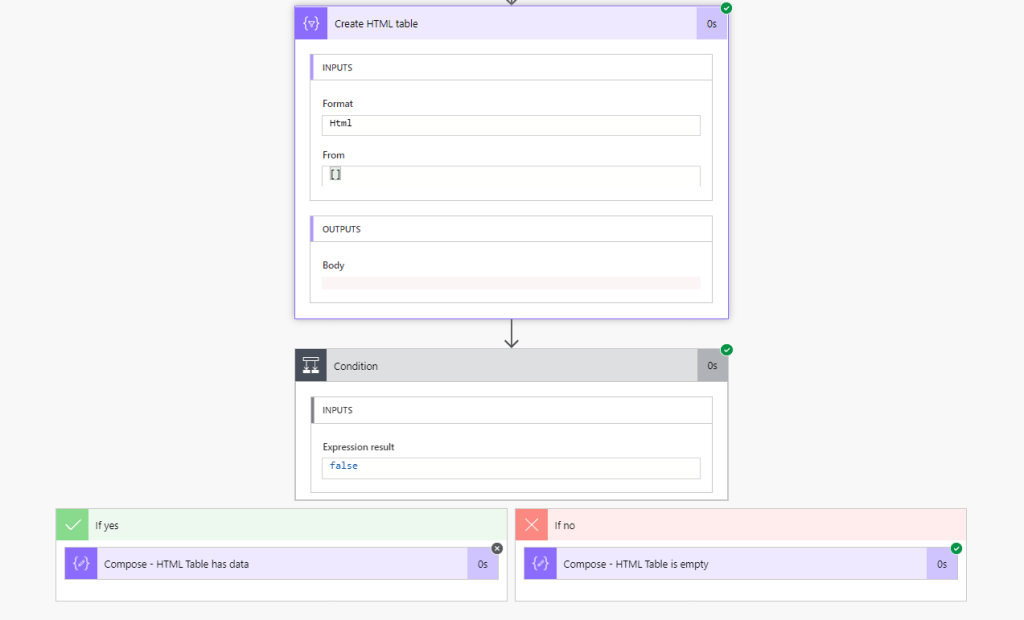
I needed to check if an HTML table had data or not. Usually when I need to check I have two expressions I go to first.
empty()
length()
I tried using empty() and found that the HTML table even when empty, is not truly empty. I then tried length() and found that when the HTML table is empty there is still a length of 30.
The Scenario
I have some data that is used to track different devices that can be loaned out. The data has properties like, Type of device, Serial Number, Etc.
I want to put this array of data inside a HTML table and send it out on an email. The problem is, my data might be empty, as only available devices will show up in my data.
I need to check if the HTML table is empty, if it is empty: If True: Send email with HTML table If False: Send email without HTML table
The Flow
For this Flow, I will be using an Array Variable to simulate my data coming in from another system. I will call this Variable ‘Data‘. The HTML table action will be added underneath. You will need to determine if you want to use ‘Custom columns‘ or ‘Automatic columns‘ This can be done in the advanced options in the HTML action:
My ‘Data‘ Variable is empty at the moment. This is what we want for our first run, we want to get the length of the HTML table when its empty.
Next add a ‘Compose‘ action, and use the expression length(), pass in the HTML table as the parameter. For example, my expression looks like:
length(body('Create_HTML_table'))
Now run the Flow with no Data in the HTML table, and check your Compose action to see what the length is. In my case it is 30
Now we can add a If Condition to check if the length is greater than 30
** TIP ** I am passing in the Compose action into the condition, this allows me to see what the outputs of the Compose action before it gets evaluated inside the condition. This is extremely useful for troubleshooting
Conclusion
The Flow will go into the ‘If yes’ block if the HTML table has data
The Flow will go into the ‘If no’ block if the HTML table is empty
Of course checking the Data Variable itself for length could work way better. This example is mainly for data that can come in that could have loads of junk. For example: An HTTP API could bring in no data, but still have other information attached like, headers, status code, version. In this case we can only do conditional checks on the HTML table, since our Data variable will always have something being passed in.
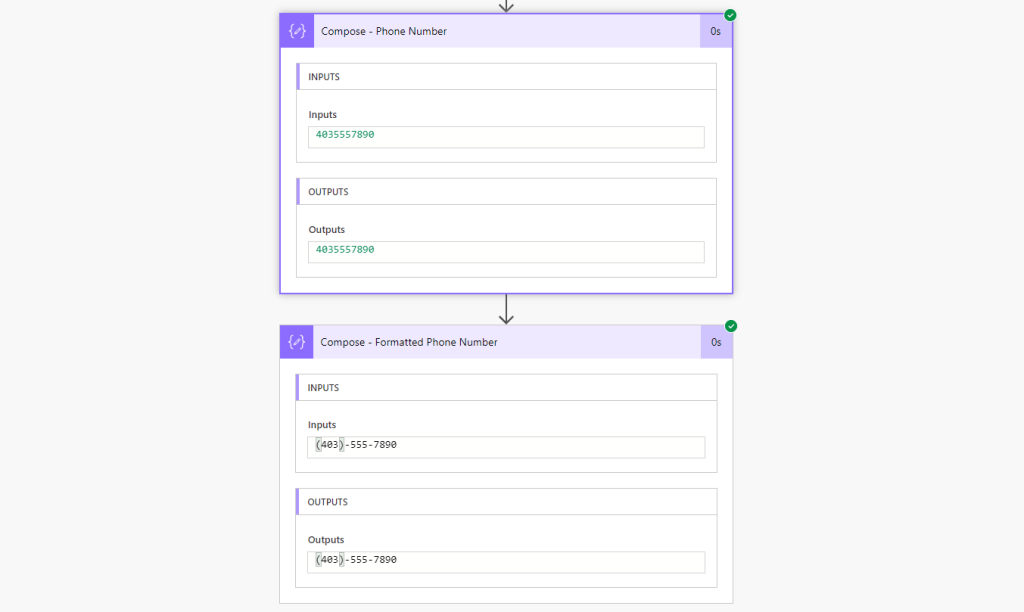
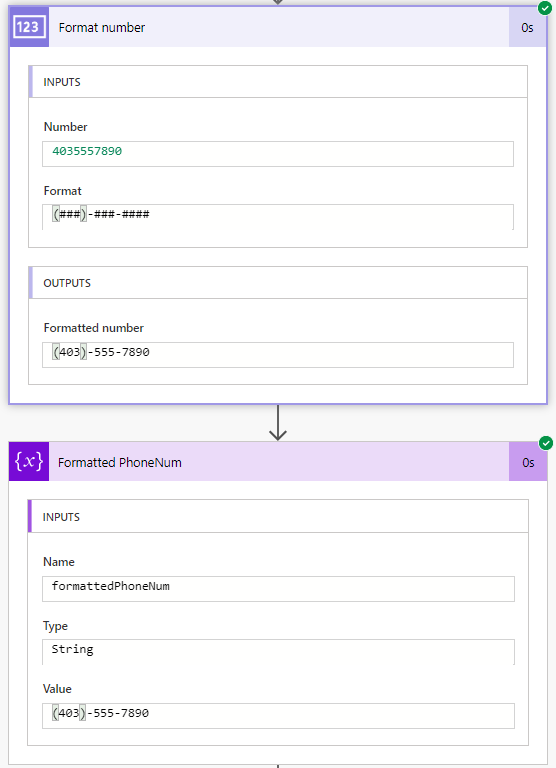
Take a phone number like 4031234567 and turn it to (403)-123-4567 with one simple step!
Scenario
We have a phone number coming in from a secondary system as a integer number. We than want to add some formatting to this to be easily read and look cleaner. For example, a phone number comes in like this: 4035557890 And make it look like (403)-555-7890
Things to Know
Since we add ‘-‘ and ‘( )’ this turns our data type to become an String. Keep this in mind, since you wont be able to pass this into a field in another system that is looking for a Integer value
The Flow
This Flow is very simple. To achieve the formatted number I am using the action ‘Format number’. This is a fairly new connector that is mainly used to format currency values. But we can utilize the format to define any formatting we want
Looking at the above picture, we are passing a Integer phone number into the Format number action. Than we specify the format we want to use by selecting the drop down > clicking ‘Enter custom value‘
End Result!
Conclusion
Since this action is fairly new, I am curious and looking forward to see if the Power Automate team will expand and add more actions like this to make formatting a breeze.
I have learnt this method from John Liu. I have pointed so many people, and community users to John’s blog when they run into this Excel connector limitation. I have found multiple people thinking its too complicated, or confusing, because the method works with Graph API to get the File ID. So this blog will be a very easy guide to follow and hopefully will be able to get your Flow being able to use a dynamic filename. If you have any questions or problems with this guide or other Power Automate related questions, reach out to me on Twitter.
New Update – Easy Way 2021
The following video explains a way easier way to do this, no API, no messy File ID’s. Check it out!
Things to Know
To make this even easier, we will be having the Excel file that be stored into a SharePoint Document Library. We can also use the SharePoint HTTP call action to better build our REST call more easily. * We will still need the Excel file to have a table defined *
Getting Started
First we will create a new SharePoint Document Library for the files, or use an existing document library.
Next, we want to have one Excel file in the Library to start, so we can make sure this is working. Here is what mine looks like:
My example, I have a Document Library called ‘Excel Files’ with a Excel file to start with
Overview of The Flow
For the Flow, I am using the SharePoint action ‘Send an HTTP request to SharePoint‘. This action uses MS Graph in the background, but makes it a lot easier to construct a API call. First we will use a simple call to SharePoint using the ‘Send an HTTP request to SharePoint‘ action to get all the Document Libraries for our site. Than use the output of that action to find the Document Library Drive ID. This is how we navigate through the SharePoint site, we want to do this until we are in the folder of our Excel File.
Lets Build that Flow
First we add ‘Send an HTTP request to SharePoint‘ action
Uses Graph API in the back-end
In the SharePoint HTTP action, use the following: – Site Address: If your SharePoint site does not show up in the drop down, click use ‘Enter custom value’ and type the homepage of your site – Method: GET – Uri: _api/v2.0/drives/ – Headers: accept application/json
Now trigger the Flow to get the Output of the HTTP request.
You can also read and get what you need through the Output Body window
I am using Visual Studio Code to paste the Output into, its free, and easy to use. If you have lots of Document Libraries, you may want to use a Find feature and search for the Document Library name. For this demo I will be searching Excel Files. We need to look for a specific ‘id’ inside the output
Copy this ‘id‘,we can use this value to navigate inside that Document Library in our HTTP request. Our new URI should looks something like: _api/v2.0/drives/b!MJxrwkJ2FUGanaxoijg0eZmnU9iP4aJJsidrZJQNlsBAb-8VLzYJRbD9CKmJa0j8
Now we need to add /root:/ to the end of our URI
We are almost complete! We now need to specify the path to our file. Here are some examples:
If file is directly in the Document Library(No Folders) – Just add the filename with the extension _api/v2.0/drives/b!MJxrwkJ2FUGanaxoijg0eZmnU9iP4aJJsidrZJQNlsBAb-8VLzYJRbD9CKmJa0j8/root:/MyNewExcelFile.xlsx
If file is in a folder – Add the folder name, than the Excel file with the extension * NOTE: If folder name has spaces, than use%20 instead of a space * Folder name = Historical Files _api/v2.0/drives/b!MJxrwkJ2FUGanaxoijg0eZmnU9iP4aJJsidrZJQNlsBAb-8VLzYJRbD9CKmJa0j8/root:/Historical%20Files/MyOldExcelFile.xlsx
Mine is not in a folder so I will be using the first one. Now to make the file dynamic, I will be using a Compose action to store the Filename. So in my HTTP Request I will be using my Compose action with the Filename and extension at the end. My example will look like this:
The Filename, can come from any Dynamic content, I am just using a Compose for the sake of this Demo
Now test the Flow to validate the HTTP request is valid. The output should have some references to the file, like the name of the file, size, created date time, and last modified date time. My output looks like this:
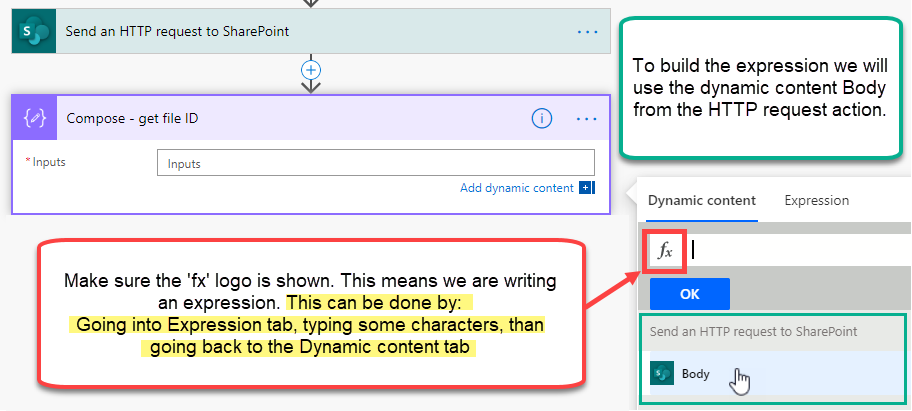
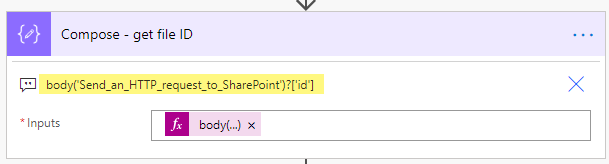
Next, to get the file ID, we use a Compose action with an expression. Add a Compose action, inside the Compose we will use the HTTP request Body dynamic content in a expression:
With the fx logo present on the dynamic content tab. Click the Dynamic content Body. Now we use JSON path to grab the file ID. This is done by adding a ?['id'] to the end of the expression. My expression looks like this:
body(‘Send_an_HTTP_request_to_SharePoint’)?[‘id’]
body('Send_an_HTTP_request_to_SharePoint')?['id'] You can copy my expression, just make sure to change the Send_an_HTTP_request_to_SharePoint to your HTTP request action name
Next add an Excel Get tables action. Use the outputs from the Compose – get file ID for the File
Now add an Excel List rows present in table action. File: Use the outputs from Compose – get file ID action (same as we did for Get Tables) Table: Click Enter custom value. Use this expression to get the first table name first(body('Get_tables')?['value'])?['id'] Power Automate has been updated the new expression to get the tables is: first(outputs('Get_tables')?['body/value'])['id'] ** Same as before. Get_tables is my action name **
first(outputs(‘Get_tables’)?[‘body/value’])[‘id’]
Success!!
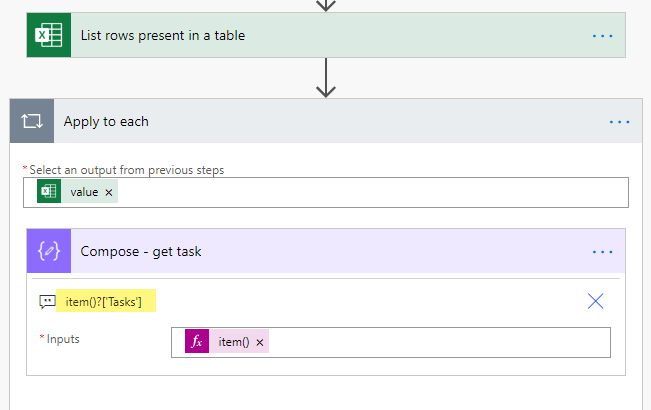
Now, sometimes the Dynamic content of the Excel columns wont be there now. You can easily grab any column you like using the item() expression. For example I have a column named Tasks so my expression will be item()?['Tasks']
item() can only be used inside an Apply to each
Conclusion
Being able to use a Dynamic filename in the Excel connector can be tricky. But I am hoping with this guide, anyone who needs this business requirement can easily follow this, and get it done.