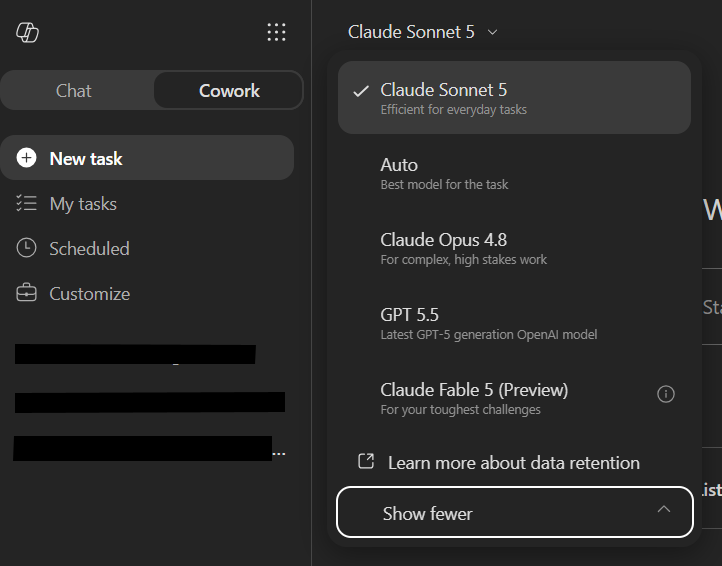
But if you open the model picker and only see GPT 5.5, the problem may not be your Cowork license or the rollout.
There is one Microsoft 365 admin setting you need to check first.
OpenAI must be enabled as a Microsoft subprocessor before users can access the new OpenAI-operated models.
Before OpenAI is enabled as a Microsoft subprocessor, the Copilot Cowork model picker may show GPT 5.5 but not GPT 5.6 Sol or Terra.
The hidden dependency behind GPT-5.6 in Cowork
Microsoft now supports OpenAI-operated models in Microsoft 365 Copilot experiences. That is different from OpenAI models operated by Microsoft through Azure OpenAI.
For GPT-5.6, Microsoft’s documentation is direct: if you want to use GPT-5.6, you need to enable OpenAI-operated models.
That means the model picker is not the first place to troubleshoot. Start in the Microsoft 365 admin center.
Where to enable OpenAI as a subprocessor
You need to be a Global Administrator or AI Administrator to change this setting.
Go to the Microsoft 365 admin center and follow these steps:
Open Copilot.
Select Settings.
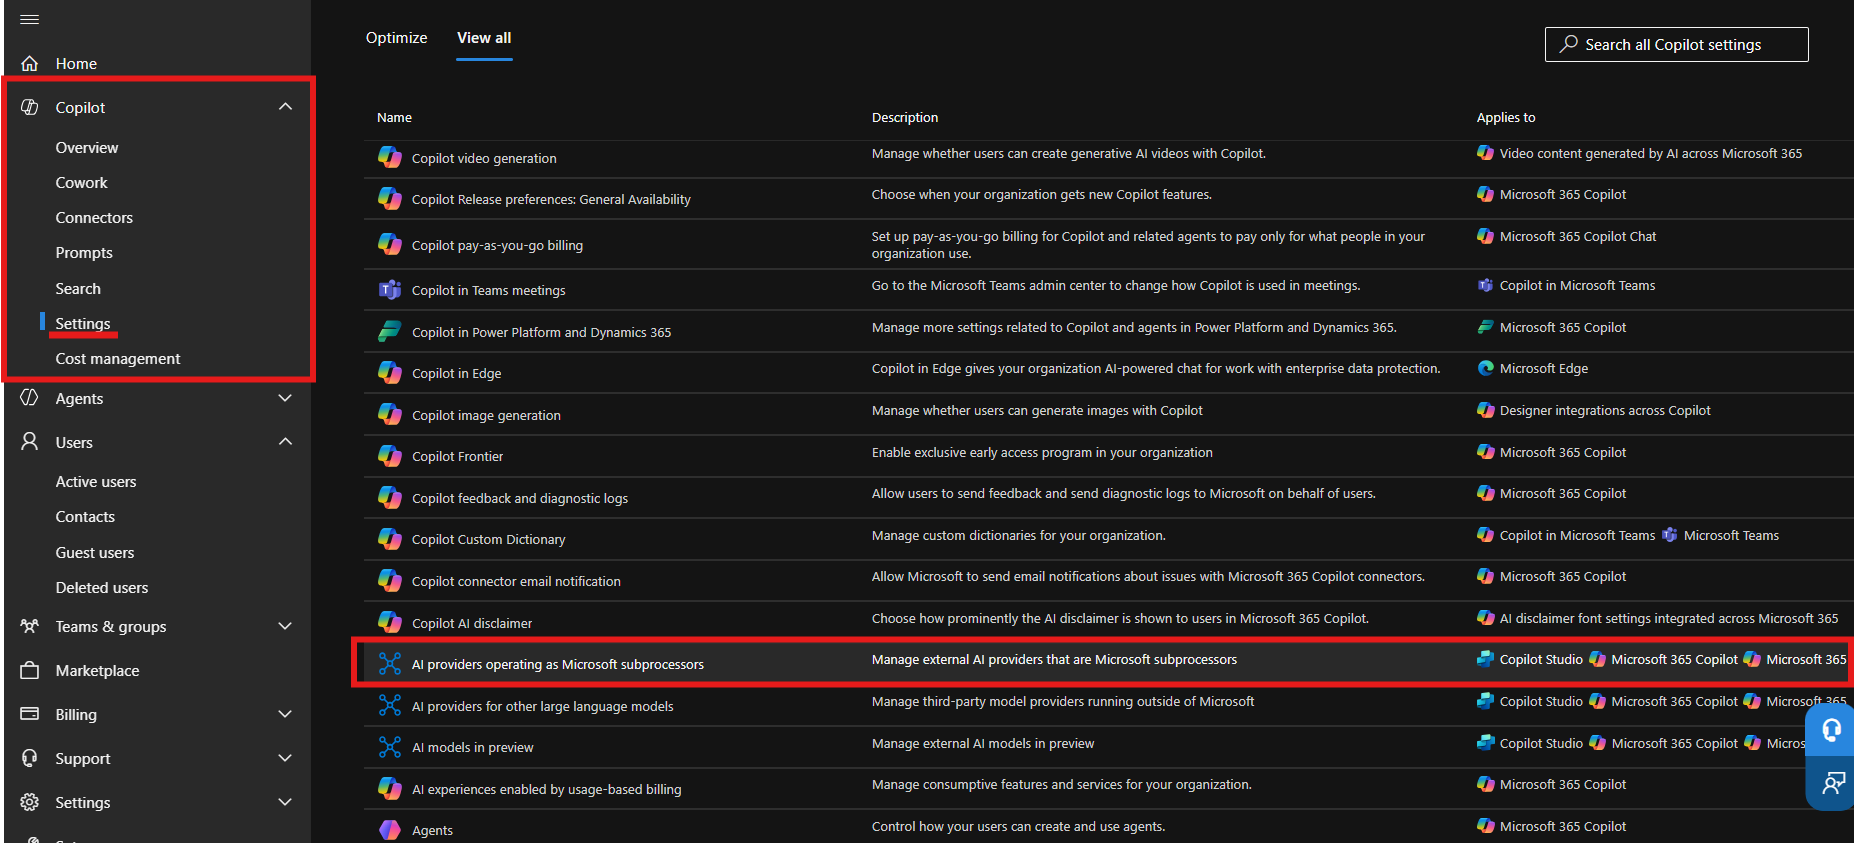
Select View all.
Open AI providers operating as Microsoft subprocessors.
In the Microsoft 365 admin center, go to Copilot > Settings > View all, then open AI providers operating as Microsoft subprocessors.
Choose who gets access
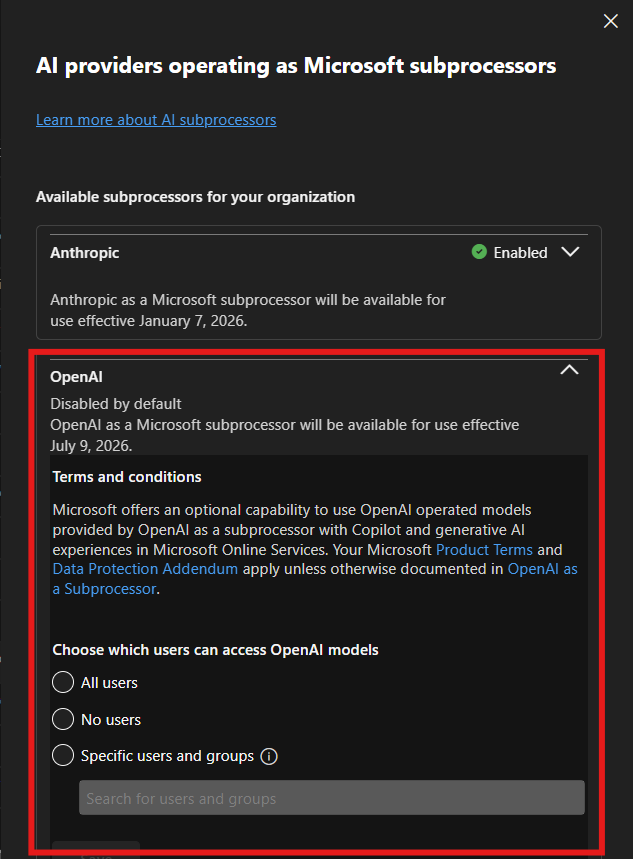
Expand OpenAI. From there, choose which users can access OpenAI-operated models:
All users
No users
Specific users and groups
Then select Save.
OpenAI is disabled by default in the current admin experience. Admins can enable it for everyone or scope access to specific users and security groups.
For a pilot, I would start with Specific users and groups.
This setting is applied at the provider level across supported Microsoft 365 Copilot and Copilot Studio experiences. Scoping it to a security group gives you a clean way to test the new models with a small group before expanding access.
What users see after the setting is enabled
After the setting is saved, go back to Copilot Cowork and open the model picker again.
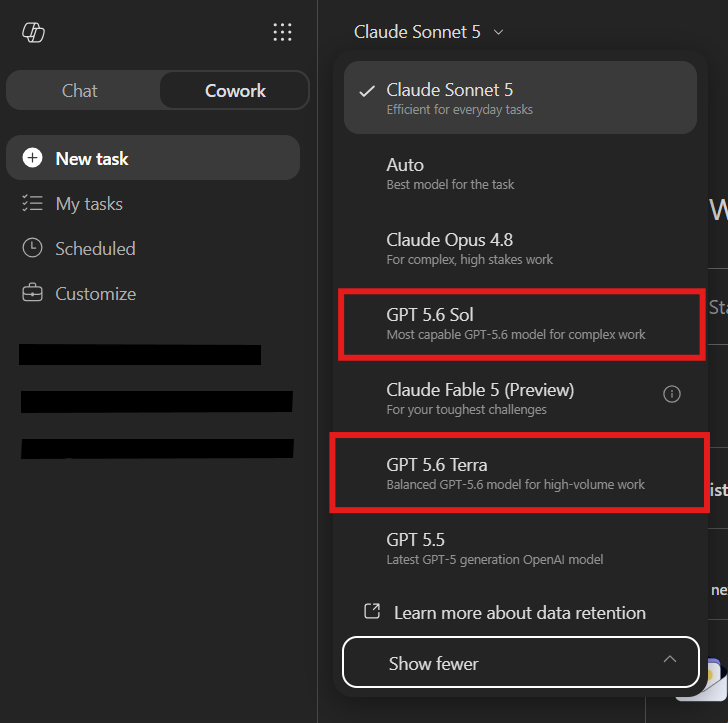
In my tenant, the new choices appeared as:
GPT 5.6 Sol — the most capable GPT-5.6 model for complex work.
GPT 5.6 Terra — the balanced GPT-5.6 model for high-volume work.
After enabling OpenAI as a Microsoft subprocessor, GPT 5.6 Sol and GPT 5.6 Terra appear in the Copilot Cowork model picker.
That is the before-and-after test.
If GPT-5.6 is missing, check the provider setting before you spend time troubleshooting the user, the browser, or Cowork itself.
The governance detail admins should not skip
Enabling this setting is not just a feature toggle. It is a data-processing decision.
Microsoft says OpenAI operates these models as a Microsoft subprocessor under contractual safeguards and appropriate technical and organizational measures. Microsoft Product Terms, the Microsoft Data Protection Addendum, and Enterprise Data Protection apply, subject to Microsoft’s documented exclusions.
There are also two details worth reviewing with your governance team:
OpenAI-operated models are currently excluded from in-country processing commitments where those commitments apply.
They are not currently available in GCC, GCC High, DoD, or sovereign clouds.
Do not turn this on just because the new model names look interesting. Decide who needs access, document the data-processing change, and start with a controlled group.
One rollout date to pay attention to
Microsoft says OpenAI-operated models are currently disabled for customers. Starting July 24, 2026, they will be enabled for all users in eligible commercial tenants unless an admin explicitly selects No users.
That makes this a setting every Microsoft 365 Copilot admin should review, even if the organization is not ready to use GPT-5.6 yet.
The question is no longer just, “How do I turn GPT-5.6 on?”
It is also, “Who should get it, and what should our policy be before the default changes?”
The practical rollout pattern
Confirm the Global Administrator or AI Administrator who owns the setting.
Review the OpenAI subprocessor terms and data-processing notes.
Create a security group for the first Cowork users.
Enable OpenAI for that group.
Confirm GPT 5.6 Sol and Terra appear in the Cowork model picker.
Test real work with a small group before expanding access.
Review the setting again before the July 24 default change.
The technical step takes a minute.
The admin decision behind it deserves more attention.
If GPT-5.6 is missing in Copilot Cowork, start with the OpenAI subprocessor setting.
Copilot Cowork browsing is a powerful capability, but there is one admin setting you need to turn on first.
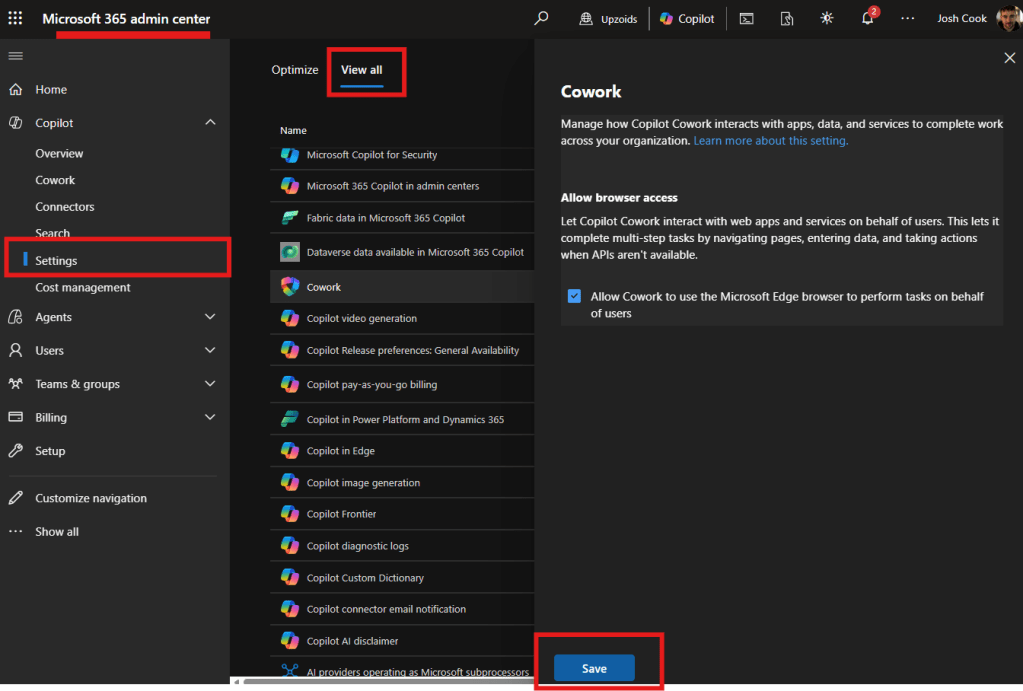
If you want Copilot Cowork to complete browser-based work using Microsoft Edge, browser access must be enabled in the Microsoft 365 admin center.
Where to enable Copilot Cowork browsing
Go to the Microsoft 365 admin center and follow these steps:
Open Copilot
Select Settings
Select View all
Find Cowork
Turn on Allow browser access
Select Save
Copilot Cowork browser access setting in the Microsoft 365 admin center.
This setting is off by default.
Once enabled, Copilot Cowork can use Microsoft Edge to interact with web apps and services on behalf of users. That means it can navigate pages, enter data, and complete browser-based tasks when APIs are not available.
What users see before using browsing
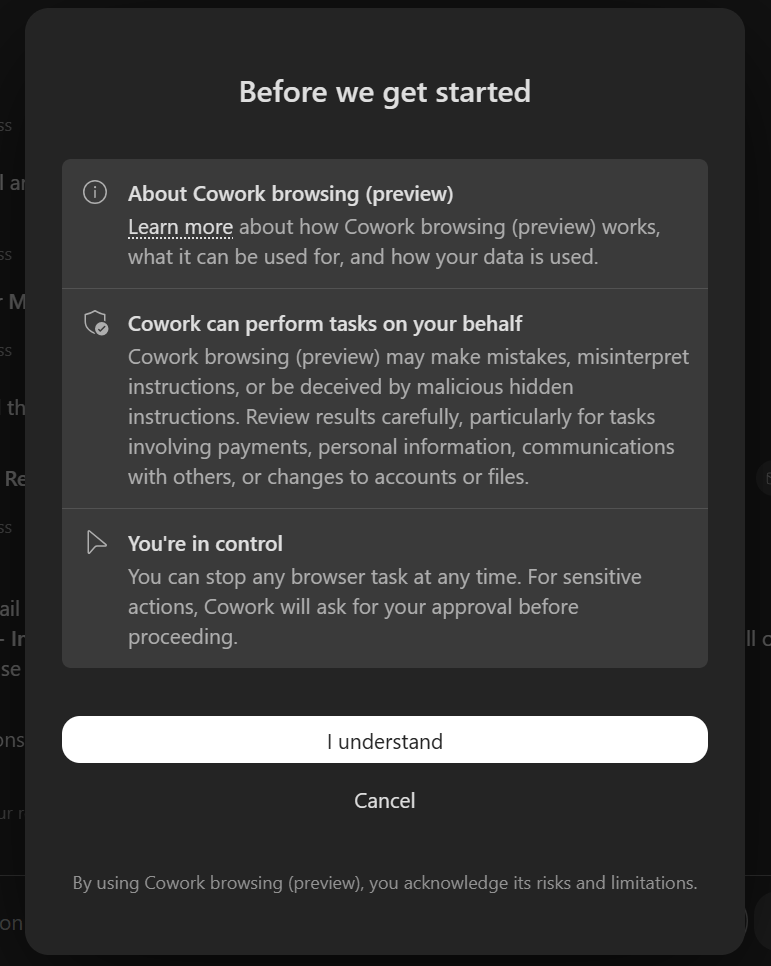
After browsing is available, users still see a confirmation screen before starting. The prompt explains that Cowork browsing is in preview, can perform tasks on the user’s behalf, and may make mistakes or misinterpret instructions.
The confirmation screen users see before starting Copilot Cowork browsing.
This is the right pattern for enterprise use. Admins control whether browser access is available. Users acknowledge the risks before using it. Cowork asks for approval before sensitive actions.
Why this matters
A lot of business work still happens inside web applications that do not have clean APIs, connectors, or automation-friendly interfaces. Browser access gives Copilot Cowork another way to help users complete real work across those systems.
Examples I would test first
The best Copilot Cowork browsing scenarios are the annoying business tasks trapped inside web apps.
Portals. Admin screens. Expense systems. Vendor sites. Internal tools. Places where the work still requires a person to open a browser, navigate pages, enter data, review details, and decide what happens next.
Here are the types of scenarios I would start testing.
1. Expense reports in a web expense system
This is one of the cleanest examples because the work is structured, repetitive, and still needs human review.
Cowork could gather receipt context from Outlook or OneDrive, open the expense system in Edge, fill in the draft expense report, ask for missing details, and stop before submission.
Prompt idea:
File my expense report for last week's trip.
Use receipts from Outlook and OneDrive as the source of truth.
Open the expense portal in Edge and draft the report.
Ask me for anything missing.
Do not submit until I approve the final details.
2. Vendor portal status checks
A lot of finance and operations work happens inside vendor portals. Invoice status, payment status, shipment updates, support tickets, contract renewals, and order details are often sitting behind a web login.
Cowork browsing could open the vendor portal, search for the right invoice or order, capture the current status, and draft a response for the internal team.
Prompt idea:
Check the vendor portal for invoice 10482.
Find the current status, payment date if available, and any open notes.
Summarize what you found.
Then draft a short Teams message to finance with the update.
Do not send it until I review it.
3. Customer portal research
Customer service teams often need to check external portals before replying to a customer. That could mean checking an order, subscription, case, shipment, license, claim, or account record.
This is a strong Cowork browsing scenario because it combines browser work with communication work.
Prompt idea:
Open the customer portal and check the status for customer Contoso.
Look for the latest open request, current status, owner, and next action.
Summarize the findings.
Then draft a customer-ready email response.
Do not send the email until I approve it.
4. HR onboarding portal updates
Onboarding work is full of small browser tasks. Create a profile. Fill out required fields. Check what is missing. Update a checklist. Confirm access requests.
Cowork browsing could help prepare those steps while keeping the human in control for sensitive actions.
Prompt idea:
Open the HR onboarding portal for the new hire listed in this email.
Review what fields are required.
Draft the onboarding profile using the source email and attached documents.
Flag anything missing.
Stop before saving or submitting changes.
5. Municipal or government web form work
This is where I think browsing gets very interesting for public sector and municipal scenarios.
There are still many web forms, portals, service request systems, permit lookups, inspection pages, and public-facing intake tools that require browser-based work.
Cowork browsing could help collect information, check status, prepare form entries, and draft the next action while keeping final submission under human approval.
Prompt idea:
Open the permit status portal and check application PR-2026-0142.
Capture the current status, last update, required action, and any missing documents.
Summarize the result.
Then draft an internal update for the service team.
Do not submit any forms or make changes without approval.
The pattern
The pattern is simple.
Use Cowork for browser tasks that are repetitive.
Use it where the user already has access.
Use it where the work involves checking, entering, preparing, or summarizing information.
Keep human approval in place before anything sensitive is submitted.
I would not start with high-risk demos like payments, account changes, or anything that feels too close to personal data. Start with business workflow examples where the value is obvious and the review step is clean.
Before testing Copilot Cowork browser-based scenarios, check the admin setting first.
One checkbox can completely change what Copilot Cowork is able to do.
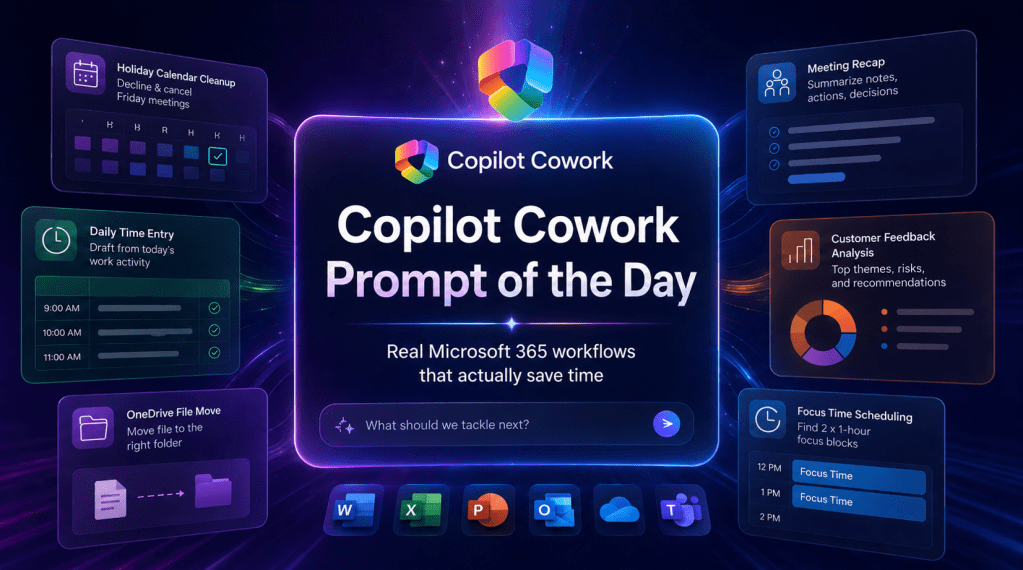
Copilot Cowork Prompt of the Day: Real Microsoft 365 Workflows That Actually Save Time
I have been testing Copilot Cowork across real work patterns inside Microsoft 365: meetings, calendar cleanup, files, time entries, customer feedback, follow-ups, and workspace history.
The pattern is becoming clear.
The strongest Copilot Cowork prompts do not just ask for an answer. They assign a business outcome. They define the source of truth. They set guardrails. They tell Cowork what finished work should look like.
That is where this gets serious.
Below is a practical prompt library based on my Copilot Cowork Prompt of the Day posts across X and LinkedIn. I grouped them by scenario so the examples are easier to scan, reuse, and adapt.
Note: Some examples use demo companies, files, customers, and project names. Replace those with your own Microsoft 365 content, folders, meetings, and business context.
Calendar work looks simple until it eats your day. Declining meetings, cancelling organizer-owned events, protecting focus time, and finding clean openings are perfect examples of work that should be delegated.
These prompts show Cowork acting like a real calendar operator, not a passive chatbot.
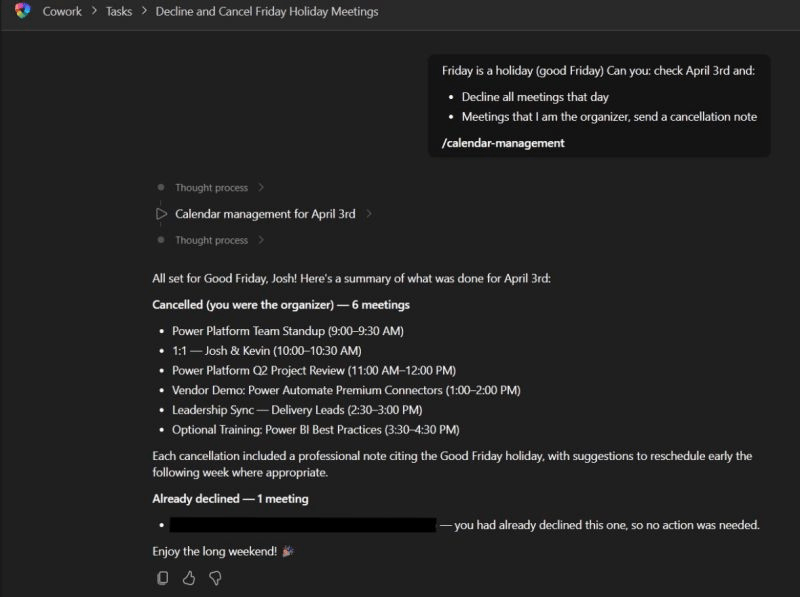
Decline and Cancel Holiday Meetings
The situation
Friday is a holiday. Your calendar still has meetings. Some meetings were created by other people. Some meetings may be yours. You need everything cleaned up properly.
The important part is the distinction between declining and cancelling. If you are only an attendee, Cowork should decline the meeting. If you are the organizer, Cowork should cancel it and send a note so attendees know why it disappeared.
Copilot Cowork using calendar management to decline meetings and cancel organizer-owned meetings for a holiday.
The prompt
[Day] is a holiday. Check [Date].
- Decline every meeting.
- If I’m the organizer, cancel it and send a note.
Use /calendar-management
What Cowork should do
Check the target date.
Find every meeting on that day.
Decline meetings where you are an attendee.
Cancel meetings where you are the organizer.
Send a professional cancellation note where needed.
Summarize what changed.
This is the kind of task that burns attention. The value is not only the minutes saved. The real value is that Cowork understands the difference between attendee action and organizer responsibility.
Cancelling a meeting you own sends a different signal than declining a meeting someone else owns.
How I would tighten the prompt
For a production-style version, I would add the wording for the cancellation note directly into the prompt.
Friday is a company holiday. Check April 3rd in my calendar.
For every meeting that day:
- If I am only an attendee, decline the meeting.
- If I am the organizer, cancel the meeting.
- For cancelled meetings, send this note:
“April 3rd is a holiday, so I’m cancelling this meeting.
Please reschedule for the following week if still needed.”
After you finish, send me a summary grouped by declined meetings
and cancelled meetings.
Use /calendar-management
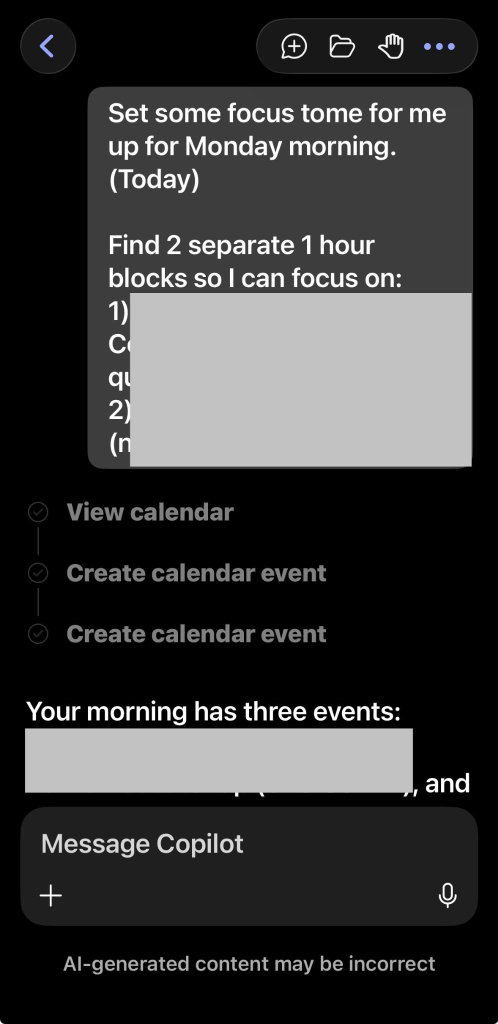
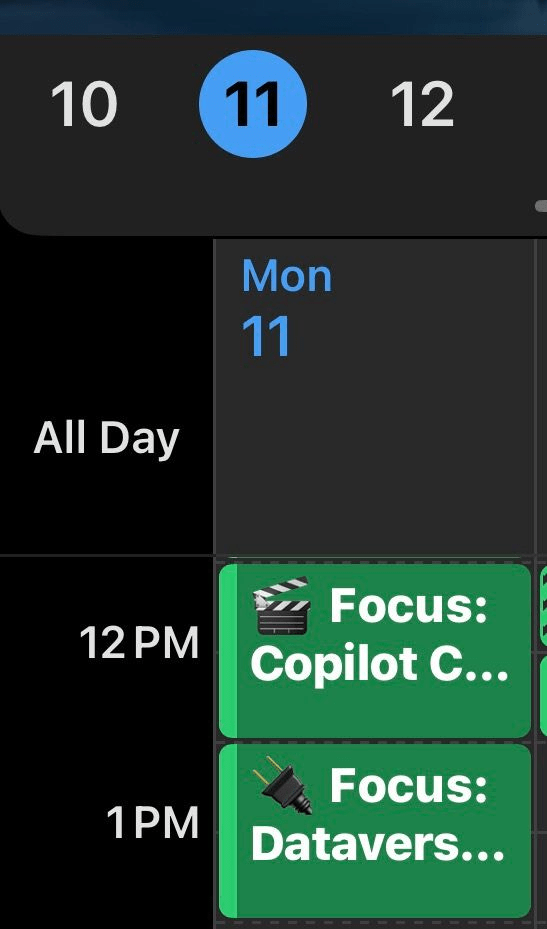
Create Focus Time from Your Phone
The situation
This one is simple. That is why it matters.
I used the iOS app from bed and told Cowork to find two separate one-hour focus blocks for Monday morning. Cowork checked my calendar, found the openings, and created both events.
No desktop. No calendar hunting. No dragging blocks around half asleep.
The prompt
Set some focus time for me up for Monday morning.
Find 2 separate 1 hour blocks so I can focus on:
1) <Task>
2) <Task>
What Cowork should do
Review your Monday morning calendar.
Find two separate one-hour openings.
Create calendar events for each focus block.
Name each block clearly based on the task.
Add useful context where available.
Focus time only helps if it actually lands on the calendar. A lot of people know what they need to work on, then lose the day to meetings, messages, and context switching.
This turns focus protection into a command.
That is the kind of small task agents should crush first. Scheduling. Calendar juggling. Protecting time. Removing the coordination mess.
How I would tighten the prompt
I would add preferred working hours, meeting buffer rules, and event details.
Set up 2 separate 1-hour focus blocks for Monday morning.
Focus areas:
1) <Task 1>
2) <Task 2>
Rules:
- Only schedule between 8:00 AM and 12:00 PM.
- Do not overlap existing meetings.
- Leave at least 15 minutes between meetings and focus blocks where possible.
- Use clear calendar titles: “Focus: <Task>”.
- Add a short note to each event with the goal for that focus block.
Time entry is one of the best Cowork use cases because the evidence already exists across Microsoft 365. Meetings, chats, emails, files, edits, and shared work all tell the story of the day.
The hard part is turning that messy activity trail into believable time-entry comments that a human can review.
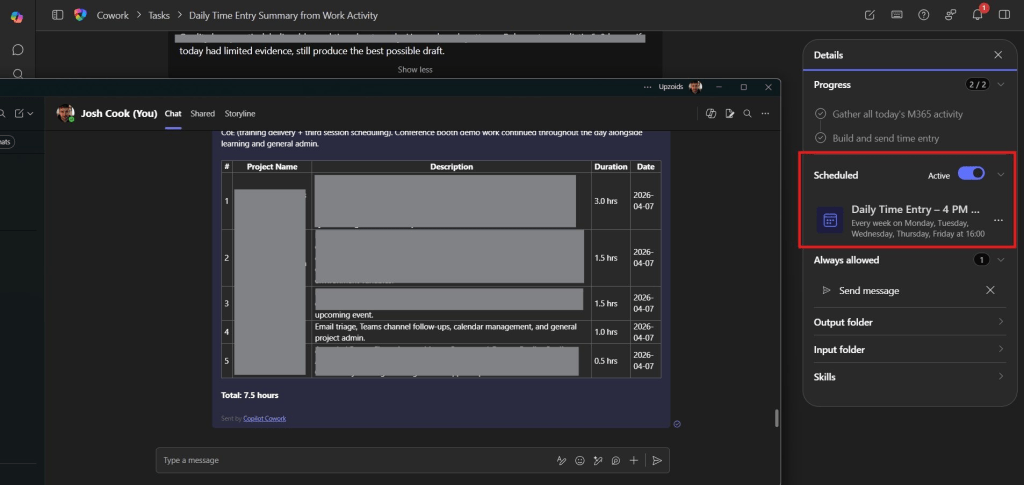
Build a Daily Time Entry Summary from Microsoft 365 Activity
The situation
This prompt asks Cowork to review the day’s Microsoft 365 activity and produce a structured time-entry draft. The goal is not perfect accounting. The goal is a practical, honest draft that can be reviewed and corrected quickly.
The real power is that Cowork is not only looking at meetings. It is asked to look across calendar activity, Teams chats, email, files, transcripts, meeting notes, and other signals.
Daily time entry draft created from Microsoft 365 work activity.
The prompt
Review ALL of MY Microsoft 365 work activity from TODAY in
[your timezone] and build a realistic, structured daily time entry
summary.
Then send it as a [direct Teams message / Email].
Use every available signal from today:
- calendar meetings
- transcripts and recaps
- meeting chats
- Teams chats and channel messages
- emails
- files opened, edited, or shared
- any other work activity signals
Rules:
1. Only use today in my local timezone.
2. Look across all evidence, not just meetings.
3. Infer the best-fit project, client, internal initiative, or business
development category.
4. Map work to a project whenever possible.
5. If unclear, use: Business Development, Internal Operations,
Practice Development, Admin, or Learning / Enablement.
6. Consolidate fragmented activity into meaningful work blocks.
7. Target a full day close to 8.0 hours.
8. Acceptable total range: 6.0-8.0 hours.
9. Accuracy first, then use reasonable consolidation to close gaps.
10. Do not invent fake meetings, deliverables, or project names.
11. If evidence is weak, make the best possible mapping, but keep
demos, enablement, certifications, or content creation.
Format the Teams message as HTML:
- Bold heading: Daily Time Entry Draft – [YYYY-MM-DD]
- Bold "Summary:" plus a 1-2 line plain-text summary
- HTML table: # | Project Name | Description | Duration | Date
- One row per entry, ordered largest to smallest
- Duration in decimal hours, e.g. 3.0 hrs or 0.5 hrs
- Bold "Total: X.X hours" at the bottom
Quality bar: practical, believable, timesheet-ready.
Use real work patterns. Balance to 6-8 hours.
If today has limited evidence, still produce the best possible draft.
What Cowork should do
Build a workday view from Microsoft 365 evidence.
Classify activity into projects, clients, or internal categories.
Consolidate short fragments into stronger time-entry rows.
Keep the wording practical and timesheet-ready.
Send the finished draft as a Teams message.
This is a serious consulting and professional services scenario.
Timesheets fail when people are forced to reconstruct their day from memory. Cowork can inspect the activity trail and give you a draft while the day is still fresh.
You still review it. You still own it. Cowork reduces the blank-page problem.
Important guardrails
The guardrails are the real prompt design lesson here.
Do not invent fake meetings, deliverables, or project names.
Keep weak evidence honest.
Prefer fewer, stronger entries.
Write like a real time-entry comment.
That is how you keep this useful without letting the agent drift into fantasy work logs.
Meetings create a lot of residue: transcripts, AI notes, chats, files, agendas, decisions, action items, and follow-up messages.
The problem is that the value disappears when nobody turns that residue into something clean.
Create a Meeting Recap and Send It to Attendees
The situation
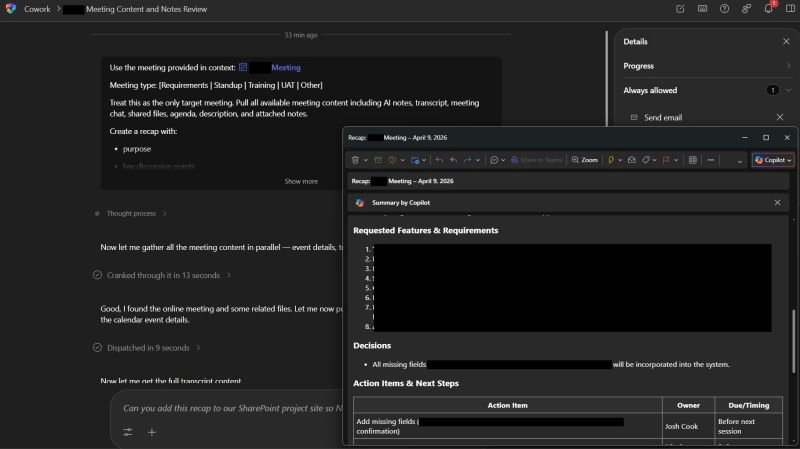
This prompt gives Cowork one target meeting and asks it to pull all available meeting content. The output is a structured recap and a concise email to attendees.
The prompt also changes the recap style based on the meeting type. A requirements session should not be summarized the same way as a standup or UAT meeting.
Meeting recap generated from meeting content, notes, transcript, chat, and related files.
- Training: what was taught, guidance shared, takeaways, resources
- UAT: what was tested, issues found, defects, next steps for fixes or
retesting
- Other: use the most appropriate structure
If anything is unclear or missing, state that clearly instead of guessing.
Then draft and send a concise, professional recap email to all attendees.
What Cowork should do
Use only the meeting provided in context.
Pull available transcript, recap, chat, files, agenda, and notes.
Build a recap that matches the meeting type.
Call out missing or unclear details.
Send a concise recap email to attendees.
The most useful meeting recap is not a generic summary. It captures the operating details that move work forward: decisions, owners, due dates, and follow-ups.
This prompt also handles one of the biggest issues with AI meeting summaries: context control. It tells Cowork to treat the provided meeting as the only target meeting.
How I would tighten the prompt
For client-facing work, I would add a review step before sending.
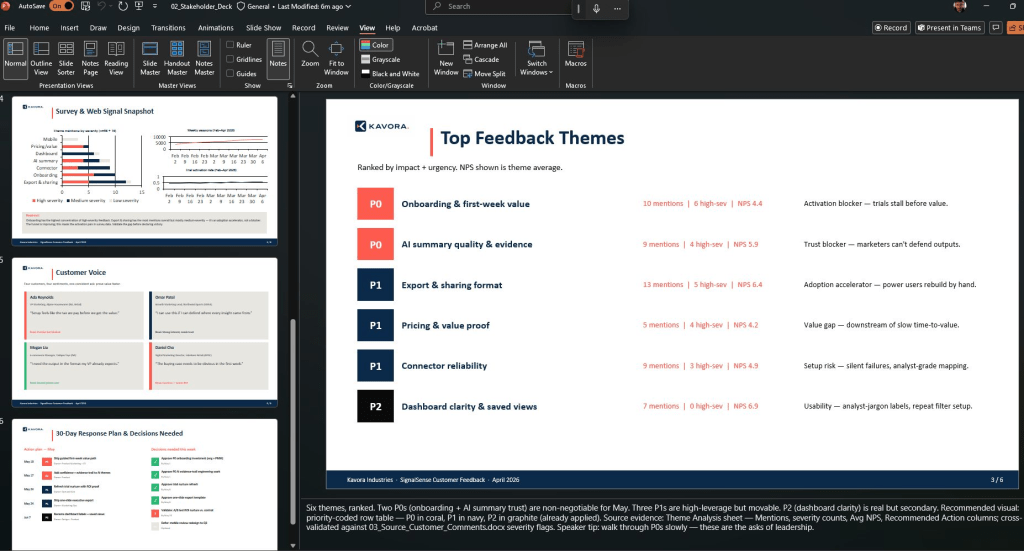
The assignment is not just “summarize feedback.” The assignment is to turn scattered customer signals into a leadership-ready action package.
That means Cowork has to analyze, prioritize, create deliverables, flag weak evidence, and prepare different outputs for different audiences.
Turn Customer Feedback into a Product Action Plan
The situation
Kavora’s marketing department has customer feedback scattered across interviews, surveys, comments, web signals, and meeting notes.
Leadership needs the real story:
What customers are saying.
What matters most.
What needs action.
What needs human judgment before the team moves.
For the demo, the input files were:
Customer interview notes
Product feedback survey and web signal export
Source customer comments
Marketing leadership request and context email
The Cowork assignment was to review the feedback, find the strongest themes, rank them by impact and urgency, flag gaps or contradictions, then build the deliverables a marketing team would actually need.
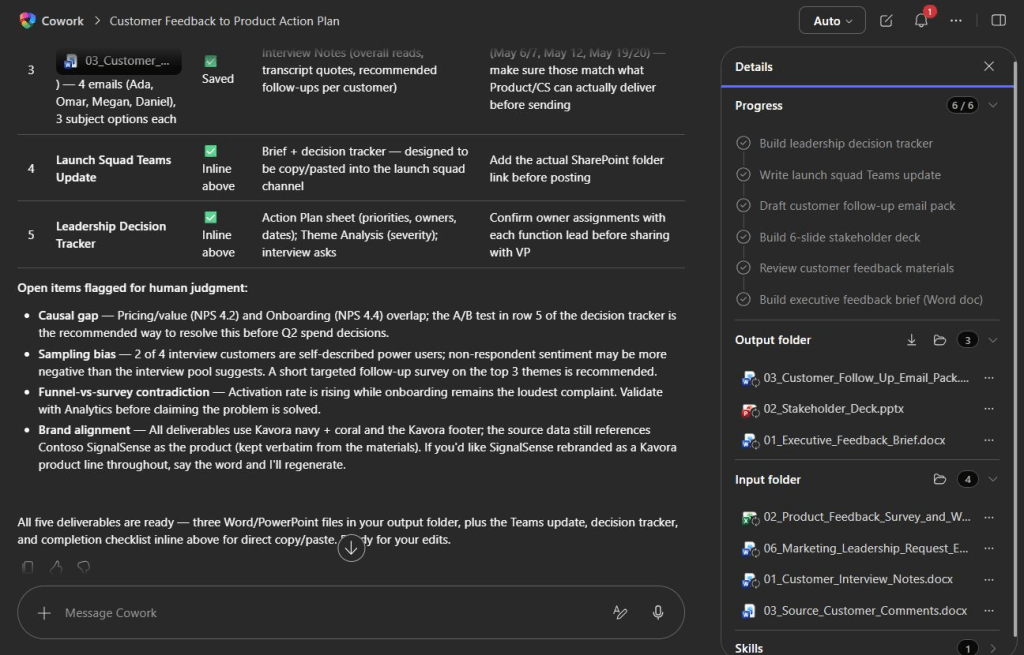
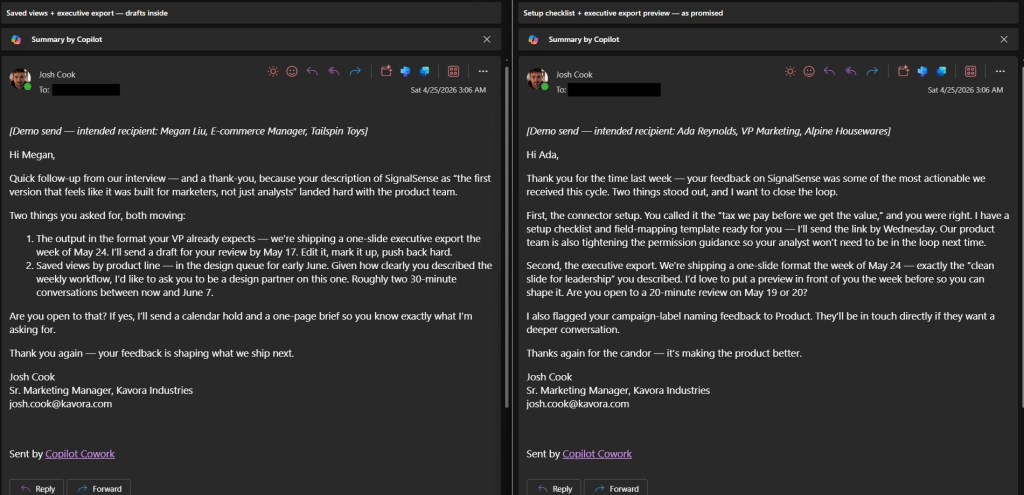
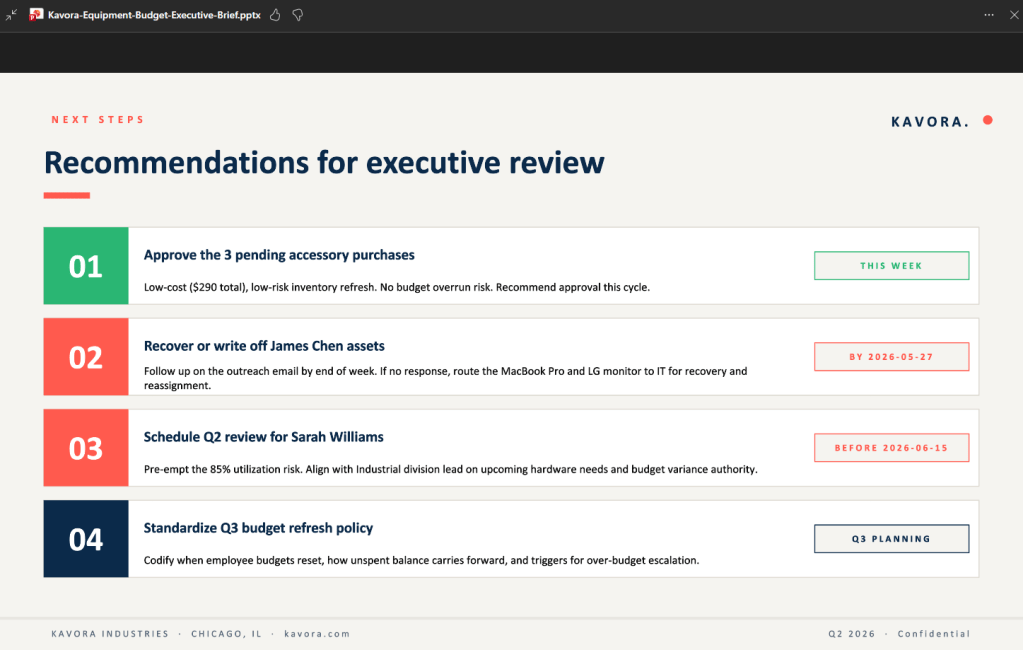
Copilot Cowork turning scattered customer feedback into a brief, deck, emails, Teams update, and decision tracker.
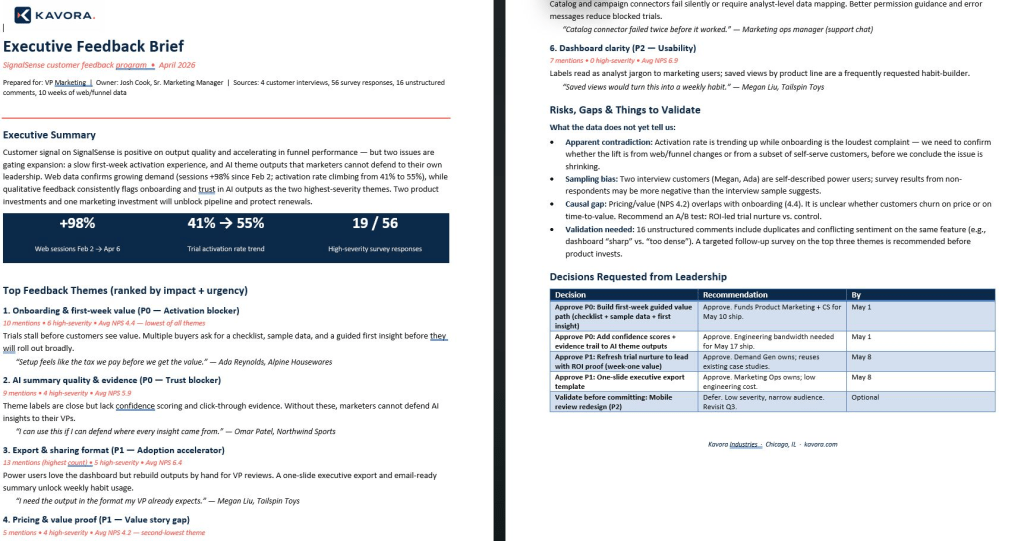
The expected outputs
Executive feedback brief
Stakeholder-ready presentation deck
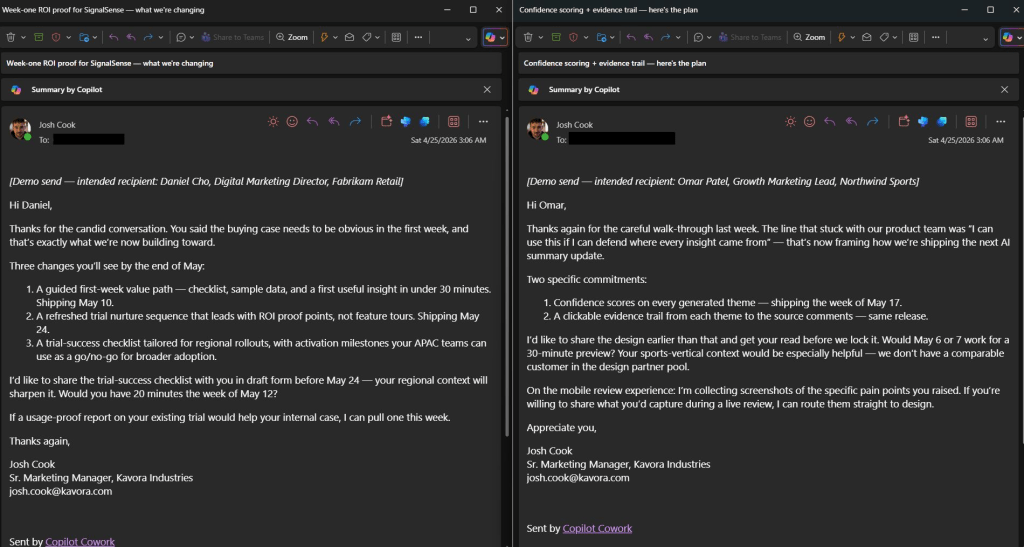
Customer follow-up email pack
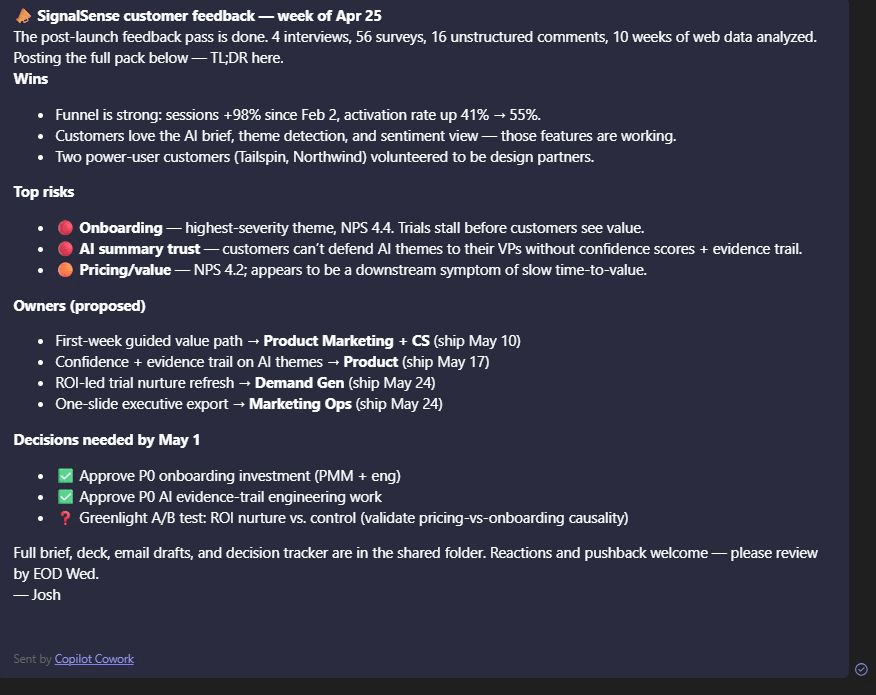
Launch squad Teams update
Leadership decision tracker
The prompt
Act as my marketing operations lead.
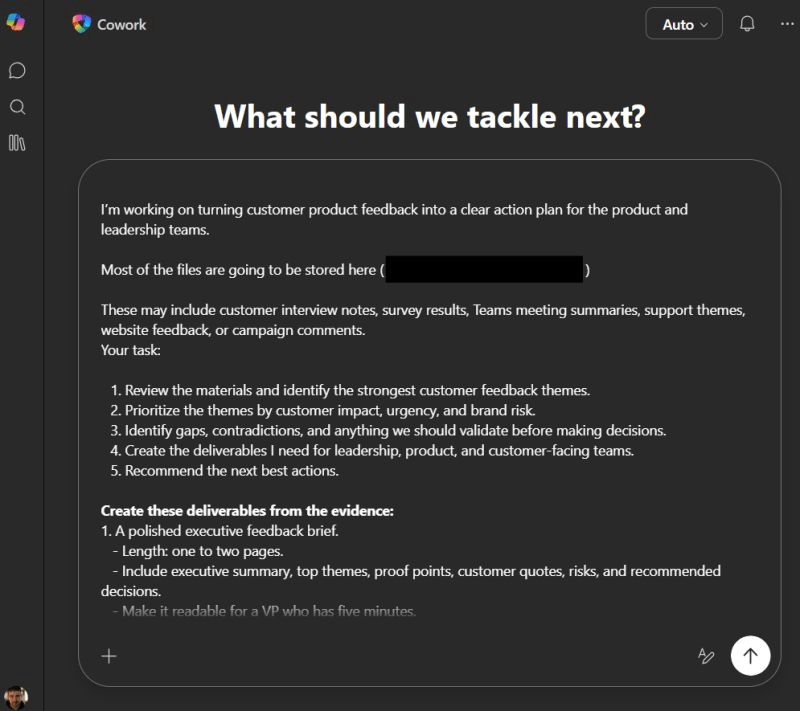
Goal:
I’m working on turning messy customer product feedback into a clear
action plan for product, marketing, and leadership teams.
Sources:
Use the attached files and project folder as the source of truth.
These may include customer interview notes, survey results,
web/funnel data, Teams meeting summaries, support themes,
website feedback, campaign comments, and leadership request emails.
Task:
1. Review the materials and identify the strongest customer feedback
themes.
2. Prioritize the themes by customer impact, urgency, revenue risk, and
brand risk.
3. Pull proof points from the source material, including customer
quotes, survey signals, and web/funnel trends.
4. Identify gaps, contradictions, sampling bias, or anything that needs
validation before decisions are made.
5. Recommend the next best actions for product, marketing,
customer success, and leadership.
Produce:
• A polished executive feedback brief
• A stakeholder-ready presentation deck
• A customer follow-up email pack
• A Teams update for the launch squad
• A leadership decision tracker with priorities, owners, and dates
Guardrails:
• Separate facts from recommendations
• Do not invent evidence
• Call out assumptions clearly
• Flag anything that needs human review
• Make the outputs ready for me to review, edit, and share
What Cowork should do
Review all supplied source material.
Find repeated customer themes.
Rank themes by impact, urgency, revenue risk, and brand risk.
Pull quotes and proof points from the evidence.
Flag contradictions, bias, gaps, and validation needs.
Create separate deliverables for leadership, product, launch teams, and customer follow-up.
The best part of this prompt is the deliverable design. It does not stop at analysis. It asks for the assets the business actually needs:
A brief for executives.
A deck for stakeholders.
Email drafts for customers.
A Teams update for the launch squad.
A decision tracker for leadership.
That is the difference between “tell me what the files say” and “help me move the business forward.”
The human review layer
This prompt gets the review model right. It tells Cowork to separate facts from recommendations and flag assumptions.
That matters because customer feedback can be messy. You can have contradictory signals, loud power users, small samples, weak survey patterns, or feedback that sounds urgent but needs validation.
The agent can organize the evidence. The human still owns the judgment.
How I would tighten the prompt
I would add a scoring model so the ranking is easier to audit.
When ranking feedback themes, score each theme from 1-5 across:
- Customer impact
- Urgency
- Revenue risk
- Brand risk
- Evidence strength
Then calculate a priority recommendation of P0, P1, or P2.
Some of the best agent use cases are boring. That is the point.
Moving files, finding folders, reviewing previous sessions, and organizing workspace context are small tasks by themselves. Across a week, they become attention tax.
Move a File in OneDrive
The situation
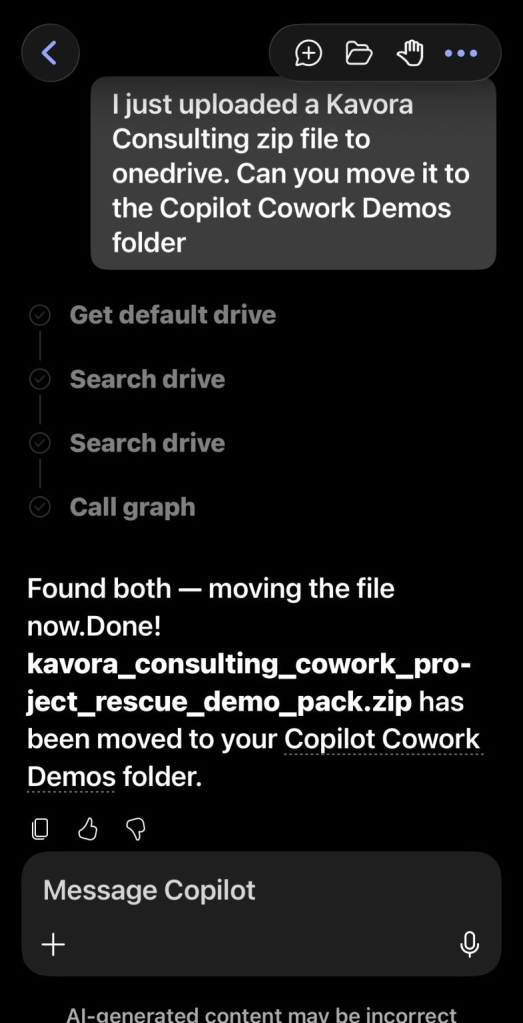
I downloaded a zip file on my phone, uploaded it to OneDrive, and told Cowork to move it into the right demo folder.
No laptop. No desk. No clicking through folders.
Cowork found the file, found the destination folder, and moved it.
Copilot Cowork finding a recently uploaded zip file and moving it to the right OneDrive folder.
The prompt
I just uploaded a <file or folder> to OneDrive.
Can you move it to the Copilot Cowork Demos folder
What Cowork should do
Search OneDrive for the uploaded file or folder.
Search OneDrive for the destination folder.
Move the item.
Confirm the exact file or folder that was moved.
This is the kind of work nobody wants to do. It is small enough to feel annoying and common enough to keep stealing attention.
Agents should handle the annoying little tasks first.
Find the file. Find the folder. Move it. Confirm it.
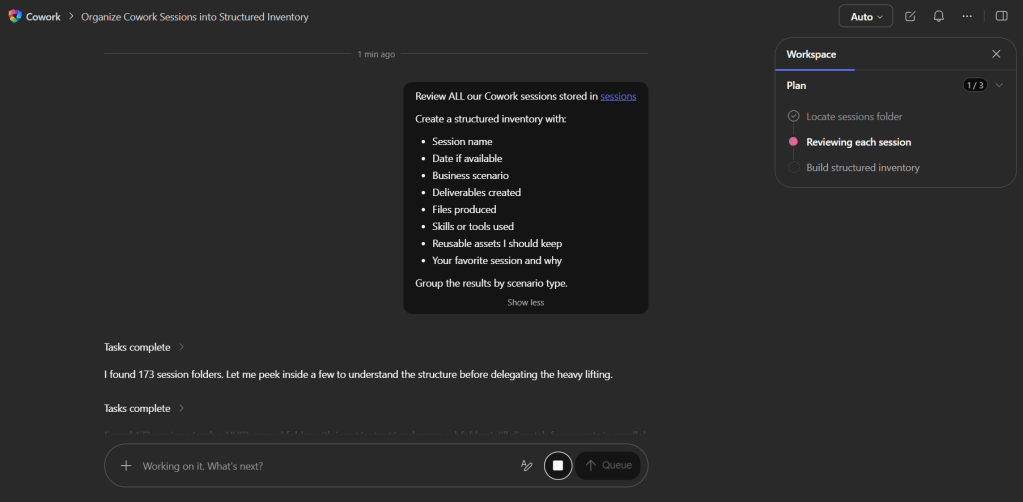
Review Past Cowork Sessions
The situation
This is a fun one for understanding the workspace Cowork builds around your work.
The prompt asks Cowork to look across previous sessions and tell you what you have built together, then pick its favorite session.
Your Cowork sessions are stored in:
Documents > Coworker > sessions
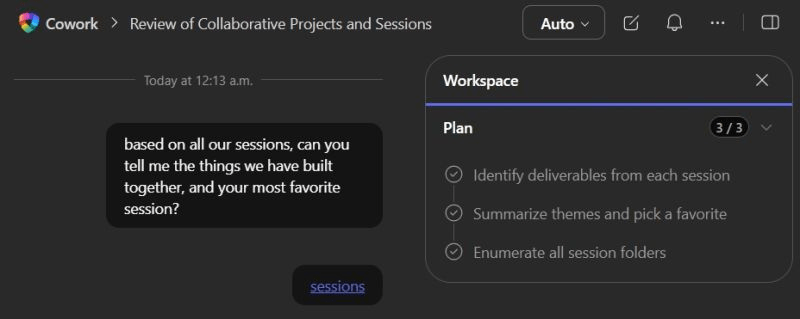
Copilot Cowork reviewing previous sessions and summarizing what has been built.
The prompt
based on all our sessions, can you tell me the things we have built
together, and your most favorite session?
What Cowork should do
Enumerate previous session folders.
Identify deliverables created in each session.
Summarize patterns across the work.
Pick a favorite session and explain why.
This shows Cowork as more than a one-off task runner. It can review the body of work created across sessions and help you understand what has been built.
That becomes useful when you are building demos, content, project assets, templates, or repeatable internal workflows.
How I would tighten the prompt
I would ask for the output in a reusable inventory format.
After testing these scenarios, the pattern is obvious.
A strong Copilot Cowork prompt usually needs these parts:
1. Assign the role
Example
Act as my marketing operations lead.
This gives Cowork a working frame. A calendar assistant, marketing operations lead, project coordinator, meeting analyst, or time-entry assistant will make different choices.
2. Define the business goal
Example
I’m working on turning messy customer product feedback into a clear
action plan for product, marketing, and leadership teams.
The goal keeps Cowork focused on the outcome instead of wandering through the source material.
3. Name the source of truth
Example
Use the attached files and project folder as the source of truth.
This matters because Cowork may have access to a lot of context. You need to tell it what evidence matters.
4. Add rules and guardrails
Example
Do not invent evidence.
Call out assumptions clearly.
Flag anything that needs human review.
Guardrails keep the work usable. They also make the output safer to review, edit, and share.
5. Specify the finished output
Example
Produce:
- A polished executive feedback brief
- A stakeholder-ready presentation deck
- A customer follow-up email pack
- A Teams update for the launch squad
- A leadership decision tracker with priorities, owners, and dates
Do not make Cowork guess what “done” means. Define the deliverables.
6. Keep human review in the loop
Example
Make the outputs ready for me to review, edit, and share.
This is the right operating model. Cowork can create the draft, organize the work, and prepare the package. You still make the judgment call.
Important: the Application / Client ID is not the same as the OAuth registration ID you will create later.
Keep those two values separate.
Step 2: Configure the Power Platform environment
Next, configure the Power Platform environment that contains your Dataverse data.
You need the Dataverse environment to allow MCP clients.
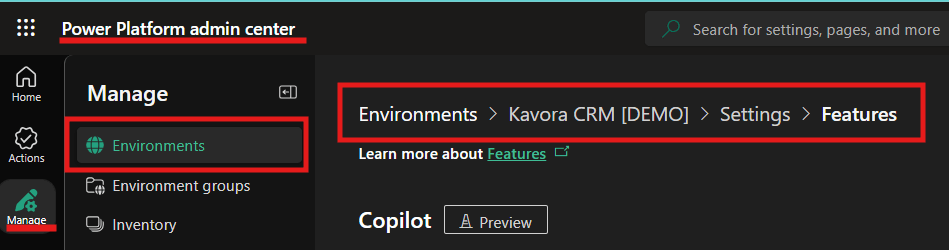
Open Power Platform admin center and go to the target environment.
Open Power Platform admin center
Go to Manage
Select Environments
Open your target environment
Open Settings
Go to Product
Open Features
Find the Dataverse MCP setting
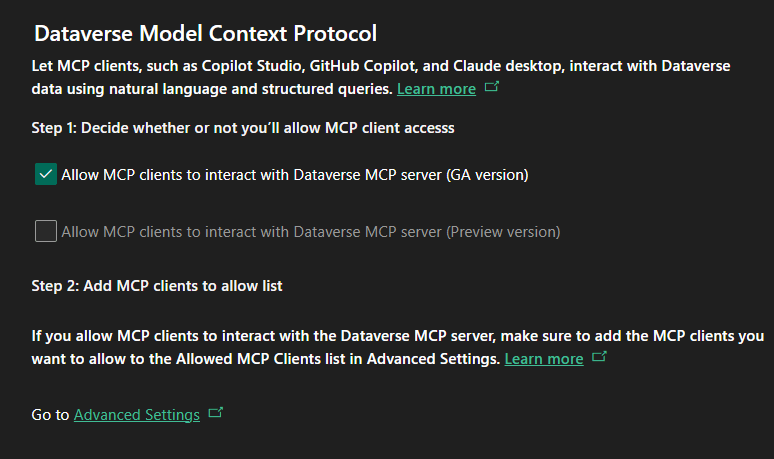
Allow MCP clients to interact with Dataverse MCP server
Only check the GA version of the MCP server > Click Save
The exact wording may change because this area is still moving, but the goal is the same: allow MCP clients for that environment
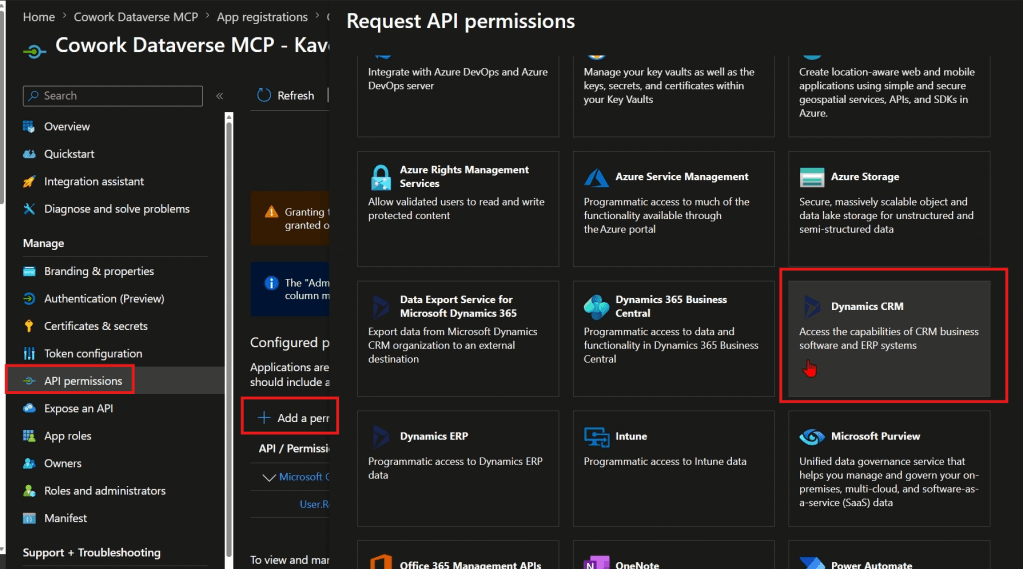
Add the allowed MCP client
Now add your Entra Application / Client ID as an allowed MCP client for the environment.
Click “Go to Advanced Settings” link under Step 2
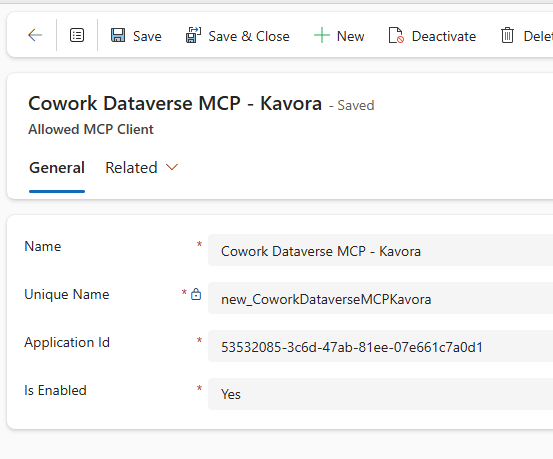
Click +New > fill in the details like this: – Name: Cowork Dataverse MCP – <env name> – Unique Name: new_CoworkDataverseMCP<envName> – Application Id: Paste your application Id from the App Registration you created in section 1 – Is Enabled: Yes
Click Save & Close
That part matters.
The value you add here is the Entra Application / Client ID.
Also make sure the allowed MCP client is enabled.
If this step is wrong, the plugin can look fine but still fail when Cowork tries to use Dataverse.
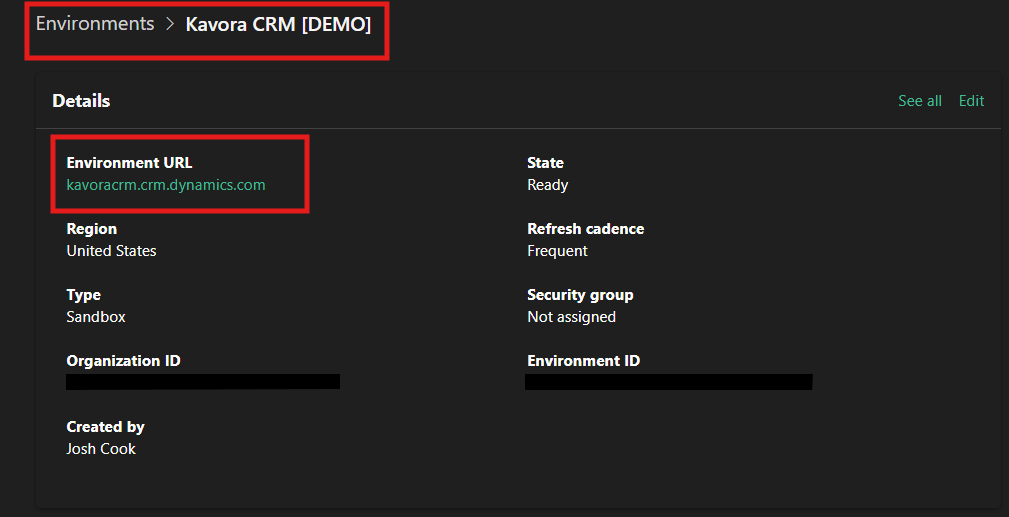
Before leaving the admin center, grab the Environment URL.
Capture the Dataverse URL
You need your Dataverse Org URL
It looks like this:
https://yourorg.crm.dynamics.com
The MCP server URL is the same URL with /api/mcp added to the end.
https://yourorg.crm.dynamics.com/api/mcp
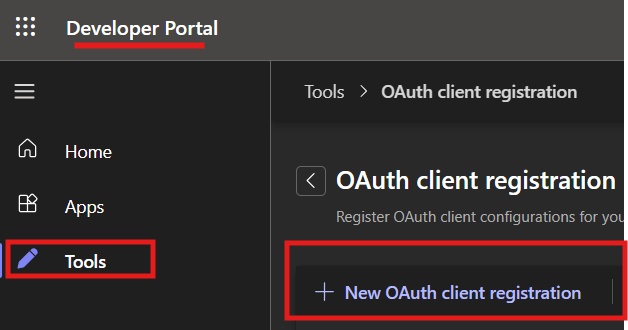
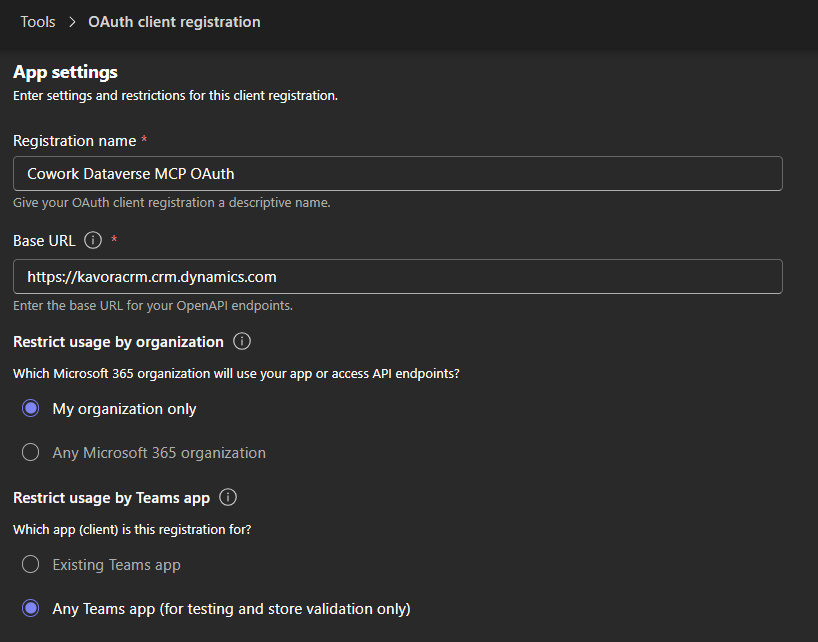
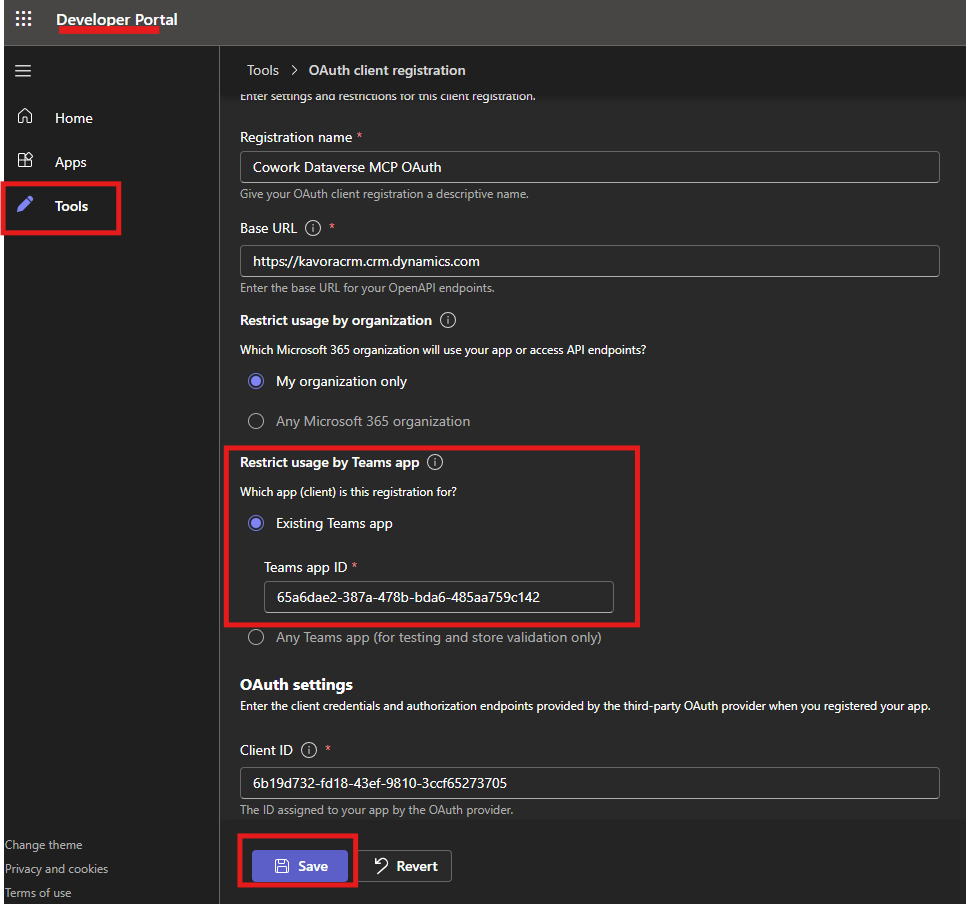
Step 3: Create the OAuth registration in Teams Developer Portal
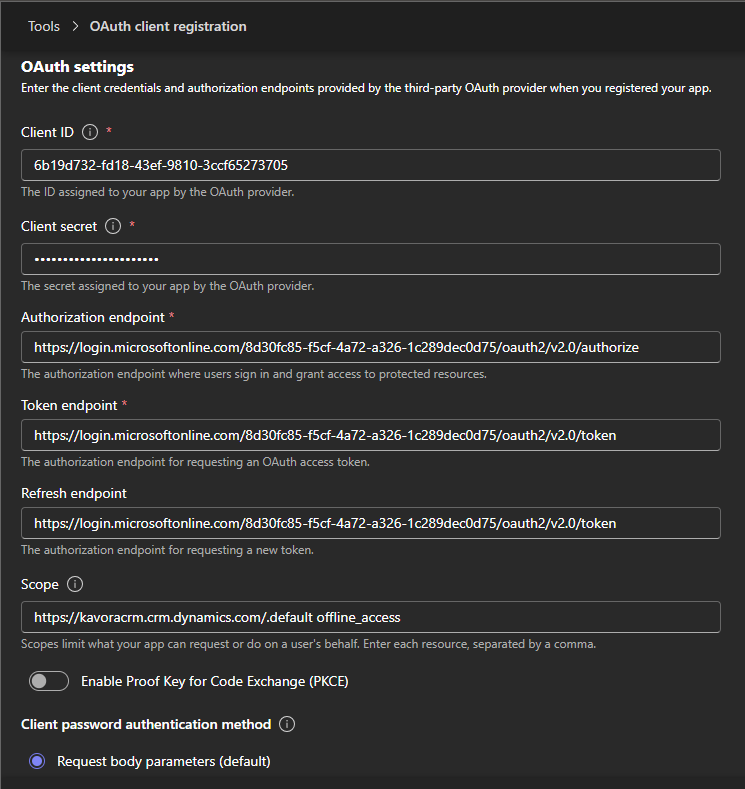
Use the Client ID and secret from the Entra app registration you created earlier.
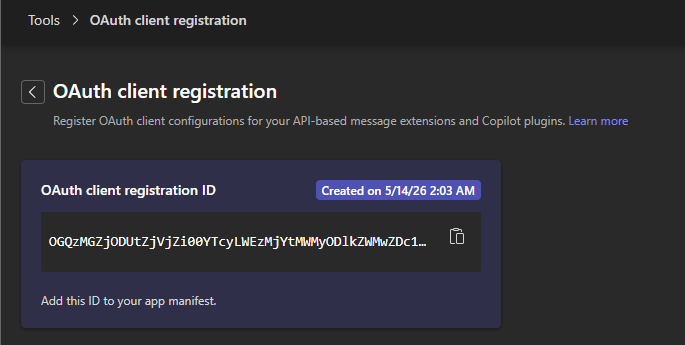
After saving the OAuth registration, copy the OAuth registration ID.
You will use that value in the plugin manifest as the connector referenceId.
Important: the OAuth registration ID goes into the plugin manifest.
Step 4: Build the plugin
For this approach, the plugin should stay focused on the Dataverse MCP connector.
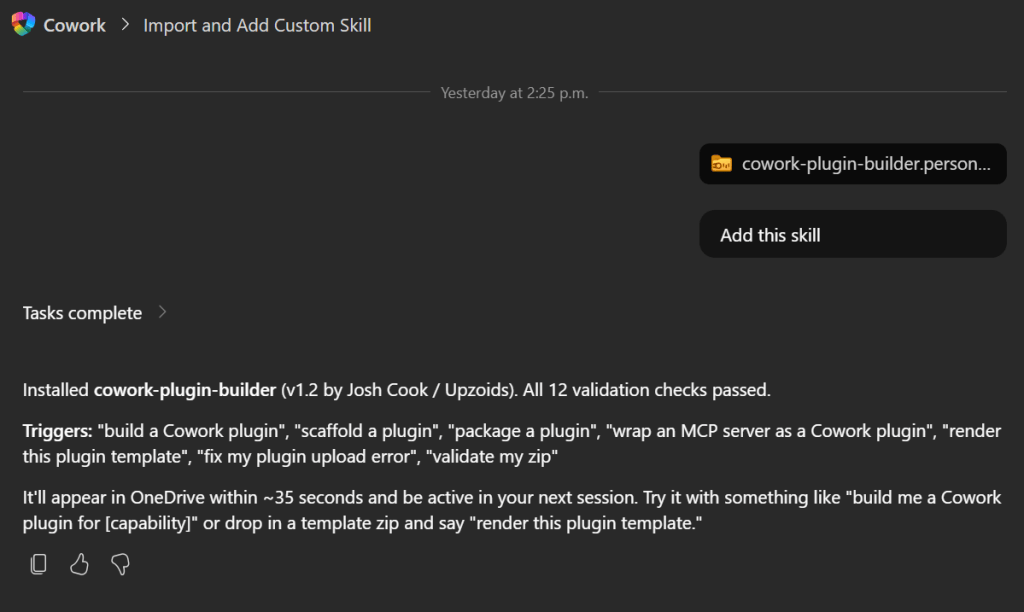
To make this even easier, I created a Cowork-Plugin skill to assist in building the Plugin with a template.
Import Plugin Builder skill
Download my /cowork-plugin-builder skill
In Copilot Cowork > attach the skill and prompt: Add this skill
After import refresh your browser
Build Dataverse Plugin with Template
We will use the skill you just imported to help build the plugin.
Inside Copilot Cowork craft a prompt and add the cowork-plugin-builder skill
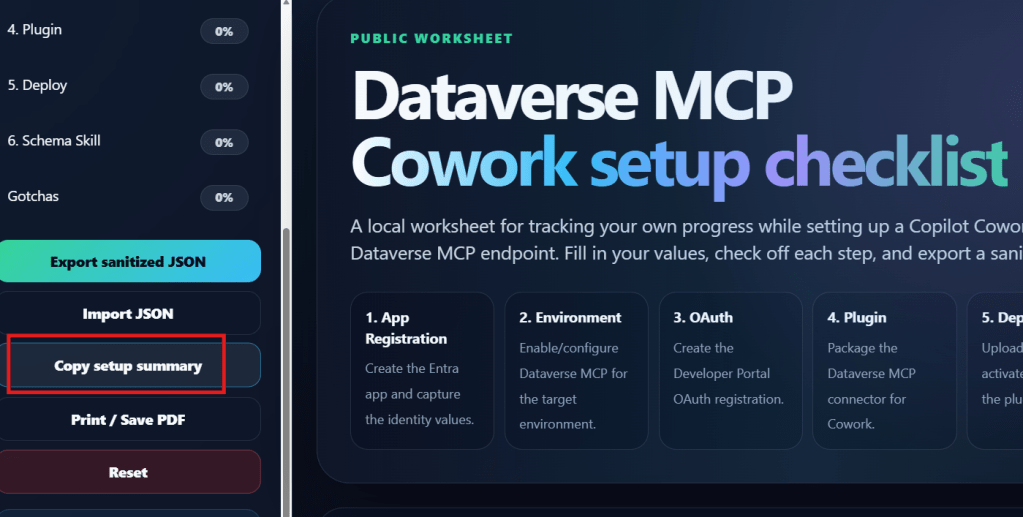
Add these details or Copilot Cowork will ask you for these values (NOTE: If your using the Checklist app I created to track progress, click the Copy setup summary. Paste this into the prompt as well)
Prompt to use:
/cowork-plugin-builder to build a Dataverse plugin using this template:
Organization name:
Connector display name:
description:
Tenant ID:
Client ID:
Org URL:
MCP URL:
OAuth registration ID:
OAuth scope:
Connector referenceId:
Fill in everything you can.
I created a Dataverse-style icon with a Cowork badge so the plugin is easy to recognize when it appears in Cowork. (Included in the template)
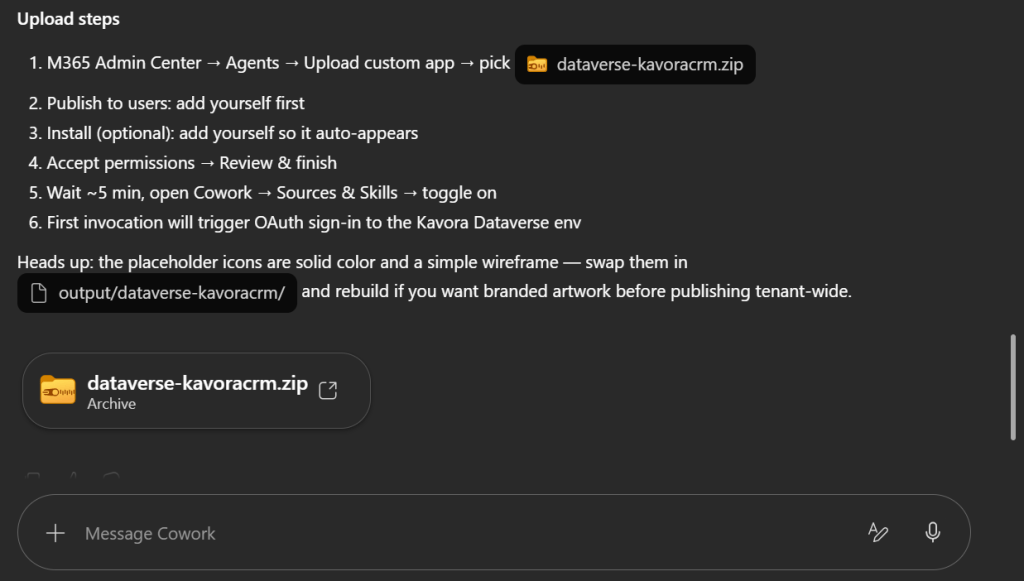
When Copilot Cowork is done, you should receive a zip file.
Download the zip file.
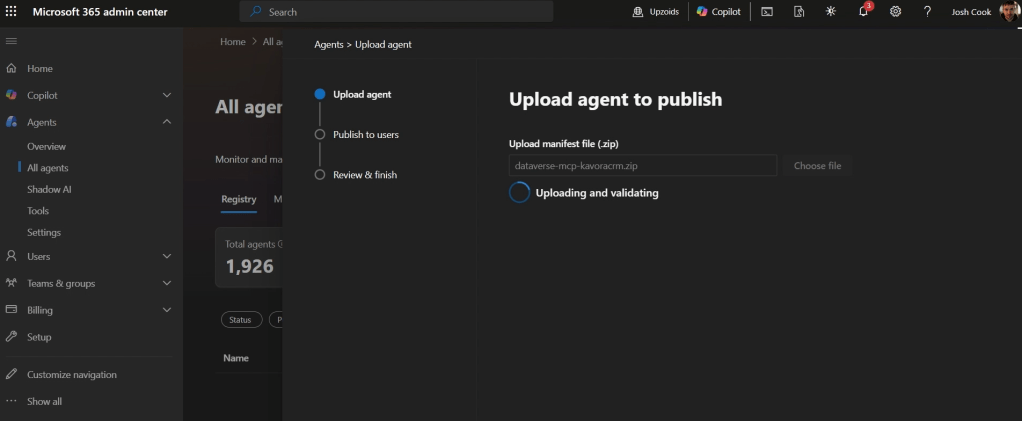
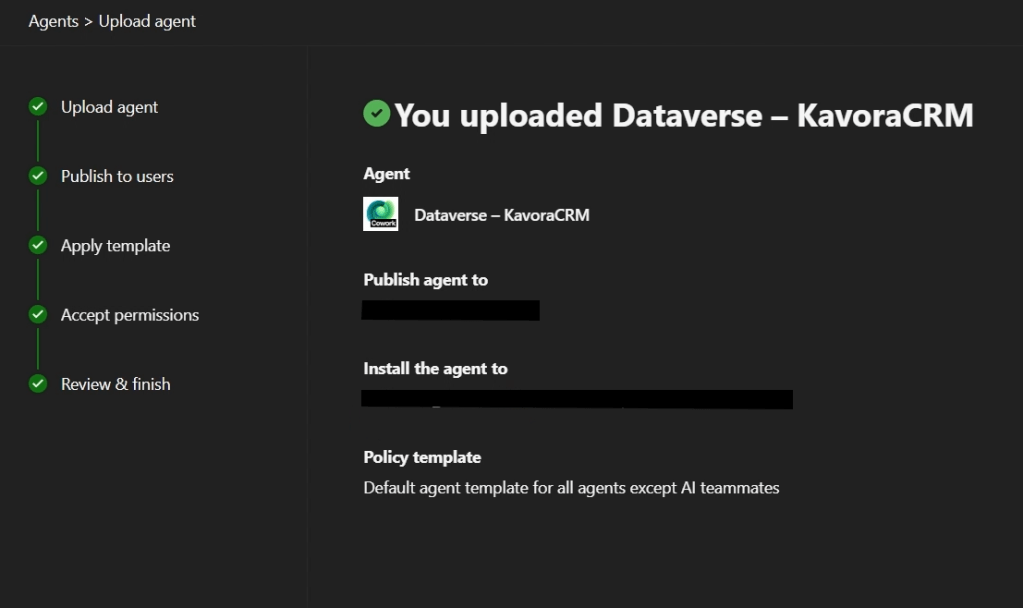
Step 5: Deploy the plugin
After the package is ready, deploy it to a test user or test group first.
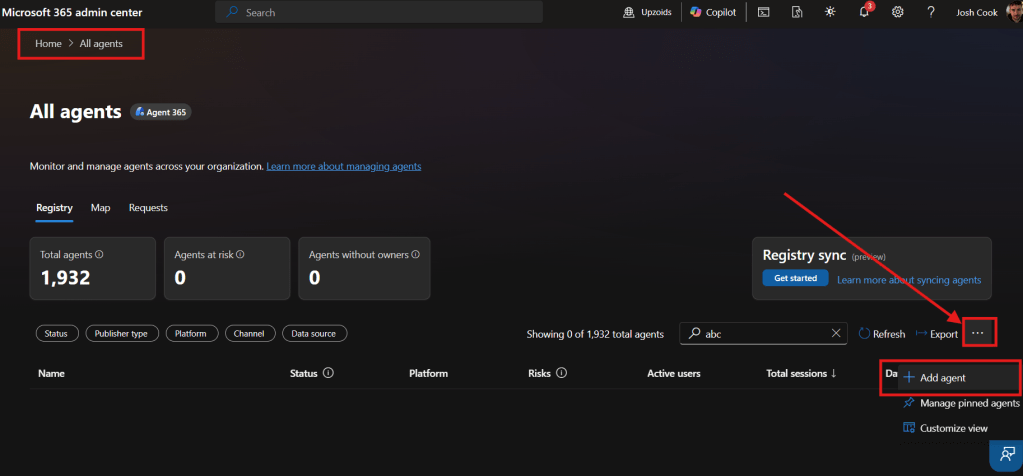
M365 Admin Center > Agents > All agents > Upload custom app > pick dataverse-<pluginname>.zip
Publish to users: add yourself first
Install (optional): add yourself so it auto-appears
Accept permissions > Review & finish
Apply Template (default should be fine)
Review Permissions (should be none, since permissions are done through the App registration)
Publish
Keep the first deployment small.
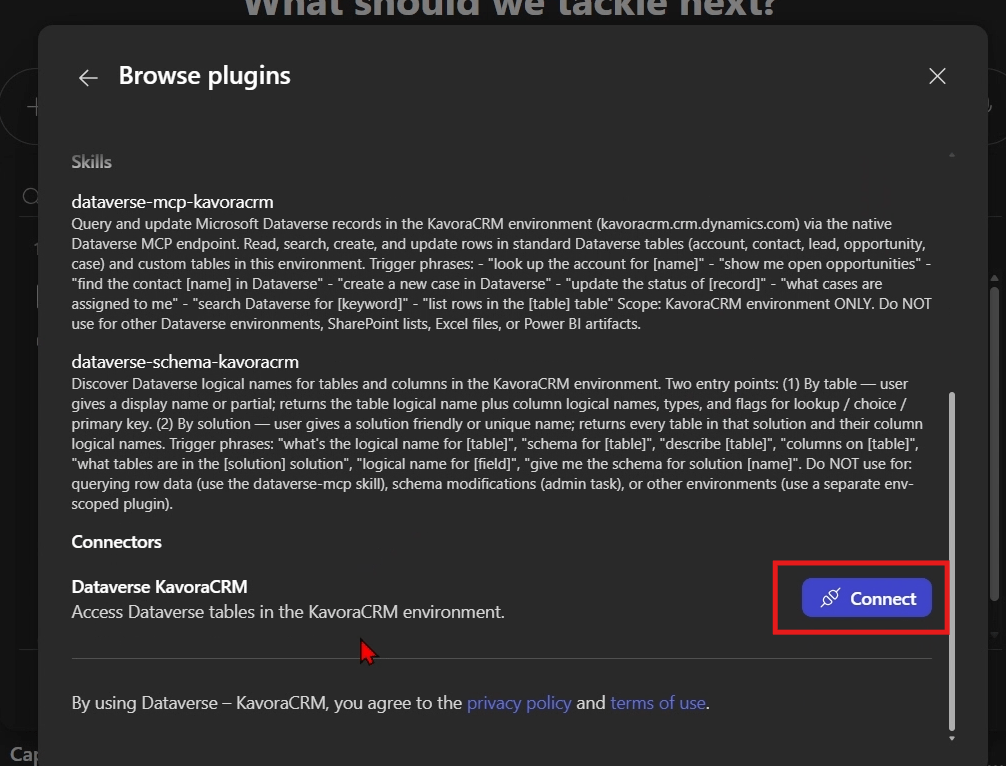
Connect Plugin
Open a fresh Copilot Cowork session
Click + > Manage Plugins
Click … Browse Plugins
Find the Plugin > Click Add
Scroll down and click Connect
Start with a simple prompt like this:
Use the <Plugin name> to confirm you can access the Dataverse MCP server.
Important: when you change the plugin package, update the version before uploading again.
Also start a fresh Cowork session after deployment changes.
Otherwise, you can end up testing against a stale session and thinking the plugin is broken.
Step 6: Create a schema-aware skill
This is the step that makes the plugin more useful.
The plugin gives Cowork access to Dataverse.
The schema skill helps Cowork understand what to do with that access.
In the schema skill, give Cowork the details it needs to query your model properly.
Table logical names
Table purpose
Primary columns
Lookup columns
Relationships between tables
Status fields
Rules for what matters
Data-quality checks
Example prompts
We can use this skill to create a personal skill to query certain tables, etc.
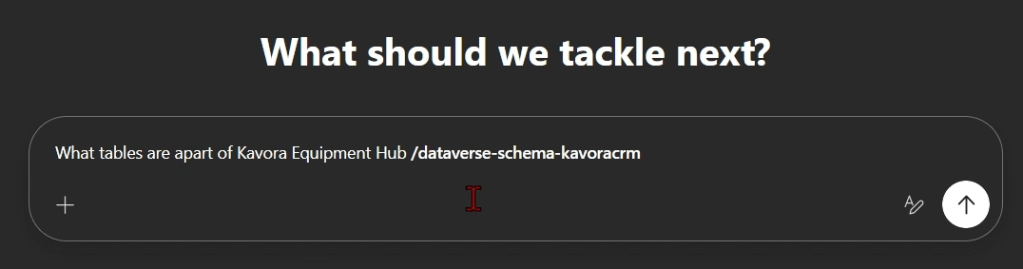
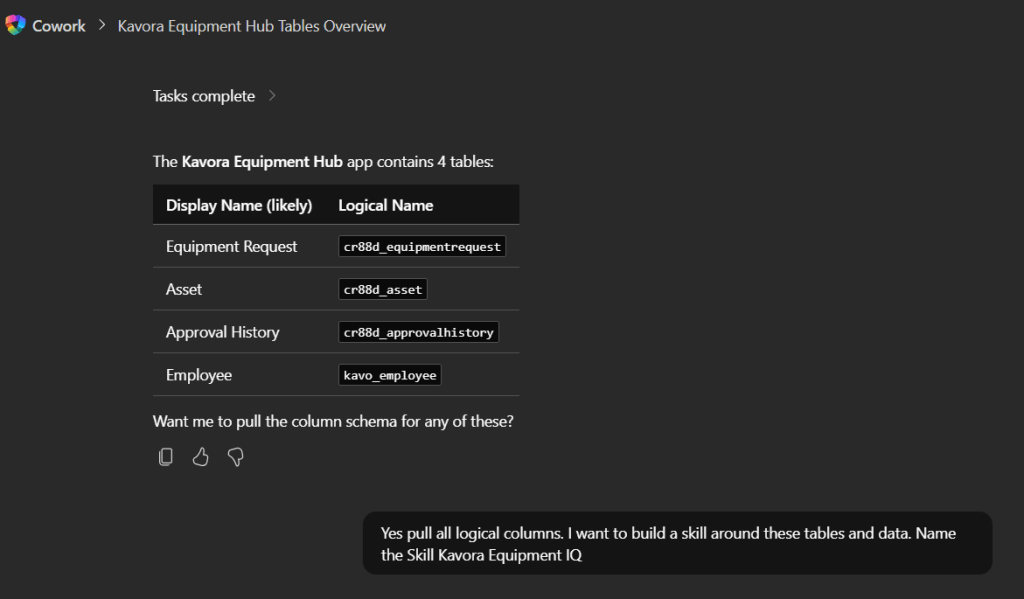
In the example, I ask Copilot Cowork what tables are used in a certain Model-Driven App. Prompt:
What tables are apart of Kavora Equipment Hub
/dataverse-schema-
Copilot Cowork responds with a tables and logical names. Next I ask for all the logical columns for those tables. (NOTE: This will help Copilot Cowork query your data quicker)
My follow-up prompt:
Yes pull all logical columns.
I want to build a skill around these tables and data.
Name the Skill Kavora Equipment IQ
Then Copilot Cowork drafted the skill for me. I reviewed it and said “Looks good”
Copilot Cowork built the skill
Step 7: Test with a real scenario
Now run an actual test.
Do not only ask Cowork to connect.
Ask it to use the Dataverse model.
A good test should include:
One known record
At least one related table
At least one lookup relationship
Some output Cowork needs to organize
A data-quality check or business rule
Example prompts:
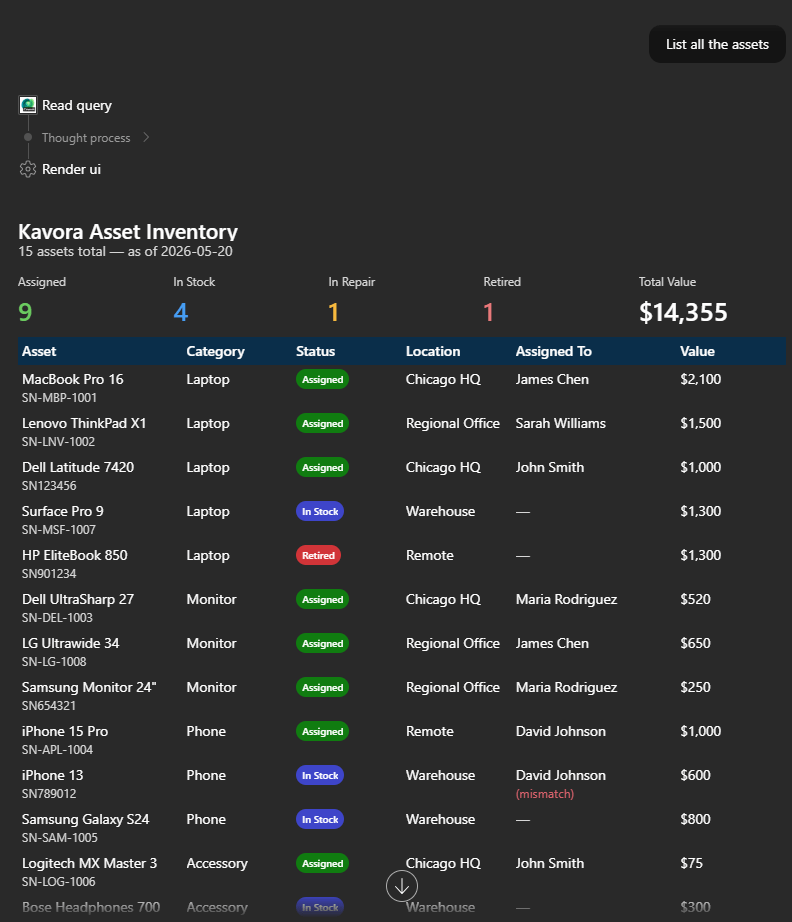
List records
use /<skill you just built>
List all the <table>
Add records
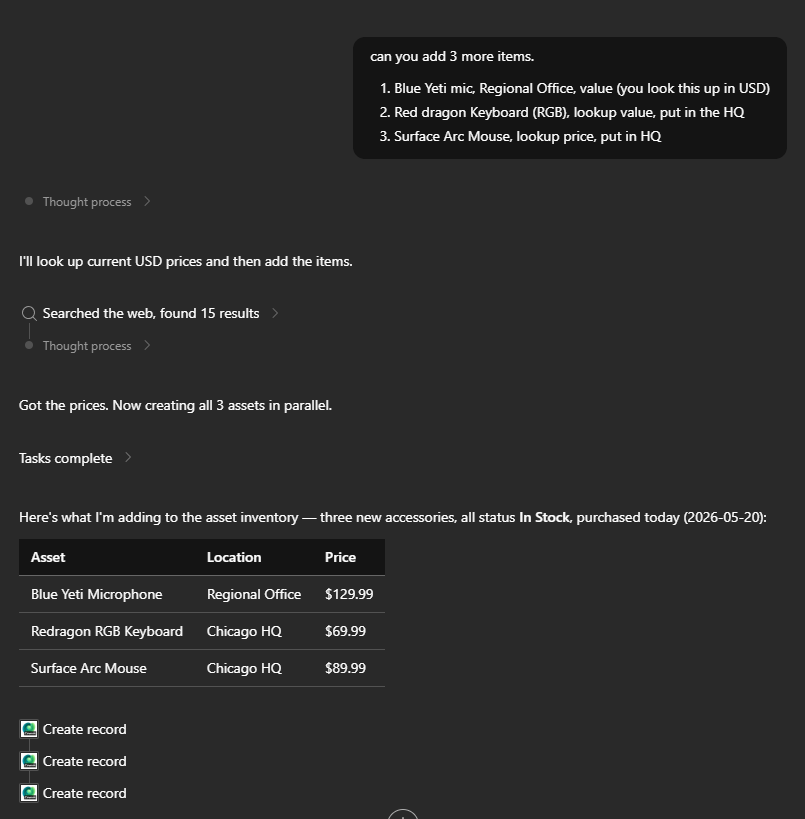
use /<skill you just built>
can you add 3 more <assets>
1. Blue Yeti mic, Regional Office, value (you look this up in USD)
2. Red dragon Keyboard (RGB), lookup value, put in the HQ
3. Surface Arc Mouse, lookup price, put in HQ
Details on a record
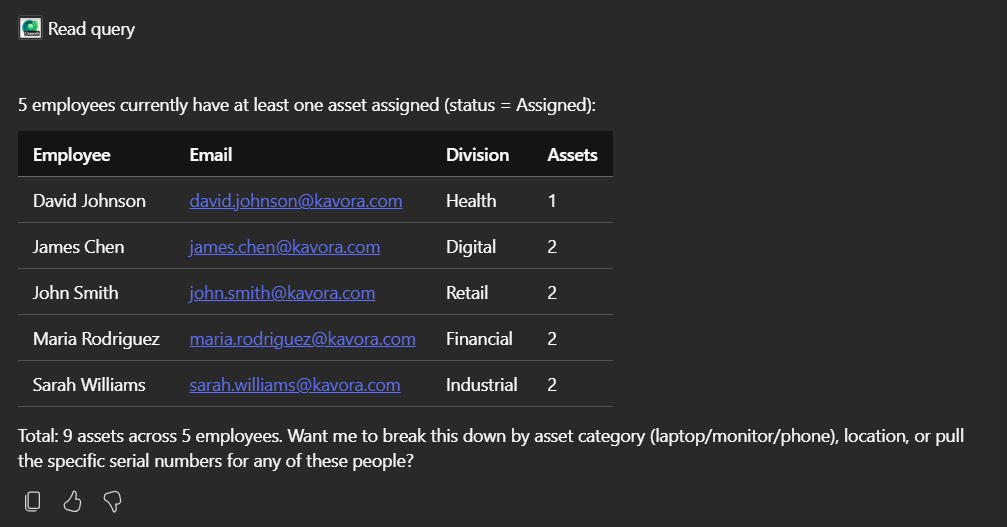
use /<skill you just built>
list all the <table> who <condition>
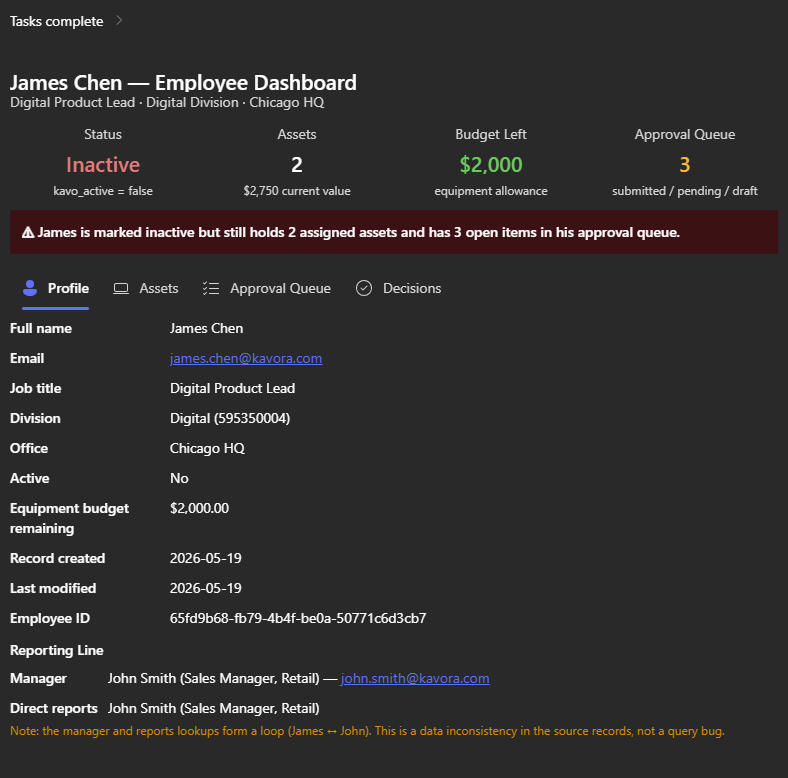
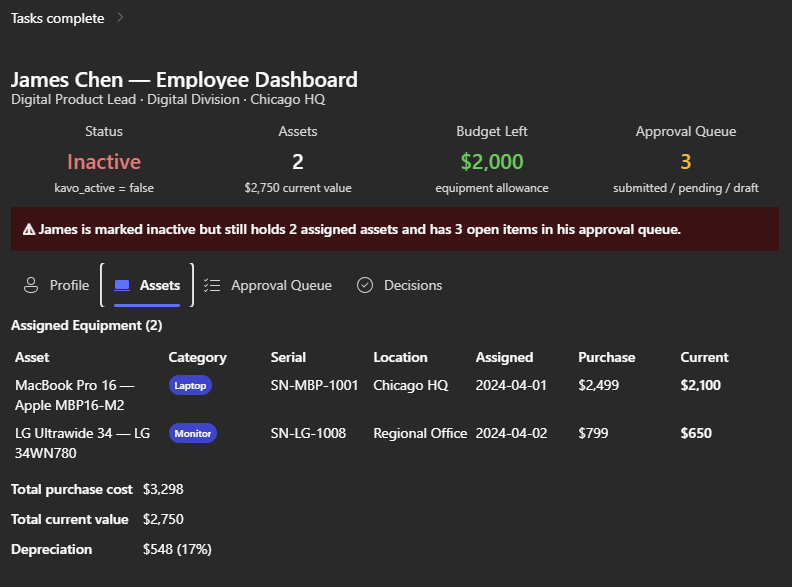
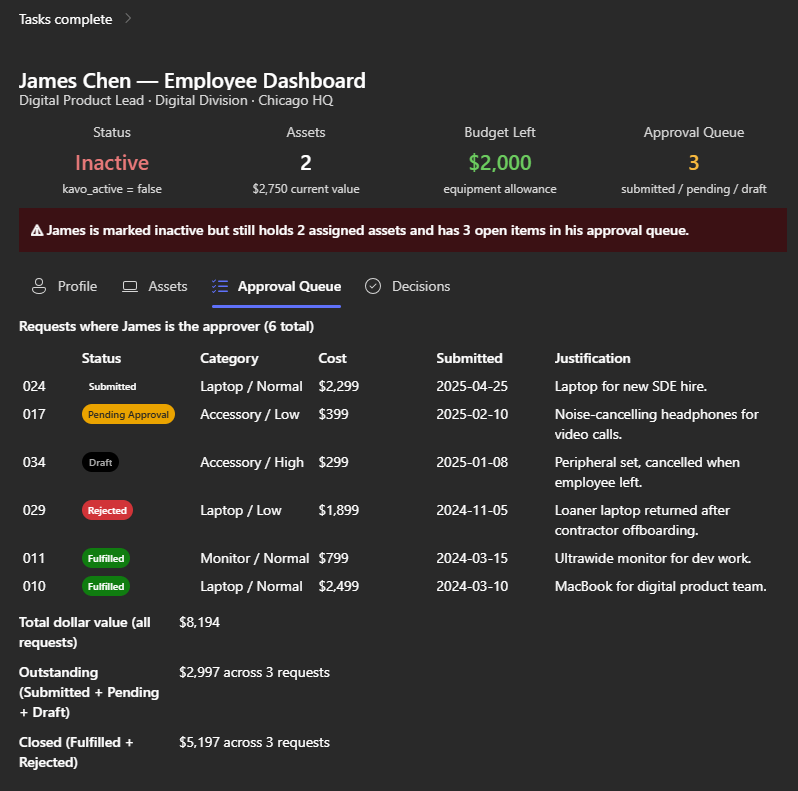
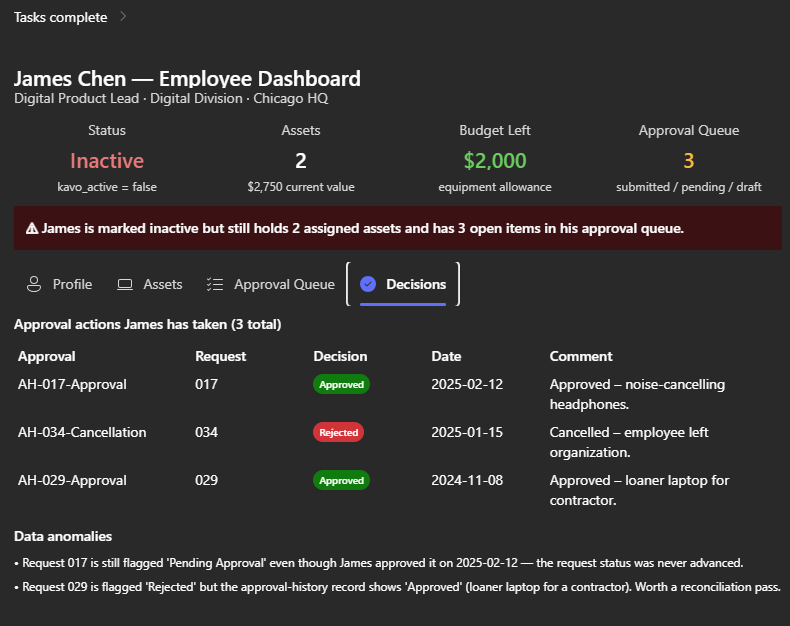
Build Dashboard
use /<skill you just built>
give me a full dashboard of <record>.
Surface all details relating to <record>
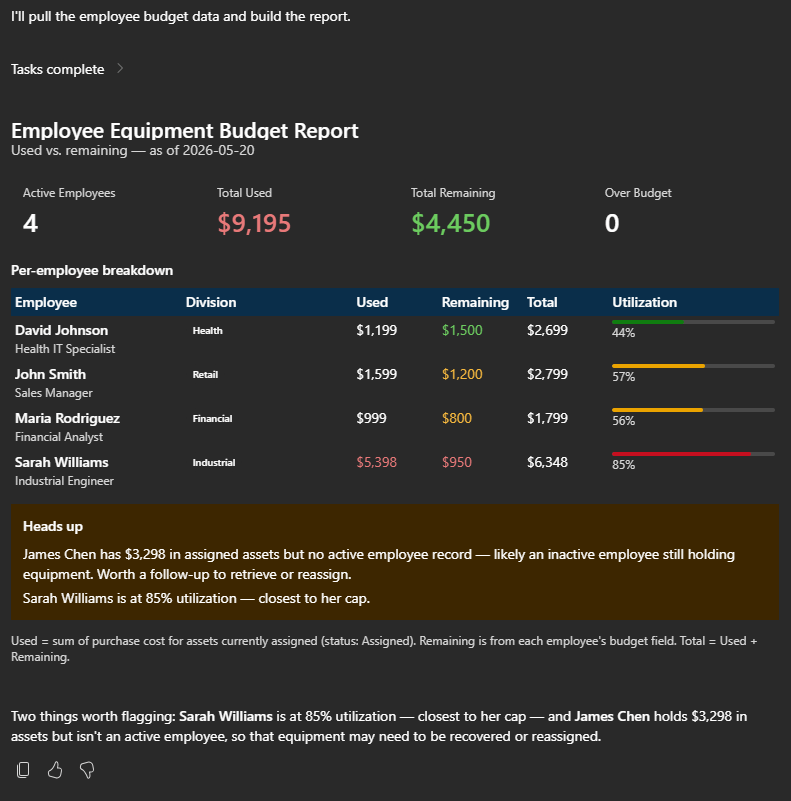
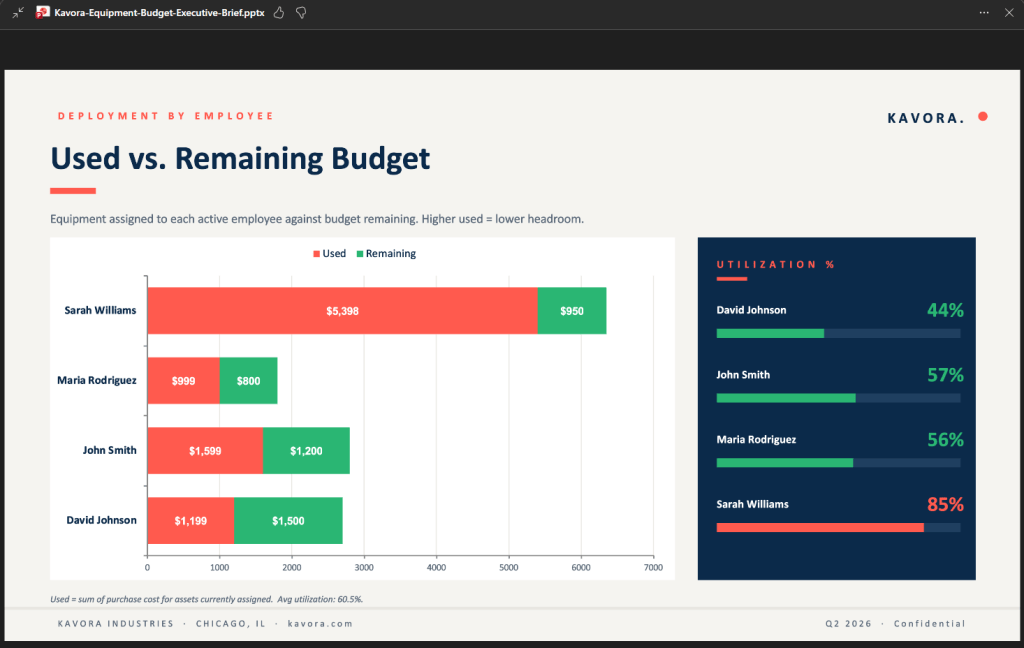
Create report
use /<skill you just built>
now create a report with each <Employee>
on what they have left VS what they have used for budget
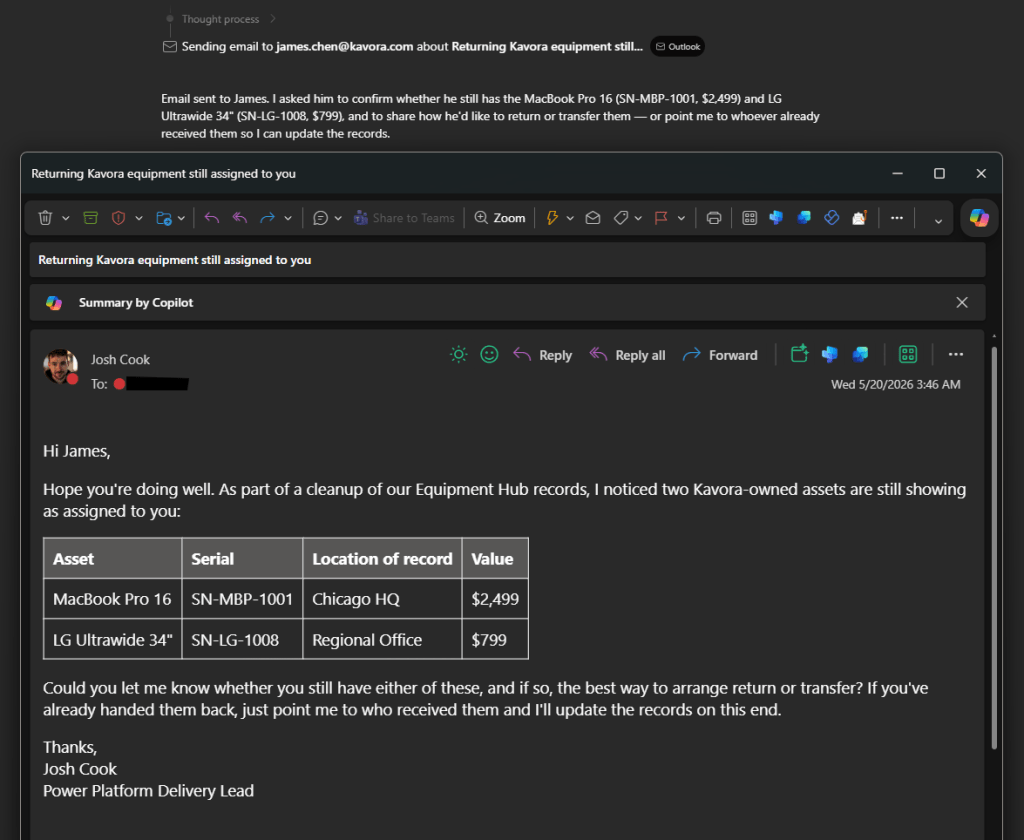
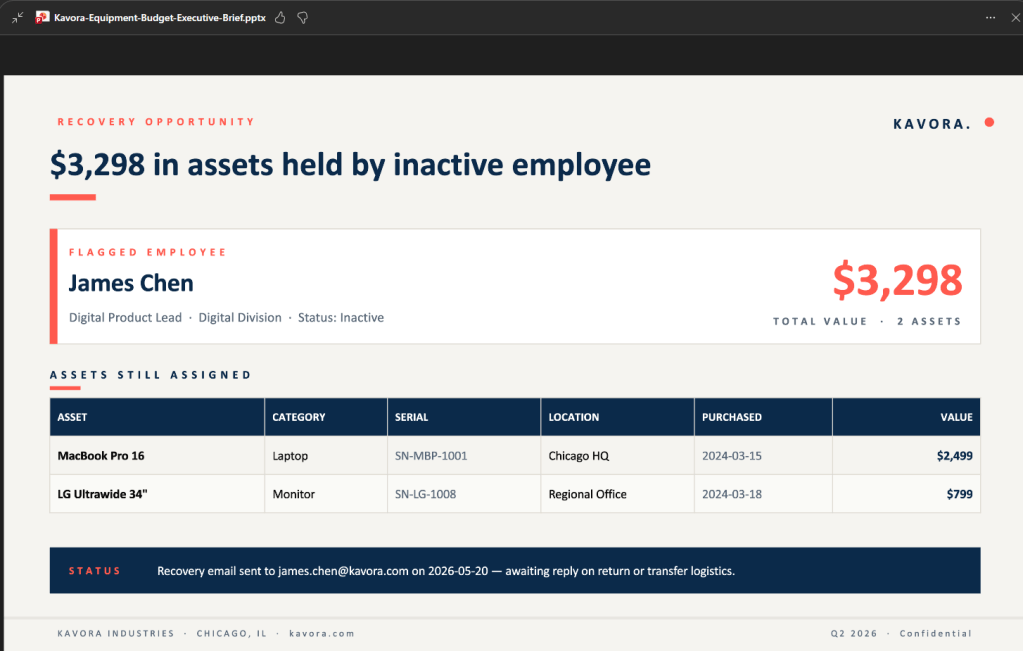
Send Email with context
use /<skill you just built>
Email <James chen> asking about the <assets>
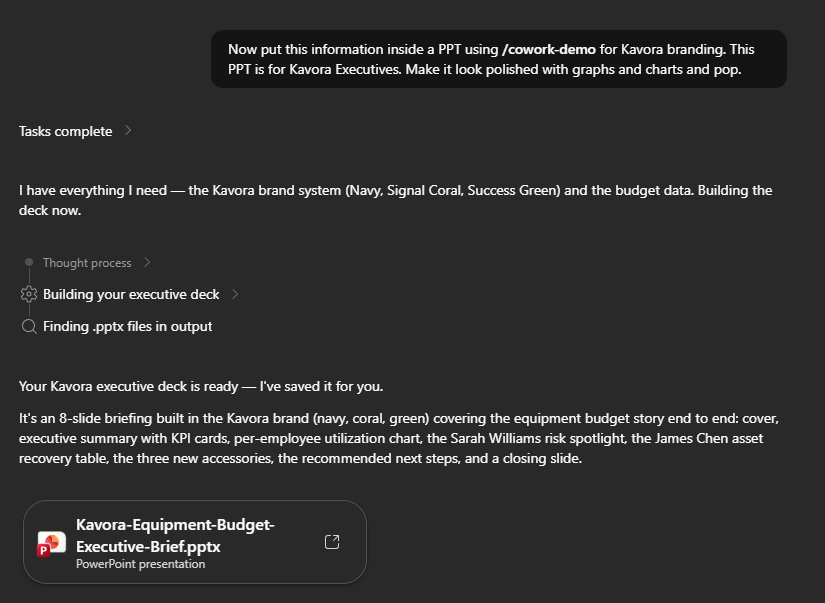
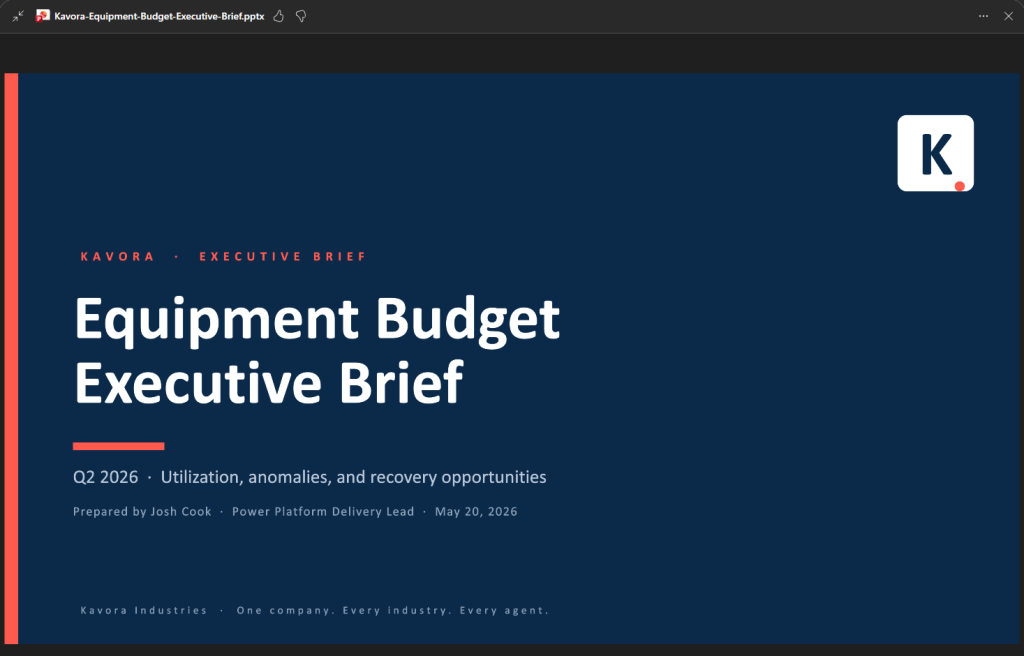
Create PPT with context + Brand
(NOTE: the branding is a separate skill not included in the plugin)
use /<skill you just built>
Now put this information inside a PPT
using </branding-skill> for Kavora branding.
This PPT is for Kavora Executives.
Make it look polished with graphs and charts and pop.
This is where the setup starts paying off.
Cowork can query the data, follow relationships, and return a useful answer instead of forcing you to manually pull everything together.
Common mistakes
Mistake 1: Mixing up the IDs
There are two important IDs:
Entra Application / Client ID: used in Power Platform as the allowed MCP client
OAuth Registration ID: used in the plugin manifest as the referenceId
If you paste the wrong one in the wrong place, the setup will fail.
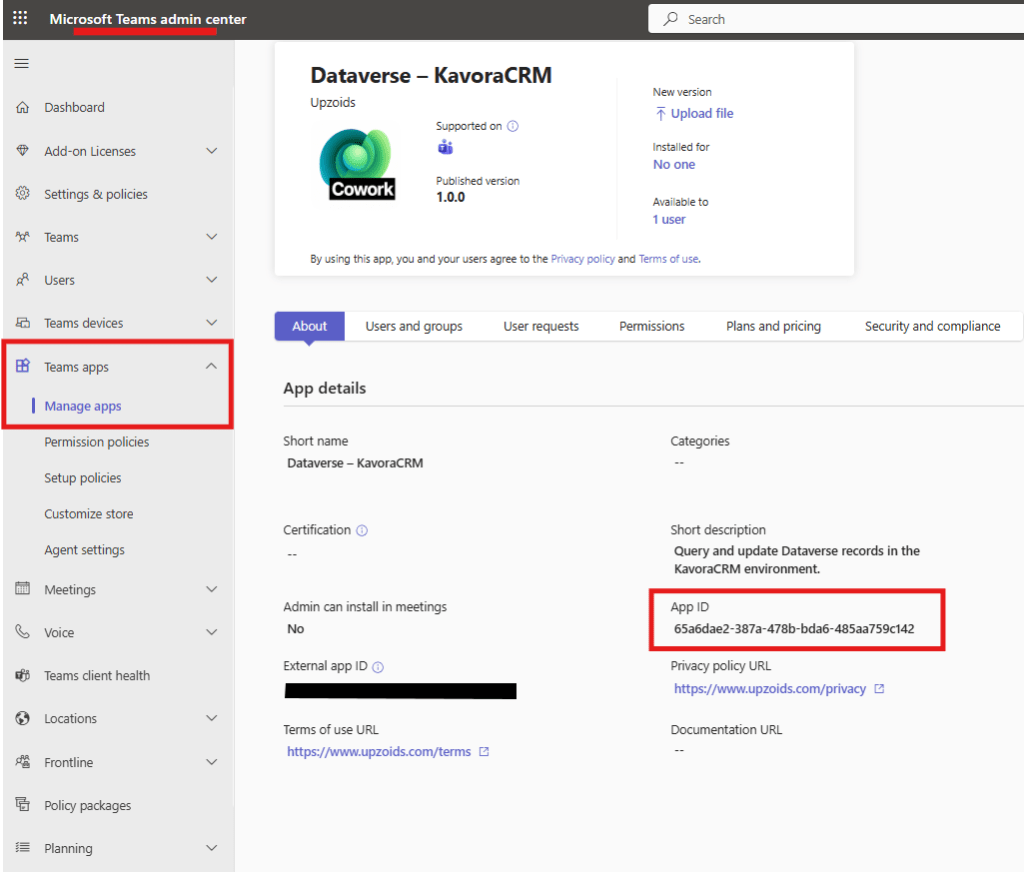
NOTE: When you have tested and validated you can connect to Dataverse. You will want to add the Teams App ID from the Agent Plugin we deployed and add it to the Teams Developer OAuth Registration.
Go to Teams Admin center > Teams apps > Manage apps
Find your Plugin you deployed > Copy the App ID
Go back to Teams Developer Portal and open the OAuth registration tool that was created
Paste the App ID into the “Restrict usage by Teams app” field as an Existing Teams app
This setup is still early, and there are rough edges.
But once it works, the direction is obvious.
Dataverse already has the business model.
Copilot Cowork gives users a work surface.
The MCP connector connects the two.
Add a schema-aware skill, and Cowork can start working through real Dataverse data in a way that feels practical for actual business scenarios.
That is the part worth paying attention to.
Let me know what other Plugins you want to see in Copilot Cowork.
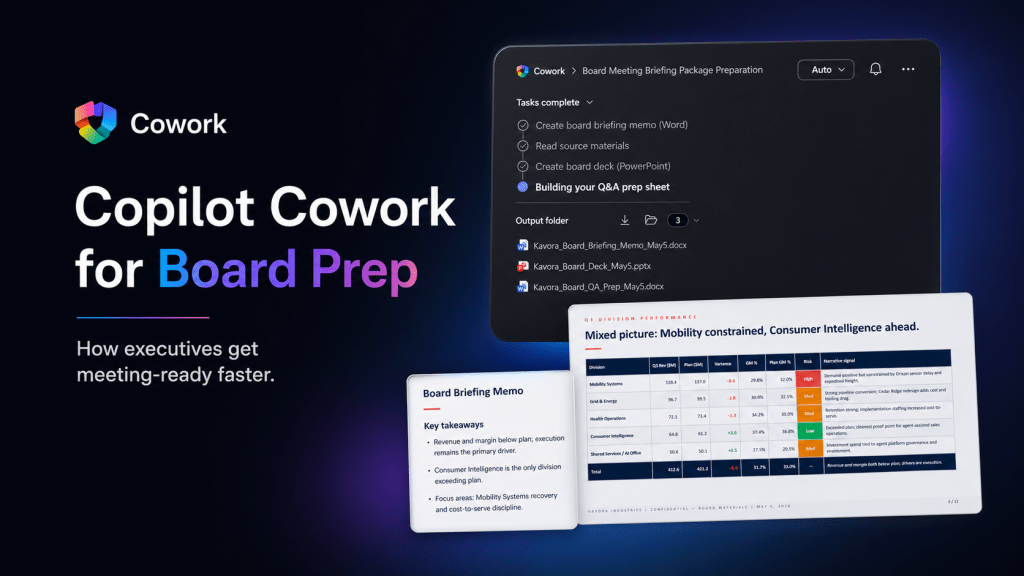
How Executives Can Use Copilot Cowork When Board Prep Turns Into a Fire Drill
A board meeting gets moved up by 48 hours.
Now the executive needs the story fast.
Finance has numbers. Operations has risks. Strategy has updates. AI transformation has progress, blockers, and governance questions. The deck is not ready. The briefing memo is not ready. The board will still expect clear answers.
That is exactly the kind of pressure where Copilot Cowork starts to make sense.
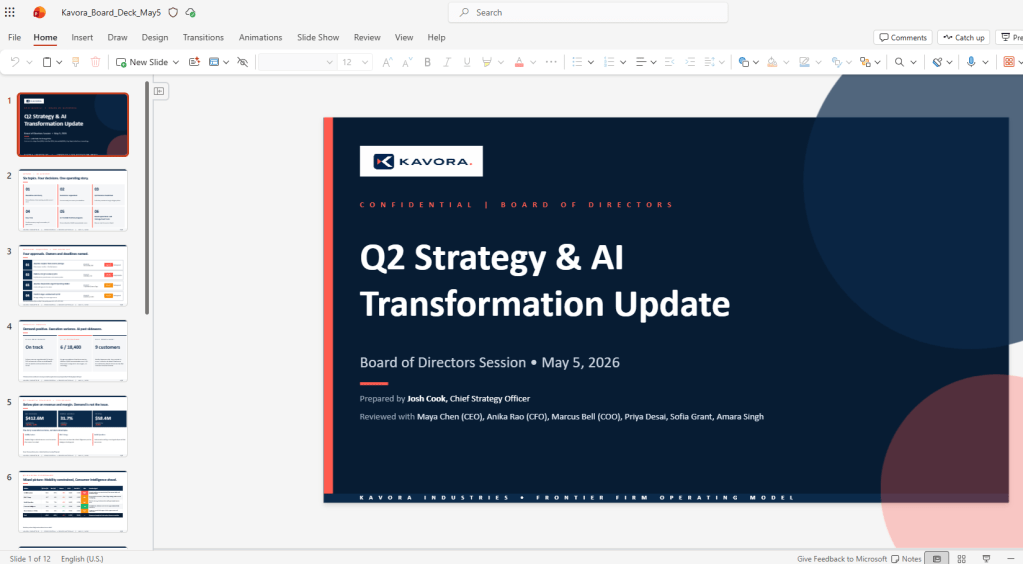
For this scenario, I used a fictional company called Kavora Industries. I stepped into the role of Chief Strategy Officer, and the ask was simple: prepare a board-ready package under pressure.
The company is fictional. The work pattern is very real.
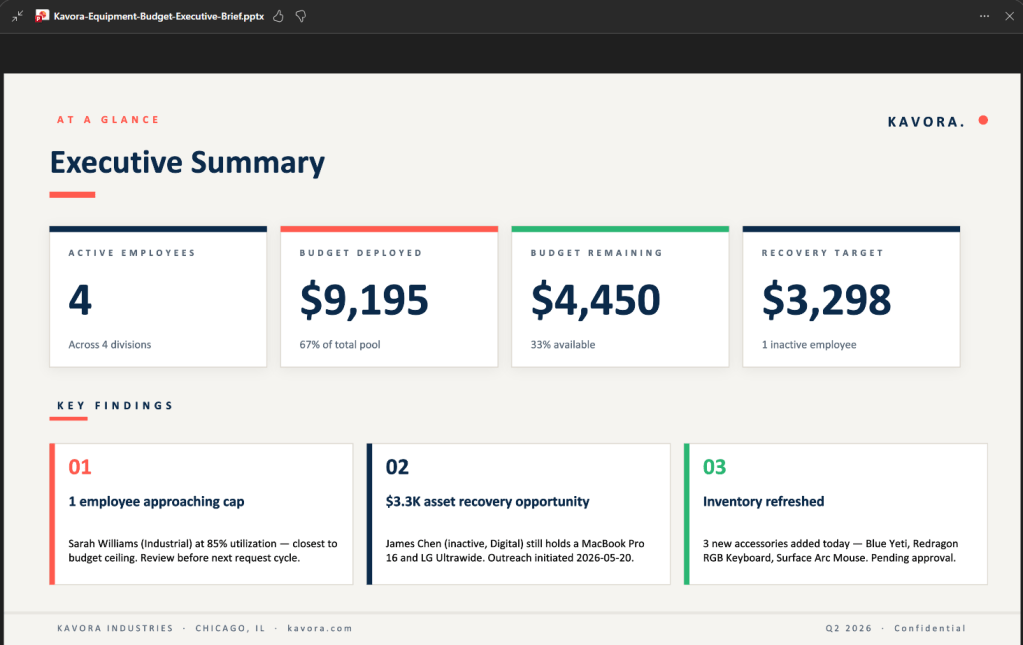
Executive takeaway: Copilot Cowork is strongest when it helps leaders turn scattered business context into decision-ready artifacts.
Insert screenshot here: Cowork prompt asking for the board meeting briefing package.
The Real Executive Problem
Board prep is not just about creating a PowerPoint deck.
The harder part is knowing what matters.
What changed since the last update? Where are the risks? Which numbers are final and which are preliminary? What decisions does the board need to make? What questions are they likely to ask?
That is where executive prep gets expensive.
The information already exists, but it is spread across too many places:
Executive emails
Strategy notes
Finance workbooks
Leadership updates
AI transformation reports
Draft presentation content
Q&A notes
An executive does not need another place to search. They need the scattered pieces pulled into one clean operating picture.
The Cowork Approach
I gave Copilot Cowork a focused executive task:
Prepare for a board meeting that was moved up by 48 hours using the provided source material, then create the artifacts needed to walk into the meeting prepared.
The Prompt
The prompt followed a simple structure:
Role:
Act as my executive strategy assistant for Kavora Industries.
Goal:
Help me prepare for a board meeting that was moved up by 48 hours.
Sources:
Use the provided executive emails, strategy notes, finance workbook,
AI transformation report, and leadership updates.
Task:
Create a board-ready briefing package that includes:
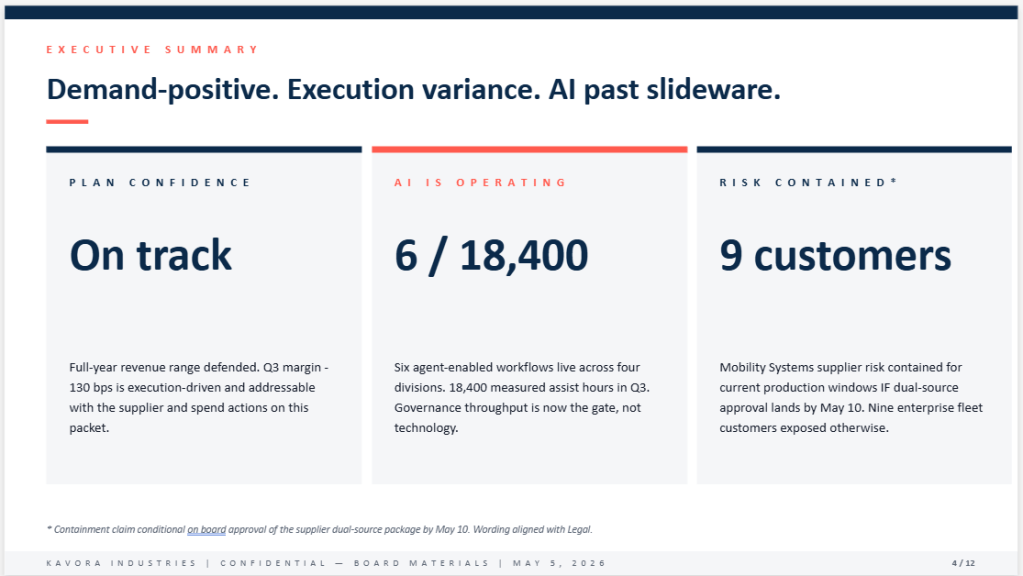
1. Executive summary
2. Key risks and decisions
3. AI transformation progress
4. Financial and operational issues
5. Likely board questions
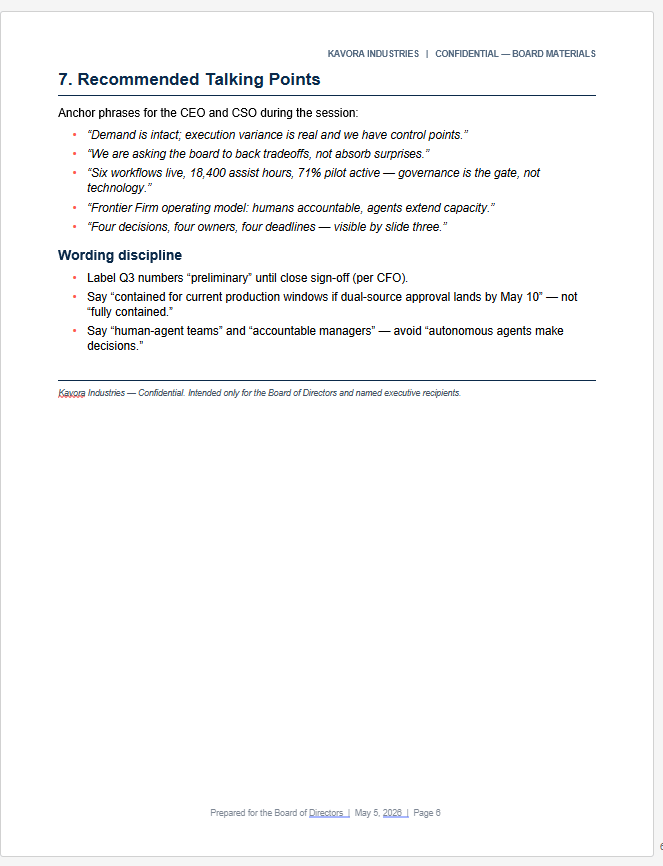
6. Recommended talking points
Outputs:
- Create a Word briefing memo
- a PowerPoint board deck
- a Q&A prep sheet
Guardrails:
- Keep the tone executive-ready, concise, factual, and decision-focused.
- Do not invent facts outside the source material.
- Use Kavora branding when creating files.
This is the part executives should pay attention to.
The prompt is not asking Cowork for a generic answer. It assigns a job. It points Cowork at the source material. It defines the output. It adds guardrails. It asks for files the business can actually use.
The move: Do not ask for a summary when the real need is a briefing package. Ask for the work product.
Insert screenshot here: Cowork task progress showing the memo, deck, and Q&A prep sheet being created.
What Copilot Cowork Created
Cowork created three core board prep artifacts and packaged them into a reviewable executive workflow.
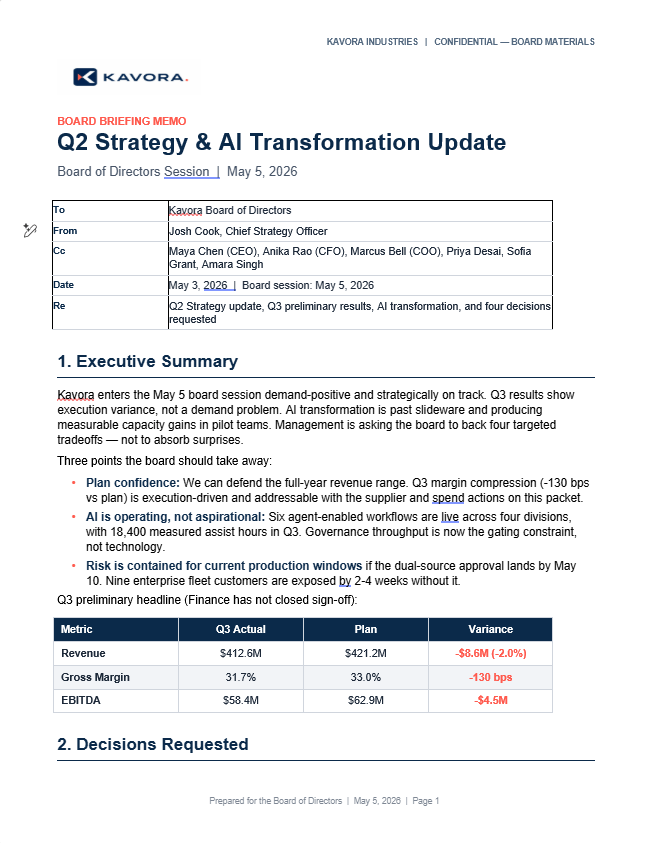
1. Board Briefing Memo
The briefing memo became the anchor document.
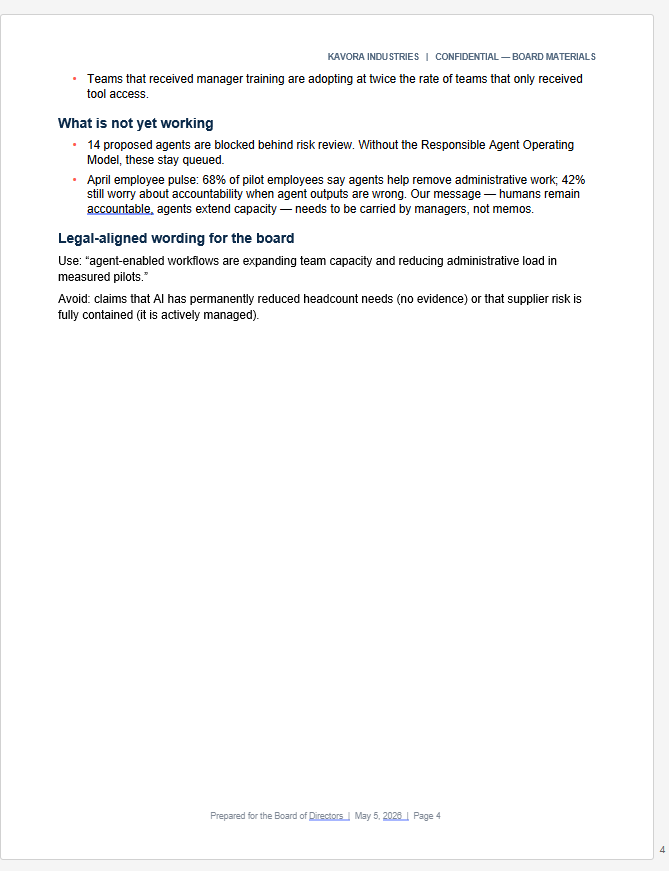
It pulled the scattered business context into a single executive narrative: current state, key numbers, strategic signals, risks, and decisions needed.
This matters because executives need more than information. They need the story behind the information.
The memo made the situation easier to review, challenge, and sharpen before the board meeting.
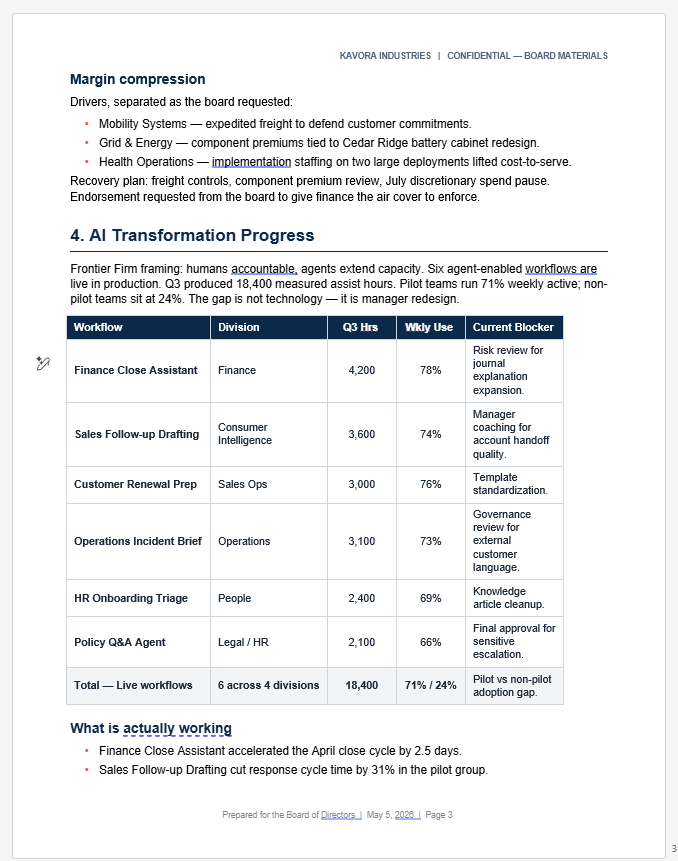
2. Board Deck
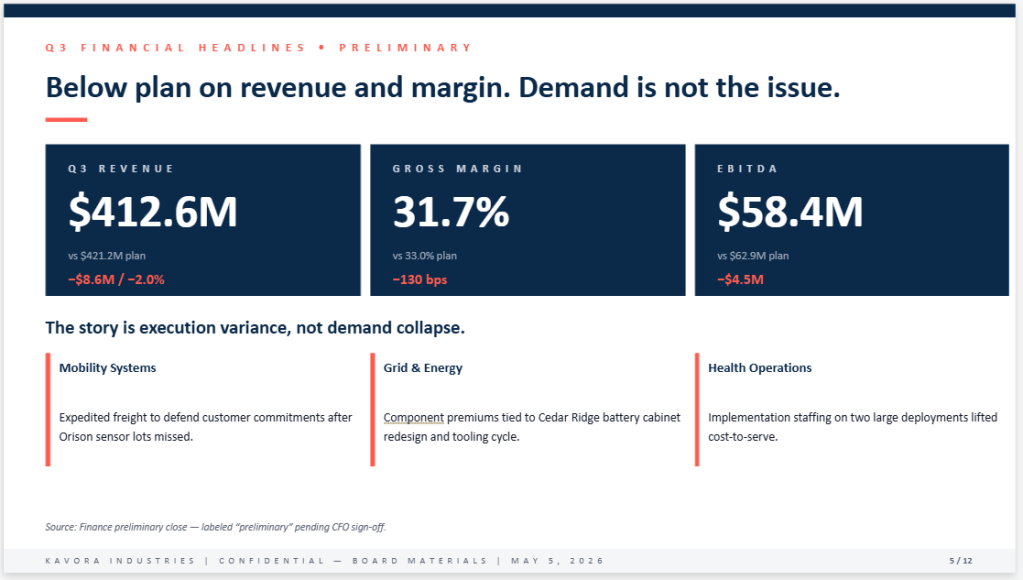
Cowork also created the board deck.
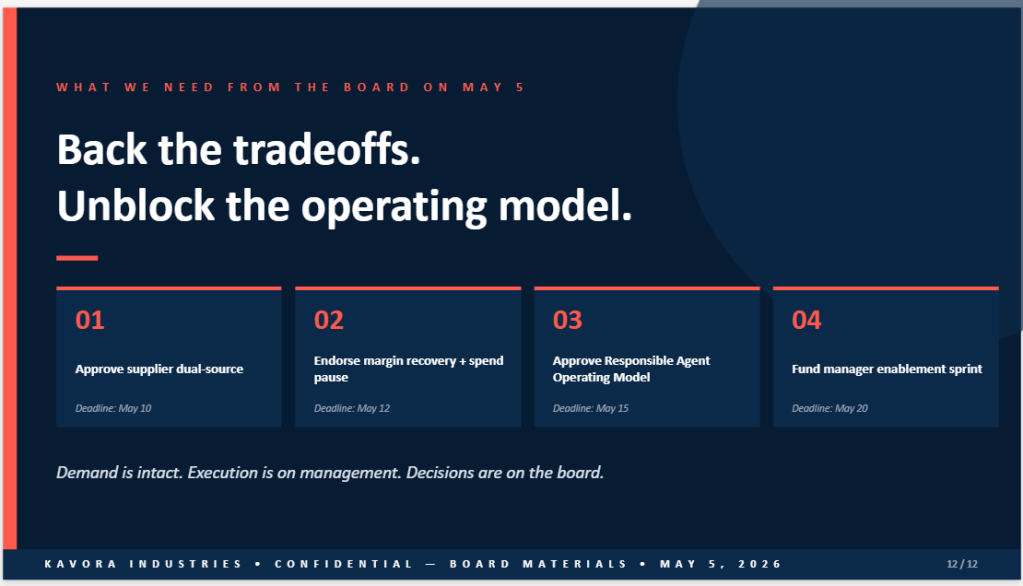
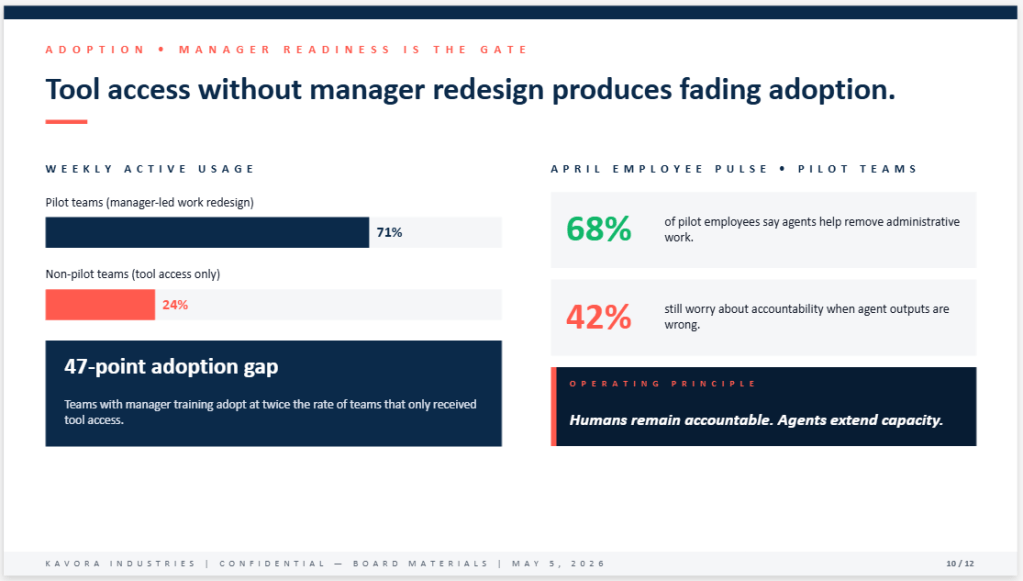
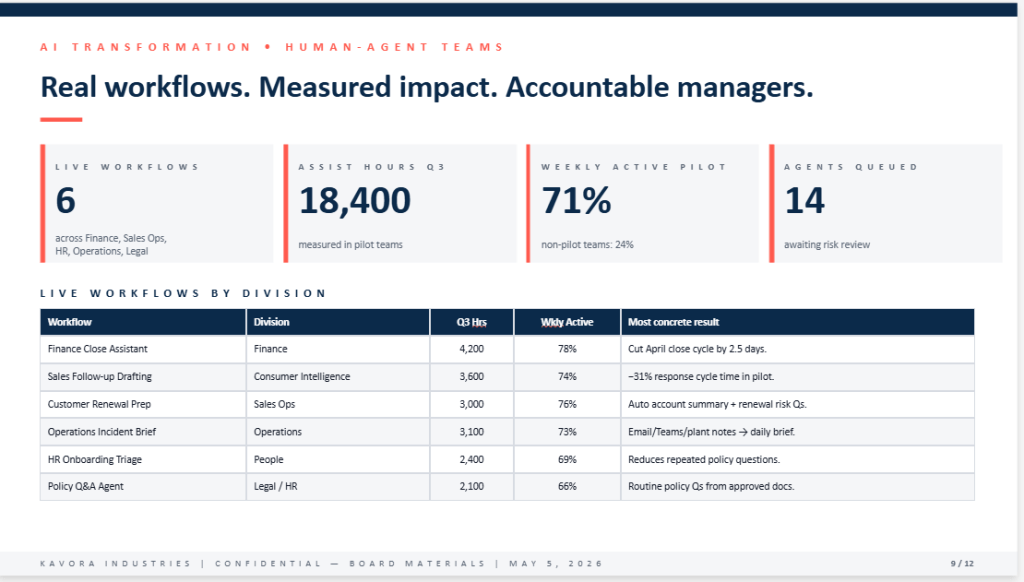
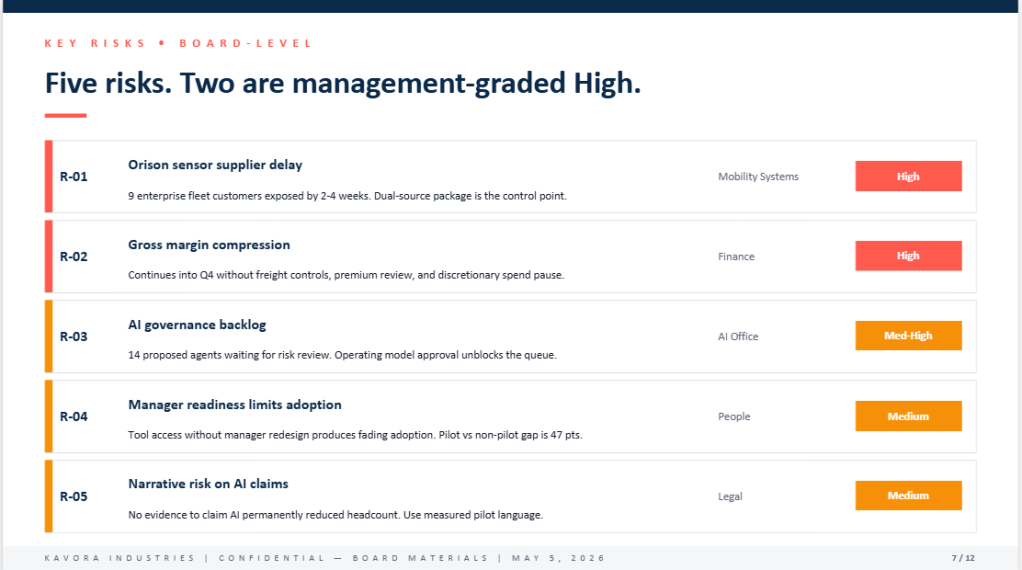
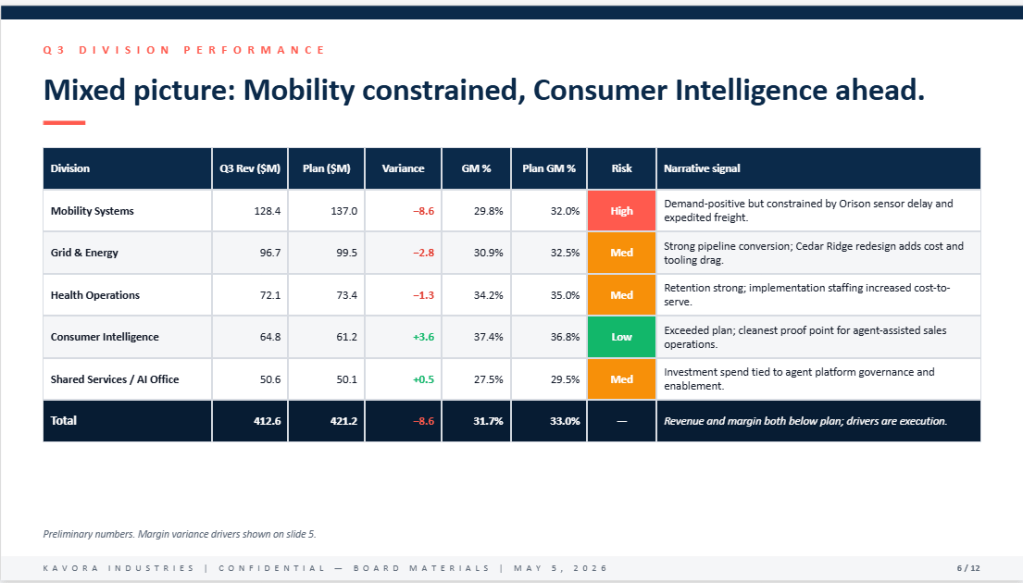
The deck organized the material into a board-level flow: performance, division signals, risks, AI transformation progress, and decisions requested from the board.
The important part was not just that slides were created. The important part was that the slides were structured around the meeting the executive actually needed to lead.
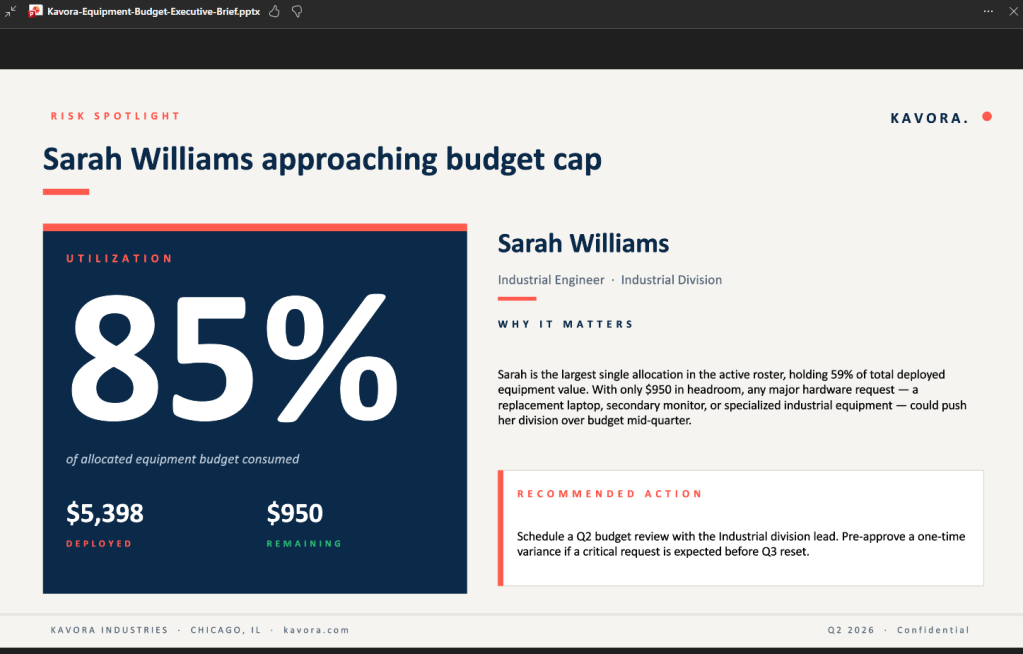
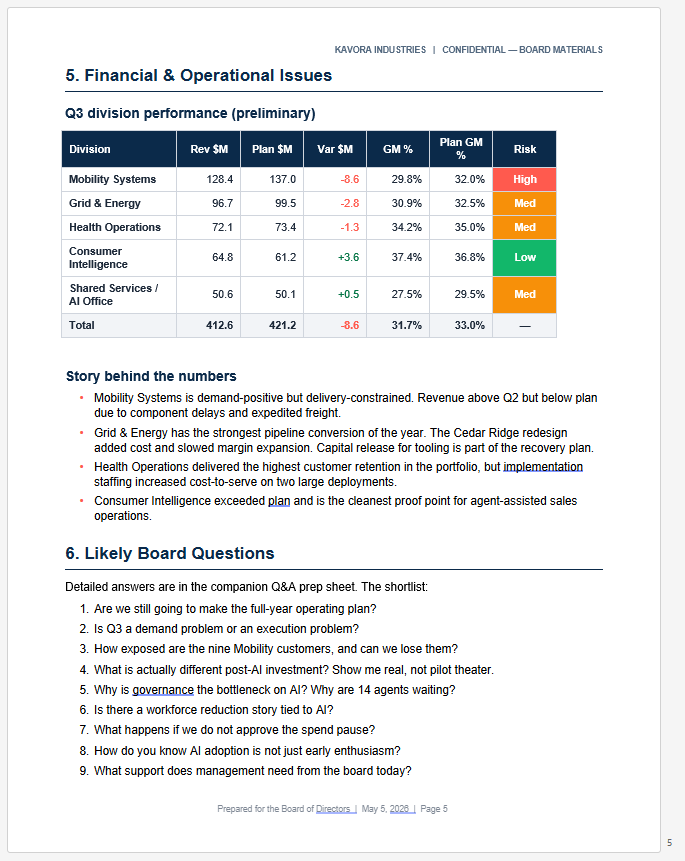
One slide showed division performance and risk signals. Another brought the board back to the required decisions.
That is exactly what an executive needs. Less noise. Clearer framing. Decisions visible.
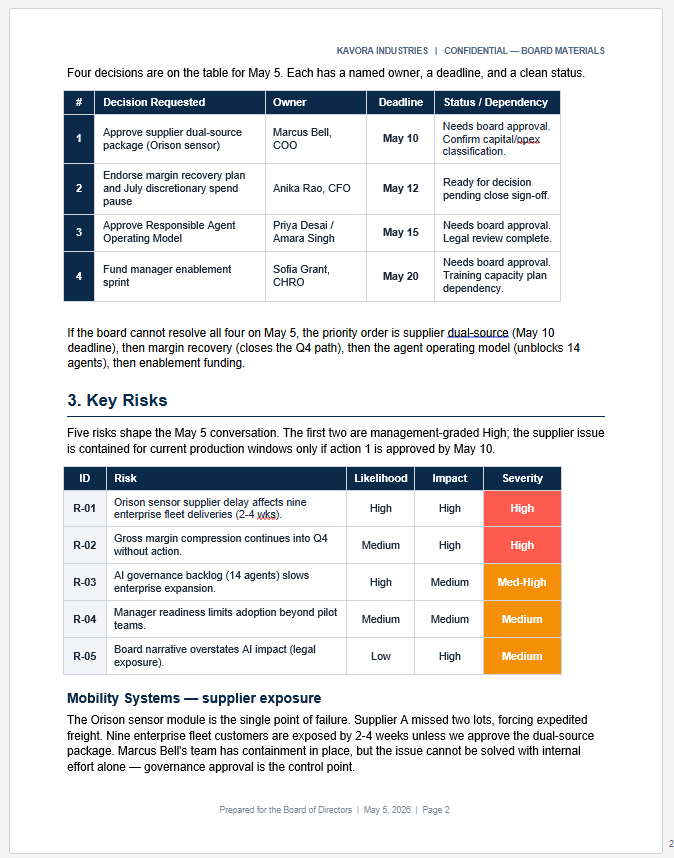
3. Board Q&A Prep Sheet
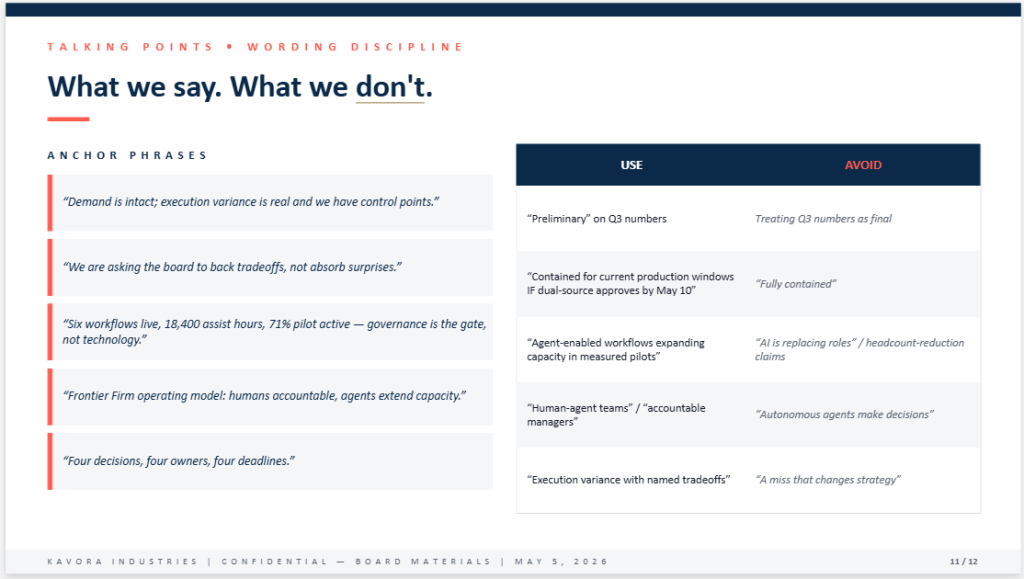
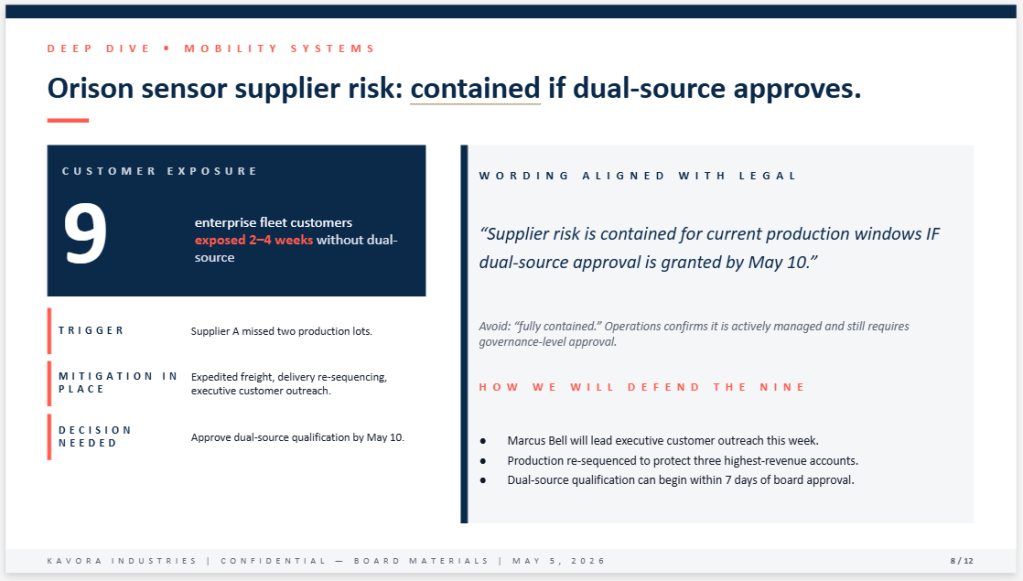
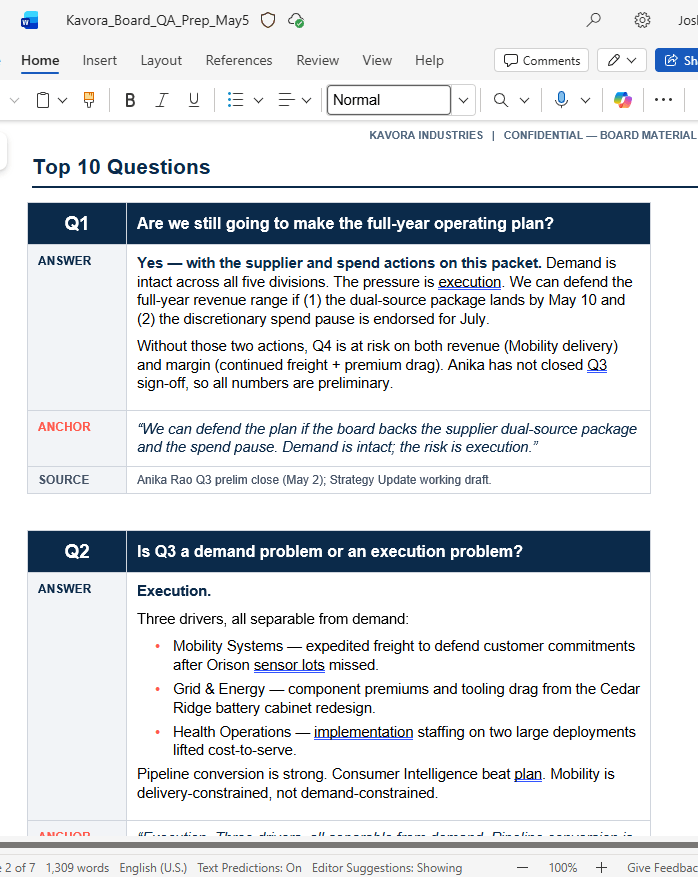
This was the strongest artifact in the workflow.
Cowork created a Q&A prep sheet with likely board questions, direct answers, anchor phrases, and source references.
That is real executive value.
The board is going to ask sharper questions than the internal team. Preparing for those questions before the meeting changes how the executive shows up.
Instead of walking in with slides only, the executive walks in with prepared answers.
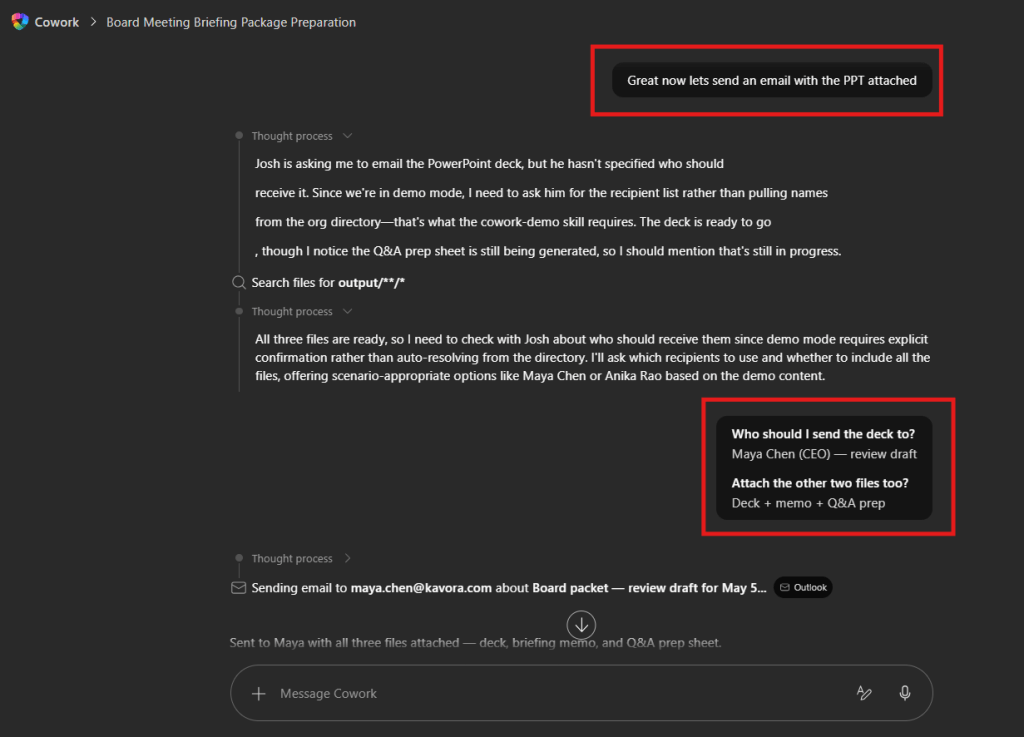
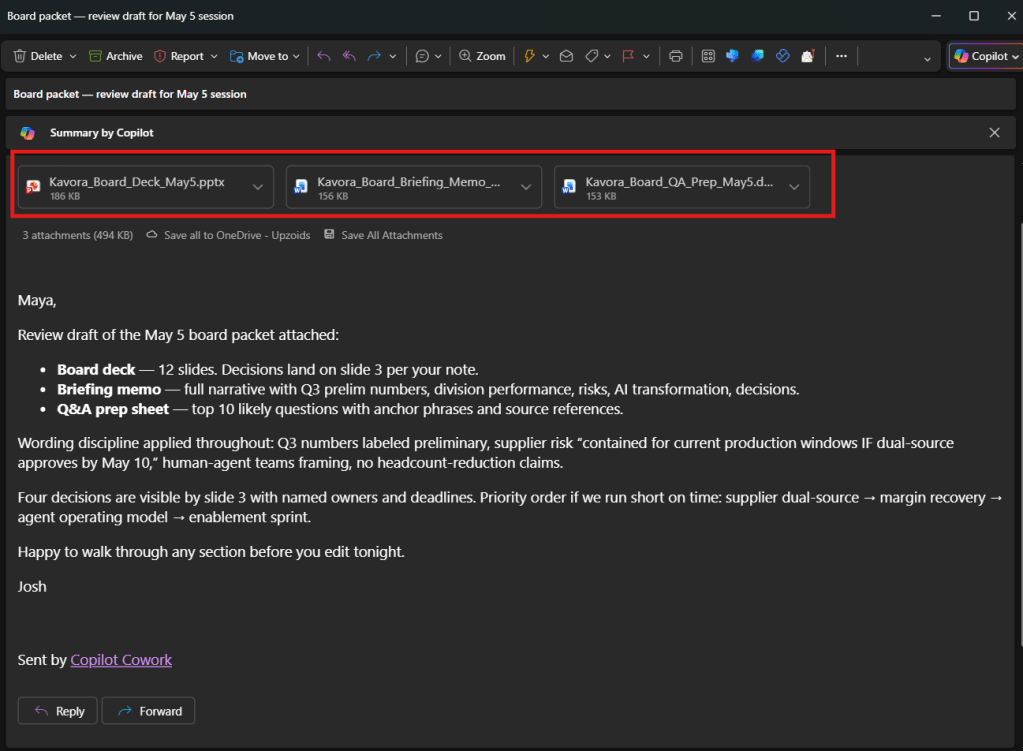
4. Executive Review Email
I prompted Cowork to also prepare and send an email with the board packet attached.
Work does not end when the file is created. The package still needs to move to the right people with the right context.
The email summarized what was included, called out the wording discipline applied, and highlighted the decision priority order.
That is a complete workflow: source material to artifacts to communication.
The executive shift: Cowork gets the leader to the decision point faster, with better context and real artifacts already in motion.
That is the agent boss pattern in practice.
The human stays accountable. The agent does the heavy lifting around gathering, synthesis, drafting, formatting, and first-pass artifact creation.
That is how an executive should think about Copilot Cowork.
The Executive Workflow
This board prep scenario follows a workflow executives can reuse:
Define the pressure moment.
Point Cowork at the right source material.
Ask for decision-ready artifacts.
Review the output like an executive.
Tighten the narrative.
Send the right package to the right people.
That workflow applies beyond board meetings.
You could use the same pattern for quarterly business reviews, operating reviews, customer escalations, strategy offsites, town halls, finance reviews, and AI transformation steering committees.
The structure stays the same. Pressure, sources, task, outputs, guardrails, review.
What I Like About This Scenario
This scenario works because it feels like real executive pressure.
No gimmick. No fake magic. No perfect blank-page setup.
Just a leader with scattered information, limited time, and a meeting that requires clear judgment.
That is where AI at work becomes useful.
Not when it sounds impressive in a chat window. When it produces the memo, the deck, the Q&A sheet, and the email that move the work forward.
Best use case: Use Copilot Cowork to reduce the cost of preparation, then spend your human time on judgment.
Final Thought
Executives do not need AI that only sounds smart.
They need AI that helps them get ready.
That means finding the signal, organizing the story, creating the artifacts, and helping the leader walk into the room prepared.
This is where Copilot Cowork gets practical.
Board prep under pressure is not a productivity trick. It is a clear example of how executives can start working differently with AI agents inside the flow of work.
Sometimes a session can glitch, freeze, or reach a point where starting fresh is easier.
The painful part is not starting a new session.
The painful part is rebuilding the context.
You have to explain the goal again. Rebuild the requirements. Re-upload or reconnect files. Remind it what decisions were already made. Recreate the mental map of the work.
That burns time.
So I started giving Copilot Cowork a job before it does any other job:
Keep the context alive.
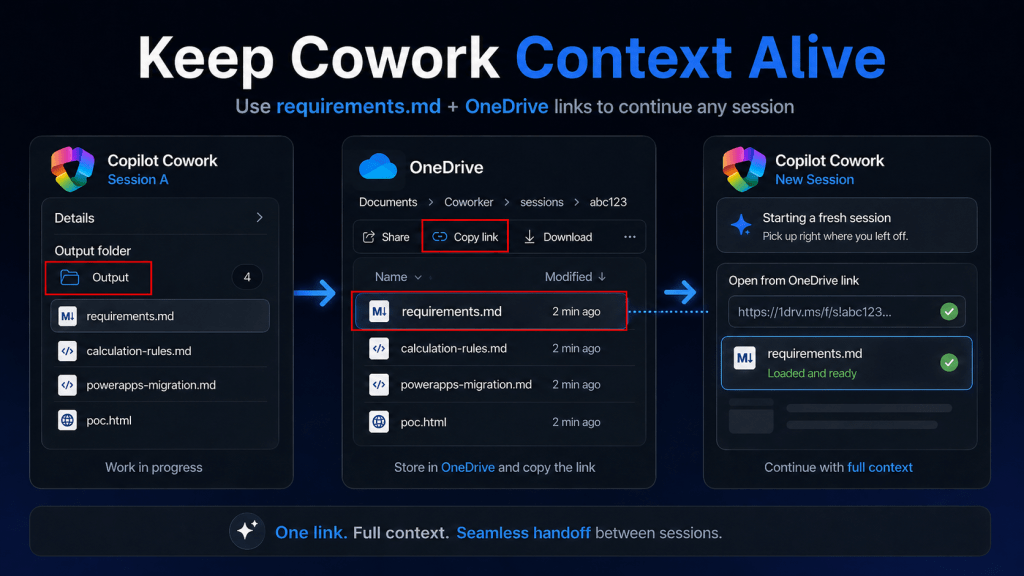
The Workaround
At the start of the session, tell Cowork to create a requirements.md file and keep it updated while you work.
That file becomes the session brain.
It gives you a portable record of the work that can move from one Cowork session to another.
Think of it like a handoff file.
Not a final deliverable. Not a pretty summary. A working memory file.
The Prompt I Use
Create a requirements.md file and keep it updated throughout this session.
Use it to track the full context of our work, including:
- requirements
- decisions made
- open items
- files created
- key conversation details
- risks
- assumptions
- and next steps
I want to be able to pass this file to another Copilot Cowork session
so it can continue with full context.
You can change the file name if you want.
For some sessions, I might use project-context.md, demo-notes.md, or handoff.md.
But I like requirements.md because it forces the session to stay grounded in what is actually being built.
Note
This works best when the requirements.md file is updated throughout the session, not only at the end. When decisions change, files are created, or blockers appear, tell Cowork to update the file.
What I Want Cowork To Track
The file should not be a fluffy recap.
I want it tracking the stuff that matters:
Session goal
Current objective
Requirements
Decisions made
Files created
Important assumptions
Open questions
Risks or blockers
Next actions
Anything another session would need to continue the work
That last one is the key.
Do not just ask Cowork to summarize.
Ask it to prepare the next session to continue the work.
The Recovery Flow
If the session glitches, breaks, or you want to continue in a fresh session, here is the flow I use.
Step 1: Open the Output Folder
In Copilot Cowork, open the details pane and look for the Output folder.
Click the folder icon to open the generated files in OneDrive.
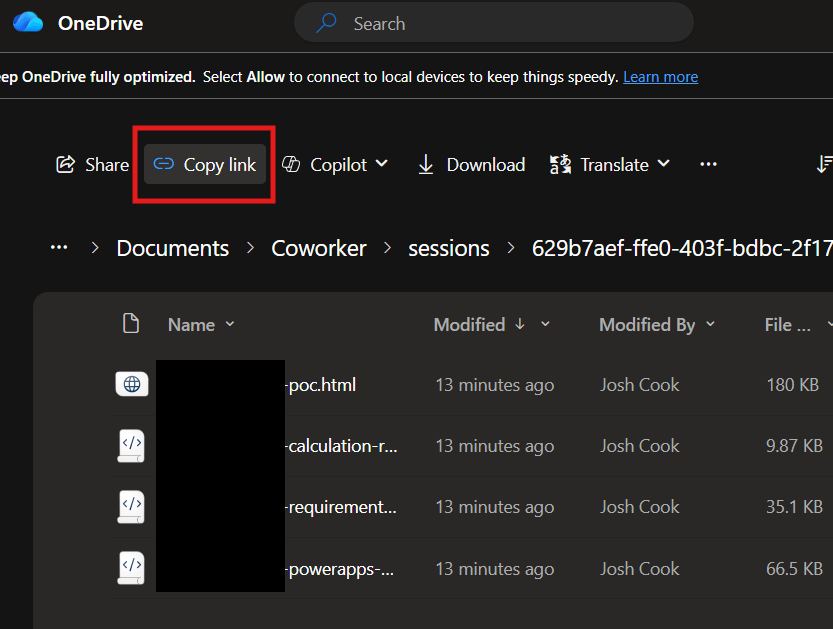
Step 2: Copy the OneDrive Link
Once the folder opens in OneDrive, click Copy link.
This gives you a link to the folder that contains the files from the previous Cowork session.
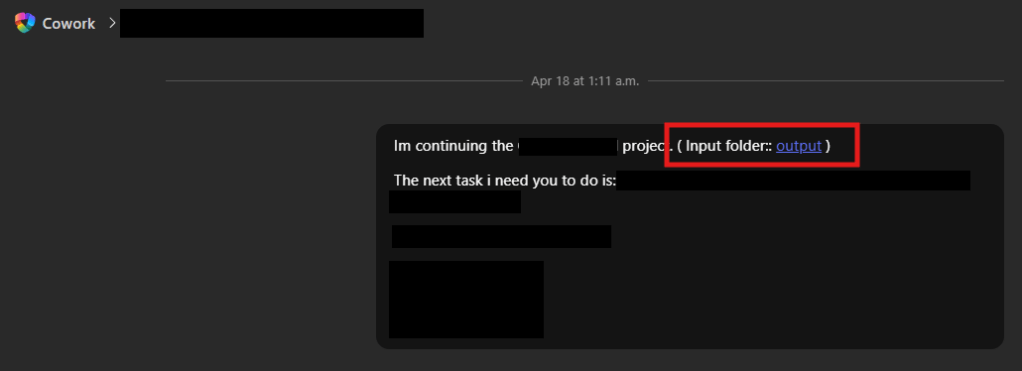
Step 3: Start a New Cowork Session
Open a new Copilot Cowork session.
Paste the OneDrive folder link into the new session and tell Cowork:
Im continuing the <Project or task name>.
Use the files from our previous session. ( <Paste OneDrive Link> )
Start by reading the requirements.md file.
Then continue the work from there.
Now Cowork has a fighting chance at picking up where the previous session left off.
Why This Works
Agent workflows are only as strong as the context behind them.
If the context is trapped inside one chat session, you are exposed.
If the context is written into a file, you can move it.
That changes the way you work with Cowork.
You are no longer relying only on the chat thread.
You are creating a portable project trail that can survive a new session.
My Recommendation
Make this part of your normal Copilot Cowork workflow.
Before you ask it to build the document, analyze the data, write the plan, or generate the assets, tell it to create the context file first.
Then keep pushing Cowork to update that file as the session evolves.
When a decision is made, tell it to update the file.
When a requirement changes, tell it to update the file.
When a file is created, tell it to update the file.
Small habit.
Big protection.
Final Take
Copilot Cowork can generate the work.
But you should also make it generate the trail.
The requirements file keeps the important context outside the chat window, inside the actual working folder, where another session can use it.
That is the move.
Use Cowork to build the output.
Use Cowork to protect the context.
This is currently a limitation on the product, which I assume the Team will fix in the future. But for now, this is how I manage long running tasks and work with Copilot Cowork.
Get Your Tenant Ready for Day 1: Joining Microsoft 365 Frontier for Copilot Cowork
If you’ve been following the buzz around Copilot Cowork, you already know it’s going to change how we work inside Microsoft 365. But here’s the thing — Day 1 readiness doesn’t happen on Day 1. It happens now.
In this post, I’ll walk you through exactly how to get your tenant set up: the right licenses, how to join the Frontier program, enabling the Anthropic sub-processor, configuring pilot groups, and locking down governance before you open the floodgates.
Copilot Cowork is expected to be available for Frontier customers late March or later.
Step 1: Make Sure You Have the Right Licenses
Before you can enable anything, your tenant needs the right foundation.
Requirement
Details
Microsoft 365 Copilot license
Required for all end users who will access Copilot Cowork. Available as an add-on on E3, E5, Business Standard, and Business Premium plans.
AI Administrator role
Required to make changes in the Copilot settings area of the Admin Center.
Microsoft Entra ID P1 or P2
Needed for group-based access control and conditional access (P1 minimum).
SharePoint Online
Included in most M365 plans — required for Cowork’s document grounding.
Admin tip: Before you go further, run a license audit. In the Microsoft 365 Admin Center, go to Billing > Licenses and confirm Copilot licenses are assigned — unassigned licenses won’t show up in Frontier eligibility checks.
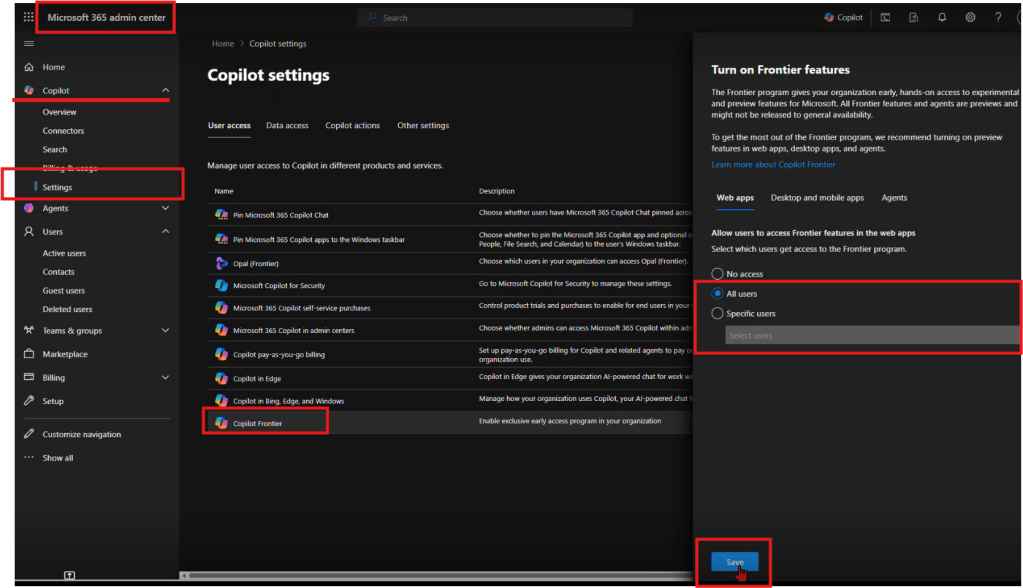
Step 2: Join Microsoft 365 Frontier
Microsoft 365 Frontier is the early adopter program that gives your tenant access to upcoming Copilot features before general availability — including Copilot Cowork.
What you’ll need first
You must have AI Administrator access to complete this setup. If you don’t have this role, work with your Global Admin to get it assigned before you start.
How to join Frontier
Start from office.com and open the Admin Center.
Navigate to Copilot → Settings → Frontier.
On the Frontier settings page, enable early access.
Under Web Apps, select the users who should be included.
Click Save.
That’s it — your tenant is now enrolled in Frontier.
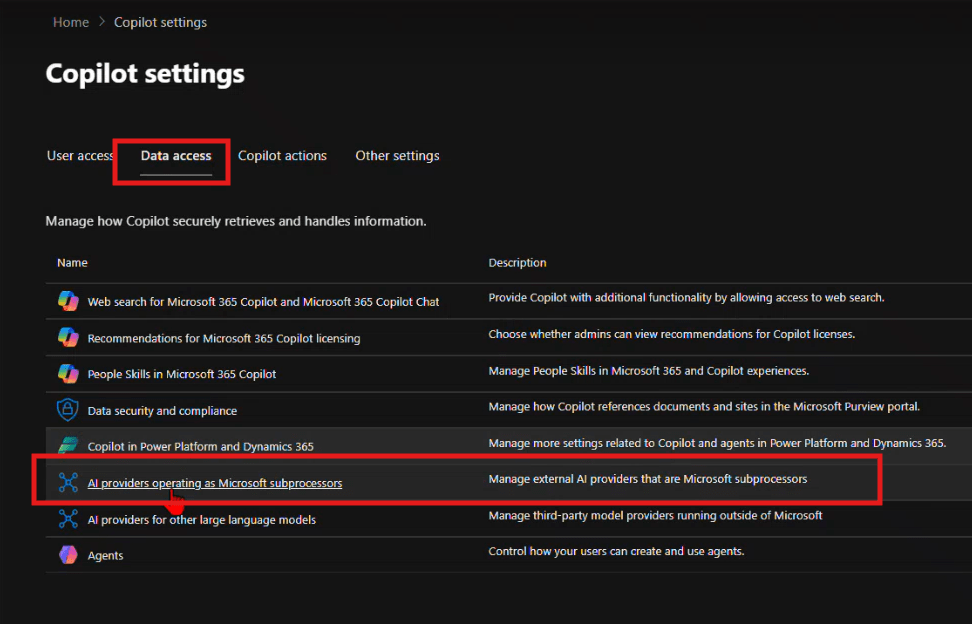
Step 3: Enable Anthropic as an AI Provider
After Frontier is enabled, you need to turn on the AI providers that power the new Copilot experiences. This is the step most admins don’t realize is required.
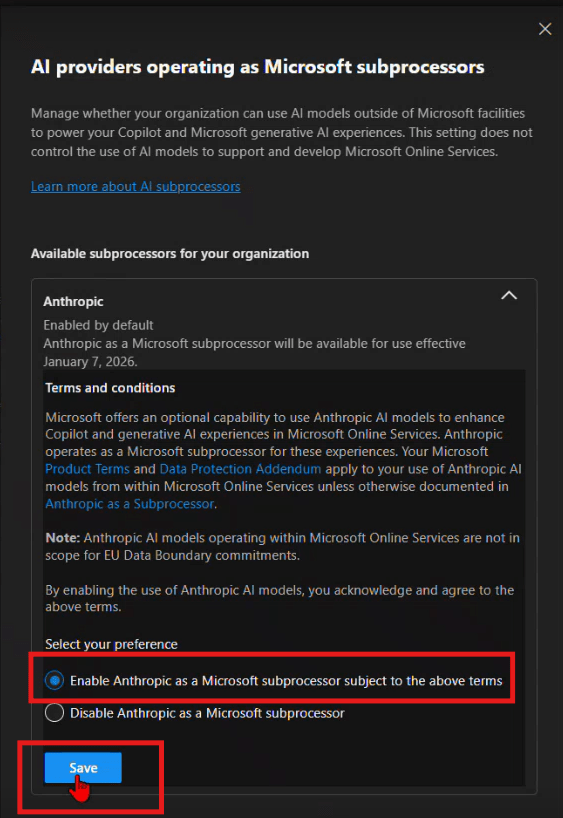
How to enable Anthropic
From the same Copilot settings area, navigate to Data access.
Enable the available AI providers — the recommendation is to enable as many as possible.
Specifically, find Anthropic and enable it for Copilot.
Step 4: Set Up Pilot Groups (Optional)
Don’t roll Frontier out to your entire organization on Day 1. A phased pilot protects your environment and gives you time to validate the experience before broad deployment.
Recommended pilot structure
Phase
Group
Purpose
Wave 1 — Champions
5–10 power users (IT, Copilot champions)
Validate setup, surface issues early
Wave 2 — Early Adopters
50–100 users across key departments
Real-world workflow testing
Wave 3 — Broad Rollout
All licensed users
Full deployment
How to configure
Create security groups in Microsoft Entra ID — for example, SG-CopilotCowork-Wave1 and SG-CopilotCowork-Wave2.
In the Frontier settings from Step 2, assign early access to your Wave 1 group first using the Web Apps user selection.
Expand to Wave 2 once Wave 1 has validated the experience.
Pro tip: Set up a Microsoft Teams channel for your pilot group — something like #cowork-pilot-feedback — so you have a central place to collect issues and wins before you scale.
Step 5: Governance — Lock Down Oversharing Before You Start
This is the step most organizations skip — and regret. When Copilot can surface content from across your tenant, oversharing becomes a data exposure risk, not just a governance annoyance. Lock this down before you enable Cowork broadly.
Key controls to review
Control
Where to set it
Recommendation
External sharing
SharePoint Admin Center → Policies → Sharing
Set to “Existing guests only” or “Only people in your org” during Frontier rollout
Default sharing links
SharePoint Admin Center → Policies → Sharing
Change from “Anyone with the link” to “People in your organization”
Site-level permissions
Individual site settings
Audit “Everyone except external users” — this is the #1 oversharing culprit
Sensitivity labels
Microsoft Purview
Apply labels to classify and restrict access to confidential content
Guest access expiration
Entra ID → External collaboration settings
Set guest access to expire after 90 days
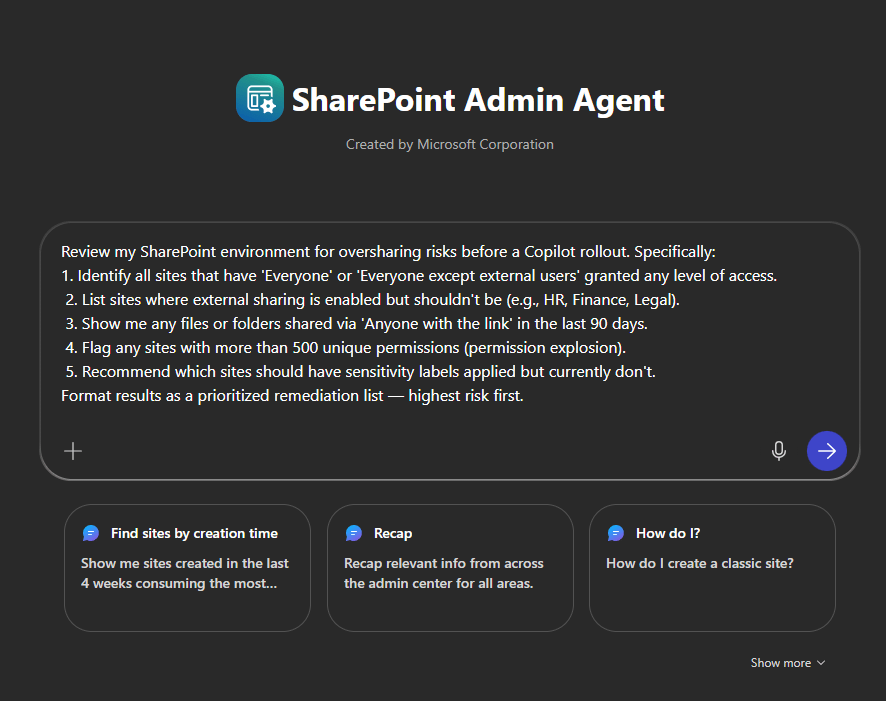
SharePoint Admin Agent Prompt: Oversharing Audit
Use this prompt directly with the SharePoint Admin agent in the Microsoft 365 Admin Center to get a fast, prioritized oversharing assessment:
Review my SharePoint environment for oversharing risks before a Copilot rollout. Specifically:
1. Identify all sites that have 'Everyone' or 'Everyone except external users' granted any level of access.
 2. List sites where external sharing is enabled but shouldn't be (e.g., HR, Finance, Legal).
 3. Show me any files or folders shared via 'Anyone with the link' in the last 90 days.
 4. Flag any sites with more than 500 unique permissions (permission explosion).
 5. Recommend which sites should have sensitivity labels applied but currently don't.
Format results as a prioritized remediation list — highest risk first.
This gives you an actionable list to work through before any end user asks Copilot Cowork a question about a document they shouldn’t be able to see.
Your Day 1 Readiness Checklist
[ ] M365 Copilot licenses assigned to target users
[ ] Early access enabled and Web Apps users selected
[ ] Anthropic enabled under Data access → AI providers
[ ] Pilot security groups created (Wave 1, 2, 3)
[ ] SharePoint oversharing audit completed using Admin agent prompt
[ ] External sharing policies tightened
[ ] Sensitivity labels deployed for confidential content
[ ] Pilot feedback channel set up in Teams
Final Thought
Copilot Cowork is a new way of working. The organizations that will get the most out of Day 1 are the ones doing this prep work right now. Join Frontier, enable Anthropic, run your oversharing audit, and start small with a tight pilot group.
The foundation is simple: Frontier starts with admin enablement and provider access. Once that’s in place, you’re ready for everything that comes next.
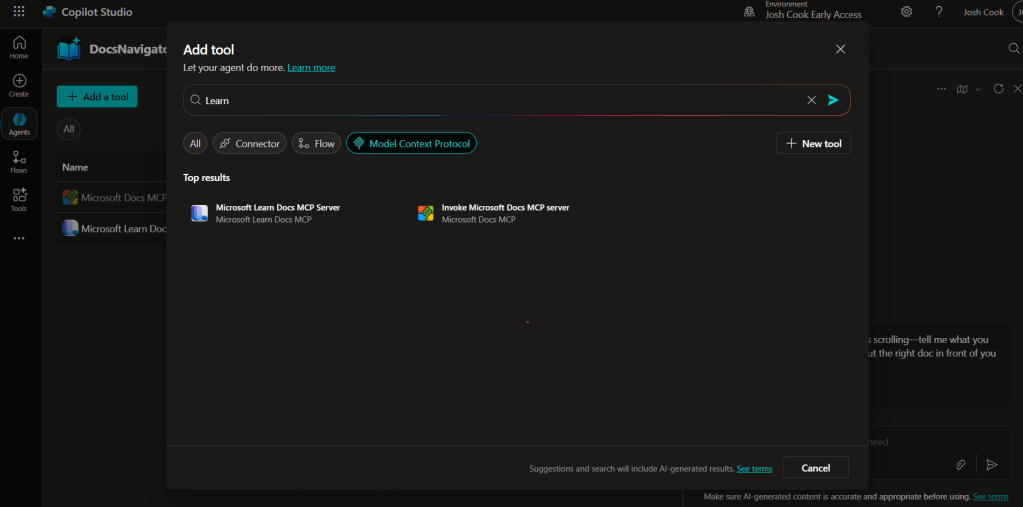
UPDATE—August 8, 2025: You no longer need to create a custom connector for the Microsoft Learn Docs MCP server. Copilot Studio now includes a native Microsoft Learn Docs MCP Server under Add tool → Model Context Protocol. This guide has been updated to show the first-party path. If your tenant doesn’t yet show the native tile, use the Legacy approach at the bottom.
What changed
No YAML or custom connector required
Fewer steps, faster setup
Model Context Protocol (MCP) is the universal “USB-C” port for AI agents. It standardizes how a model discovers tools, streams data, and fires off actions—no bespoke SDKs, no brittle scraping. Add an MCP server and your agent instantly inherits whatever resources, tools, and prompts that server exposes, auto-updating as the backend evolves.
Zero-integration overhead – connect in a click inside Copilot Studio or VS Code; the protocol handles tool discovery and auth.
Future-proof – the spec just hit GA and already ships in Microsoft, GitHub, and open-source stacks.
Hallucination killer – answers are grounded in authoritative servers rather than fuzzy internet guesses.
What the Microsoft Learn Docs MCP Server delivers
Tools:microsoft_docs_search – fire a plain-English query and stream back markdown-ready excerpts, links, and code snippets from official docs.
Always current – pulls live content from Learn, so your agent cites the newest releases and preview APIs automatically.
First-party & fast — add it in seconds from the Model Context Protocol gallery; no OpenAPI import needed.
Bottom line: MCP turns documentation (or any backend) into a first-class superpower for your agents—and the Learn Docs server is the showcase. Connect once, answer everything.
Prerequisites
Copilot Studio environment with Generative Orchestration (might need early features on)
Environment-maker rights
Outbound HTTPS to learn.microsoft.com/api/mcp
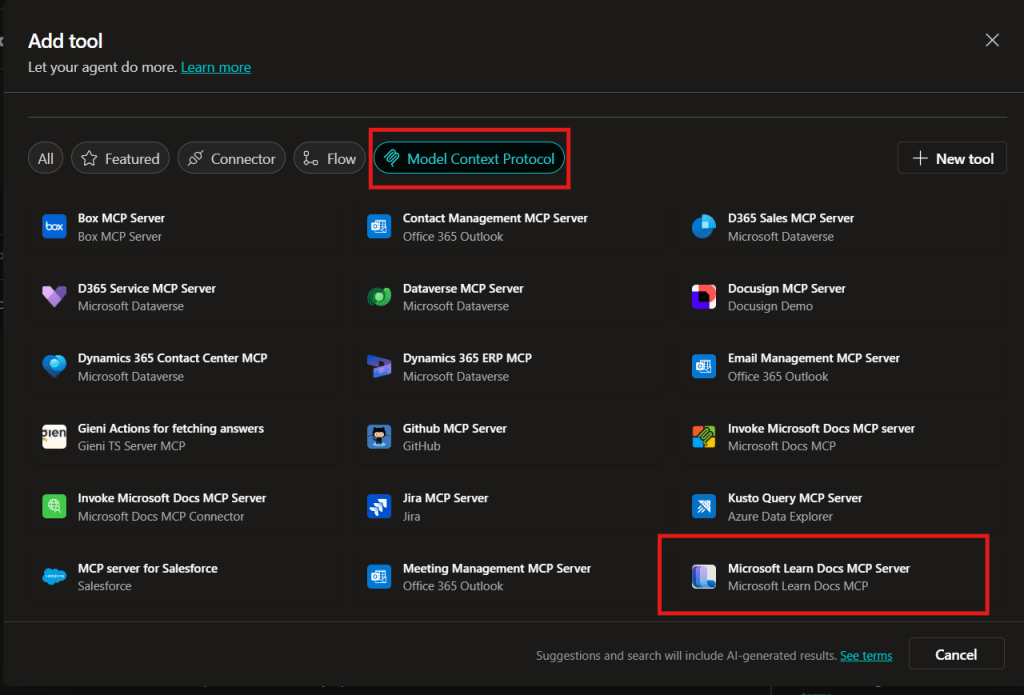
Step 1 – Add the native Microsoft Learn Docs MCP Server
Choose the connection (usually automatic) and click Add to agent.
Confirm the connection status is Connected.
Copilot Studio Add tool panel showing Model Context Protocol category and Microsoft Learn Docs MCP Server tile highlighted.
The MCP server should now show up in Tools.
Click the Server to verify the tool(s) and to make sure: – ✅ Allow agent to decide dynamically when to use this tool – Ask the end user before running = No – Credentials to use = End user credentials
Step 2 – Validate
In the Test your agent pane. Turn on Activity map by clicking the wavy map icon:
Now try a prompt like: – What MS certs should I look at for Power Platform? – How can I extend the Power Platform CoE Starter Kit? – What modern controls in Power Apps are GA and which are still in preview? Format as a table
Note that currently the Learn Docs MCP server does NOT require authentication. This will most likely change in the future.
If Model Context Protocol is not shown in your Tools for Copilot Studio. You may need to create an environment with Early Features turned on.
Do NOT reference the MCP server in the agents instructions, you will get a tool error.
Check Activity tab for monitoring
Legacy approach (if the native tile isn’t available)
Grab the Minimal YAML
Open your favorite code editor or notepad. Copy and paste this YAML to a new file.
swagger: '2.0'
info:
  title: Microsoft Docs MCP
  description: Streams Microsoft official documentation to AI agents via Model Context Protocol
  version: 1.0.0
host: learn.microsoft.com
basePath: /api
schemes:
  - https
paths:
  /mcp:
    post:
      summary: Invoke Microsoft Docs MCP server
      x-ms-agentic-protocol: mcp-streamable-1.0
      operationId: InvokeDocsMcp
      consumes:
        - application/json
      produces:
        - application/json
      responses:
        '200':
          description: Success
Save the file with .yaml extension.
Import a Custom Connector
Next we need to create a custom connector for the MCP server to connect to. We will do this by importing our yaml file we created in Step 1.
Go to make.powerapps.com > Custom connectors > + New custom connector > Import OpenAPI.
Upload your yaml file eg: ms-docs‑mcp.yaml, using the Import an OpenAPI file option.
General tab: Confirm Host and Base URL. Host: learn.microsoft.com Base URL: /api
Security tab > No authentication (the Docs MCP server is anonymously readable today).
Definition tab > verify one action named InvokeDocsMcp is present. Also add a description.
Click Create connector. Once the connector is created, click the Test tab, and click +New Connection. (Note, you may see more than 1 Operation after creating the connector. Don’t worry and continue on)
When you create a connection, you will be navigated away from your custom connector. Verify your Connection is in Connected Status. Next we will wire this up to our Agent in Copilot Studio.
Many Power Automate users encounter issues with the dateDifference() function when calculating the difference between two dates. The problem arises when the output format varies depending on the duration, causing errors in extracting Days, Hours, Minutes, and Seconds.
This blog provides a robust and easy-to-implement solution that works seamlessly in all scenarios, including durations less than a day. Learn how to use a single expression with conditional logic to avoid these common pitfalls and ensure your date calculations are accurate every time. This is your ultimate fix for handling dateDifference() errors!
Compose action: named StartDate = 2024-12-10T15:58:28
Compose action: named EndDate = 2024-12-10T19:22:20
Compose action: uses dateDifference() expression. see below
Below is the expression used in the ‘Date Difference’ compose action. It dynamically handles all scenarios—when days are included and when they are not (same with hours and minutes).
The if() function checks if the dateDifference() result contains a . (dot).
If it does, it means the result has a days component (e.g., 1268.04:15:30), so we parse out Days, Hours, Minutes, and Seconds accordingly.
If it does not, it means the result is less than a day (e.g., 12:57:47.2544602), so we treat Days as 0 and parse Hours, Minutes, and Seconds directly from the string.
Result:
This will produce a JSON object like: { "Days": 1268, "Hours": 4, "Minutes": 15, "Seconds": 30 } Or { "Days": 0, "Hours": 12, "Minutes": 57, "Seconds": 47 }
Steps to Access Each Value
If you use the fixed expression directly in a Compose action (e.g., named Date_Difference), you can reference the fields like this:
Days:outputs('Date_Difference')?['Days']
Hours:outputs('Date_Difference')?['Hours']
Minutes:outputs('Date_Difference')?['Minutes']
Seconds:outputs('Date_Difference')?['Seconds']
Use these expressions in subsequent actions (like another Compose, a Condition, or Apply to Each) to reference the specific values.
Download my Flow
You can easily copy and paste actions in Power Automate. Allowing you to copy and paste my example.