Tag: Power Platform

  • Creating Navigation Buttons for Different Views in Model-Driven Apps

    Creating Navigation Buttons for Different Views in Model-Driven Apps

    When building model-driven apps, one common frustration is the limitation of adding a single table with only a default view. For example, if you have a Contacts table with a Choice field, and you’ve created a view for each choice, users have to select Contacts first, then navigate to the desired view manually.

    But what if you could streamline this process by adding separate navigation buttons for each view directly in the app’s left-hand navigation bar? This blog post will walk you through how to achieve that using URL-based navigation—no extra coding required.

    1. The Scenario
    2. Setup
      1. Step 1: Create views
      2. Step 2: Get the entitylist ID and view ID
      3. Step 3: Edit model-driven app to add URL

    The Scenario

    This is a small example, but the functionality I am about to show you is very powerful, and can help streamline UX.

    Imagine you have:

    • A Contacts table in Dataverse.
    • A Choice field in the Contacts table called Contact Type with options like Client, Vendor, and Partner.
    • Custom views for each Contact Type, such as Client Contacts, Vendor Contacts, and Partner Contacts.

    By default, when adding the Contacts table to your app, only one button appears on the navigation bar, leading to the default view. Users must manually switch to the other views. This approach isn’t user-friendly for frequent switching between views. Especially when some users only care about certain contact types.

    Setup

    Step 1: Create views

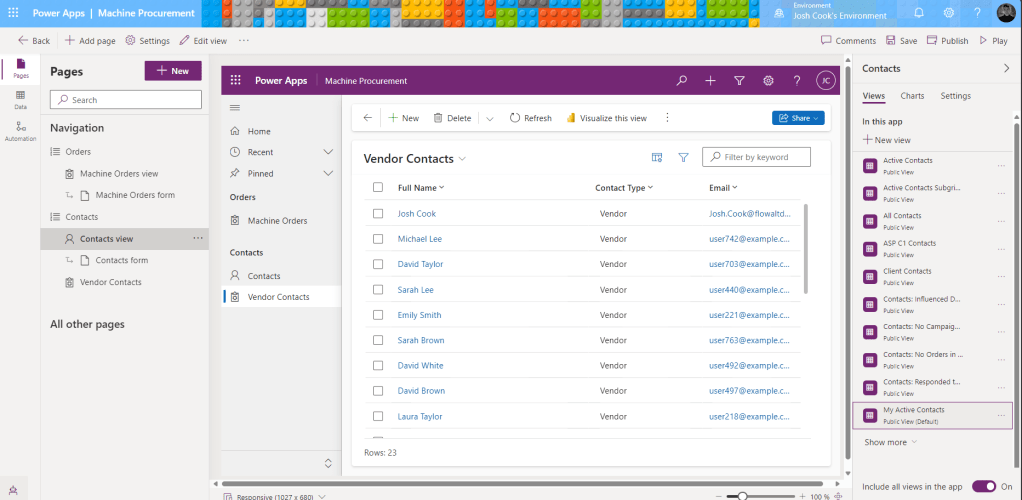
    First you will want to create a view for each button on the navigation. In my case I created a view for Vendor Contacts, and Client Contacts. Each view I added a simple filter to show only that Contact Type

    Example:


    Step 2: Get the entitylist ID and view ID

    Play your model driven app, select the Table and choose the view.
    Now look at the URL, and copy everything after entitylist&etn=

    So in my example the Vendor Contacts view URL is:
    contact&viewid=ee7b9134-7cb2-ef11-a72f-000d3af40ac9&viewType=1039

    Next add this to the beginning of the URL you just copied:
    /main.aspx?pagetype=entitylist&etn=

    So my final URL will be:
    /main.aspx?pagetype=entitylist&etn=contact&viewid=ee7b9134-7cb2-ef11-a72f-000d3af40ac9&viewType=1039

    This will be the URL we use as our navigation link.


    Step 3: Edit model-driven app to add URL

    Edit your model driven app, click +New, and select Navigation link

    Add the URL we built in Step 2, and give it a name, click Add
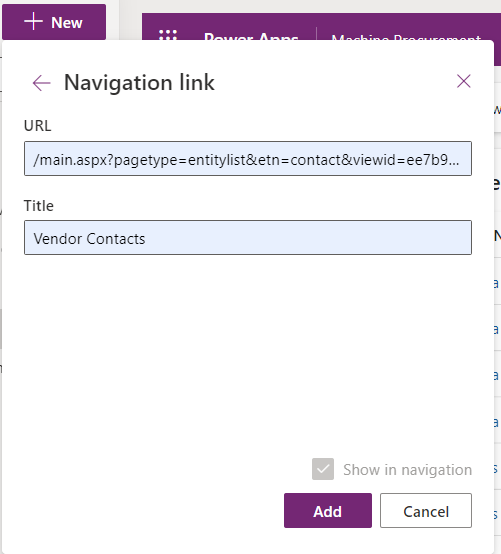
    NOTE: If you get an error, it means your URL is wrong. Follow Step 2.

    By leveraging this simple yet effective approach, you can elevate the user experience in your model-driven apps, making navigation more intuitive and streamlined for your team.

    Special thanks to Kevin Nguyen for showing me how to do this.

    Let me know how this works for your app or if you have other creative solutions to share!

  • Dataverse Record Level Security

    Dataverse Record Level Security

    The scenario here is to enable row level security within the concepts of Dataverse inside a Model-Driven App. Important to note, this can be applied to Canvas or Model-driven apps.

    For example:
    I have a Sale Commission table which is connected to a Model-Driven App. One of the columns is a choice called Store.

    The concept is; we only want users to see records from their own respective stores. This concept seems straight forward and easy.. After some digging and reading documentation and asking some friends in understanding this model. I found a way to do this. So here it is!

    Video Tutorial

    Prerequisites

    The feature that will help us in this concept is called Matrix data access structure (Modernized Business Units). Click the link to read more into it. But I will articulate what we need to do.

    Enable record ownership across business units (preview)

    First we need to enable this feature on an environment. Follow the steps below to enable this feature.

    1. Sign in to the Power Platform admin center, as an admin (Dynamics 365 admin, Global admin, or Microsoft Power Platform admin).
    2. Select the Environments tab, and then choose the environment that you want to enable this feature for.
    3. Select Settings > Product > Features.
    4. Turn On the Record ownership across business units toggle.
    5. Click Save.
    Record ownership across business units (Preview)

    Setup steps

    This guide is assuming you have your Dataverse tables built.
    We need to setup a few things to get this functionality to work:

    1. Create Business Units
    2. Create security role
    3. Assign security role
    4. Create Business rule

    Create Business Units

    We are creating a Business unit for each “Store” in this example.
    Creating business units in the Power Platform Admin center:

    1. In the Admin center, select your environment.
    2. Select the Settings cog in the top.
    3. Under Users + permissions.
    4. Select Business units.
    Showing step 4. Clicking Business units
    1. Click New, and create as many business units as you need.
    2. In this example, I am creating 3. One for each store.
    Showing all business units that have been created

    Create security role

    We want to create a security role. This is a role to give access to the custom tables we have for Dataverse, as well as privileges for Business unit. This will allow users to append different Business units to new records.

    While still in the Admin center;

    1. Click See all under Security roles.
    Admin center showing the security role option
    1. Click, New role or edit an existing role.
    2. When editing the role click the Custom Entities tab.
    3. Find your table that users will be interacting with. In this example, its Sale Commission table.
    4. Set this table to:
      Read = Business unit
      Create = Parent child business unit
    Showing the Sale commission permission
    1. Next, click the Business Management tab.
    2. Set the Business Unit table to:
      Read = Parent child business unit
      Write = Parent child business unit
      Append To = Parent child business unit
    Showing the Business Unit permissions
    1. Click Save and Close.

    Assign security role

    Now we need to assign the security role to users based on the Business unit. To do that follow the steps:

    While in the Admin center;

    1. Click See all under Users.
    2. Select a user to assign the Business unit role to.
    3. Click Manage roles.

    Notice that we can change the Business unit the Security role can be assigned under.

    Showing the new option to select Security roles under each Business unit

    In this example, I am assigning the role under each Business unit to give permissions.

    1. Select the Business unit and assign the role.
    UserRoles assigned + Business unit
    AdeleSales Contributor in MainStore-BU
    AlexSales Contributor in NorthStore-BU
    Sales Contributor in DowntownStore-BU
    Showing a table of permissions

    Based on the table above.

    • Adele can see all records part of the Main store
    • Alex can see all records in North Store and Downtown Stores
    1. Click Save.

    Create Business rule

    Now that the feature has been enabled and configured, we still need to change the Owning Business Unit field based on the selected store. There are many ways to do this, but for this example, I will be using a Business rule.

    To configure a Business rule;

    1. Navigate to your solution, or where the table (Sale Commission) is in Power Apps.
    2. Select the table, and click Forms.
    3. Select the form that users will be using when creating records.
    4. Once the form is opened, add the Owning Business Unit field, and select it
    5. Once selected, click Business rules on the right pane.
    6. Click New business rule.
    7. Give the rule a meaningful name.
    8. In the default condition, in the properties tab mine looks like this:
    Business rule condition 1

    For the rule, I am going to add a Condition to the “is false” and continue to do this for each Business unit / Store I want to check.
    Here is what mine looks like after adding all the conditions:

    All conditions added to Rule

    Next we need to Set the values of the business unit based on the store.

    1. In the components tab, add a Set Field Value action to all the “Is true” paths.
    2. With the Set Field Value selected, click on the Properties tab.
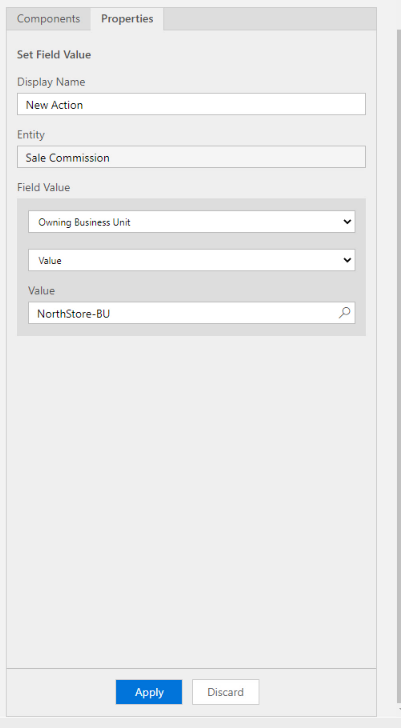
    3. Select Owning Business Unit for Field and the right Value. Example for the NorthStore:
    Set Field Value properties for North Store
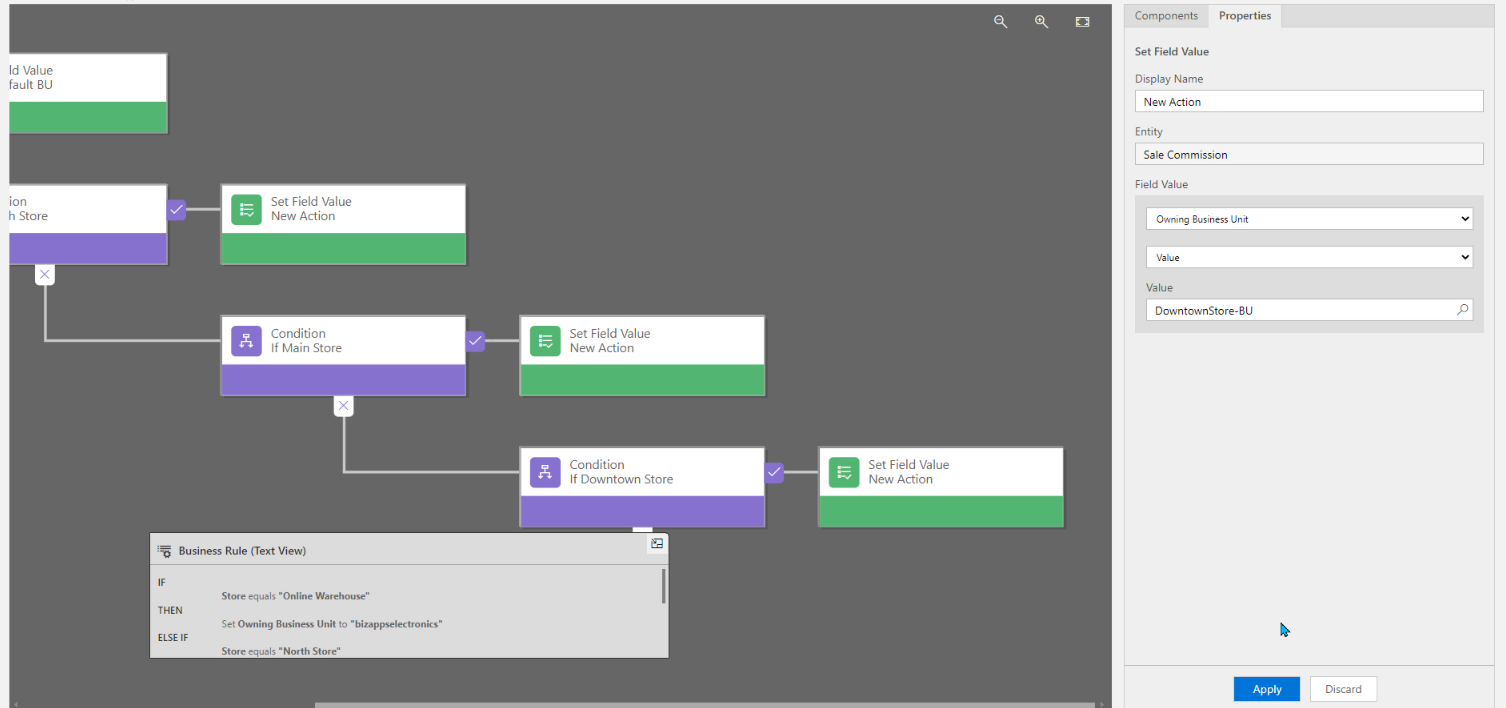
    1. Do this for all the Conditions. Mine looks like this:
    Completed Business Rule
    1. After you’re done, click Validate.
    2. If validation is good, click Save.
    3. After saved, click Activate.

    That’s it. Done!!
    Now when a user selects the Store, it will automatically change the Owning Business Unit.

    Form view of Owning Business Unit changing based on Store selected.
  • How to Use Regular Expressions in Microsoft Power Virtual Agents With Examples

    How to Use Regular Expressions in Microsoft Power Virtual Agents With Examples

    Regular Expressions in Power Virtual Agents? Sounds like a pretty advanced topic. But it’s actually not that difficult and can save you hours of time if you’re trying to validate user input for things such as credit card numbers, tracking IDs, custom invoice numbers or even IP addresses. In this post we’ll cover some of the basics of Regular Expression syntax so you can get started using them inside Power Virtual Agents.

    Summary

    To utilize regular expressions inside Power Virtual Agents, we must first create a new entity.
    This can be be done by clicking the Entities tab > New entity.

    Now select Regular expression (Regex)

    PVA does a great job in providing some general use case examples.

    The syntax is based on .NET


    RegEx Examples in PVA

    Below you will find some examples you can copy and paste directly into the Pattern for your Regular Expression:

    PatternDescription
    ^(?:(?:25[0-5]|2[0-4][0-9]|[01]?[0-9][0-9]?).){3}(?:25[0-5]|2[0-4][0-9]|[01]?[0-9][0-9]?)$IP Address
    – Looks for X.X.X.X format
    – Each X range in 0-255
    – X length 0-3
    ^4[0-9]{12}(?:[0-9]{3})?$Visa Credit Card numbers
    – Start with a 4
    – Old cards use 13 digits
    – New cards use 16 digits
    ^3[47][0-9]{13}$American Express
    – Starts with 34 OR 37
    – All have 15 digits
     ^(?:5[1-5][0-9]{2}|222[1-9]|22[3-9][0-9]|2[3-6][0-9]{2}|27[01][0-9]|2720)[0-9]{12}$Mastercard
    Starts with either:
    51-55 OR 2221-2720
    – All have 16 digits
    ^(?!0{3})(?!6{3})[0-8]\d{2}-(?!0{2})\d{2}-(?!0{4})\d{4}$Social Security Number
    – SSN are 9 digits
    – Looks for XXX-XX-XXXX format
    – Cannot contain all zeros
    – Cannot begin with 666 OR 900-999
    ^[a-fA-F0-9]{2}(:[a-fA-F0-9]{2}){5}$Mac Address
    – 6 byte hex separated by colon “:” OR dash “-”
    ^((6553[0-5])|(655[0-2][0-9])|(65[0-4][0-9]{2})|(6[0-4][0-9]{3})|([1-5][0-9]{4})|([0-5]{0,5})|([0-9]{1,4}))$Port Number
    – Matches valid port number in computer network
    – 16 bit
    – Ranges from 0-65535
    [A-Z]{2,}-\d+Jira Ticket Number
    – Looks for format Hyphen-separated Jira project key and ticket issue number
    ^(bc1|[13])[a-zA-HJ-NP-Z0-9]{25,39}$Bitcoin Address
    26-35 alphanumeric characters
    – Start with 1 OR 3 OR bc1
    ^[0-9a-fA-F]{8}\b-[0-9a-fA-F]{4}\b-[0-9a-fA-F]{4}\b-[0-9a-fA-F]{4}\b-[0-9a-fA-F]{12}$UUID / {guid}
    – 36 characters
    – 128 bit, represented in 16 octets
    – Looks for format form of  8-4-4-4-12

    Using them in PVA

    Once we create the Entity, and define the pattern for our RegEx. We can now use this validation inside our PVA chat.

    For example, I will test the IP Address pattern

    ^(?:(?:25[0-5]|2[0-4][0-9]|[01]?[0-9][0-9]?).){3}(?:25[0-5]|2[0-4][0-9]|[01]?[0-9][0-9]?)$
    

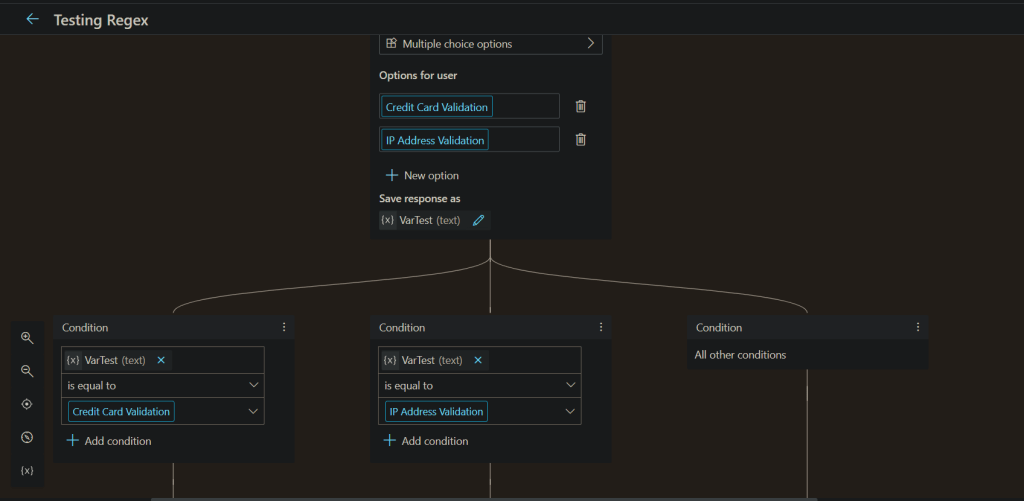
    I have created a topic for testing my RegEx.

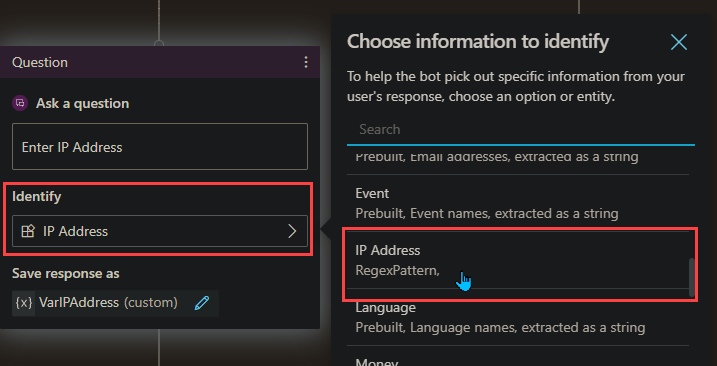
    To use the newly created entity, Add a Question, under Identify select your Custom Entity

    Under this, I add a message to confirm its valid.
    (Note, the bot will automatically let the user know if the validation does not match)

    Testing the RegEx

    Okay, drumroll….
    The values I will be testing are

    User InputValid?
    192.168.1.1Valid ✔
    127.0.0.1Valid ✔
    999.55.1.5Not Valid ✖
    Not A IP AddressNot Valid ✖

    Conclusion

    Being able to use Regular Expressions inside Power Virtual Agents can be extremely powerful. And with the above list of common patterns, I hope you find value in this post.

    Thank you, and have a great day!