Regular Expressions in Power Virtual Agents? Sounds like a pretty advanced topic. But it’s actually not that difficult and can save you hours of time if you’re trying to validate user input for things such as credit card numbers, tracking IDs, custom invoice numbers or even IP addresses. In this post we’ll cover some of the basics of Regular Expression syntax so you can get started using them inside Power Virtual Agents.
Summary
To utilize regular expressions inside Power Virtual Agents, we must first create a new entity. This can be be done by clicking the Entities tab > New entity.
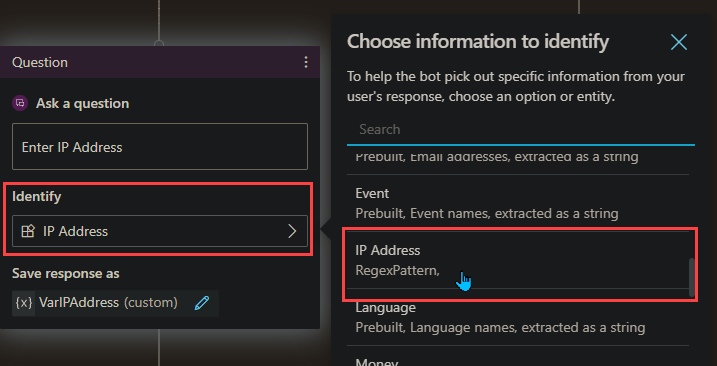
To use the newly created entity, Add a Question, under Identify select your Custom Entity
Under this, I add a message to confirm its valid. (Note, the bot will automatically let the user know if the validation does not match)
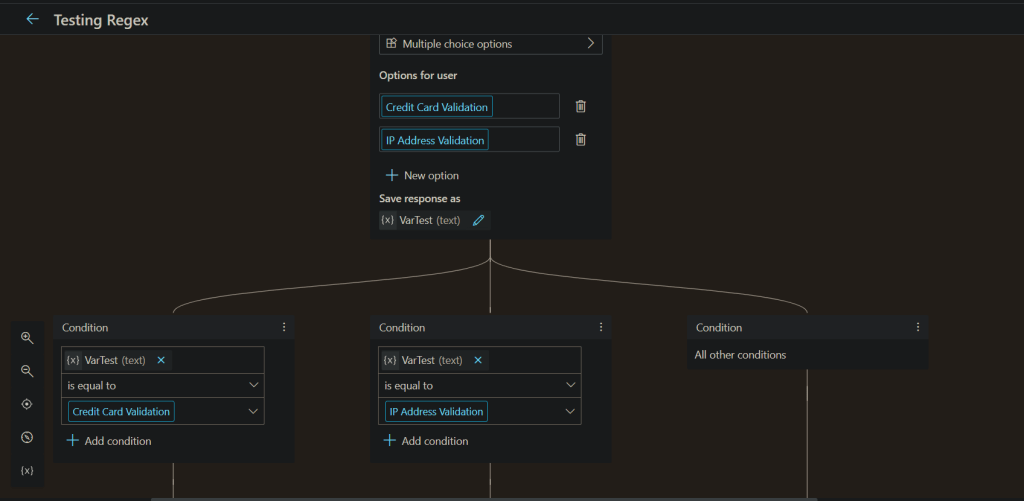
Testing the RegEx
Okay, drumroll…. The values I will be testing are
User Input
Valid?
192.168.1.1
Valid ✔
127.0.0.1
Valid ✔
999.55.1.5
Not Valid ✖
Not A IP Address
Not Valid ✖
Conclusion
Being able to use Regular Expressions inside Power Virtual Agents can be extremely powerful. And with the above list of common patterns, I hope you find value in this post.
You may have run into an issue when creating Power Apps that needs to submit data to SharePoint, Dataverse, etc. But did not want to give everyone in the app access to these. The problem is, Power Apps uses the connections of the user using the app, meaning if the app writes to a SharePoint List, the user will need Read/Write access. The same goes for Power Automate if we try to send the data to Power Automate from Power Apps, it still uses the users connection who triggered the Flow. How can we get around this? Read below!
If you block the HTTP Request connector via data loss prevention (DLP), child flows are also blocked because child flows are implemented using the HTTP connector. Work is underway to separate DLP enforcement for child flows so that they are treated like other cloud flows.
You must create the parent flow and all child flows directly in the same solution. If you import a flow into a solution, you will get unexpected results. Call Child Flows – Power Automate | Microsoft Docs
Prerequisites
The Flows must be created inside the same Solution, so a Dataverse database must be configured on the Power Platform Environment
The Scenario
In this scenario, I will be showing how a user can use Power Apps to create items in a SharePoint List without being a member of the Site. This will allow us to use a specific Service Account to create the data in SharePoint without giving the user in the app any permission at all!
First we will build the Child Flow, then Parent Flow, and lastly customize the Power App
Child Flow
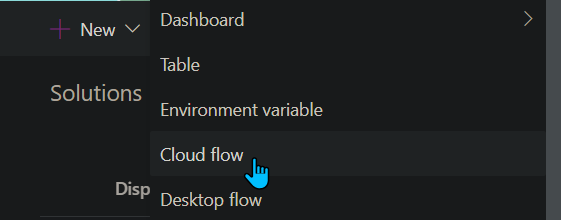
Inside your Solution create a new Cloud Flow.
For our trigger we use a Manual Button, and add the data we are expecting from Power Apps to put inside our SharePoint List (In my example I am only bringing in one field for Title)
Next, I add a Create Item action for my SharePoint List, and add the Parameters from the trigger inside the action.
Lastly, I add a ‘Respond to PowerApp or flow’ action, I create an Output called Success, and some details about what was created.
Child Flow
Make sure to use the Connection you want users of the App to use for the SharePoint Create item action.
Save and go back to the Flow dashboard screen (where you see the Details and run history screen).
There will be a Card on the right side called ‘Run only users’ click Edit
Run only users
Under Connections Used, switch ‘Provided by run-only user’ to the connection you want to be used by users of the App (They wont have access to this Connection outside this Flow)
Run only user
Click Save,
Now onto the Parent Flow
Parent Flow
Go back to the Solution and Create another Cloud Flow.
For our trigger we use the PowerApps button trigger.
As best practice, create Variables for your data that is coming from Power Apps. Don’t forget to name them, as this will be the parameter name in Power Apps, Use the ‘Ask in PowerApps‘ dynamic content for your variable values.
Next we use a action called ‘Run a Child Flow’ (If you do not see this action, your Flow was not created inside a Solution) Add the parameters (these were the input parameters from the last Flow that we just created).
Lastly, add ‘Respond to a PowerApp or flow’ action. For this demo I am adding the parameter ‘Success’ this is from the child Flow.
Click Save.
Power App
Now onto the Power App, I am going to create a simple Power App with 1 TextInput for Title, and a Button to Pass the data to Power Automate. Here are my controls for reference:
TextInput_Title Button_SendToFlow
For the Button: 1. Add the Flow to the button by clicking on the Button, 2. Clicking Action tab on top of page, 3. Clicking Power Automate 4. Select the Flow
Next add the parameters for the Flow, in my case I am adding the TextInput_Title.Text
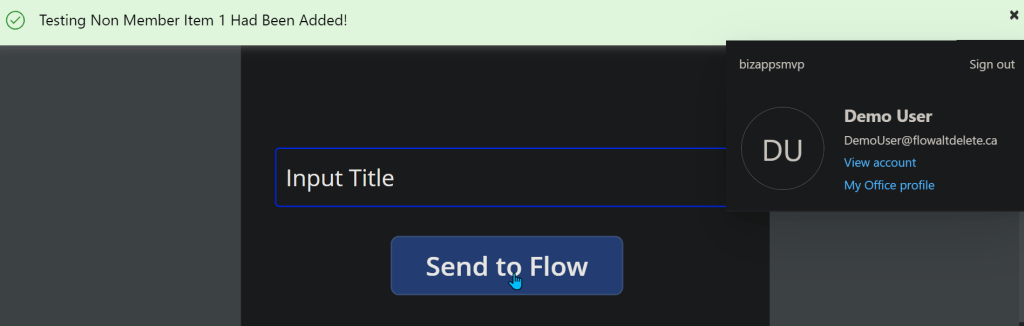
Now, I want to add a Notification that the Item has been added, which will confirm my Flow has Run correctly. Ill be using the ‘Success’ Output parameter from the Flow for this.
To add this, I put my Flow run inside a Variable inside Power Apps. Ill call my variable Results, and IO add this to the OnSelect property of the Button where my Flow is:
Now I use the ‘Notify’ function to notify the user of the item being created, I add this after the semicolon. So my function looks like this in the end:
Is your Condition not working as expected? The problem is when we use a Condition action inside Power Automate, we cannot see the “equation” that is being evaluated when looking into the run.
The problem affects how we can troubleshoot, the following solution will show what is happening inside the Condition action during the run.
Scenario
In this scenario, I am checking: If one value is greater than a second value
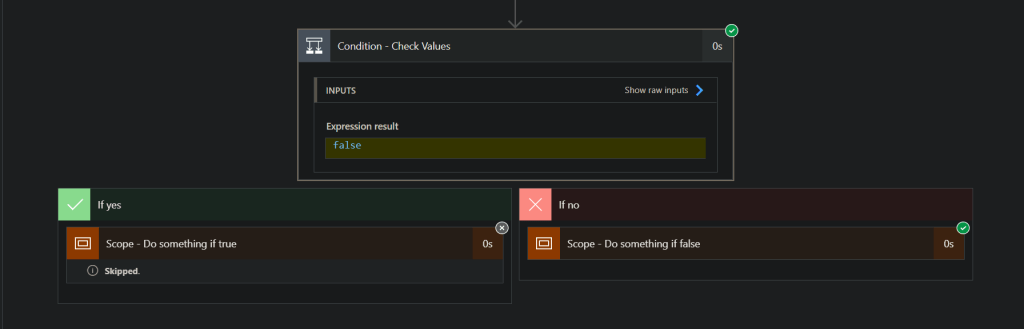
Now during a test run, I expect to see this condition true, but in my run it is always showing false and going in the If no branch.
The big problem is though, I cannot see what the values being evaluated look like. Take a look below
Clicking on the “Show raw inputs” is also not helpful..
Solution
So what is this quick and easy solution to see the condition results? A simple ‘Compose‘ action.
Lets take a look: First add a Compose under your Condition
Next copy the values that are in the Condition to the Compose. My Compose now looks like this:
Now make sure the Compose is above your Condition. I am just dragging the Condition below the Compose
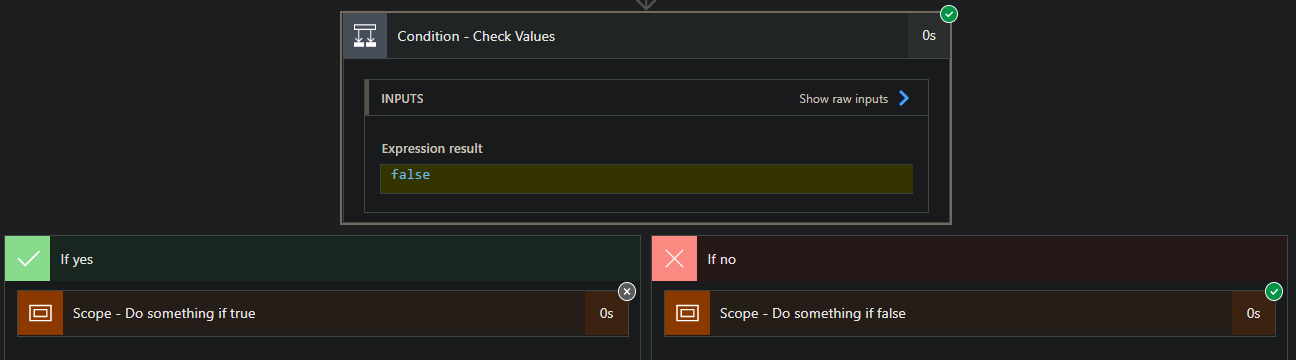
Next, we can run the Flow again, and see what the Compose can tell us:
Yikes! We can see our 2 values that are being evaluated are both 15. And 15 is not greater than 15. This is why its returning false.
My Thoughts
In my opinion, this should be already visible inside the Condition action. To get this feature added to Power Automate, we can vote on this feature. Head over to the Community Forum and vote for this idea.
I needed to check if an HTML table had data or not. Usually when I need to check I have two expressions I go to first.
empty()
length()
I tried using empty() and found that the HTML table even when empty, is not truly empty. I then tried length() and found that when the HTML table is empty there is still a length of 30.
The Scenario
I have some data that is used to track different devices that can be loaned out. The data has properties like, Type of device, Serial Number, Etc.
I want to put this array of data inside a HTML table and send it out on an email. The problem is, my data might be empty, as only available devices will show up in my data.
I need to check if the HTML table is empty, if it is empty: If True: Send email with HTML table If False: Send email without HTML table
The Flow
For this Flow, I will be using an Array Variable to simulate my data coming in from another system. I will call this Variable ‘Data‘. The HTML table action will be added underneath. You will need to determine if you want to use ‘Custom columns‘ or ‘Automatic columns‘ This can be done in the advanced options in the HTML action:
My ‘Data‘ Variable is empty at the moment. This is what we want for our first run, we want to get the length of the HTML table when its empty.
Next add a ‘Compose‘ action, and use the expression length(), pass in the HTML table as the parameter. For example, my expression looks like:
length(body('Create_HTML_table'))
Now run the Flow with no Data in the HTML table, and check your Compose action to see what the length is. In my case it is 30
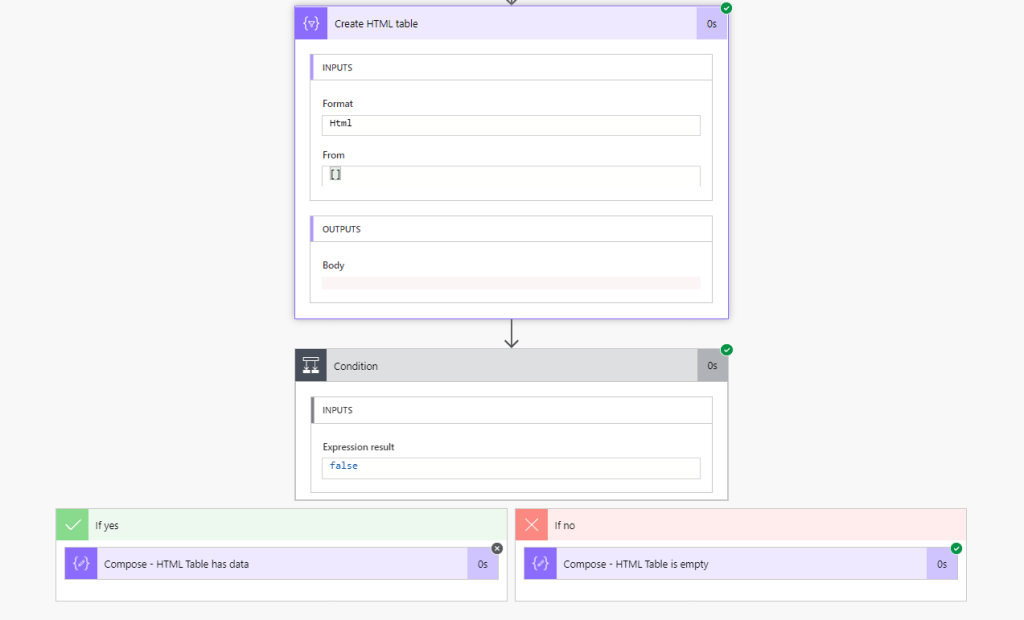
Now we can add a If Condition to check if the length is greater than 30
** TIP ** I am passing in the Compose action into the condition, this allows me to see what the outputs of the Compose action before it gets evaluated inside the condition. This is extremely useful for troubleshooting
Conclusion
The Flow will go into the ‘If yes’ block if the HTML table has data
The Flow will go into the ‘If no’ block if the HTML table is empty
Of course checking the Data Variable itself for length could work way better. This example is mainly for data that can come in that could have loads of junk. For example: An HTTP API could bring in no data, but still have other information attached like, headers, status code, version. In this case we can only do conditional checks on the HTML table, since our Data variable will always have something being passed in.
This post will go over a common problem I have seen using SharePoint action to get a specific file ID. There are three parts to this post: The Problem The Solution Conclusion
The Problem?
I encountered an issue when trying to filter a a file by filename, that was in a SharePoint document library.
When needing to get a specific SharePoint file ID. It can be troublesome to filter the Files. For example Using a ‘Get files‘ action we can see that the properties of the file are encased inside {} meaning that SharePoint is using some calculation on the Document Library to create these fields.
Attempting to use a filter query on any of the fields encased between {} returns an error. For example I am trying to filter the file called ‘Readthis.txt‘ I get a ‘Bad Request’ Error:
The error message I receive is:
Column ‘Name’ does not exist. It may have been deleted by another user. clientRequestId: 75462fg8-686d-48p1-5se7-e8l97jk84025 serviceRequestId: 75462fg8-686d-48p1-5se7-e8l97jk84025
I have read online that using Title as the column name is correct, although I do not get an error, the output is empty.
The Solution
Now the best part, the solution!
The way I have been using to filter out ‘Get files‘ action is by using the ‘Filter array‘ action. This action will allow us to filter the calculated columns that SharePoint is using, like {Name}, {Link}, {FilenameWithExtension}, Etc.
To get setup, we want the ‘Get files‘ action to pull in ALL files, so we don’t want to have any filter at this stage.
Now add a ‘Filter array‘ action, put the dynamic content value in the From field. On the left side select the dynamic content from the ‘Get files‘ action. The right side put what you want to filter on. So for example, I want to filter and get the file ‘Readthis.txt‘. So my ‘Filter array‘ action looks like this:
Now when running the Flow, the ‘Filter array’ action is properly filtering out the filename:
Did you know that Power Automate has a Date Time action that can easily convert, and format time zones in one action? Why is this important? Power Automate natively uses UTC as its time zone, as well as most SharePoint sites. Using an action can be easier than using expressions.
The Flow
In this example, we will want to get the current time (this will be in UTC since we will be using Power Automate) and converting the time to local time with a specific format.
First we want to get the current time, we can use the expression utcNow() but I will be showing how to use the Date Time actions instead.
The actions are under Date Time:
Add a Current time action, this action is the same as using utcNow() expression
Next add Convert time zone action, this action is very useful as it has pre loaded time zones and formats to choose from.
The inputs for this action are: Base time: Use the output from the Current time action Source time zone: Make sure to select Coordinated Universal Time Destination time zone: Select your local time zone or the time zone you want Format string: This dropdown has many ISO formats to choose from. If you want to have a custom format, simply click the drop down and select Enter custom value. See below for examples
Format Examples
If for some reason the format you want is not in the dropdown for formats, you can create a custom format as long as it follows ISO 8601 format. To add a custom format click Enter custom value in the dropdown
Some tips when creating a format for the date ‘2020-10-13‘ (October 13 2020) yy = 20 yyyy = 2020
Controlling when your Flow triggers can be crucial. By default Flows run in Parallel, this means multiple runs could be running at the same time, this is great for performance, but could cause troubles in some Flows. For example:
Lets say we have a Flow setup that is triggered on when an item in a SharePoint list is created, which gets sent to other systems for different purposes. For data quality reasons, we only want the Flow to run one at a time, and have other runs be waiting in a queue.
The Flow
The only setting we need to change is in our Trigger.
This can be done on Triggers other than SharePoint
For this demo, I added a Compose action to get the Name of the item being created in SharePoint.
I added a Delay action only to show what happens if multiple runs queue up.
The setting we want to change is in the trigger, click the 3 dots on the trigger and select Settings from the drop down.
Now inside Settings, find and enable Concurrency Control, and set Degree of Parallelism to 1. This setting is how many runs can run in at one time. Click Done
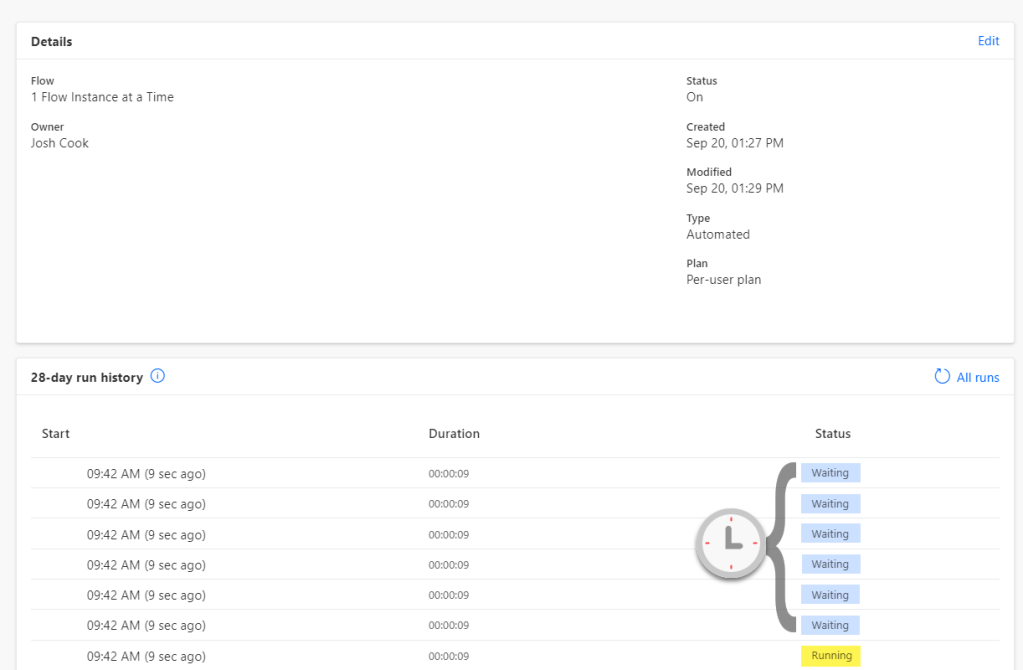
My trigger is When an item is created, so I will create 3 items, one every 15 seconds to show what happens with queued runs. 1st item = Run1 2nd item = Run2 3rd item = Run3
Here are my findings:
As we can see the runs are not in order, of the way I created the items. So we can conclude that if we create the items faster than our trigger time, we can expect that the Flow will not run in a sequential order.
Conclusion
As we can see above, this Trigger setting is very useful when needing to limit the Flow to run one at a time. But the limitation on this is, if the Flow is being triggered multiple times and having the runs queue up, there is a chance that the runs will not run in order.
Deploying Power Automate Flows can be a headache if you have to manually change values inside the Flow for each environment. You also run the risk of missing a value.
This post will go in depth on using Environment variables inside solutions to allow certain values to be used in different environments. I will be using Two(2) environments for this demo: Dev, and Test
This demo will utilize the data type ‘JSON’, this will save loads of time.
Terms / Glossary
Here are some familiar terms that will help in this post: Default Value = The value that you’re expecting after you deploy the Flow. This will be our Test environment values
Current Value = The value that overrides the Default Value. This will be our Dev environment values
Parameters = These are just values. For example 2 + 2. Each 2 is a parameter of the addition expression (+)
** Note: I Have created this guide to be as simple as possible, If you name everything as I do, you will be able to copy and paste all my expressions directly into your Flow **
The Scenario
My Flow posts a message into Microsoft Teams group. When deploying the Flow into different environments, I want to change the Teams content like:
Team Name
Channel ID
Subject
Usually after deploying, we can go in to the Flow and manually change the values. This can cause errors, especially if we forget to change some values after deploying (I may have done this a few times).
Getting Parameter Values
It is important to note that not all Action values can be parameterized. Follow the steps below to see if the values can be parameterized:
Teams Example: My Teams action, I want to parameterize the Team Name, Channel ID, and Subject. For this I add the Action, and select the values as needed.
Now with the information filled in, click the 3 dots ‘. . .’ on the action, and click ‘Peek Code’.
Dev Parameters
In the ‘Peek code’ view, we can see the different parameters and the values that this action uses in the background. Copy these values into notepad or code editor for use later. I have created a simple JSON to be placed in my Environment Variable later on.
I will be using the Env value for my Subject in the teams message
For example: Team = 1861402b-5d49-4850-a54b-5eda568e7e8b Channel = 19:be3759762df64d94a509938aa9962b29@thread.tacv2 Subject = Message From Dev Environment
To test that we can use custom values as parameters, we want to grab these values from above and insert them into the ‘Teams Post a message’ action as custom value, than run the Flow
Mine looks like this now:
Now run the Flow to make sure everything works as expected using the Custom values
Now that we know Custom values work for the inputs/parameters for the action. We now want to get the values for the other environment. Remove the custom values from the inputs and choose the correct value that we want to point to when this Flow is deployed to another environment. For example:
Again we do a ‘Peek code’ to get the parameter IDs that this action uses
Test Parameters
Copy these values into notepad or a code editor for use later. Now we have two sets of values, one for Dev, and one for Test. I have created a simple JSON to be placed in my Environment Variable later on.
I will be using the Env value for my Subject in the teams message
Make sure the Two(2) JSONs have the same structure. We will be using the data to populate the Environment Variables in the following steps
Creating Environment Variables
Environment variables can only be created inside a solution, there are multiple ways you or your organization may want this set up.
In this demo I have created a Publisher in CDS called ‘param’, this will better define the parameters that we create inside the solution. (this is optional) The default CDS publisher could also be used.
Create a solution inside Power Automate. Click Solutions on the left navigation menu, Than click ‘New Solution’ on the top on menu, and fill the information out
Once the solution is created, Click ‘New’ > Environment variable
Now fill in the information like the screenshot below.
Note, I will be using the Data Type as JSON. I use this for simplicity, as I have more than one value I want to add. Also we can use the Parse JSON action in Flow to reference each value separately. You can use any Data Type you like
Now we populate the values we want to use per environment, the way we do this is fill in the Default Value, and the Current Value.
Default Value = The values we want for the other environment, in this case Test Current Value = The values we want to use for this environment, in this case Dev
Once the values are pasted in click ‘Save’
Creating The Flow
I will be creating the Flow inside the solution that the Environment Variable is in from above. Inside the solution click ‘New’ > Flow
For the demo I will use a Manual trigger, than add Two(2) ‘Initialize Variable’ actions
Initialize variable – Schema Name Name: schemaName Type: String Value: Put the Name of the environment variable in the value (This can be found on the main screen of the solution under Name column)
Initialize variable – Parameters Name: parameters Type: String Value: Leave blank for now, this variable will store either the Default Value or Current Value, based on which environment we are in
Next add a ‘Scope’ action to hold all the actions that will get the parameters
I renamed my ‘Scope’ to Load Parameters.
NOTE: You can copy and paste my filter query as long as you kept the same name as I did. When you see the @ in Power Automate, this allows you to call expressions without having to go into the expression tab. If you want to build the expression yourself, I will include the syntax under each picture of the List Records actions and on
Inside the Scope, add Two(2) ‘Common Data Service Current Environment – List Records’ actions.
1) List records – Parameter Definitions Entity name: Environment Variable Definitions Filter Query: schemaname eq ‘@{variables(‘schemaName’)}’
schemaname eq ‘YOUR ENVIRONMENT VARIABLE NAME’
2) List records – Parameter Current Values Entity name: Environment Variable Values Filter Query: environmentvariabledefinitionid_value eq ‘@{first(outputs(‘List_records-_Parameter_Definitions’)?[‘body/value’])?[‘environmentvariabledefinitionid’]}’
Under the ‘If condition‘ add a ‘Parse JSON‘ Name: Parse JSON – Parameters Content: @{variables(‘parameters’)} Schema: To generate your schema, Click the ‘Generate from sample’ button, than paste in the JSON that you used for Default Value
We are done with the parameter scope now..
Using The Parameters
I will be adding a Teams Action ‘Post a message‘ I will use the dynamic content from my ‘Parse JSON‘ action.
Triggering the Flow, I expect the Dev values to be used (Current Value)
Here is the Teams message:
Next we will export and import into a different Environment which will use different parameters (Default Value)
Export And Import – Deployment
Overview of this sections steps: 1. Remove Current Value from Environment variable 2. Publish Solution 3. Export Solution 4. Import Solution 5. Authorize any Connections 6. Enable Flow 7. Trigger / Test
Remove Current Value from Environment variable
Inside the Solution click on the Environment variable, under Current Value click the 3 dots ( . . . ) Select Remove from this solution
This will only remove the values from this solution. The Current Values will still be in CDS and can also be added back into this solution if needed by clicking Add existing under Current Value
Publish Solution
Inside your solution, click ‘Publish all customization’
Export Solution
Once published click ‘Export’
Export as ‘Managed’ or ‘Unmanaged’ Choose either or based on your needs.
Import Solution
Switch to your other Environment, and click Solutions tab. Click ‘Import’
Choose your Zip file from your Export, and follow instructions by clicking ‘Next’
Authorize any Connections
Once the solution is imported successfully, you may need to authorize any connections inside the Flow. This can be done by clicking on the Flow from inside your solution, and clicking ‘Sign in’ on all actions > Click ‘Save’
Enable Flow
Now enable / turn on the Flow
Trigger / Test
Trigger the Flow to confirm the values are coming over as correct (Default Value).
Test Env – Using Default Value as expected
Now in Teams our message has been posted in a different team chat, different channel, and with the ‘Test’ text in the subject line
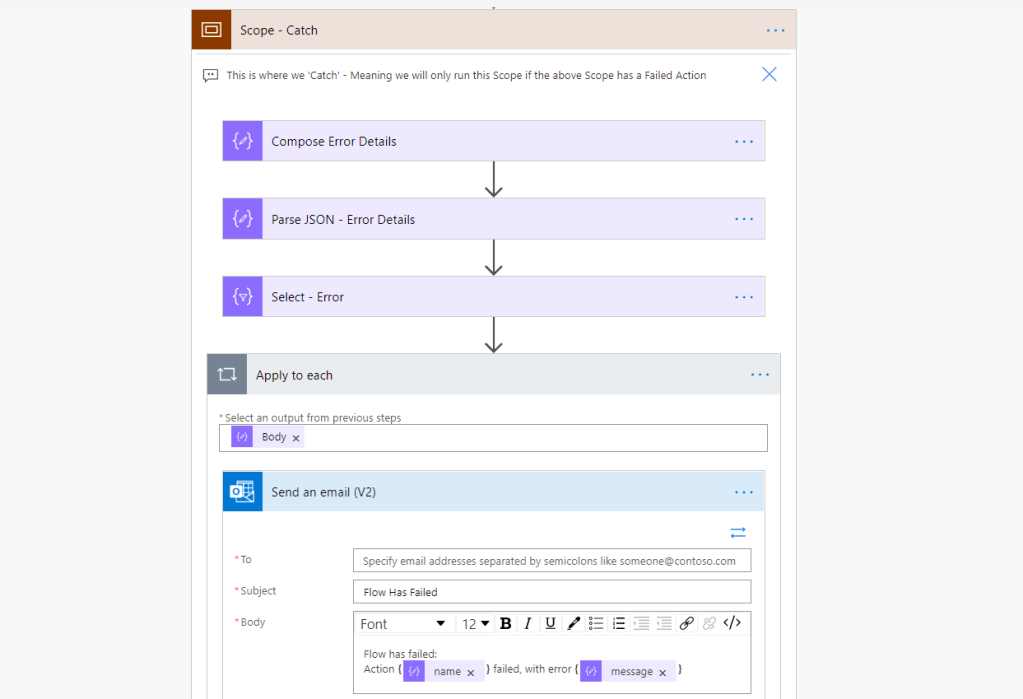
When a Flow fails, sometimes we want to capture and send that message out, to a user, support team, or teams channel. In this demo we will go through the steps to capture any error messages from a failed run.
Virus Total in Power Automate. Now we can scan links or files and generate a report, right in Power Automate. Some examples may include: Links or files from Emails, Teams, Etc.
What is Virus Total
Virus Total is a free and powerful tool to scan Files, and Links. Virus Total uses the Hash of the File/URL and checks some of the most popular antivirus systems to generate a report. https://www.virustotal.com/
Prerequisites
This is a Premium connector Note: These actions of the time of this blog, are in Preview.
Virus total has two types of API Free (Public): – The Public API is limited to 4 requests per minute and 1K requests per day. – The Public API must not be used in commercial products or services. – The Public API must not be used in business workflows that do not contribute new files. Paid (Premium): – The Premium API does not have request rate or daily allowance limitations, limits are governed by your licensed service step. – The Premium API returns more threat data and exposes more endpoints and functionality. – The Premium API is governed by an SLA that guarantees readiness of data.
Keep the above information in mind when using the API
To use the Virus Total connector, you must sign up on their site and get a token. To get the token, follow these steps:
First head over to https://www.virustotal.com/ and sign up for free Next you will have to confirm your email address
Now once you can login to your account, you want to click your person logo in the top right, and select API key
Now copy the API key that you are given. That is it! Now you can use that Key to create a connection with the Virus Total Connector is Power Automate
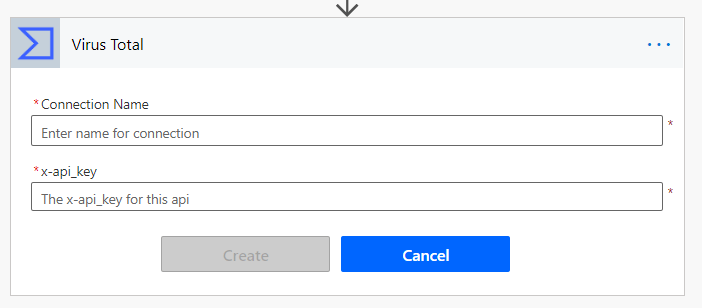
Connection Setup
First, we make a connection to the Virus Total API. In your Flow, add a new action, search for Virus Total.
Virus Total has a couple Actions here that are very powerful. We will be using ‘Analyse an URL’ action for this demo.
All that is needed to create the connection is your API key from the prerequisites.
Connection name can be anything you want, for this demo I chose VirusTotalDemo
Now that we have the connection established we can build the Logic for analyzing a URL.
Building the Flow
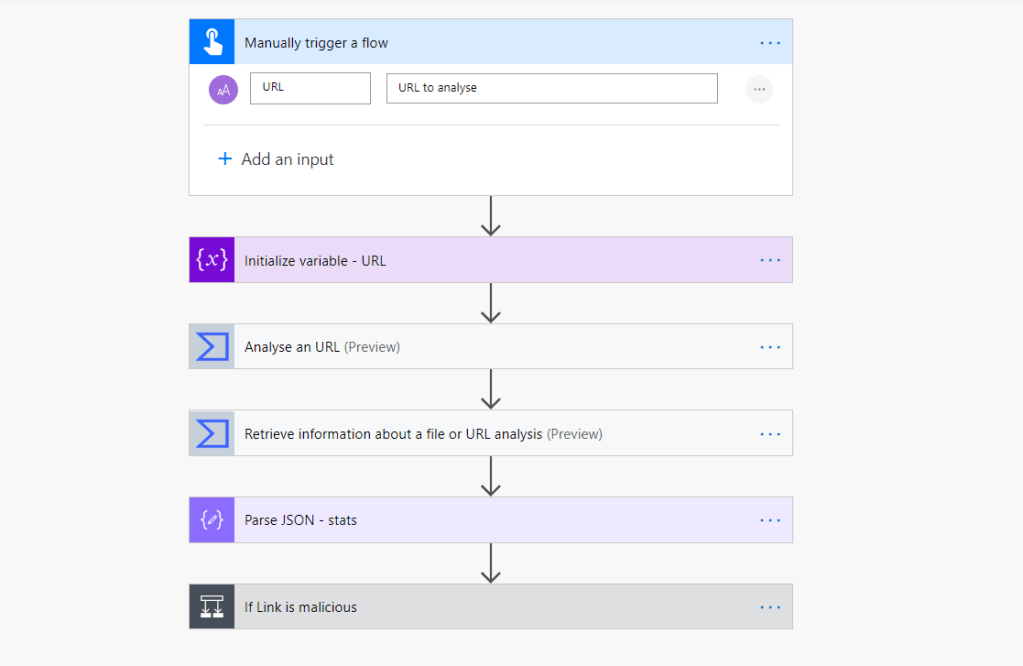
I will be using a Button trigger, and a Variable to store the URL I want to analyze but I will go through some use cases at the end of this blog of how this can be implemented.
There are two main actions in the Virus Total connector I will be using: – Analyse an URL – Retrieve information about a file or URL analysis
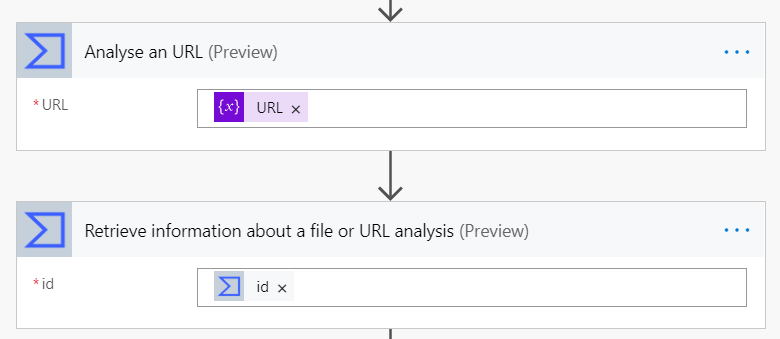
I am using a string variable to store the URL. Now we use the Virus total action called: Analyse an URL. This action only needs one input, the URL we want to analyse. This action outputs the ‘id’ for the analysis. We can use this ‘id’ in our next action.
Now we add the second Virus Total action called: Retrieve information about a file or URL analysis. This action wants the ‘id’ from the first step.
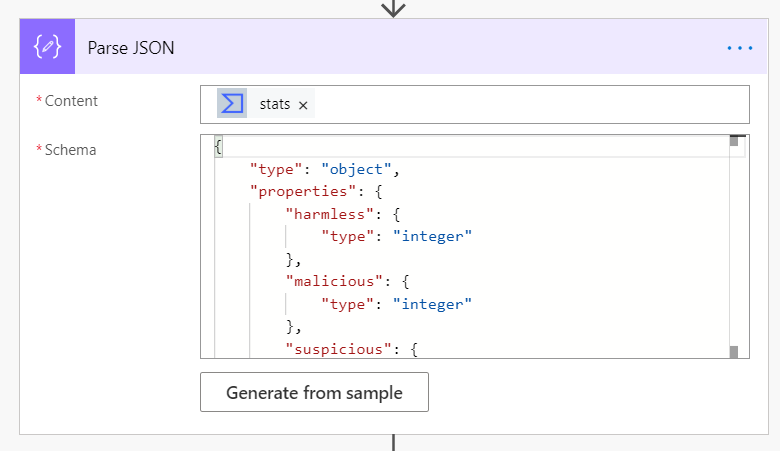
From here we get a bunch of cool dynamic content for the stats of this URL.. But for this demo, I will use the ‘stats’ dynamic content, this is a JSON object so I will add a Parse JSON action. To get the schema, you can either copy my schema, or use {} inside your schema, and run the flow, than copy the outputs to ‘Generate from sample’
From parsing the ‘stats’ object, I am able to check if the URL has any harmless, malicious, suspicious, or undetected reports. This information can be very useful.
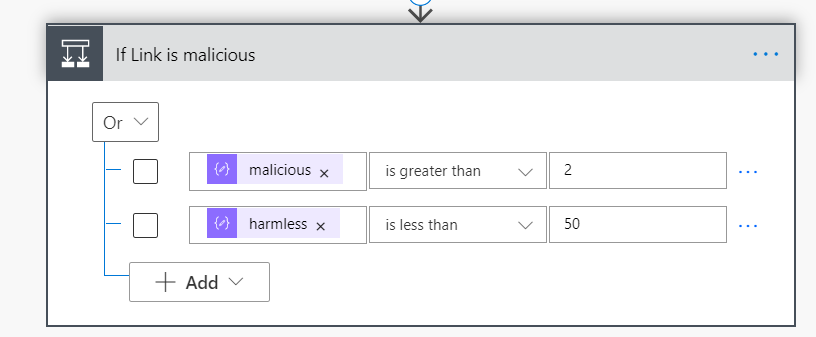
Now I can add a If condition and control what kind of sites I want to classify as harmful or malicious. Here is my condition:
If URL has 3 or more report engines pick up the URL as Malicious, OR if the report has less than 50 harmless reports. That I am classifying this URL as BAD
Use Cases / Conclusion
I have only scratched the surface with Virus Total in this blog. I am sure lots of people can find a great use out of this. A great example of how this can be used: Have users send files or URLS, which can get analyzed, to help with cyber security. Could trigger by: – Flow bot in Teams – Have a flow monitor a certain email, which can parse the body for URLS, and check for attachments