Many Power Automate users encounter issues with the dateDifference() function when calculating the difference between two dates. The problem arises when the output format varies depending on the duration, causing errors in extracting Days, Hours, Minutes, and Seconds.
This blog provides a robust and easy-to-implement solution that works seamlessly in all scenarios, including durations less than a day. Learn how to use a single expression with conditional logic to avoid these common pitfalls and ensure your date calculations are accurate every time. This is your ultimate fix for handling dateDifference() errors!

The Flow
- Compose action: named StartDate =
2024-12-10T15:58:28 - Compose action: named EndDate =
2024-12-10T19:22:20 - Compose action: uses dateDifference() expression. see below
Below is the expression used in the ‘Date Difference’ compose action. It dynamically handles all scenarios—when days are included and when they are not (same with hours and minutes).
dateDifference expression
Create a compose action for StartDate and EndDate
if(
   contains(
     dateDifference(outputs('StartDate'), outputs('EndDate')),
     '.'
   ),
   json(
     concat(
       '{"Days":', string(int(split(dateDifference(outputs('StartDate'), outputs('EndDate')), '.')[0])),
       ',"Hours":', string(int(split(split(dateDifference(outputs('StartDate'), outputs('EndDate')), '.')[1], ':')[0])),
       ',"Minutes":', string(int(split(split(dateDifference(outputs('StartDate'), outputs('EndDate')), '.')[1], ':')[1])),
       ',"Seconds":', string(int(split(split(dateDifference(outputs('StartDate'), outputs('EndDate')), '.')[1], ':')[2])),
       '}'
     )
   ),
   json(
     concat(
       '{"Days":0',
       ',"Hours":', string(int(split(dateDifference(outputs('StartDate'), outputs('EndDate')), ':')[0])),
       ',"Minutes":', string(int(split(dateDifference(outputs('StartDate'), outputs('EndDate')), ':')[1])),
       ',"Seconds":', string(int(split(dateDifference(outputs('StartDate'), outputs('EndDate')), ':')[2])),
       '}'
     )
   )
)
How it works
- The
if()function checks if thedateDifference()result contains a.(dot). - If it does, it means the result has a days component (e.g.,
1268.04:15:30), so we parse out Days, Hours, Minutes, and Seconds accordingly. - If it does not, it means the result is less than a day (e.g.,
12:57:47.2544602), so we treat Days as 0 and parse Hours, Minutes, and Seconds directly from the string.
Result:
This will produce a JSON object like:{
"Days": 1268,
"Hours": 4,
"Minutes": 15,
"Seconds": 30
}
Or{
"Days": 0,
"Hours": 12,
"Minutes": 57,
"Seconds": 47
}
Steps to Access Each Value
If you use the fixed expression directly in a Compose action (e.g., named Date_Difference), you can reference the fields like this:
- Days:
outputs('Date_Difference')?['Days'] - Hours:
outputs('Date_Difference')?['Hours'] - Minutes:
outputs('Date_Difference')?['Minutes'] - Seconds:
outputs('Date_Difference')?['Seconds']
Use these expressions in subsequent actions (like another Compose, a Condition, or Apply to Each) to reference the specific values.

Download my Flow
You can easily copy and paste actions in Power Automate. Allowing you to copy and paste my example.
Classic designer
Step 1: Copy the code snippet
{"id":"b6b531e2-b7b5-4a9e-86bd-7e2a069529a0","brandColor":"#8C3900","connectionReferences":{},"connectorDisplayName":"Control","icon":"data:image/svg+xml;base64,PHN2ZyB3aWR0aD0iMzIiIGhlaWdodD0iMzIiIHZlcnNpb249IjEuMSIgdmlld0JveD0iMCAwIDMyIDMyIiB4bWxucz0iaHR0cDovL3d3dy53My5vcmcvMjAwMC9zdmciPg0KIDxwYXRoIGQ9Im0wIDBoMzJ2MzJoLTMyeiIgZmlsbD0iIzhDMzkwMCIvPg0KIDxwYXRoIGQ9Im04IDEwaDE2djEyaC0xNnptMTUgMTF2LTEwaC0xNHYxMHptLTItOHY2aC0xMHYtNnptLTEgNXYtNGgtOHY0eiIgZmlsbD0iI2ZmZiIvPg0KPC9zdmc+DQo=","isTrigger":false,"operationName":"Get_date_difference_object","operationDefinition":{"type":"Scope","actions":{"StartDate":{"type":"Compose","inputs":"2024-12-10T15:58:28","runAfter":{}},"EndDate":{"type":"Compose","inputs":"2024-12-10T19:22:20","runAfter":{"StartDate":["Succeeded"]}},"Date_Difference":{"type":"Compose","inputs":"@if(\r\n contains(\r\n dateDifference(outputs('StartDate'), outputs('EndDate')), \r\n '.'\r\n ),\r\n json(\r\n concat(\r\n '{\"Days\":', string(int(split(dateDifference(outputs('StartDate'), outputs('EndDate')), '.')[0])),\r\n ',\"Hours\":', string(int(split(split(dateDifference(outputs('StartDate'), outputs('EndDate')), '.')[1], ':')[0])),\r\n ',\"Minutes\":', string(int(split(split(dateDifference(outputs('StartDate'), outputs('EndDate')), '.')[1], ':')[1])),\r\n ',\"Seconds\":', string(int(split(split(dateDifference(outputs('StartDate'), outputs('EndDate')), '.')[1], ':')[2])),\r\n '}'\r\n )\r\n ),\r\n json(\r\n concat(\r\n '{\"Days\":0',\r\n ',\"Hours\":', string(int(split(dateDifference(outputs('StartDate'), outputs('EndDate')), ':')[0])),\r\n ',\"Minutes\":', string(int(split(dateDifference(outputs('StartDate'), outputs('EndDate')), ':')[1])),\r\n ',\"Seconds\":', string(int(split(dateDifference(outputs('StartDate'), outputs('EndDate')), ':')[2])),\r\n '}'\r\n )\r\n )\r\n)","runAfter":{"EndDate":["Succeeded"]},"metadata":{"operationMetadataId":"03c8d578-576a-41a3-8d63-609a15ce594b"}}},"runAfter":{"Add_to_time":["Succeeded"]}}}Step 2: In Power Automate when adding a new action click My clipboard .
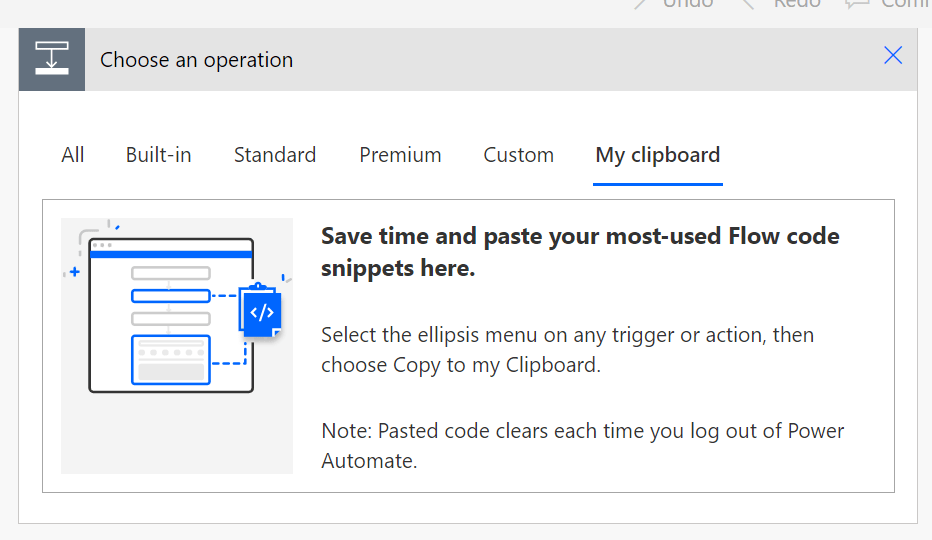
Step 3: Ctrl + V

New designer
Step 1: Copy the code snippet
{"nodeId":"Get_date_difference_object-copy","serializedOperation":{"type":"Scope","actions":{"StartDate":{"type":"Compose","inputs":"2024-12-10T15:58:28"},"EndDate":{"type":"Compose","inputs":"2024-12-10T19:22:20","runAfter":{"StartDate":["Succeeded"]}},"Date_Difference":{"type":"Compose","inputs":"@if(\r\n contains(\r\n dateDifference(outputs('StartDate'), outputs('EndDate')), \r\n '.'\r\n ),\r\n json(\r\n concat(\r\n '{\"Days\":', string(int(split(dateDifference(outputs('StartDate'), outputs('EndDate')), '.')[0])),\r\n ',\"Hours\":', string(int(split(split(dateDifference(outputs('StartDate'), outputs('EndDate')), '.')[1], ':')[0])),\r\n ',\"Minutes\":', string(int(split(split(dateDifference(outputs('StartDate'), outputs('EndDate')), '.')[1], ':')[1])),\r\n ',\"Seconds\":', string(int(split(split(dateDifference(outputs('StartDate'), outputs('EndDate')), '.')[1], ':')[2])),\r\n '}'\r\n )\r\n ),\r\n json(\r\n concat(\r\n '{\"Days\":0',\r\n ',\"Hours\":', string(int(split(dateDifference(outputs('StartDate'), outputs('EndDate')), ':')[0])),\r\n ',\"Minutes\":', string(int(split(dateDifference(outputs('StartDate'), outputs('EndDate')), ':')[1])),\r\n ',\"Seconds\":', string(int(split(dateDifference(outputs('StartDate'), outputs('EndDate')), ':')[2])),\r\n '}'\r\n )\r\n )\r\n)","runAfter":{"EndDate":["Succeeded"]},"metadata":{"operationMetadataId":"03c8d578-576a-41a3-8d63-609a15ce594b"}}},"runAfter":{"Add_to_time":["Succeeded"]}},"allConnectionData":{},"staticResults":{},"isScopeNode":true,"mslaNode":true}Step 2: In Power Automate click the + to add an action. Click Paste an action

Conclusion
That’s it! pretty easy right? if you encounter any issues, comment below!