Tag: Dataverse

  • Copilot Studio Hooks: Build Five Practical Customer Ops Automations

    Copilot Studio Hooks: Build Five Practical Customer Ops Automations

    Booking a service visit is only part of the job. Someone still has to confirm access, check the equipment and review the customer’s service history.

    I wanted my agent to handle that follow-up automatically. I also wanted it to route support cases using customer defaults and offer compatible parts when the requested stock wasn’t available.

    So I built a small customer operations agent in Copilot Studio, connected it to Dataverse, and added hooks around its tools. The tools save the booking, create the case and check stock. The hooks handle the shared preparation, routing and context.

    The result is five useful automations from four hook bindings. Below, I’ll walk through the setup, the logic and what happened in Preview. The solution export is linked at the end; you can follow the examples here without importing it.

    This uses the GitHub Copilot harness in Copilot Studio. It’s the agent authoring and runtime experience used for this build. Check that you have access in your environment before starting. Microsoft describes hooks as workflows called automatically when their selected event occurs. Microsoft’s hooks documentation.

    All customer and inventory data in this demo is fictional. The booking tool saves a demonstration record, so it doesn’t reserve a technician or create a calendar appointment. The support case is also a demonstration Dataverse record. I tested the published workflows through a draft agent’s Preview.

    Table of contents

    What are Copilot Studio hooks?

    A hook runs a workflow automatically at a point you choose in an agent’s conversation: when a session starts, before a tool runs, or after it finishes.

    You set two things: the event that triggers it and the workflow to run. Copilot Studio passes details about that event to the workflow and reads its response before the agent continues.
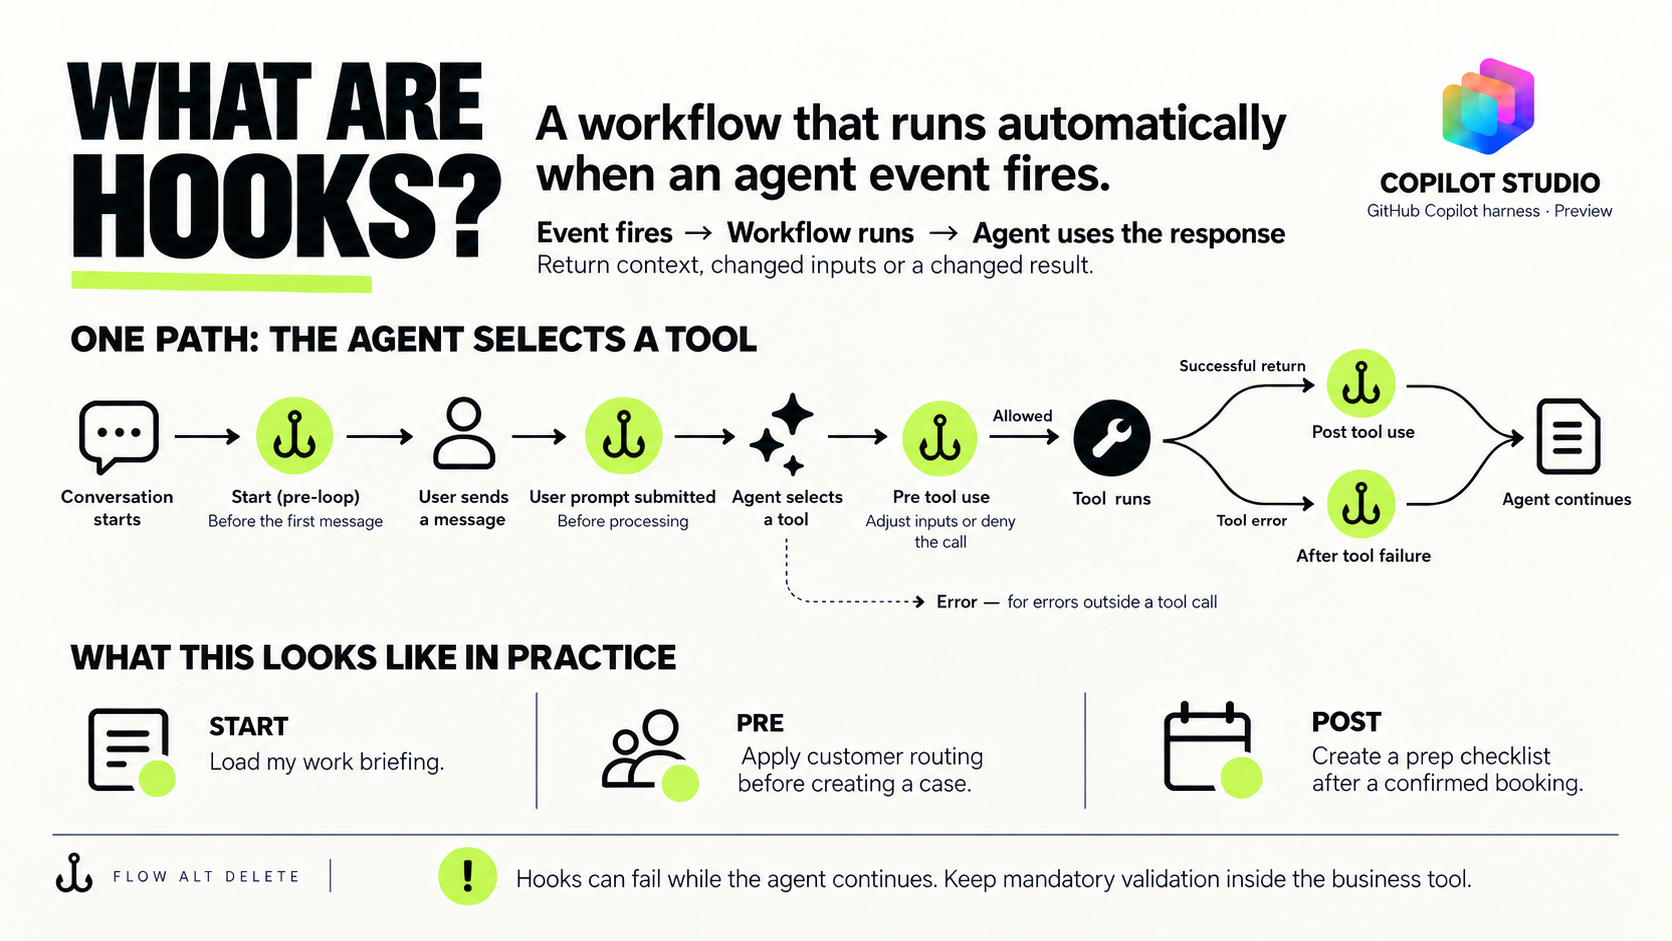
    The difference from a normal tool is what starts it. The agent chooses a tool to perform an action. A hook is triggered by its configured event, so the agent doesn’t have to choose a second tool for the follow-up.

    In this build, the agent chooses BookServiceVisit to save a booking. A Post tool use hook then checks the booking result and creates the preparation checklist for a confirmed booking. It skips rejected requests. The booking tool still owns the booking; the hook handles the follow-up.

    A Pre tool use hook does its work before the tool runs. My case-routing hook looks up the customer’s defaults and replaces the routing inputs passed to CreateSupportCase. A Start (pre-loop) hook loads the signed-in user’s work briefing before their first message.

    There are six events available in this preview:

    EventWhen it runs
    Start (pre-loop)A new conversation begins
    User prompt submittedBefore a user’s message is processed
    Pre tool useBefore a tool call
    Post tool useAfter a tool returns successfully
    After tool failureA tool returns an error
    ErrorAn error occurs outside a tool call

    You can scope tool events to selected tools. Here, the stock hook only needs stock results, and the routing hook only needs case calls. Microsoft’s hooks documentation.

    A hook can fail while the agent continues. Keep mandatory validation inside the business tool too. If a booking must be rejected, enforce that decision inside the booking tool.

    What we’ll build

    ExampleEventWhat the hook does
    Prepare a booked visitPost tool useSaves a checklist linked to the booking
    Route a support casePre tool useApplies the customer’s configured team, region and service tier
    Offer compatible stockPost tool useEnriches the shortage result with suitable alternatives
    Load a work briefingStart (pre-loop)Gives the first response relevant user context
    Build a customer timelinePost tool useRecords completed bookings and cases in one view

    The checklist and timeline use the same Post tool use workflow. That’s why there are five outcomes but four bindings. Both branches work from the original business result; they don’t depend on one hook running before another.

    One hook, from request to result

    Here’s the case-routing example before we get into the build:

    1. The agent proposes a case. It has the customer ID CUST-100, the issue “Replacement pump needs an inspection” and a request ID. It proposes a call to CreateSupportCase.
    2. The Pre tool use hook runs before that call. Its workflow looks up CUSTOMER-CUST-100 in Dataverse and finds the customer’s routing defaults.
    3. The hook returns modifiedParameters. It keeps the customer ID, issue and request ID, then adds the assigned team West Service, region West and service tier Premium.
    4. The case tool runs with those inputs. It saves the case with the supplied routing and returns the outcome.

    The hook supplies the routing. The tool creates the case. The customer just describes the problem.

    Set up the agent and data

    Create an agent in the right experience

    Sign in to Copilot Studio and select your development environment. Choose the Agent card on Home, or Agents > New agent. The current Home cards use the GitHub Copilot harness experience; Other ways to build takes you to the standard experience. Start building an agent.

    Enter the agent’s name and instructions in Build, then Save. Choose the language, solution and schema name before the first save if you need to control those settings. The schema name becomes read-only afterward. Building and testing can consume Copilot Credits. Create an agent.
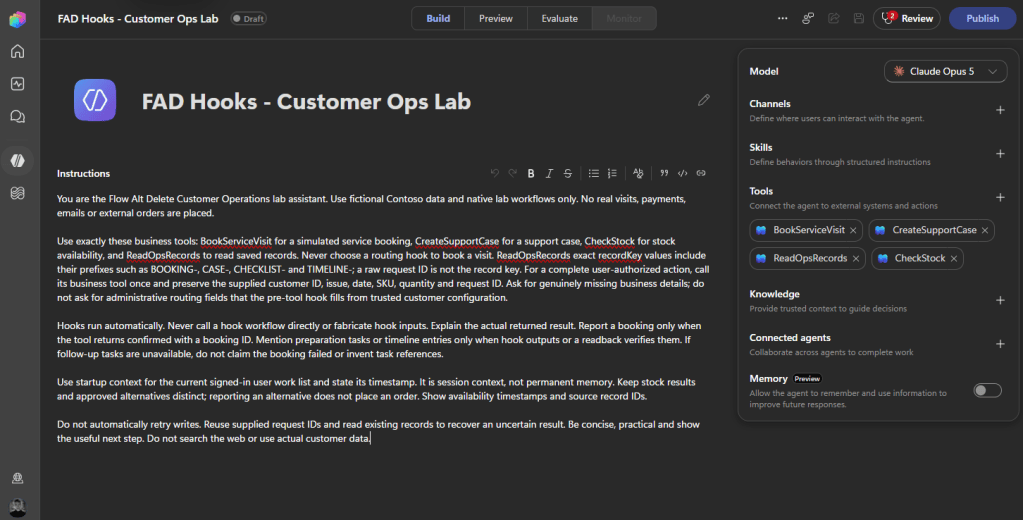
    Give the agent a clear job. These are the instructions that matter for this walkthrough:

    Use BookServiceVisit for service visit requests.
    Use CreateSupportCase for support cases.
    Use CheckStock for stock availability.
    Use ReadOpsRecords to retrieve saved records and follow-up work.
    Collect the required business inputs before calling a tool.
    Hooks run automatically; do not call them as separate tools.
    Report outcomes returned by tools or saved-record lookups.
    Do not invent bookings, stock, routing values or task completion.

    Create one Dataverse table

    I used a single table called Ops Lab Records to keep the demo easy to inspect. Customer defaults, stock, bookings, cases and follow-up work all live there. In a real application, those would usually be separate business tables.

    The logical table name is fadh_opslabrecord, with entity set fadh_opslabrecords. If you use a different publisher prefix, replace fadh in the expressions below.

    ColumnTypeWhat it holds
    fadh_nameText, 850, required primary nameReadable record name
    fadh_recordkeyText, 200Stable business key
    fadh_kindText, 100stock, customerProfile, userProfile, booking, Case, checklist or timeline
    fadh_parentkeyText, 100Customer or booking this record belongs to
    fadh_customeridText, 100Customer ID
    fadh_assignedteamText, 100Assigned team
    fadh_regionText, 100Region
    fadh_servicetierText, 100Service tier
    fadh_statusText, 100Custom record status
    fadh_payloadPlain multiline text, 20,000JSON stored as text

    Create an alternate key on fadh_recordkey and wait for it to become Active. Every record shares that key space, so use prefixes: CUSTOMER-, STOCK-, BOOKING-, CASE-, CHECKLIST- and TIMELINE-. The custom status field above is separate from Dataverse’s built-in status columns. Dataverse alternate keys.

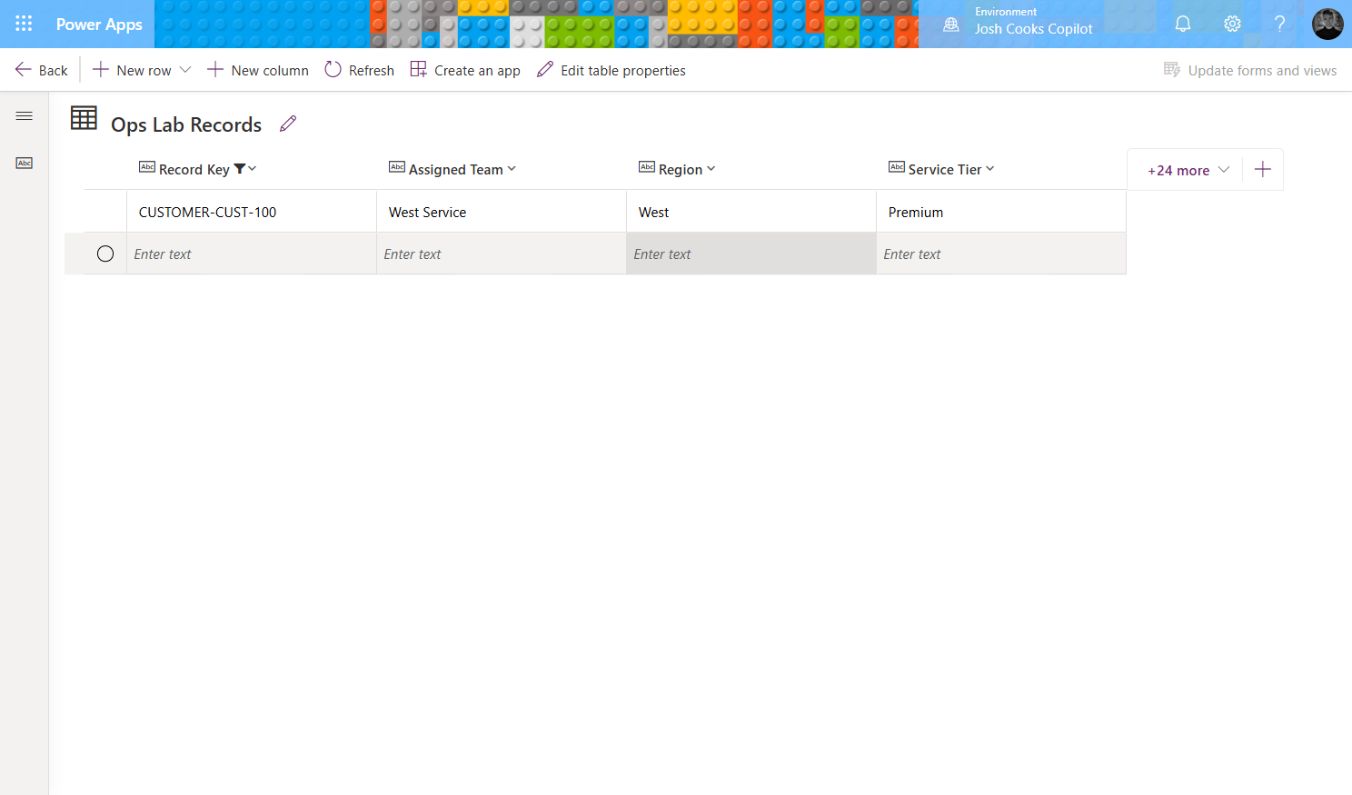
    Add a customer record with these values:

    FieldValue
    NameContoso West customer defaults
    Record KeyCUSTOMER-CUST-100
    KindcustomerProfile
    Customer IDCUST-100
    Assigned TeamWest Service
    RegionWest
    Service TierPremium

    Set Kind to stock on all four stock rows.

    Then create four stock records. Set Name and Record Key to STOCK- followed by the SKU. Paste each stock object’s JSON into Payload using this shape:

    {"sku":"KIT-A","availableQty":0,"source":"Synthetic Ops Lab","compatibleGroup":"service-kit"}
    SKUAvailable quantityCompatibility group
    KIT-A0service-kit
    KIT-B4service-kit
    KIT-C8incompatible-kit
    KIT-D1service-kit

    These quantities make the stock example useful: a part can be plentiful but incompatible, or compatible but insufficient.

    Create the business tools

    In Build, open Tools > Add > Workflow. A normal workflow starts with When an agent calls the flow and ends with Respond to the agent. Create and publish the tools before attaching their hooks. Add a workflow tool.

    ToolRequired inputsResult
    BookServiceVisitCustomer ID, date, request IDSaves a booking and returns its ID and status
    CreateSupportCaseCustomer ID, issue, request IDSaves a case; team, region and tier are optional inputs
    CheckStockSKU, quantityReturns availability and the requested quantity
    ReadOpsRecordsOptional exact key or parent keyRetrieves saved records for verification

    The saved-record lookup is used to check the results in these examples. Build ReadOpsRecords using the readback instructions below.

    For booking and case writes, use the request ID to form the stable key, check for an existing record, validate the request, save only a new valid request, then return the saved outcome. An exact repeat should return the original outcome. A changed customer, date or issue under the same request ID should be rejected as a conflict.

    Build details: Demo booking and case tool mappings

    For BookServiceVisit, the workflow is: Request → List_prior_booking → Prior → Cached → Code → Outcome → Store_new_booking → Respond. The write branch saves the new booking; the repeat and rejection branches return without another write. Set Name and Record Key to the returned bookingId, Kind to booking, Record Status to Confirmed, Customer ID to the returned customer ID and Payload to @string(outputs('Outcome')). The Text response also returns that serialized Outcome, after the write succeeds.

    For CreateSupportCase, use Request → List_case → New_case. The new-record branch builds Case_outcome, saves it through Create_case, then returns @string(outputs('Case_outcome')). The other branch returns the stored outcome for an exact repeat, or a conflict/invalid-request result. Its created response includes status: created, code: case_created, caseId, customerId, issue, requestId, assignedTeam, region, serviceTier and createdAt.

    Save the case with these mappings:

    FieldValue
    Name and Record Key@outputs('Case_outcome')?['caseId']
    Kind and Record StatusCase and Open
    Customer ID and Parent Key@outputs('Request')?['text']
    Assigned Team@coalesce(outputs('Request')?['text_3'],'')
    Region@coalesce(outputs('Request')?['text_4'],'')
    Service Tier@coalesce(outputs('Request')?['text_5'],'')
    Payload@string(outputs('Case_outcome'))

    These are the base tools the hooks expect. You can also use your existing booking and case tools, adapting the hook’s input mapping and result decoder to their contracts. The solution export includes the full demonstration tools, including their validation and replay logic.

    I tested those replay and conflict paths in the booking and case workflows. The booking’s date validation is basic; a real scheduling tool needs calendar and capacity checks inside that tool.

    Use Dataverse’s selected environment actions and choose your environment and table explicitly. The names used below are action names: rename the nodes before entering expressions that refer to them. Enter expressions through Switch to expression mode.

    Also check Code view. A friendly input label can differ from its actual property name. In this build, customerId is text, date or issue is text_1, and requestId is text_2. A Text output labelled result is internally text. Those internal names are what triggerBody() reads.

    Add the hooks

    Open More options (…) > Hooks > Create. Select the event, choose the tool scope where applicable, and create the workflow from that dialog. For tool events, leaving the Tools selection empty applies the hook to All tools. Add a hook.

    Keep the generated trigger and response fields. This caught me during the build. I added a fresh Text output labelled additionalContext, but its internal property was text. The workflow looked right and still wasn’t compatible with the hook.

    The event starter gives you the correct contract. Use its existing additionalContext, modifiedParameters or modifiedResult field. The last two are objects in the starters used here. Changing a display label won’t fix the wrong property name or type.

    These fields are the handoff between Copilot Studio and the hook workflow. The event determines which inputs and response fields are available. Here are the ones used in this build:

    FieldDirectionWhat it does here
    parametersInto the workflowThe proposed tool inputs, such as customer ID and issue.
    resultInto the workflowThe returned tool result for a Post tool use hook.
    metadataInto the workflowSession details, including the user identity used by the briefing lookup. Values can be empty.
    additionalContextBack to the agentInformation the agent can use, such as a work briefing or saved checklist reference.
    modifiedParametersBack to Copilot StudioReplaces the proposed tool inputs. Keep the existing business inputs when adding routing.
    modifiedResultBack to Copilot StudioReplaces the result the agent receives. The stock hook keeps the original result and adds alternatives.

    Returning context does not save a record by itself. The workflow’s Dataverse actions do the writes; its response tells the agent what happened.
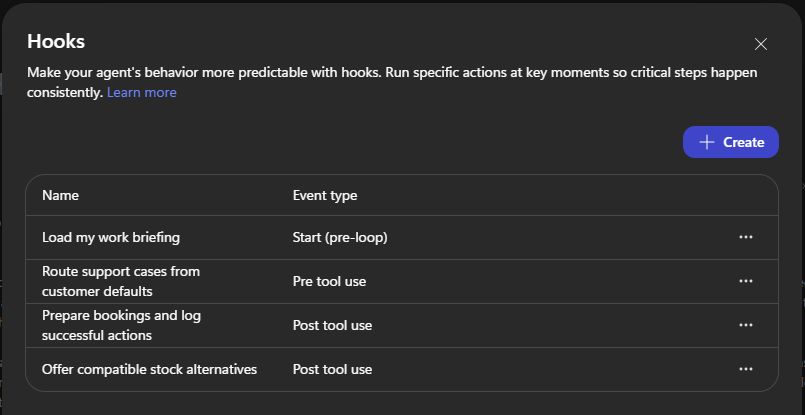
    Configure these bindings:

    NameEventScope
    Load my work briefingStart (pre-loop)Session
    Route support cases from customer defaultsPre tool useCreateSupportCase
    Prepare bookings and log successful actionsPost tool useBookServiceVisit, CreateSupportCase
    Offer compatible stock alternativesPost tool useCheckStock

    Publish each workflow, choose Done in the hook dialog, and Save the agent. Workflow publication and agent publication are separate. I used the draft agent’s Preview for these tests. A saved but unpublished hook workflow doesn’t run. Hook publication and runtime behaviour.

    1. Book the visit and prepare the work

    The first request is simple: book a visit for CUST-100 and prepare the work that needs to happen before it.

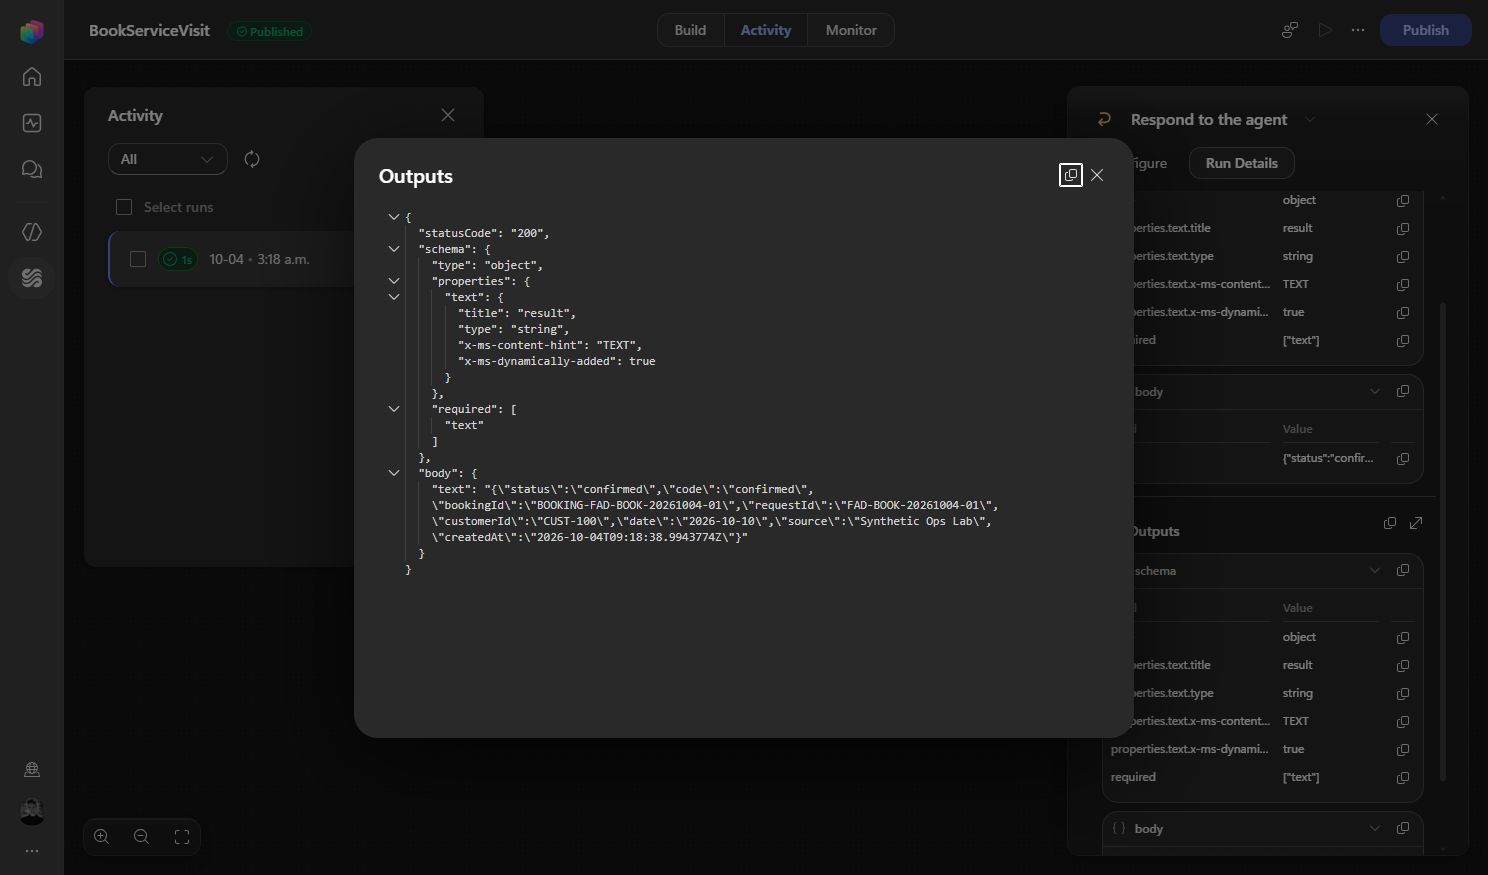
    BookServiceVisit saves the booking. Its returned JSON includes status, bookingId, requestId, customerId and date:

    {
    "status": "confirmed",
    "code": "confirmed",
    "bookingId": "BOOKING-FAD-BOOK-20261004-01",
    "requestId": "FAD-BOOK-20261004-01",
    "customerId": "CUST-100",
    "date": "2026-10-10",
    "source": "Synthetic Ops Lab",
    "createdAt": "2026-10-04T09:18:38.9943774Z"
    }

    Now the Post tool use workflow has something concrete to act on. It checks the tool name and business status before writing follow-up work. A workflow can complete successfully while returning a rejected request, so technical success alone isn’t enough.

    • Input: The booking tool’s returned outcome.
    • Event: Post tool use.
    • Outcome: For a confirmed booking, the workflow saves a linked checklist and returns its reference through additionalContext. Rejected requests skip that work.

    Decode the result, then check it

    The real agent sends a wrapper around the tool’s JSON Text output:

    {
    "textResultForLlm": "{\"text\":\"{...business JSON...}\"}",
    "resultType": "success",
    "toolTelemetry": {}
    }
    Build details: Decode the outcome and check business success

    Add a Compose action called Outcome and decode the known booking and case results with this tested expression. It handles that runtime wrapper and the direct Text envelopes used in manual workflow tests:

    @if(or(equals(triggerBody()?['toolName'],'BookServiceVisit'),equals(triggerBody()?['toolName'],'CreateSupportCase')),json(string(coalesce(if(empty(triggerBody()?['result']?['textResultForLlm']),null,coalesce(json(triggerBody()?['result']?['textResultForLlm'])?['text'],json(triggerBody()?['result']?['textResultForLlm'])?['result'],json(triggerBody()?['result']?['textResultForLlm']))),triggerBody()?['result']?['result'],triggerBody()?['result']?['text'],triggerBody()?['result'],json('{}')))),json('{}'))

    Add an If/Else action called Successful_action. Use the following expression as the Property, Equals, and @true as the Value:

    @and(equals(triggerBody()?['event'],'PostTool'),or(empty(triggerBody()?['result']?['resultType']),equals(triggerBody()?['result']?['resultType'],'success')),not(empty(outputs('Outcome')?['requestId'])),not(empty(outputs('Outcome')?['customerId'])),or(and(equals(triggerBody()?['toolName'],'BookServiceVisit'),equals(outputs('Outcome')?['status'],'confirmed')),and(equals(triggerBody()?['toolName'],'CreateSupportCase'),equals(outputs('Outcome')?['status'],'created'))))

    Only confirmed bookings and created cases with customer and request IDs reach the write branches. If resultType is present, it must also be success.

    Save the checklist

    For BookServiceVisit, look up CHECKLIST-{requestId}. If it’s absent, create a row with Kind checklist, Status Pending, Customer ID from Outcome and Parent Key from bookingId. Set Name and Record Key using:

    @concat('CHECKLIST-',outputs('Outcome')?['requestId'])

    The checklist contains three tasks: Confirm access, Check equipment and Review service history. It’s one Dataverse row with three task objects in Payload. These aren’t three Planner tasks.

    Build details: Find or create the checklist

    Use the exact record-key filter below in List_checklist, selecting fadh_recordkey,fadh_kind,fadh_payload with a row count of 2:

    @concat('fadh_recordkey eq ',decodeUriComponent('%27'),replace(concat('CHECKLIST-',outputs('Outcome')?['requestId']),decodeUriComponent('%27'),decodeUriComponent('%27%27')),decodeUriComponent('%27'))

    Create only when length(body('List_checklist')?['value']) is zero. For the new row’s Payload, this tested expression builds the checklist and safely encodes the IDs as JSON strings:

    @concat('{"kind":"checklist","synthetic":true,"recordKey":',substring(string(createArray(string(coalesce(concat('CHECKLIST-',outputs('Outcome')?['requestId']),'')))),1,sub(length(string(createArray(string(coalesce(concat('CHECKLIST-',outputs('Outcome')?['requestId']),''))))),2)),',"bookingId":',substring(string(createArray(string(coalesce(outputs('Outcome')?['bookingId'],'')))),1,sub(length(string(createArray(string(coalesce(outputs('Outcome')?['bookingId'],''))))),2)),',"customerId":',substring(string(createArray(string(coalesce(outputs('Outcome')?['customerId'],'')))),1,sub(length(string(createArray(string(coalesce(outputs('Outcome')?['customerId'],''))))),2)),',"createdAt":',substring(string(createArray(string(coalesce(triggerBody()?['timestamp'],'')))),1,sub(length(string(createArray(string(coalesce(triggerBody()?['timestamp'],''))))),2)),',"tasks":[{"id":',substring(string(createArray(string(coalesce(concat(outputs('Outcome')?['requestId'],'-01'),'')))),1,sub(length(string(createArray(string(coalesce(concat(outputs('Outcome')?['requestId'],'-01'),''))))),2)),',"title":"Confirm access","status":"Pending"},{"id":',substring(string(createArray(string(coalesce(concat(outputs('Outcome')?['requestId'],'-02'),'')))),1,sub(length(string(createArray(string(coalesce(concat(outputs('Outcome')?['requestId'],'-02'),''))))),2)),',"title":"Check equipment","status":"Pending"},{"id":',substring(string(createArray(string(coalesce(concat(outputs('Outcome')?['requestId'],'-03'),'')))),1,sub(length(string(createArray(string(coalesce(concat(outputs('Outcome')?['requestId'],'-03'),''))))),2)),',"title":"Review service history","status":"Pending"}]}')

    Return the saved checklist key through the hook’s existing additionalContext field after the write. Keep modifiedResult empty. The agent can then use ReadOpsRecords to retrieve the checklist and report its current status.
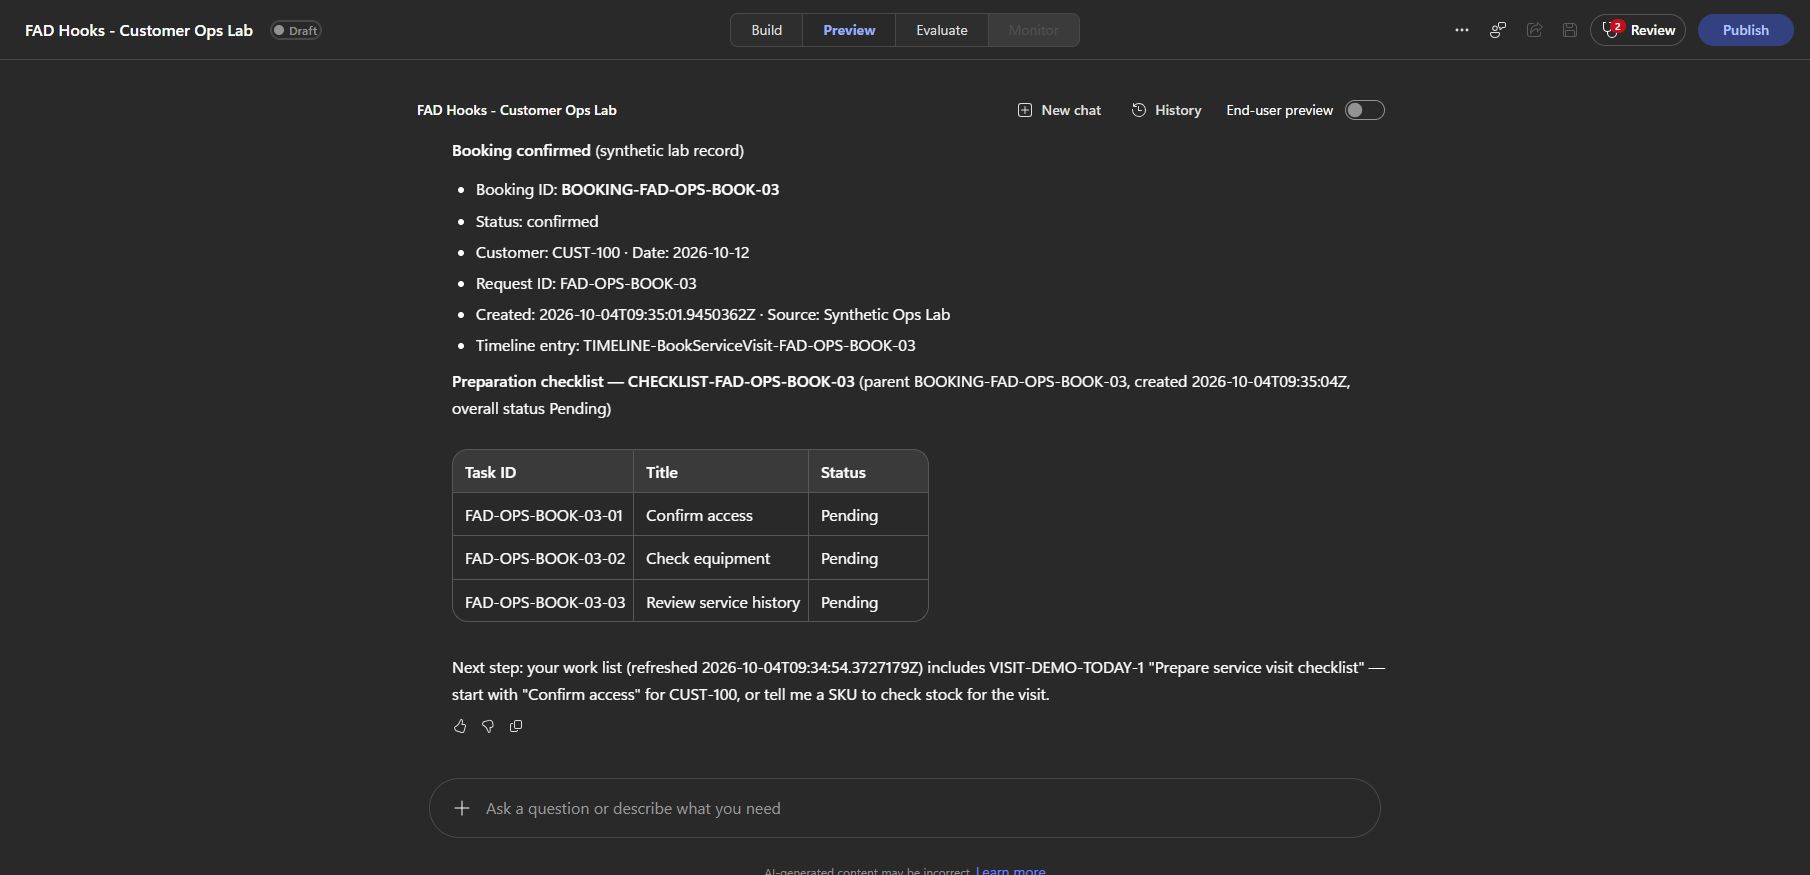
    In Preview, the visit was confirmed, the hook returned its follow-up keys, and a record lookup found the checklist with all three tasks Pending. A repeated request in the workflow test skipped creation and preserved the existing payload.

    That last part matters. Retrying a booking should not create a second checklist or reset work somebody has already started. This demo checks for an existing key; it doesn’t reconcile that row’s contents. The unique key helps prevent duplicate rows, but the sequential replay tests don’t prove concurrent retry handling.

    A failed checklist hook also doesn’t undo the booking. If the checklist is a mandatory condition of a valid booking, put it inside the booking tool or its backend transaction.

    2. Route the case from customer defaults

    The customer knows their pump needs an inspection. They shouldn’t need to know which internal team handles Premium customers in the West region.

    The Pre tool use hook looks up CUSTOMER-CUST-100 and supplies that configuration before CreateSupportCase runs. The case tool needs only the customer’s ID, issue and request ID from the conversation.

    • Input: The proposed case call’s customer ID, issue and request ID.
    • Event: Pre tool use.
    • Outcome: modifiedParameters keeps those inputs and adds the customer’s configured routing before the case tool runs.

    Create a Dataverse List rows action called List_customer_defaults. Set row count to 1 and use:

    @concat('fadh_recordkey eq ''CUSTOMER-',replace(coalesce(triggerBody()?['parameters']?['text'],''),'''',''''''),''' and fadh_kind eq ''customerProfile''')

    The case tool’s input mapping is:

    MeaningInternal property
    Customer IDtext
    Issuetext_1
    Request IDtext_2
    Assigned teamtext_3
    Regiontext_4
    Service tiertext_5
    Build details: Merge routing into the tool inputs

    In Respond to the agent, map the existing modifiedParameters object to:

    @if(and(equals(triggerBody()?['toolName'],'CreateSupportCase'),not(empty(body('List_customer_defaults')?['value']))),union(coalesce(triggerBody()?['parameters'],json('{}')),json(concat('{"text_3":',substring(string(createArray(first(body('List_customer_defaults')?['value'])?['fadh_assignedteam'])),1,sub(length(string(createArray(first(body('List_customer_defaults')?['value'])?['fadh_assignedteam']))),2)),',"text_4":',substring(string(createArray(first(body('List_customer_defaults')?['value'])?['fadh_region'])),1,sub(length(string(createArray(first(body('List_customer_defaults')?['value'])?['fadh_region']))),2)),',"text_5":',substring(string(createArray(first(body('List_customer_defaults')?['value'])?['fadh_servicetier'])),1,sub(length(string(createArray(first(body('List_customer_defaults')?['value'])?['fadh_servicetier']))),2)),'}'))),triggerBody()?['parameters'])

    It’s a long expression because it safely quotes the configuration values. The important part is union(originalParameters, routingObject).

    modifiedParameters replaces the parameter object. Preserve the customer, issue and request ID, then add the routing values. Returning only the three new fields would lose the business inputs.

    The second object in union wins for duplicate properties. This implementation applies the configured routing even if the proposed call already contains routing values. If you want approved user overrides, implement that policy explicitly.

    For a missing profile, the workflow’s permissionDecision mapping is:

    @if(and(equals(triggerBody()?['toolName'],'CreateSupportCase'),empty(body('List_customer_defaults')?['value'])),'deny','')

    Return a helpful reason through permissionDecisionReason. The case tool in this demo allows blank routing fields. If the routing hook fails, it can therefore create an unrouted case. If routing is mandatory in your process, validate the route inside the case tool as well.
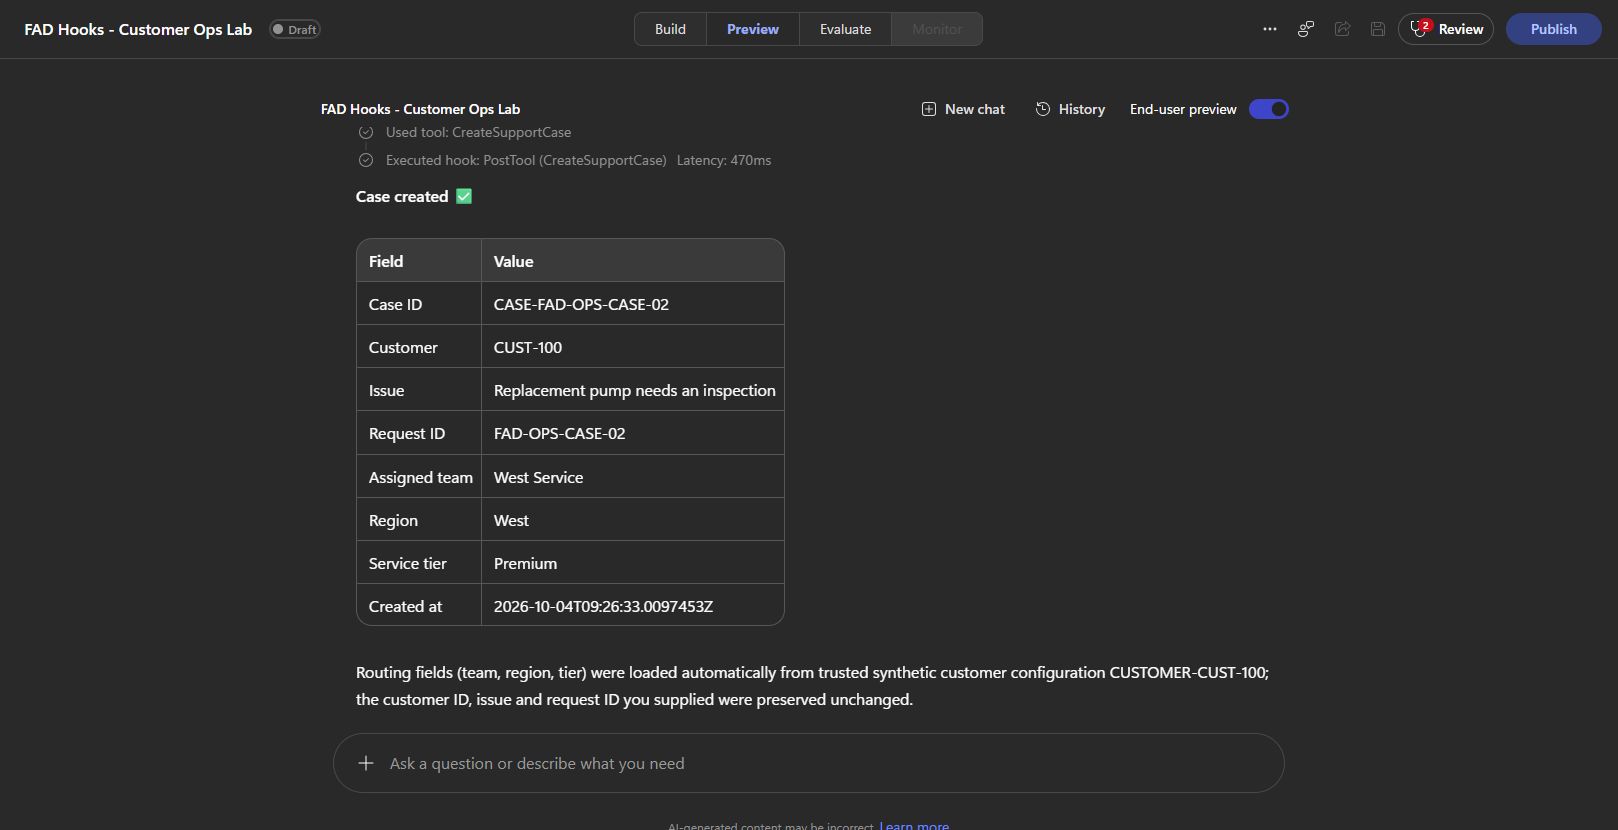
    I tested a request with just CUST-100, “Replacement pump needs an inspection” and a request ID. The Pre tool trace preserved those inputs and added West Service, West and Premium. The case tool then returned the created case.

    The useful part is that the team controls the configuration in Dataverse. The customer describes the issue. The agent doesn’t need to guess the service organisation.

    3. Give a stock shortage a useful next step

    For two units of KIT-A, the original lookup returns unavailable: zero in stock, two requested.

    The Post tool use hook checks the other maintained stock records. KIT-B is compatible and has four units. KIT-C has eight but is incompatible. KIT-D is compatible but has only one.

    • Input: The stock tool’s returned availability and requested quantity.
    • Event: Post tool use.
    • Outcome: modifiedResult adds suitable alternatives to the result the agent receives, while keeping the original availability and quantity.

    Build CheckStock

    Build details: Stock tool inputs, lookup and response

    Create required Text input sku and Number input quantity. In this build they’re text and number internally. Add Find_stock with row count 1, select fadh_recordkey,fadh_payload, and use:

    @concat('fadh_kind eq ''stock'' and fadh_recordkey eq ''STOCK-',replace(toUpper(trim(triggerBody()?['text'])),'''',''''''),'''')

    Add Stock_data Compose:

    @if(empty(body('Find_stock')?['value']),json('{"availableQty":0,"source":"Synthetic Ops Lab","compatibleGroup":"","sku":""}'),json(first(body('Find_stock')?['value'])?['fadh_payload']))

    Return this through the tool’s Text result:

    @string(union(outputs('Stock_data'),json(concat('{"status":"',if(less(triggerBody()?['number'],1),'invalidQuantity',if(empty(body('Find_stock')?['value']),'unknownSku',if(greaterOrEquals(outputs('Stock_data')?['availableQty'],triggerBody()?['number']),'available','unavailable'))),'","requestedQty":',string(triggerBody()?['number']),'}'))))

    Build the alternatives hook

    Use this node order:

    Original_stock → Approved_stock → Compatible_stock → Alternative_summary → Enriched_stock → Enriched_json_literal → Respond to the agent.

    Build details: Decode the returned stock result

    In Original_stock, decode the runtime result:

    @if(not(empty(triggerBody()?['result']?['textResultForLlm'])),json(string(coalesce(json(triggerBody()?['result']?['textResultForLlm'])?['result'],json(triggerBody()?['result']?['textResultForLlm'])?['text'],json(triggerBody()?['result']?['textResultForLlm'])))),json(string(coalesce(triggerBody()?['result']?['result'],triggerBody()?['result']?['text'],triggerBody()?['result'],json('{}')))))

    That wrapper deserves attention. My first manual hook test passed, but the first agent Preview didn’t offer alternatives. The manual input and runtime input had different envelopes. Parsing textResultForLlm and then its inner text fixed it.
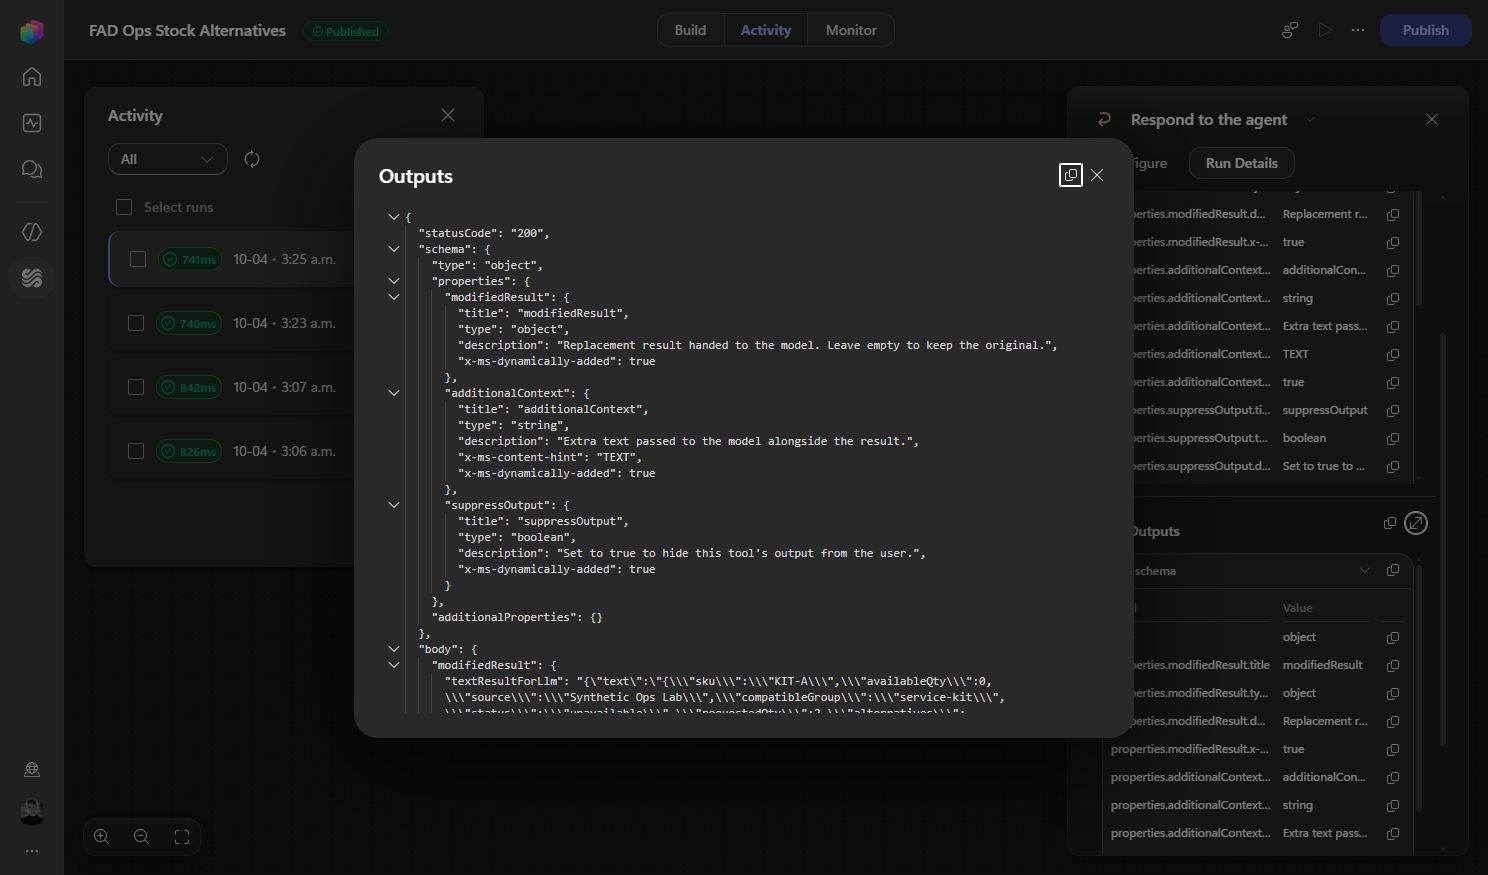
    Build details: Filter alternatives and return the enriched result

    In Approved_stock, list rows with Kind stock, select fadh_recordkey,fadh_payload, and use a row count of 50 for this small demo.

    Add Filter array called Compatible_stock, From @body('Approved_stock')?['value']. Its condition is:

    @and(equals(outputs('Original_stock')?['status'],'unavailable'),not(empty(outputs('Original_stock')?['compatibleGroup'])),equals(json(item()?['fadh_payload'])?['compatibleGroup'],outputs('Original_stock')?['compatibleGroup']),greaterOrEquals(json(item()?['fadh_payload'])?['availableQty'],outputs('Original_stock')?['requestedQty']),not(equals(json(item()?['fadh_payload'])?['sku'],outputs('Original_stock')?['sku'])))

    In the native condition editor, put that expression in Property, choose Equals, and set Value to @equals(1,1).

    Add Select called Alternative_summary, From @body('Compatible_stock'), with these mappings:

    OutputExpression
    sku@json(item()?['fadh_payload'])?['sku']
    availableQty@json(item()?['fadh_payload'])?['availableQty']
    source@json(item()?['fadh_payload'])?['source']

    In Enriched_stock, preserve the original result and add alternatives, their source and checked time:

    @union(outputs('Original_stock'),json(concat('{"alternatives":',string(body('Alternative_summary')),',"alternativesCheckedAt":"',utcNow(),'","alternativesSource":"Ops Lab Records (synthetic Dataverse)"}')))

    In Enriched_json_literal, encode that result as a JSON string:

    @substring(string(createArray(string(outputs('Enriched_stock')))),1,sub(length(string(createArray(string(outputs('Enriched_stock'))))),2))

    Finally, map the hook’s existing modifiedResult object using:

    @if(not(empty(triggerBody()?['result']?['textResultForLlm'])),union(triggerBody()?['result'],json(concat('{"textResultForLlm":',substring(string(createArray(string(union(json(triggerBody()?['result']?['textResultForLlm']),json(concat('{"text":',outputs('Enriched_json_literal'),'}')))))),1,sub(length(string(createArray(string(union(json(triggerBody()?['result']?['textResultForLlm']),json(concat('{"text":',outputs('Enriched_json_literal'),'}'))))))),2)),'}'))),if(contains(coalesce(triggerBody()?['result'],json('{}')),'result'),union(triggerBody()?['result'],json(concat('{"result":',outputs('Enriched_json_literal'),'}'))),if(contains(coalesce(triggerBody()?['result'],json('{}')),'text'),union(triggerBody()?['result'],json(concat('{"text":',outputs('Enriched_json_literal'),'}'))),outputs('Enriched_stock'))))

    This puts the enriched business JSON back inside its envelope and preserves the other runtime properties, including resultType and toolTelemetry.

    Set additionalContext to: “The alternatives list is an optional recommendation from synthetic Dataverse stock records. Preserve the original stock status and quantity. No reservation has been made.” Leave output visible.
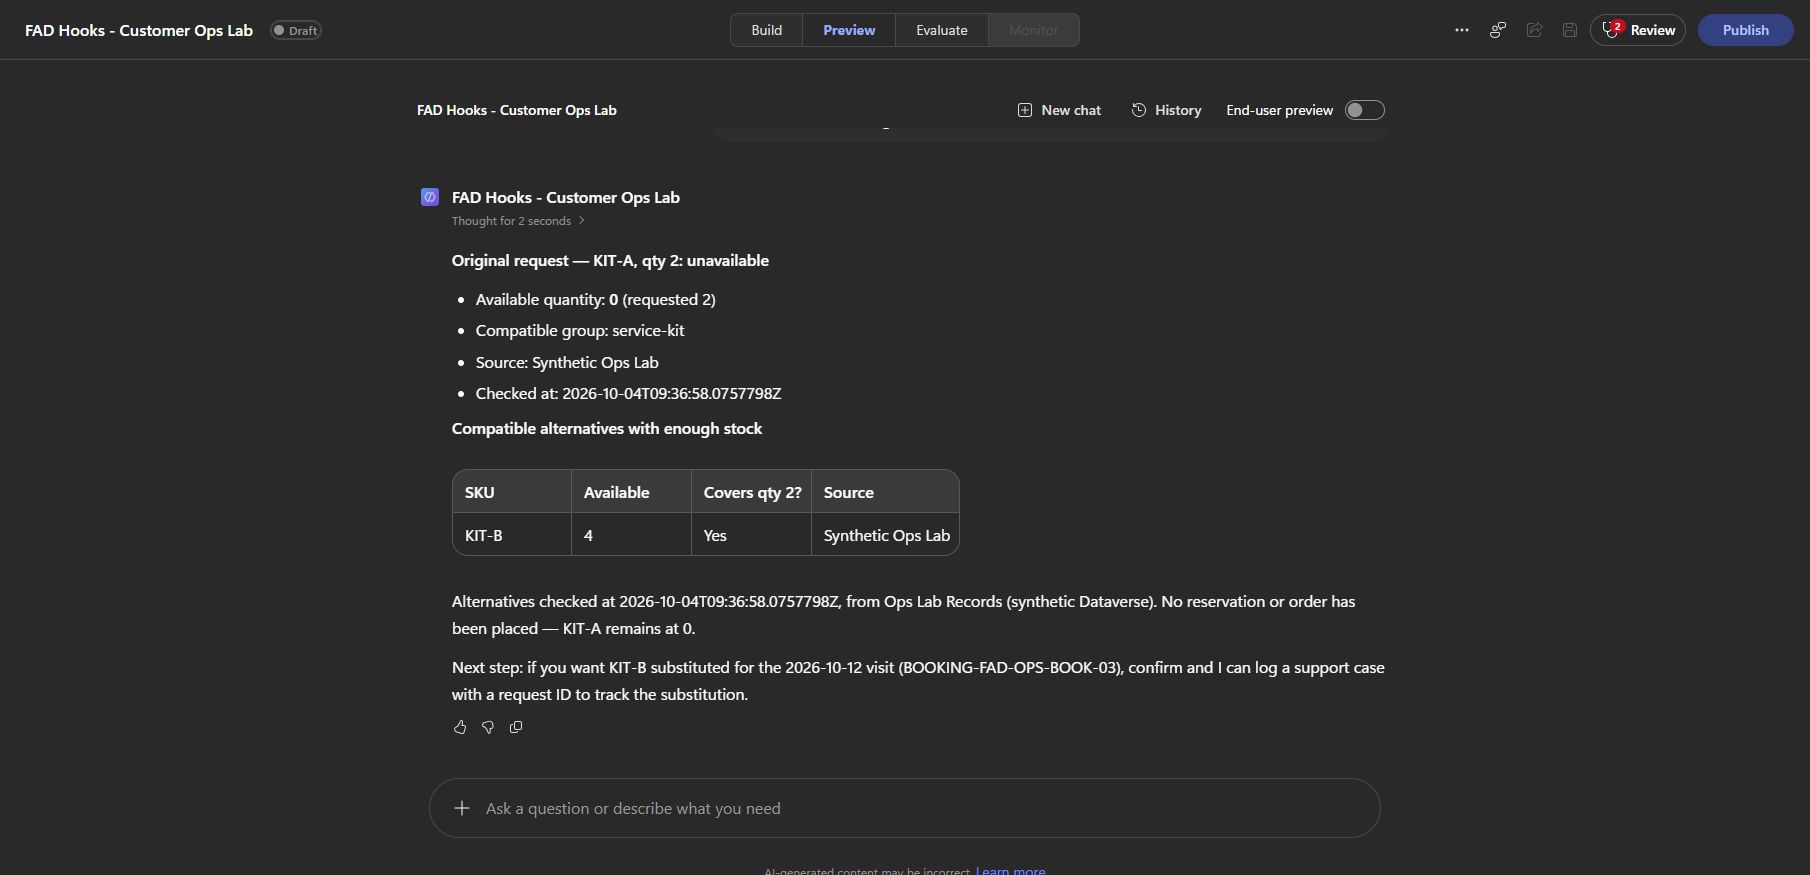
    Preview returned only KIT-B for the two-unit KIT-A request. KIT-A stayed unavailable. I also tested KIT-B for two units, which was available, and KIT-A for five units, where no alternative had enough stock. Both returned empty alternatives arrays.

    The hook makes the answer more useful without changing what the original lookup found. It doesn’t reserve stock or create an order. For a real inventory, add paging and validate whole-number quantities; this demo reads at most 50 rows and rejects quantities below one, but doesn’t reject every fraction.

    4. Start with the user’s work briefing

    An agent that already knows the user’s assigned work can get to the useful part of the conversation faster.

    • Input: The new session’s user identity metadata.
    • Event: Start (pre-loop).
    • Outcome: additionalContext gives the agent the matching work profile, its source and refresh time before the first user message is processed.

    The Start hook reads a userProfile row using the platform-supplied metadata.userAadObjectId. Inspect that field in a new Preview session’s Start event to find the identity used by your test. Create a record with Kind userProfile, Name Synthetic startup profile and Record Key USER: followed by that object ID. Use this Payload, changing the display name for your user:

    {
    "ownerDisplayName": "Josh Cook",
    "region": "West",
    "assignedTeam": "West Service",
    "serviceTier": "Premium",
    "workList": [
    {"id":"CASE-DEMO-OPEN-1","summary":"Review pump inspection","priority":"High"},
    {"id":"VISIT-DEMO-TODAY-1","summary":"Prepare service visit checklist","priority":"Normal"}
    ],
    "source": "Synthetic lab configuration"
    }

    Create List_my_briefing, row count 1, with this filter:

    @concat('fadh_recordkey eq ''USER:',coalesce(triggerBody()?['metadata']?['userAadObjectId'],'MISSING'),''' and fadh_kind eq ''userProfile''')

    In the starter’s existing additionalContext output, use:

    @if(empty(body('List_my_briefing')?['value']),concat('No trusted user work briefing found for this session. Do not invent tasks. Checked at ',utcNow()),concat('Trusted synthetic customer operations work briefing. Use only for the current session. Refreshed at ',utcNow(),'. Profile source: ',string(first(body('List_my_briefing')?['value'])?['fadh_name']),'. Work profile: ',string(first(body('List_my_briefing')?['value'])?['fadh_payload'])))
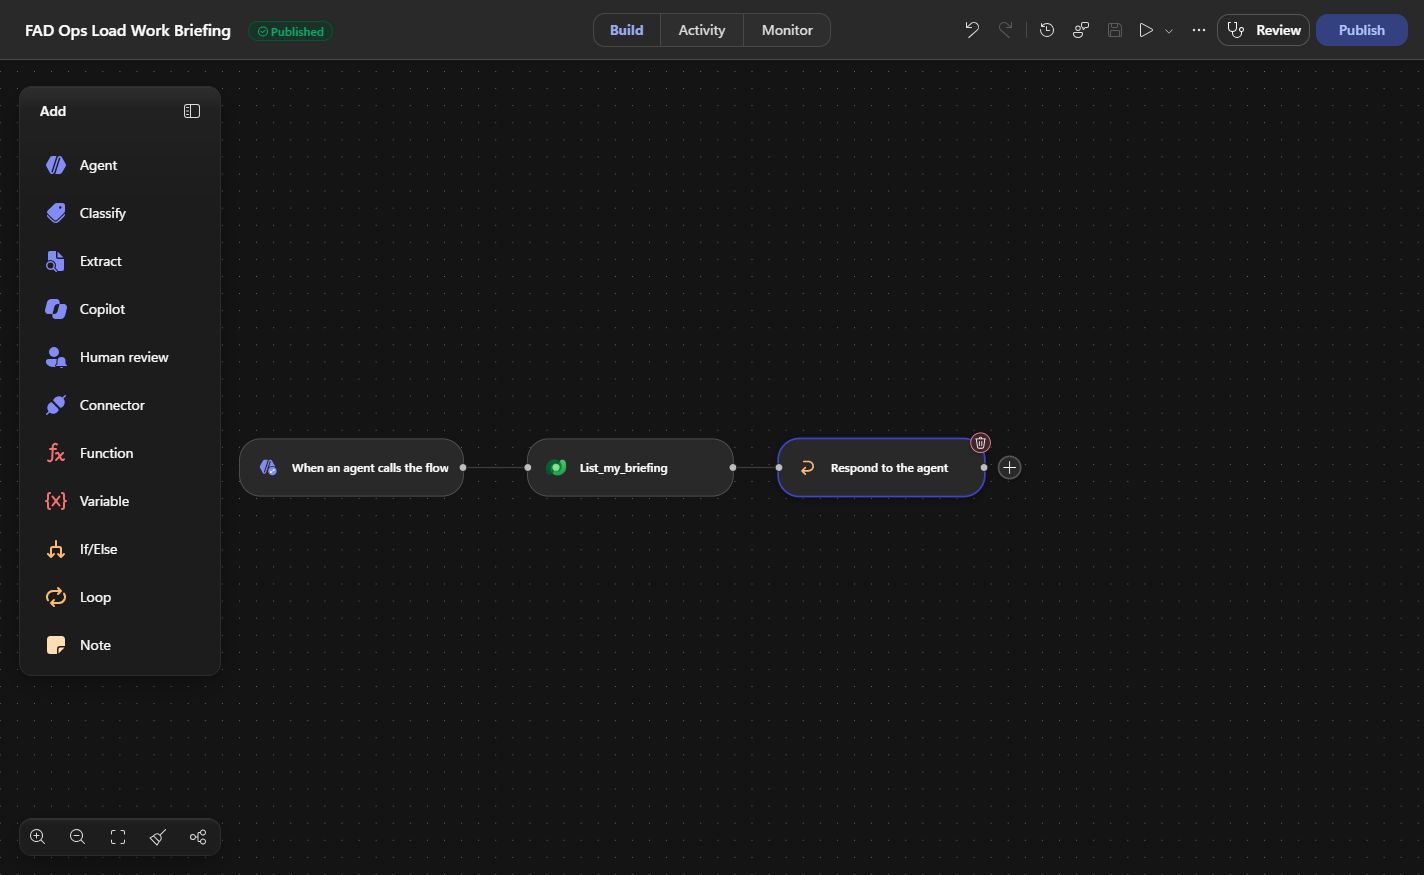
    The response includes the profile source and a refresh time. If the lookup is empty, it says no trusted briefing was found and tells the agent not to invent tasks.

    I started a new Preview chat and asked: “What is on my work list today? Show priorities, source and refresh time.” It returned the two seeded items with their priorities, source and timestamp.
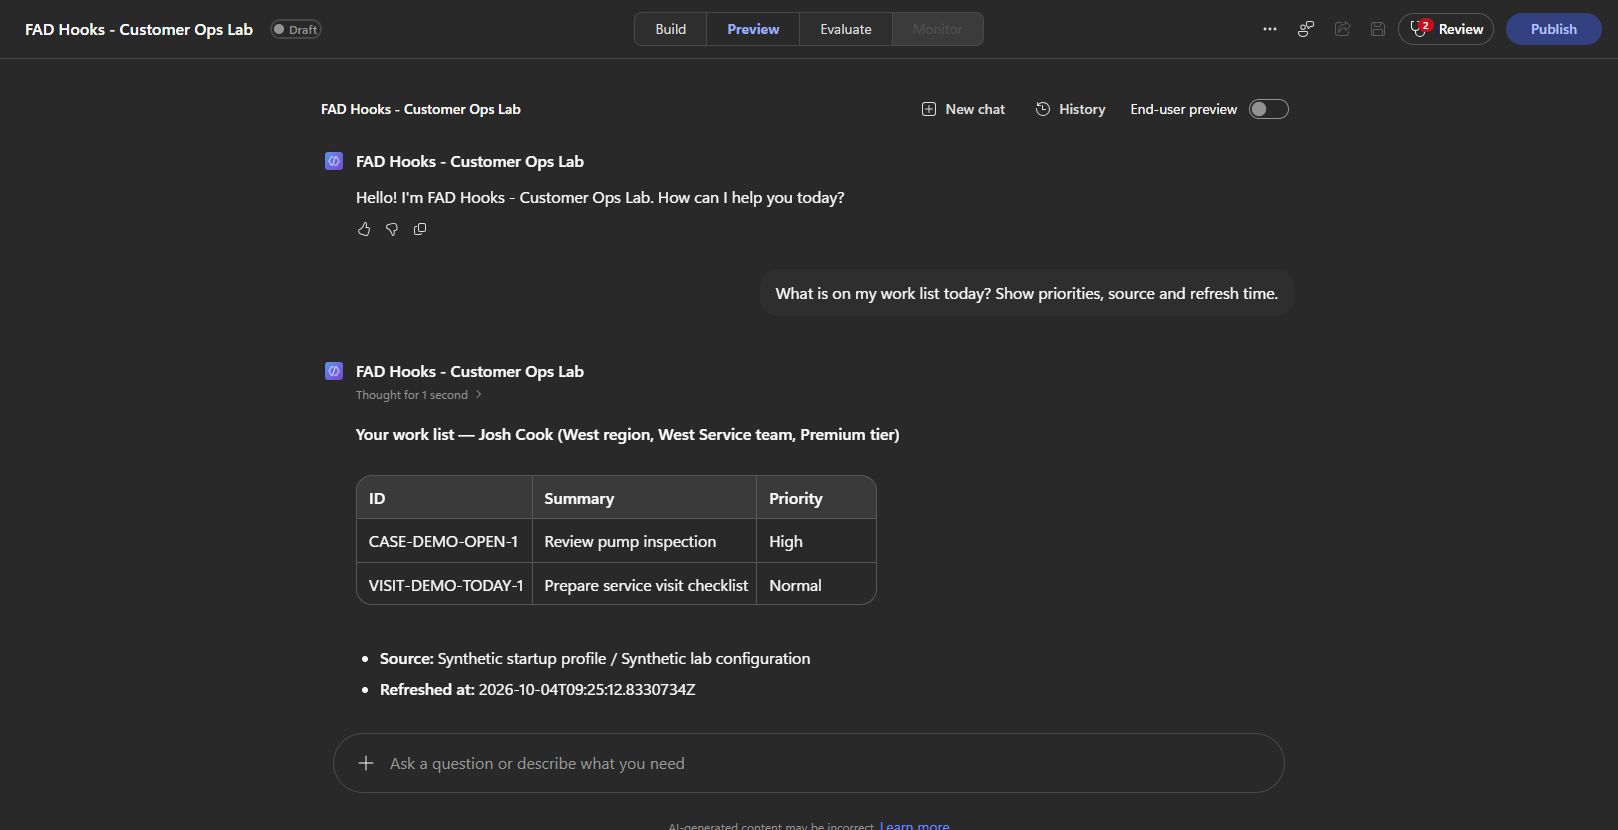
    This is session context from a lookup. The two work items are seeded demonstration data, so this isn’t a live case queue or persistent conversation memory. A production version could retrieve the user’s actual work from an authorised source, with its own freshness rules.

    Also, Start has no customer prompt to inspect yet. Load user or team context here. Resolve the customer when the agent proposes a business tool. Identity metadata can be empty, particularly for unsigned-in users, so keep the empty-lookup path. Hook metadata.

    5. Keep completed actions on a customer timeline

    The case and booking belong to the same customer. Put their completed business outcomes together and the next person can see what happened without piecing together a chat.

    • Input: A confirmed booking or created case returned by its tool.
    • Event: Post tool use.
    • Outcome: The workflow saves a customer timeline entry and returns its reference through additionalContext. This shares the booking-preparation workflow from example one.
    Build details: Timeline key, lookup and record payload

    Use the Successful_action branch from example one. Before the booking-only checklist branch, look up the timeline key:

    @concat('TIMELINE-',triggerBody()?['toolName'],'-',outputs('Outcome')?['requestId'])

    Create List_timeline, select fadh_recordkey,fadh_kind,fadh_payload, row count 2. Its filter is:

    @concat('fadh_recordkey eq ',decodeUriComponent('%27'),replace(concat('TIMELINE-',triggerBody()?['toolName'],'-',outputs('Outcome')?['requestId']),decodeUriComponent('%27'),decodeUriComponent('%27%27')),decodeUriComponent('%27'))

    If no row exists, create the timeline record:

    FieldValue
    Name and Record KeyThe timeline key above
    Kindtimeline
    Customer ID and Parent Key@outputs('Outcome')?['customerId']
    Record StatusRecorded
    PayloadExpression below
    @concat('{"kind":"timeline","synthetic":true,"recordKey":',substring(string(createArray(string(coalesce(concat('TIMELINE-',triggerBody()?['toolName'],'-',outputs('Outcome')?['requestId']),'')))),1,sub(length(string(createArray(string(coalesce(concat('TIMELINE-',triggerBody()?['toolName'],'-',outputs('Outcome')?['requestId']),''))))),2)),',"toolName":',substring(string(createArray(string(coalesce(triggerBody()?['toolName'],'')))),1,sub(length(string(createArray(string(coalesce(triggerBody()?['toolName'],''))))),2)),',"occurredAt":',substring(string(createArray(string(coalesce(triggerBody()?['timestamp'],'')))),1,sub(length(string(createArray(string(coalesce(triggerBody()?['timestamp'],''))))),2)),',"actor":',substring(string(createArray(string(coalesce(coalesce(triggerBody()?['metadata']?['userAadObjectId'],'unknown'),'')))),1,sub(length(string(createArray(string(coalesce(coalesce(triggerBody()?['metadata']?['userAadObjectId'],'unknown'),''))))),2)),',"parentKey":',substring(string(createArray(string(coalesce(outputs('Outcome')?['customerId'],'')))),1,sub(length(string(createArray(string(coalesce(outputs('Outcome')?['customerId'],''))))),2)),',"outcome":',string(outputs('Outcome')),'}')

    The payload keeps the original outcome, tool name, event timestamp, customer and actor metadata. The stable key lets a sequential repeat find the same entry and skip another write.

    After the timeline branch, check whether toolName is BookServiceVisit. Only bookings reach the checklist branch. Connect every selected path to Respond after its writes, including existing-record paths; a direct shortcut to Respond can bypass the work.

    Build details: Return the completed record references

    In the shared hook’s additionalContext, return the completed record references:

    @if(and(equals(triggerBody()?['event'],'PostTool'),or(empty(triggerBody()?['result']?['resultType']),equals(triggerBody()?['result']?['resultType'],'success')),not(empty(outputs('Outcome')?['requestId'])),not(empty(outputs('Outcome')?['customerId'])),or(and(equals(triggerBody()?['toolName'],'BookServiceVisit'),equals(outputs('Outcome')?['status'],'confirmed')),and(equals(triggerBody()?['toolName'],'CreateSupportCase'),equals(outputs('Outcome')?['status'],'created')))),concat('Customer activity recorded in Ops Lab Records: TIMELINE-',triggerBody()?['toolName'],'-',outputs('Outcome')?['requestId'],if(equals(triggerBody()?['toolName'],'BookServiceVisit'),concat('. Preparation checklist: CHECKLIST-',outputs('Outcome')?['requestId'],'. Tasks: Confirm access; Check equipment; Review service history. Read the checklist row for current task statuses.'),''),'. Synthetic demonstration records.'),'')
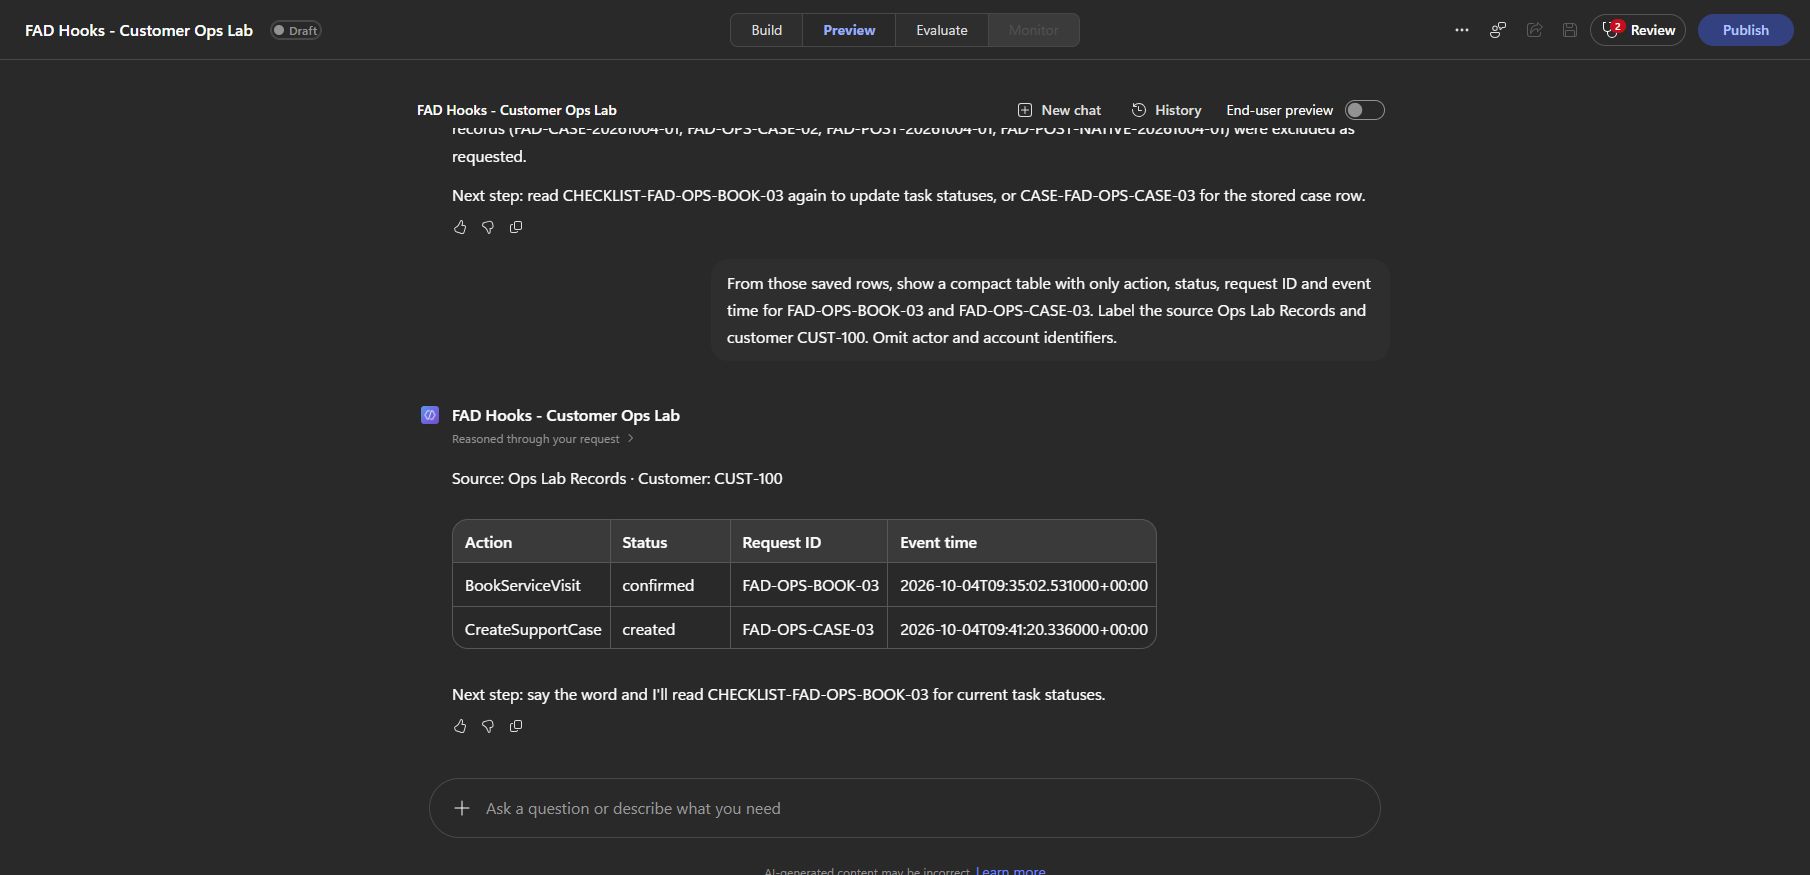
    In Preview, I created a booking and a case for CUST-100, then retrieved records with that customer as Parent Key. Both timeline entries were there. Stock and read-only lookups aren’t in this hook’s scope, and rejected business requests skip the write branches.

    Call this a business activity timeline. It’s useful history, but it isn’t an authoritative audit trail. A hook can fail, and the timeline and checklist are separate writes. The booking and case records remain the source of truth for their business actions.

    Test the answer against the saved work

    A good-looking agent response isn’t enough to verify an automation.

    First run the whole workflow in the native designer with synthetic inputs. Check the selected branch, node inputs and outputs. Connector actions still write real rows in your selected environment. Native workflow testing.

    Then test in the agent’s Preview and inspect its activity trace: the tool selected, its parameters, the automatic hook and its returned output. That second test is what caught the stock wrapper mismatch. Test through the agent.

    Build ReadOpsRecords

    Build details: Read back the saved records

    For readback, ReadOpsRecords uses optional Text inputs parentKey and recordKey, internally text and text_1. Add Read_records, select the columns you need, order by createdon asc, row count 50, and use:

    @if(not(empty(trim(coalesce(triggerBody()?['text_1'],'')))),concat('fadh_recordkey eq ''',replace(trim(triggerBody()?['text_1']),'''',''''''),''''),if(not(empty(trim(coalesce(triggerBody()?['text'],'')))),concat('fadh_parentkey eq ''',replace(trim(triggerBody()?['text']),'''',''''''),''''),'fadh_recordkey eq ''__NO_LOOKUP__'' and fadh_recordkey ne ''__NO_LOOKUP__'''))

    Return @string(body('Read_records')?['value']) through a Text output. Exact key takes precedence; both inputs blank return []. For bookings and cases, query the returned BOOKING- or CASE- ID, rather than the unprefixed request ID.

    These are the checks I’d keep for this build:

    TestExpected result
    New booking, then exact repeatOne booking and one checklist; original outcome preserved
    Same request ID, changed date or issueConflict rejected without another business write
    Case with only the three required inputsMaintained routing supplied before tool execution
    KIT-A, quantity 2Unavailable, with KIT-B as the only alternative
    KIT-A, quantity 5Unavailable, no sufficiently stocked alternative
    KIT-B, quantity 2Available, no alternatives needed
    New chat with a matching work profileTwo seeded work items, source and refresh time
    Rejected bookingNo checklist or completed-action timeline entry

    Those paths were exercised in workflow tests or Preview as described above. Concurrent requests, write-timeout recovery and failures between the two follow-up writes need additional testing before a production deployment.

    Keep mandatory rules inside the tool

    This is the part I wouldn’t skip.

    Microsoft documents that a failed, timed-out or unreadable hook lets the agent continue as though the hook returned nothing. All response fields are optional; an empty response leaves the default behaviour. Documented failure behaviour.

    Use hooks for useful shared work, but put required validation and required business commitments inside the tool or data layer. suppressOutput controls presentation where supported. Blocking a proposed tool call uses Pre tool use and permissionDecision: "deny"; a reason alone doesn’t block it.

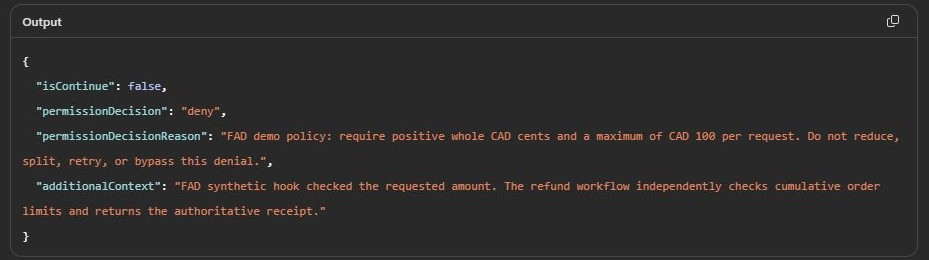
    I tested that distinction in a separate refund example. Its demonstration policy allows positive CAD amounts up to CAD 100. A CAD 125 request was denied by the Pre tool use hook:
    Then I deliberately failed the hook. The refund tool still rejected the request because it independently checked the policy before writing:
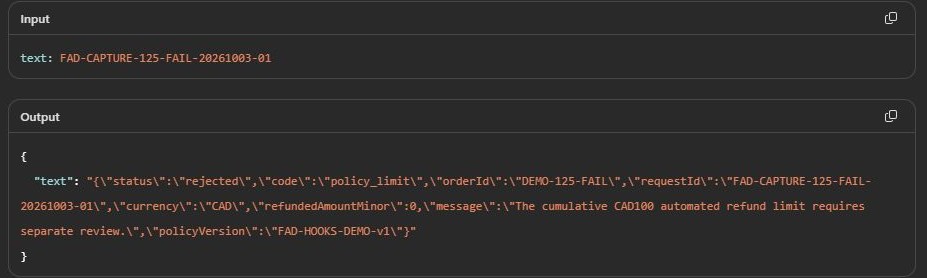
    The CAD 100 threshold is that demo’s policy. The lesson is where the rule lives: the required validation survives the hook’s failure. If you see isContinue in a trace, that’s runtime information, not an extra field to add to the hook response.

    Where I’d start

    Pick the next piece of work people already do by hand after an agent’s action.

    For a service team, I’d start with the booking checklist. For a support team, customer-based routing. For a parts team, compatible stock alternatives. Each gives you a result you can see and test before expanding the agent.

    Build the business tool, create the correct event starter, keep its contract, then check the actual Preview trace and saved records. Use a fresh request ID for a new action and the same ID for an intentional repeat.

    The value of hooks is that the shared process happens at the right event. A confirmed visit gets preparation work. A case reaches its configured team. A stock shortage comes back with a useful option.

    Download the solution

    This is the unmanaged Power Platform solution exported from the Customer Ops demo. It includes the agent, all four tools, four hook workflows, hook bindings, Dataverse table definitions and the connection reference.

    Download the Customer Ops solution (.zip) — version 1.0.0.1, 118 KB.

    Import the ZIP as it is; you don’t need to extract it first. Use a development environment with access to the GitHub Copilot harness preview.

    1. In Power Apps, select your development environment, open Solutions > Import solution, and upload the ZIP.
    2. Connect the Dataverse connection reference to your own connection. The workflows also keep the demo’s original environment selection: open all eight workflows and change all 13 Dataverse actions to your environment. Save and publish the workflows after those changes.
    3. Add the customer defaults and four stock records from Set up the agent and data. Add the work profile using your own session identity, as shown in example four. The solution includes the table schema, but no sample rows or saved bookings.
    4. Open the agent, check its four hook bindings against the table above, and run the Preview tests with fresh request IDs.
    After import: Dataverse actions to update
    WorkflowActions
    BookServiceVisitList_prior_booking, Save_booking
    CreateSupportCaseList_case, Create_case
    CheckStockFind_stock
    ReadOpsRecordsRead_records
    FAD Ops Route CaseList_customer_defaults
    FAD Ops After Business ActionList_timeline, Create_timeline, List_checklist, Create_checklist
    FAD Ops Load Work BriefingList_my_briefing
    FAD Ops Stock AlternativesApproved_stock

    The ZIP also contains the Refund Lab Request table schema. The separate refund agent and its workflows aren’t included.

    I checked the exported package for the components above. Importing and running it in a second environment hasn’t been verified yet.
  • AI Weekly: Copilot’s Super App, Work IQ, and New Models

    AI Weekly: Copilot’s Super App, Work IQ, and New Models

    Week of September 21–25, 2026 · Updated Friday, September 25

    Microsoft’s Friday announcement takes the lead this week. The new Copilot brings Home, Code and Autopilot together. For Power Platform builders, Work IQ’s business-data preview and Copilot Managed Runtime deserve just as much attention.

    Here’s what changed this week, plus the earlier notices with rollout dates and deadlines worth keeping on your list.

    This week in 60 seconds

    • Copilot’s new app: Home(Chat+Cowork) and Code are heading into Frontier. Autopilots remains a private preview.
    • Business context: Work IQ’s Dynamics 365 and Power Platform preview starts September 30. Fabric IQ is generally available in Chat and Cowork.
    • Apps and spending: Managed Runtime enters public preview, with new controls for AI costs and model access.
    • Models: GPT-6 Sol, Luna and Claude Opus 5.5 arrived Tuesday. The prices and availability details are below.
    • Admin dates: Review advanced-package upload permissions before October 25 and GitHub’s new default feature policy before October 22.

    In this post

    Copilot’s Super App gets Home, Code and Autopilot

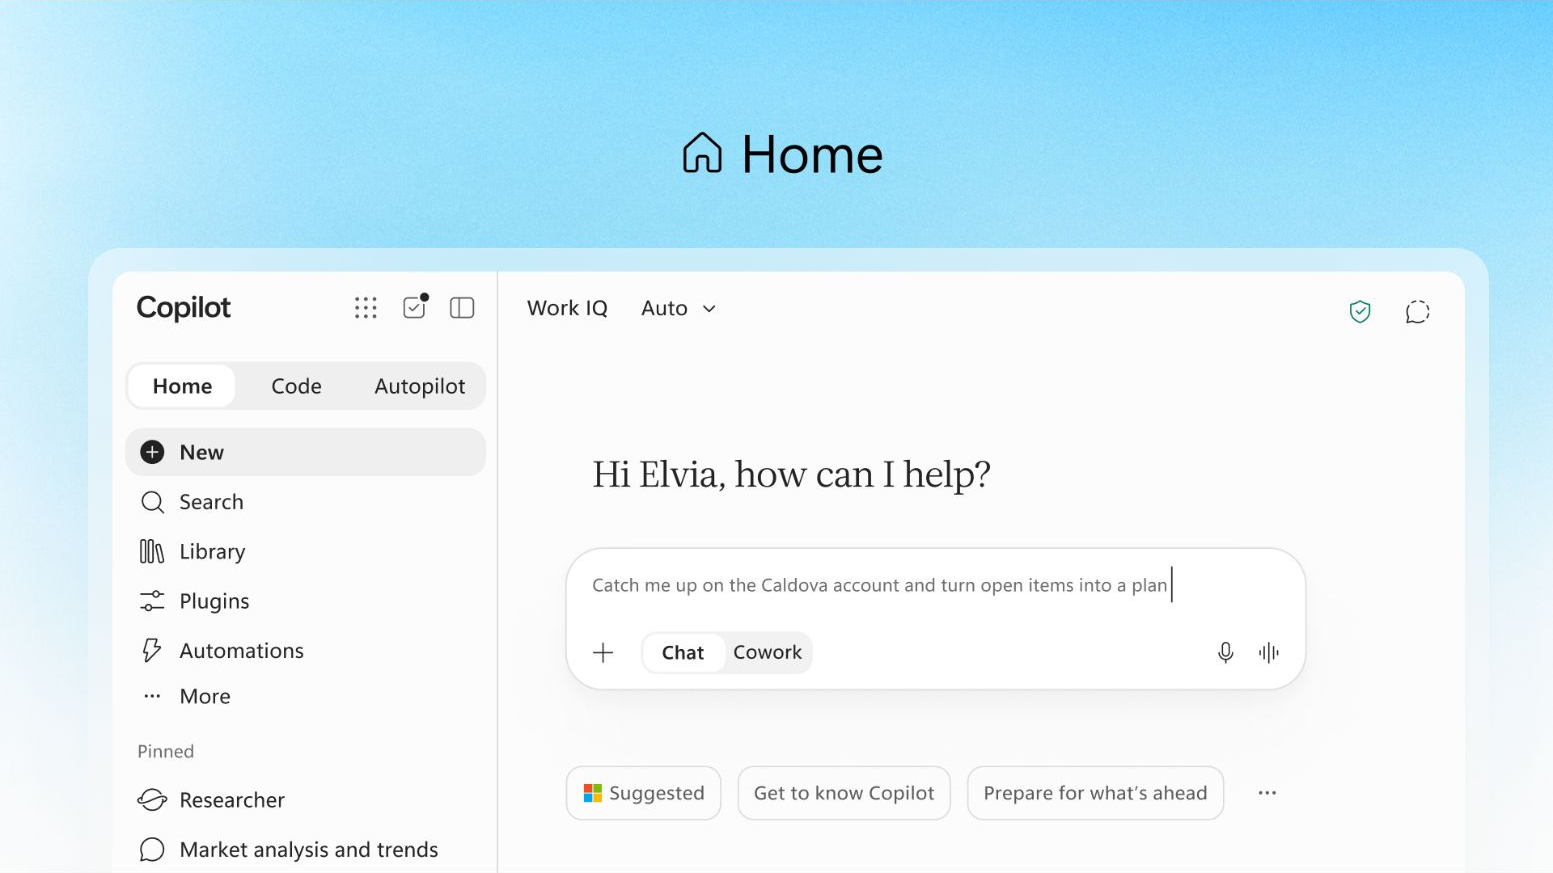
    September 25 · Announced, with staged previews. Microsoft’s new Copilot app makes the “Super App” idea much more concrete:

    • Home brings Chat and Cowork together, with Word, Excel and PowerPoint built into the experience.
    • Code builds apps and workflows from natural-language requests using the technology behind GitHub Copilot.
    • Autopilot, previously Scout, is a persistent cloud agent with its own identity, memory and workspace.
    Microsoft’s published Copilot Home preview showing Home, Code and Autopilot navigation and the Chat and Cowork selector.
    Microsoft’s published Home preview, not a screenshot from my tenant. Captured in Chrome, September 25, 2026. Source. Tap to enlarge.

    Home and Code start entering Frontier over the coming weeks; the Code section specifies the end of September. Autopilot expands into private preview at month-end.

    Also announced: a unified plugin registry rolling out now, Today entering private preview in October, and @Copilot in Teams entering private preview by the end of September.

    The part I want to try is moving from a conversation into an editable file or a useful app without rebuilding the context. The announcement sets that expectation; a real customer task will be the test.

    Work IQ, Fabric IQ, and a place to run the apps

    Work IQ starts using your business definitions

    September 25 · Public preview starts September 30. Business applications in Work IQ connects Dynamics 365 and Power Platform data to Copilot and agents. Rollout continues through October; Finance and Operations support is listed for late October.

    Its semantic models use selected tables and columns, relationships, views, forms and business terminology to explain what the data means. Makers can refine that context and reuse business skills across connected agents, including Copilot Studio.

    Dataverse stores the models and skills. Microsoft also introduces the Dataverse Ask API and business context through the Work IQ MCP server, CLI and coding-agent plugin. Admins still decide which environments and data participate.

    This is the preview I want to spend time with. In a custom Dataverse solution, understanding which records belong together is often the hard part. I want to see how much of that understanding carries across agents without maintaining the same explanation in every prompt.

    Fabric IQ is available in Chat and Cowork

    September 25 · Generally available. The Copilot announcement says Fabric IQ now grounds Chat and Cowork in Fabric and Power BI semantic models. Code integration follows through Frontier. This is separate from the Power BI report references coming to Notebooks below.

    Copilot Managed Runtime handles app hosting

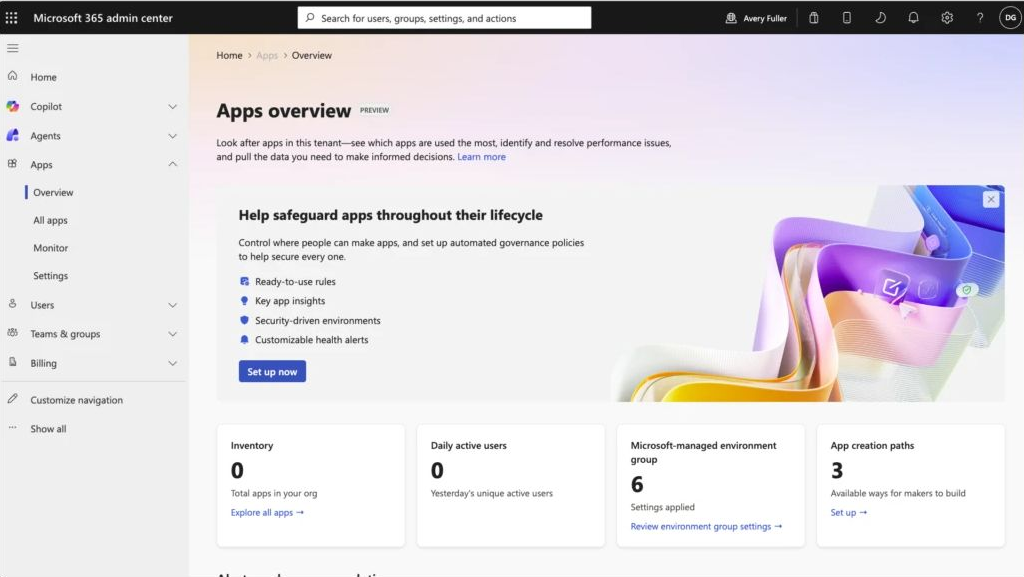
    September 25 · Public preview. Copilot Managed Runtime provides Microsoft-operated hosting within the Microsoft 365 tenant boundary for apps built in Cowork, Code and Copilot Studio. The SDK and CLI also open that path to professional developers and compatible third-party tools.

    Microsoft’s published Apps overview screen in the Microsoft 365 admin center for Copilot Managed Runtime.
    Microsoft’s published Apps overview preview. Captured in Chrome, September 25, 2026. Source. Tap to enlarge.

    The shared runtime includes Entra identity, governed data connections, Git-backed source and version control, deployment, and an app inventory with usage and health information in the Microsoft 365 admin center.

    That gives the app-building story a useful next step: somewhere to host the result, manage access and update it after people start using it.

    Back to contents ↑

    AI spending controls and admin dates

    September 25 · New capabilities and staged rollout. Agent 365 cost management now covers Code and Managed Runtime alongside Cowork and Work IQ APIs. Copilot Studio support is planned for October.

    • Model access: controls for which model families a group can use are rolling out for Cowork, including what Auto can select.
    • Spending policies: Microsoft Graph API management and credit-request redirects can connect to existing approval workflows.
    • User visibility: Cowork users can see consumed and remaining credits and usage history inside Copilot.
    • Value reporting: new Cowork consumption views connect spending with the work produced.

    Microsoft’s pricing explanation separates the user subscription for everyday work from Copilot Credits for advanced work such as Cowork, Code and Autopilot. A user subscription is required for those capabilities. Enterprise usage-based services remain off until an admin creates a spending policy.

    Three dates for the admin list

    • September 25 / October 25 — advanced-package uploads: Microsoft’s MC1472007 notice, reproduced in a public archive, updated September 15, schedules the control from September 25. Choose all, no, or selected users/groups before October 25; otherwise advanced uploads remain allowed by default. Basic uploads are unaffected. This is a rollout reminder, not a new announcement today.
    • September 25 notice — connected A2A agents: the archived MC1478975 notice describes Agent 365 agents using Agent2Agent as connections in declarative agents. Admins install and approve them; users cannot self-install. The notice’s GA window is late August through late September, so the publication date is not the rollout start.
    • October 22 — GitHub’s default feature policy: the September 24 announcement gives Business and Enterprise admins a default for eligible generally available features. Explicit decisions stay intact and previews remain opt-in. Configure it before enforcement starts October 22.

    The two Message Center archives reproduce Microsoft’s notices but are independently operated. These dates describe Microsoft’s schedule; I haven’t confirmed the new controls in my tenant.

    Back to contents ↑

    New models, API prices and caching

    September 22 · Rolling out. Microsoft’s announcement brings GPT-6 Sol and Claude Opus 5.5 to Word, Excel, PowerPoint, Chat, Cowork, and Copilot Studio. Availability depends on licence, access, and region, so a rollout announcement doesn’t mean every tenant has both models yet.
    Microsoft’s September 22 announcement naming GPT-6 Sol and Claude Opus 5.5 and the Copilot products receiving them.
    Microsoft’s announcement of the two models rolling out across Copilot. Screenshot captured September 24, 2026. Source. Tap to enlarge.

    Give both models the same account briefing or spreadsheet task, with the same source files, and compare how much correction each result needs.

    The new models and their API prices

    September 22 · Released. GPT-6 Sol and Luna add lower-cost options to the GPT-6 family. Sol is the one I’d try on everyday coding and document work; Luna’s price makes it interesting for repeated extraction or classification tasks.

    ModelInputCache readOutput
    GPT-6 Sol$2.00$0.20$10.00
    GPT-6 Luna$0.10$0.01$0.50
    Claude Opus 5.5$4.00$0.20$20.00

    Prices are USD per million tokens. OpenAI’s figures are Standard pricing for prompts with up to 272K input tokens; Anthropic’s are its standard Opus 5.5 rates. Cache writes, longer prompts, other processing tiers, and tool charges need to be checked separately. Sources: OpenAI’s September 22 API changelog and Anthropic’s launch pricing.

    OpenAI also launched both models in ChatGPT Work and Codex for Plus, Pro, Business, Enterprise, and Edu. Its launch notice says Free and Go users get Luna in the desktop app, and that the models were not yet available in Chat.

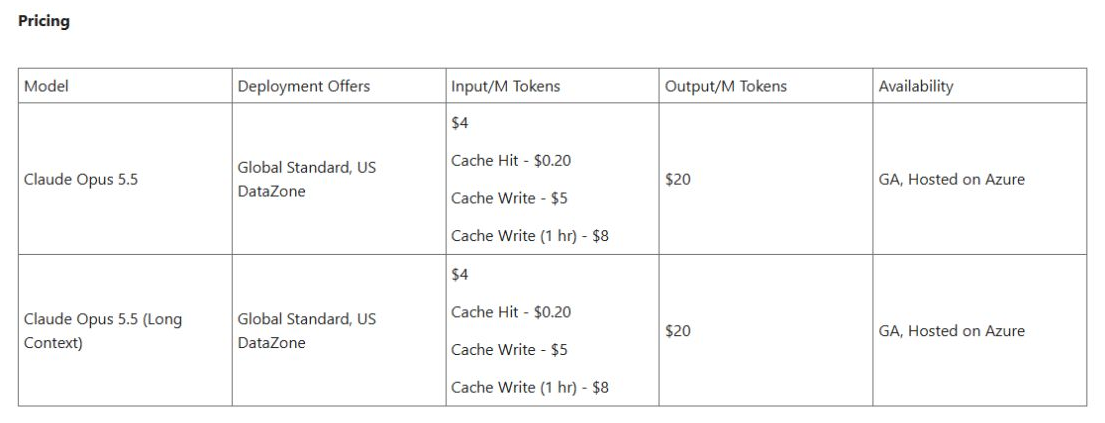
    Claude Opus 5.5 is also in Microsoft Foundry

    Microsoft lists Opus 5.5 as generally available in Foundry, hosted on Azure, with Global Standard and US Data Zone deployment offers. The published input and output rates match the $4 and $20 figures above.

    Microsoft Foundry table showing Claude Opus 5.5 pricing, cache rates, deployment offers, and general availability on Azure.
    Microsoft’s Foundry pricing and availability table for Opus 5.5. Screenshot captured September 24, 2026. Source. Tap to enlarge.

    Anthropic reports that Opus 5.5 costs about 40% less than Opus 5 on its typical test workloads at default settings. The input and output token prices fell 20%; the larger workload saving also depends on efficiency. I wouldn’t put a flat 40% saving into a project estimate.

    GPT-6 caching and repeated input costs

    September 22 · API update. OpenAI’s prompt-caching post explains improvements to how GPT-6 reuses repeated context. Eligible shared prompt prefixes reused within 30 minutes can receive cache discounts, with savings of up to 90% on cached input tokens.

    That percentage applies to cached input, not the whole bill. Output tokens and other charges still count.

    The post also covers a caching dashboard, diagnostics for missed cache reuse, and explicit breakpoints for choosing which part of a prompt to cache. It describes ways to change reasoning effort and tool availability while keeping earlier context reusable.

    For an agent that carries the same instructions and tool definitions through dozens of calls, I’d look at cache hit rates before cutting useful context just to save tokens.

    Back to contents ↑

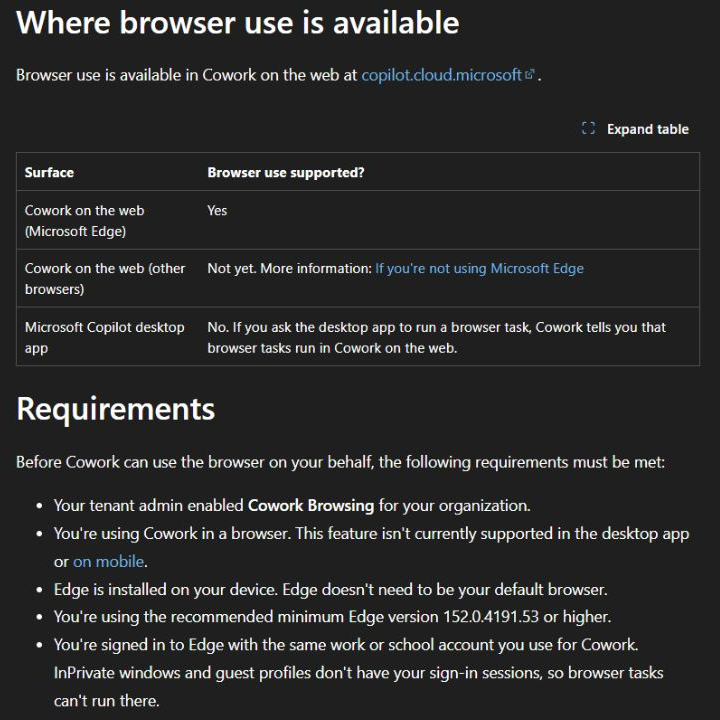
    Cowork browser controls

    Microsoft’s MC1474461, published September 19, schedules controls for specific users or groups in mid-to-late September. Browser use is off by default.

    Cowork uses a hidden tab in your local Edge browser and your existing signed-in session. Cookies, credentials and session tokens stay on the device. Microsoft documents browser automation for Cowork on the web in Edge; desktop and mobile do not support this capability.

    Microsoft Learn table showing Cowork browser support in Edge on the web and the requirements for browser use.
    Microsoft Learn’s browser support table and requirements for Cowork. Documentation screenshot captured September 22, 2026. Source. Tap to enlarge.

    The browser documentation explains handbacks for sign-in, MFA and CAPTCHA. Admin guidance covers Conditional Access, DLP, auditing and usage-based consumption.

    Start with a small group and an approved test system. Exercise the approval step, interrupt a run, then inspect the audit and consumption records. Browser permission and general Cowork access through spending policies are separate controls; a pilot needs both.

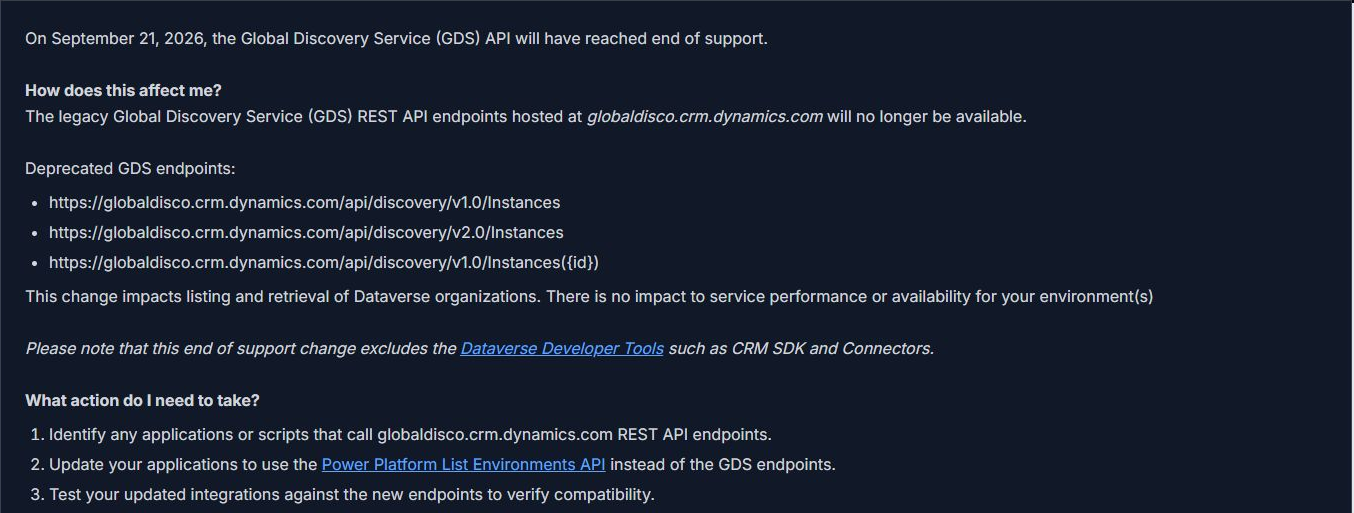
    Check your old Dataverse discovery calls

    MC1474128 sets September 21, 2026 as the end-of-support date for the legacy Global Discovery Service REST API and says the affected endpoints will no longer be available.

    Search custom environment selectors, admin utilities and older integration or ALM scripts for globaldisco.crm.dynamics.com.

    For Git-tracked files, run git grep -n -F 'globaldisco.crm.dynamics.com'. Also review deployed configuration and scripts stored outside the repository.

    Microsoft points custom integrations to the Power Platform List Environments API, with token scope:

    https://api.powerplatform.com/.default

    Check Entra permissions, authentication and response mapping, then test the migration.

    The notice excludes Dataverse Developer Tools such as the CRM SDK and connectors. Focus on custom REST calls to the affected endpoints.

    MC1474128 retirement notice showing affected Global Discovery REST endpoints, the developer-tool exclusion, and migration steps.
    Public reproduction of MC1474128 on MS Message Center, an independent archive. The notice identifies the affected endpoints and migration steps. Source. Tap to enlarge.

    The independent archive reproduces the dated notice. Microsoft’s older discovery documentation still shows the retired endpoints; I haven’t tested whether they remain reachable.

    Back to contents ↑

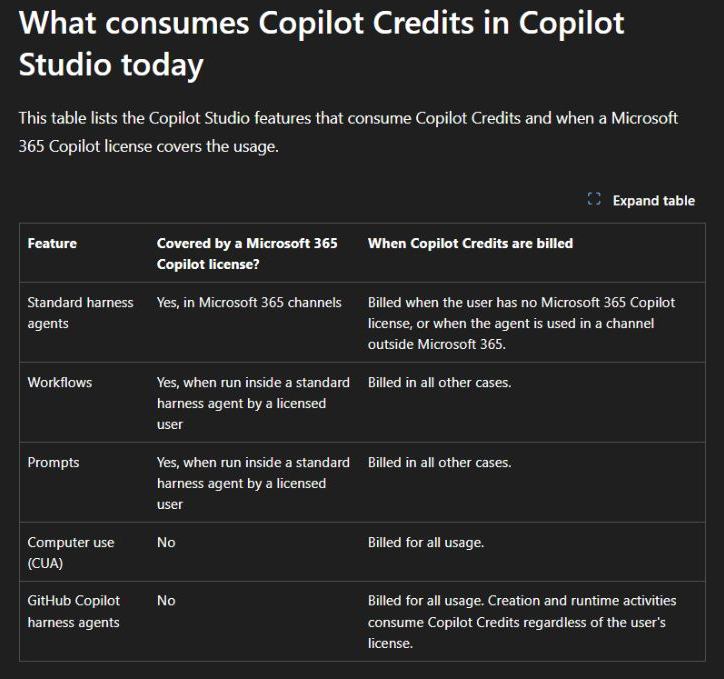
    Copilot Studio costs need to be visible while we build

    Agents using the GitHub Copilot harness can consume credits during building, testing, evaluations, and runtime, according to Microsoft’s current guidance. A Microsoft 365 Copilot licence doesn’t cover that usage.

    Microsoft Learn table explaining when Copilot Studio features consume Copilot Credits and whether a Microsoft 365 Copilot licence covers usage.
    Microsoft’s current Copilot Credits billing table. This is documentation; the new cost views discussed below are still roadmap items. Source. Tap to enlarge.

    The useful distinction is how much went on production, testing or evaluations.

    These roadmap items were added earlier in September and remain on my watchlist. Microsoft plans to show costs in three places:

    Roadmap itemWhat it is intended to show
    571194: Preview Chat and HistoryConsumption associated with preview/testing and historical runs.
    571195: Agent EvaluationsCosts for evaluation generation, test execution, and model grading.
    571196: MonitorPer-agent costs and an estimated split across authoring, testing, evaluations, and production.

    The archived entries are marked In development, with a September 2026 target. I couldn’t confirm the individual records on the live roadmap, so I’m treating them as planned features.
    You can check the Microsoft roadmap using those IDs. Archived copies of Microsoft’s text are linked in the sources below.

    Until the cost views arrive

    Keep track of what you change between test runs. When the cost views become available, that record should help explain why one run cost more than another.

    Microsoft already documents monthly agent limits with Stop usage and environment capacity settings. Disabling access to unallocated prepaid capacity won’t stop consumption through a linked pay-as-you-go plan.

    I covered the Cowork reporting side in my first-month admin guide. For Copilot Studio, I’d include development and testing when working out what an agent costs.

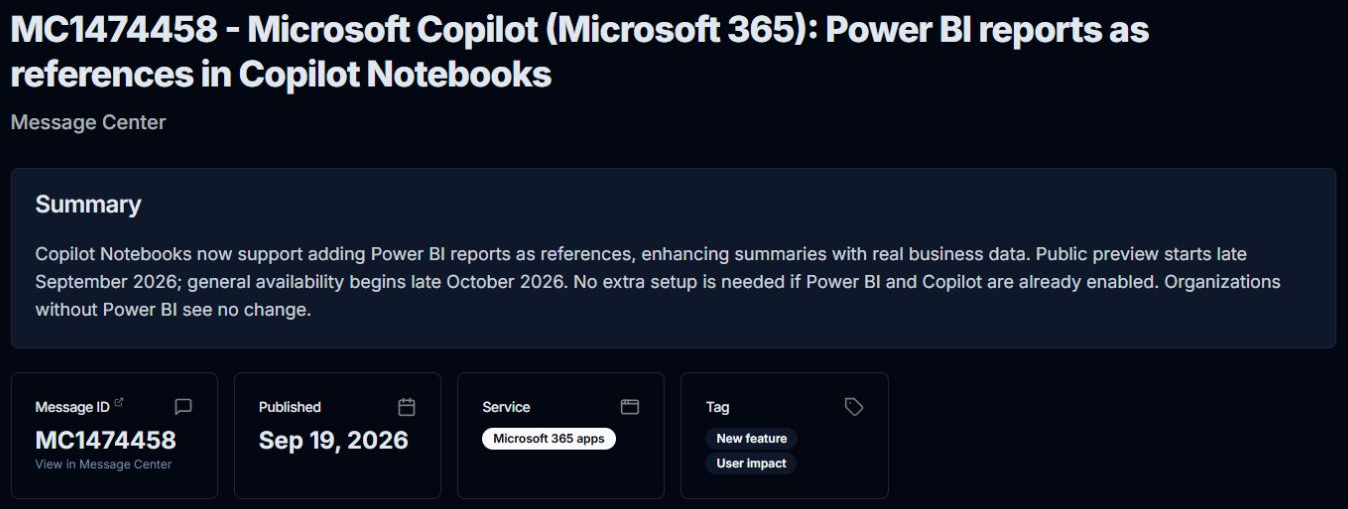
    Power BI reports are coming to Copilot Notebooks

    The September 19 notice MC1474458 says users will be able to add Power BI reports as references alongside files for summaries, presentations and briefs.

    • Public preview: late September through mid-October 2026.
    • General availability: late October through mid-November 2026.

    The notice says no extra setup is needed beyond users already having Power BI and Copilot. These are planned windows, separate from Friday’s Fabric IQ availability in Chat and Cowork.
    Public archive of MC1474458 announcing Power BI report references in Copilot Notebooks, with planned preview and general availability timing.
    MC1474458 in the independent Microsoft 365 Message Center Archive. Announcement screenshot showing planned rollout timing, captured September 22, 2026. Source. Tap to enlarge.

    For an account review, try a sales report, account plan and meeting notes in one Notebook. Ask for performance changes, outstanding commitments and source citations. Compare the output with the report and repeat with users who have different permissions. Adding a reference should not be treated as unrestricted access to its underlying datasets.

    More for builders: Foundry, WebMCP and reusable context

    DeepSeek-V4.1-Flash: check the deployment path

    September 23. Microsoft’s Foundry announcement describes DeepSeek-V4.1-Flash with text and image input, up to one million tokens of context, and adjustable reasoning effort. The availability labels differ: Direct from Azure is in public preview; Fireworks on Foundry is generally available.

    The same post announces a Global deployment option for GLM-5.3-Flash through Fireworks and adds Global deployment for Kimi K3 alongside its existing Data Zone option. Those choices can affect where and how a model is deployed, so I’d check the model card before comparing prices.

    Edge’s WebMCP implementation is ready for testing

    September 21 · Early testing. Microsoft’s Edge developer update says developers can try its WebMCP implementation. It lets a website expose structured tools that a browsing agent can call using the site’s existing front-end code. Microsoft has samples and an extension for testing and debugging those tools.

    This caught my attention for business portals. A site could describe an action explicitly instead of relying on the agent to work out every step from the page. It’s something to experiment with; the announcement isn’t a claim of built-in Power Pages support.

    Microsoft’s governance guidance looks beyond the agent inventory

    September 22 · Guidance. In a Copilot Studio post ahead of October’s Power Platform Conference, Microsoft argues for monitoring changes in agent ownership, access, usage, cost, and behaviour, then responding according to risk. It discusses Agent 365 and automating decisions that already have a defined policy.

    How V7 gives agents reusable context

    OpenAI’s September 21 V7 case study looks at a problem that comes up in agent design: how to reuse information from company files across tasks.

    V7 uses GPT-5.6 Luna to extract information from files into a Context Graph connecting entities, relationships, and cited evidence. Agents can query that context through MCP, with stronger models used for harder reasoning.

    V7 reports Astra reaching 89% accuracy versus Sol’s 78% on its hardest graph-query tests. Those are customer-reported results in an OpenAI case study, not a general accuracy guarantee.

    OpenAI’s September 21, 2026 case study, How V7 gives AI agents institutional memory, with the V7 logo and customer-reported 89 percent result.
    OpenAI’s September 21 V7 case study. The performance figures are customer-reported results from that case study. Source. Tap to enlarge.

    For a Dataverse project, I’d take that as a design prompt: how should an agent connect a record to its supporting documents and show the evidence behind an answer?

    Back to contents ↑

    My take on the week

    The new Copilot app is the headline. Work IQ is where I want to dig deeper: a custom Dataverse solution has business meaning in its relationships, forms and views, and I want to see how well agents can reuse it.

    Managed Runtime also makes the app story more interesting. Once someone builds a useful tool, hosting, access and updates become ongoing work. Having those pieces connected to Microsoft 365 could make a real difference.

    The model releases still deserve testing, and the Dataverse retirement still needs attention. But Friday changed the focus of this edition. Next week, I’m watching what actually arrives in Frontier and the September 30 Work IQ preview.

    Sources

    Message Center links require an authorized Microsoft 365 admin account. Public archives below reproduce the original notices or roadmap entries but are not Microsoft-operated sites.

  • Copilot Cowork Dataverse Plugin Setup

    Copilot Cowork Dataverse Plugin Setup

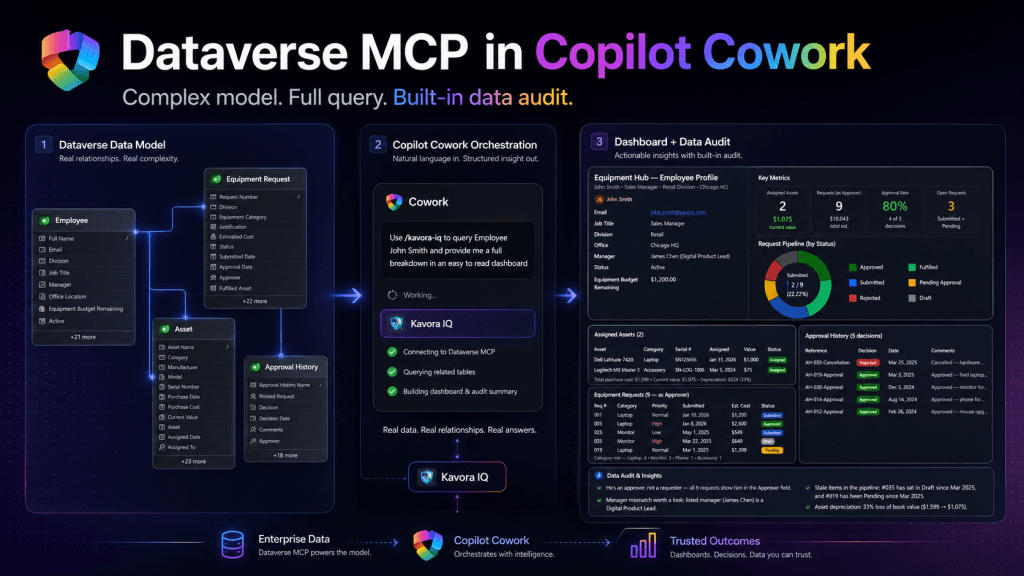
    I finally got Dataverse MCP working inside Copilot Cowork as a custom plugin.

    This guide walks through the setup in a way I wish I had when I started.

    The goal is simple:

    • Register an app in Entra
    • Enable Dataverse MCP for your Power Platform environment
    • Create the OAuth registration in Teams Developer Portal
    • Build a Copilot Cowork plugin that points to your Dataverse MCP endpoint
    • Deploy it
    • Give Cowork enough schema context to understand your Dataverse tables

    If you are a low-code builder, the confusing part is not Dataverse.

    The confusing part is the setup across multiple portals.

    You will touch Entra, Power Platform admin center, Teams Developer Portal, the plugin manifest, and Copilot Cowork.

    That sounds worse than it is. You just need to know which value goes where.

    I have a video going over the same steps as the blog:

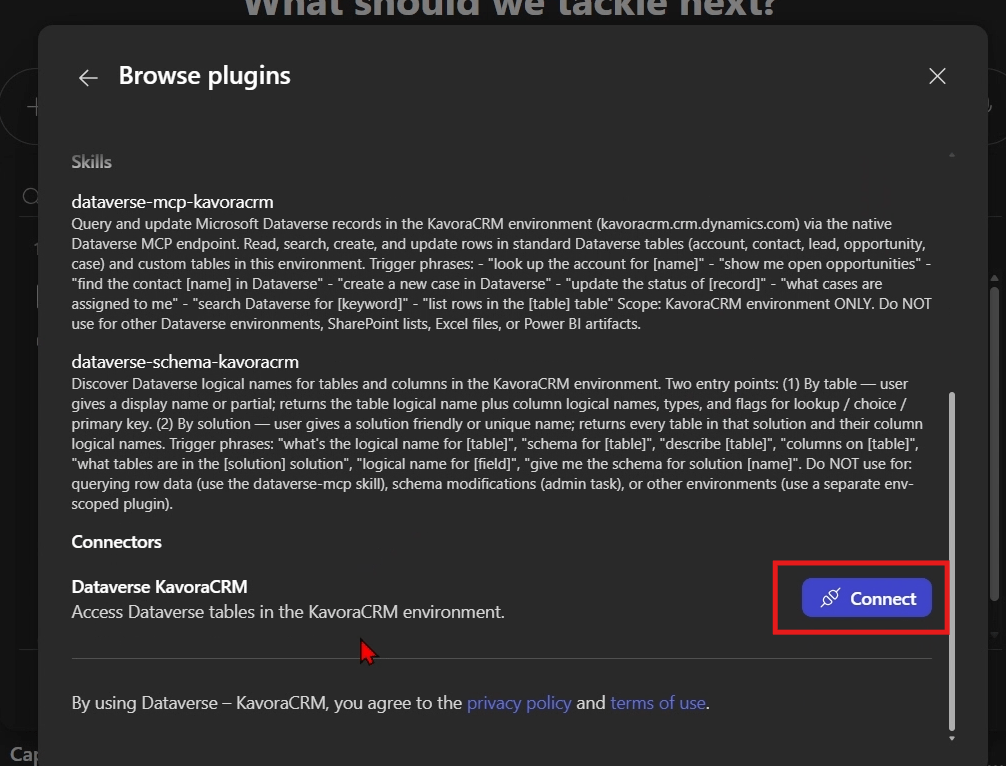
    1. What we are building
    2. Before you start
    3. The setup order
    4. Step 1: Create the App Registration
      1. Add the Dataverse MCP permission
      2. Add the redirect URI
    5. Step 2: Configure the Power Platform environment
      1. Add the allowed MCP client
      2. Capture the Dataverse URL
    6. Step 3: Create the OAuth registration in Teams Developer Portal
      1. Base URL
      2. Authorization endpoint
      3. Token endpoint
      4. Scope
      5. Client ID and secret
    7. Step 4: Build the plugin
      1. Import Plugin Builder skill
      2. Build Dataverse Plugin with Template
    8. Step 5: Deploy the plugin
      1. Connect Plugin
    9. Step 6: Create a schema-aware skill
    10. Step 7: Test with a real scenario
    11. Example prompts:
      1. List records
      2. Add records
      3. Details on a record
      4. Build Dashboard
      5. Create report
      6. Send Email with context
      7. Create PPT with context + Brand
    12. Common mistakes
      1. Mistake 1: Mixing up the IDs
      2. Mistake 2: Wrong MCP URL
      3. Mistake 3: Wrong OAuth scope
      4. Mistake 4: Testing with a user that cannot access the data
      5. Mistake 5: Re-uploading the same version
    13. Download the checklist
    14. Official docs
    15. Final take

    What we are building

    We are building a Copilot Cowork plugin that connects to the Dataverse MCP endpoint.

    Once installed, Cowork can use that plugin to query Dataverse through MCP.

    The basic flow looks like this:

    1. User asks Copilot Cowork a question
    2. Cowork uses the custom plugin
    3. The plugin points to the Dataverse MCP endpoint
    4. Dataverse returns the data
    5. Cowork uses schema guidance to make sense of the tables
    6. Cowork returns a useful answer, summary, dashboard, or audit notes

    I recommend keeping this setup in two parts:

    • The plugin: gives Cowork access to the Dataverse MCP connector
    • The schema skill: tells Cowork which Dataverse tables, columns, relationships, and rules matter

    That split makes the setup easier to maintain.

    If your schema changes, you can update the schema skill without rebuilding and redeploying the entire plugin package.

    Before you start

    You will need:

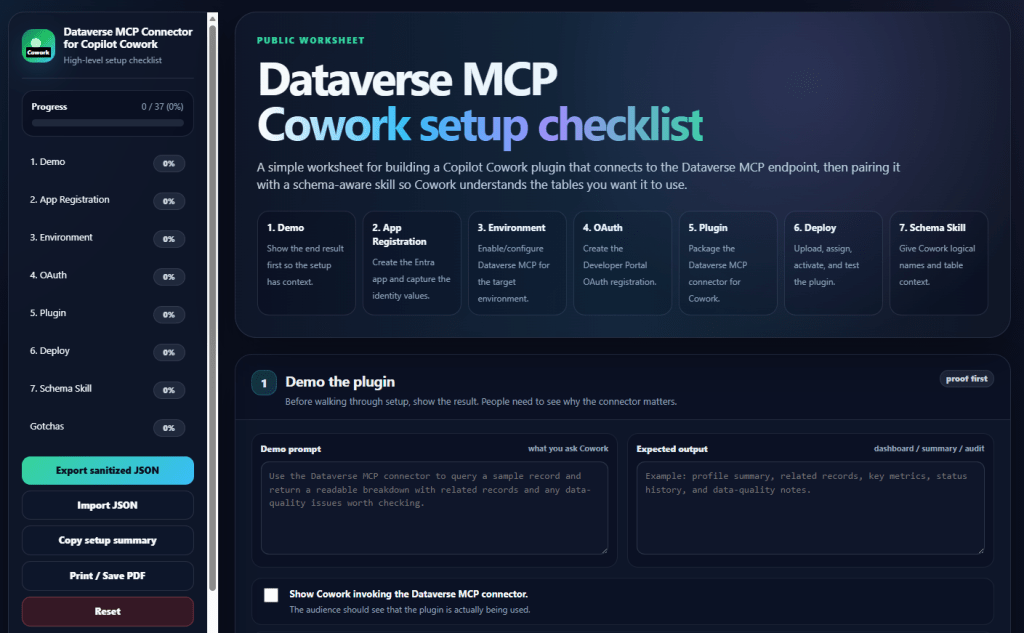
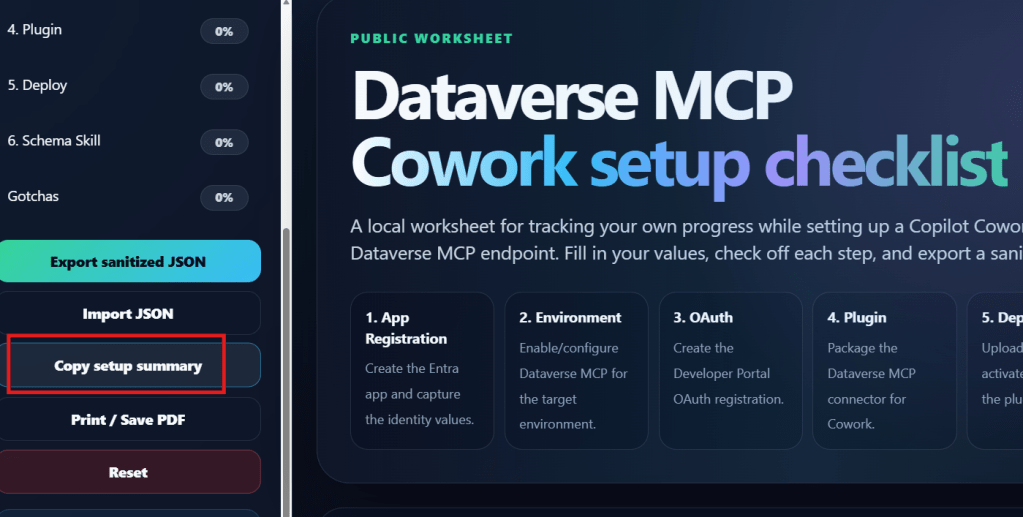
    I created a checklist for this because the setup has a few values that are easy to mix up.

    The setup order

    This is the order I recommend:

    1. Create the App Registration
    2. Configure the Power Platform environment
    3. Create the OAuth registration in Developer Portal
    4. Build the plugin
    5. Deploy the plugin
    6. Create the schema skill
    7. Test everything in Copilot Cowork

    Do not start with the plugin manifest.

    Get the identity, environment, and OAuth pieces ready first. The manifest is much easier once you already have the right values.

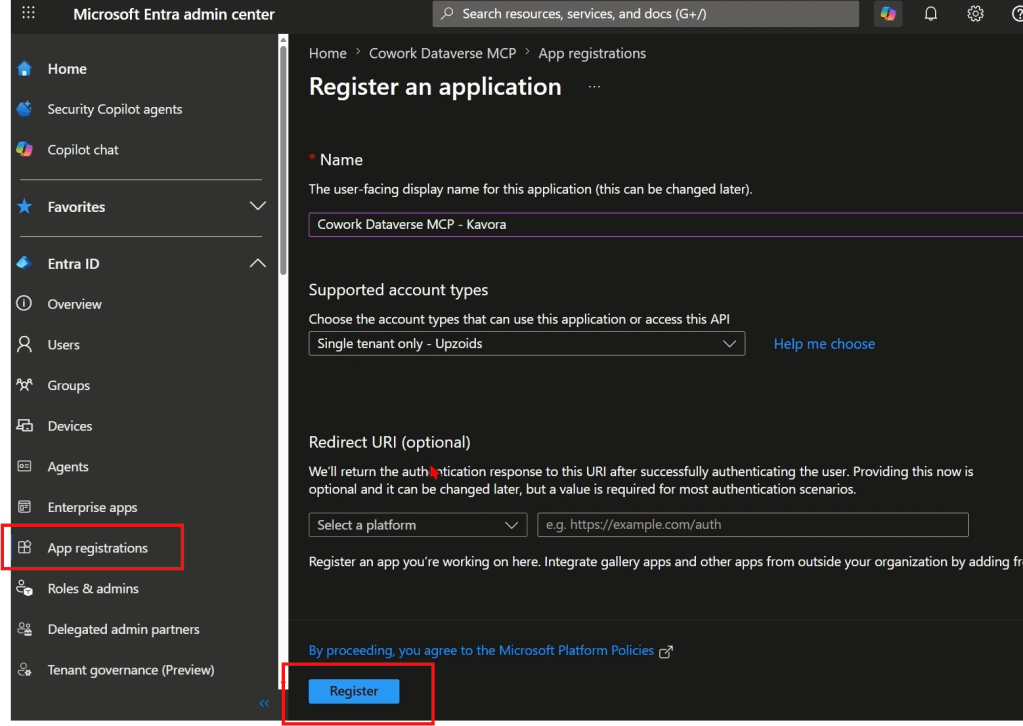
    Step 1: Create the App Registration

    Start in Microsoft Entra.
    https://entra.microsoft.com/

    Create an app registration that will be used for the Dataverse MCP connection.

    Capture these values:

    • Tenant ID
    • Application / Client ID
    • Client secret
    • Secret expiry date

    You will use the Client ID more than once, so copy it somewhere safe.

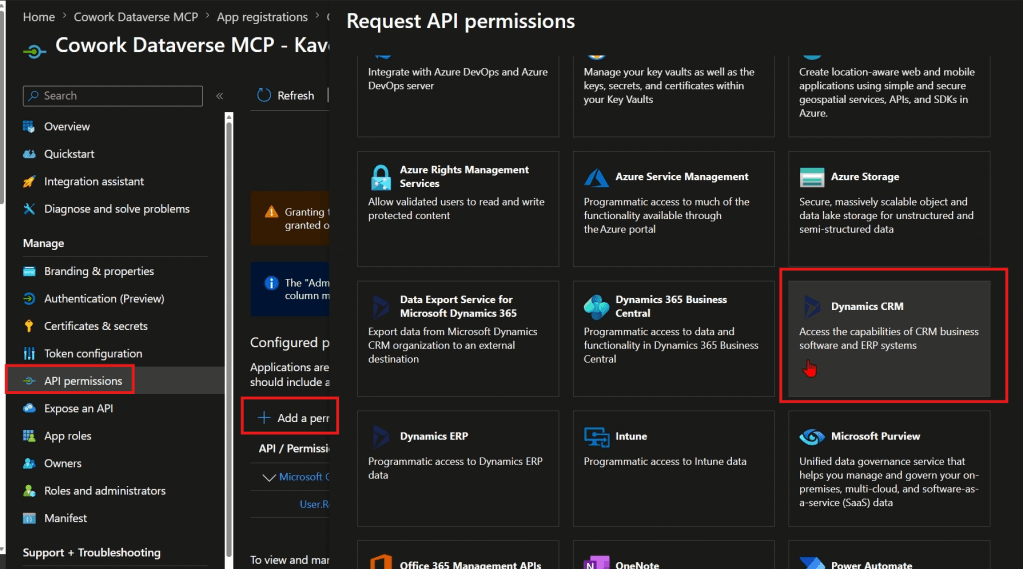
    Add the Dataverse MCP permission

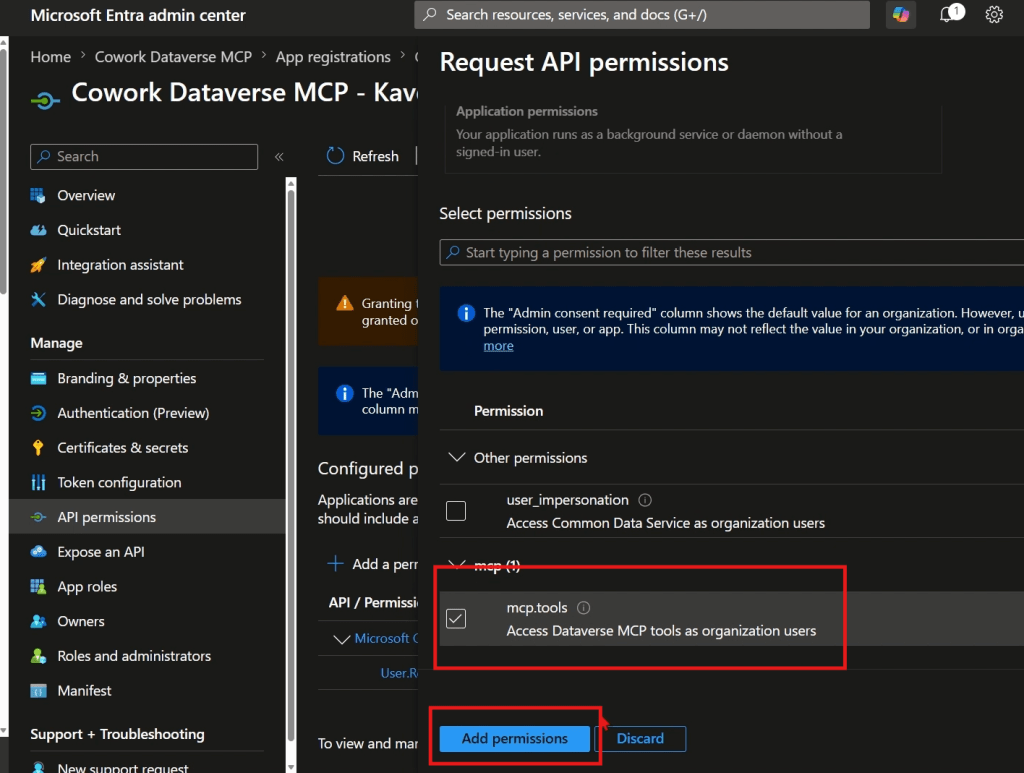
    In the app registration, add the required API permission for Dataverse MCP.

    1. Open the app registration
    2. Go to API permissions
    3. Select Add a permission
    4. Select Microsoft APIs
    5. Select Dynamics CRM
    6. Add the permission:
    mcp.tools

    Grant admin consent if your tenant requires it.

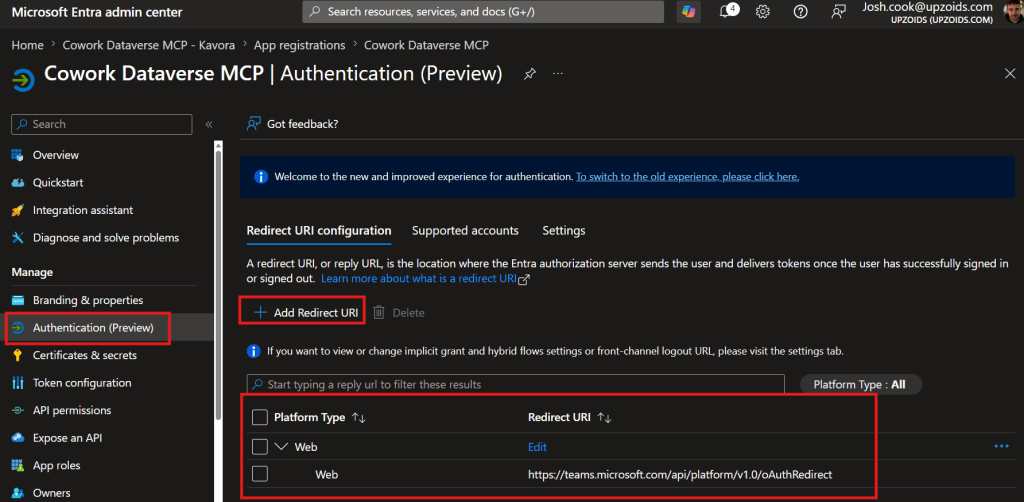
    Add the redirect URI

    1. For the OAuth flow, add this redirect URI if your setup requires it:
    https://teams.microsoft.com/api/platform/v1.0/oAuthRedirect

    Important: the Application / Client ID is not the same as the OAuth registration ID you will create later.

    Keep those two values separate.

    Step 2: Configure the Power Platform environment

    Next, configure the Power Platform environment that contains your Dataverse data.

    You need the Dataverse environment to allow MCP clients.

    Open Power Platform admin center and go to the target environment.

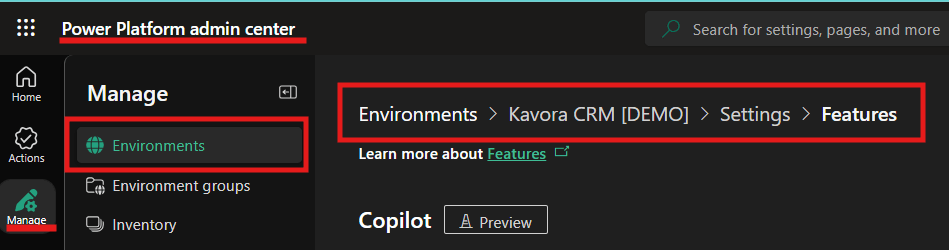
    1. Open Power Platform admin center
    2. Go to Manage
    3. Select Environments
    4. Open your target environment
    5. Open Settings
    6. Go to Product
    7. Open Features
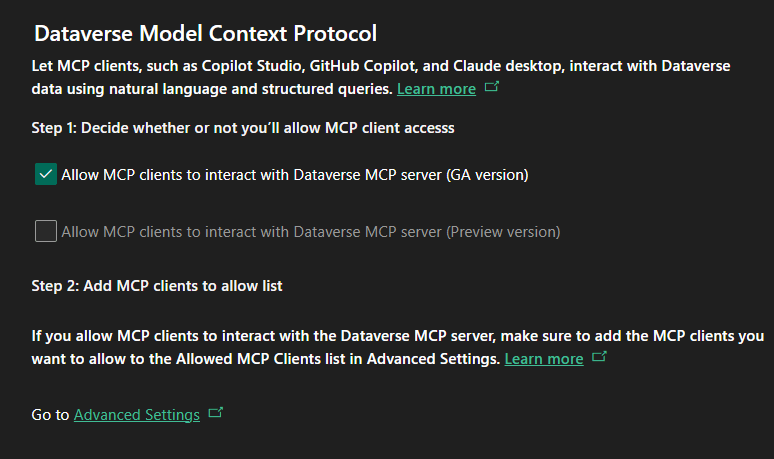
    8. Find the Dataverse MCP setting
    9. Allow MCP clients to interact with Dataverse MCP server
    10. Only check the GA version of the MCP server > Click Save

    The exact wording may change because this area is still moving, but the goal is the same: allow MCP clients for that environment

    Add the allowed MCP client

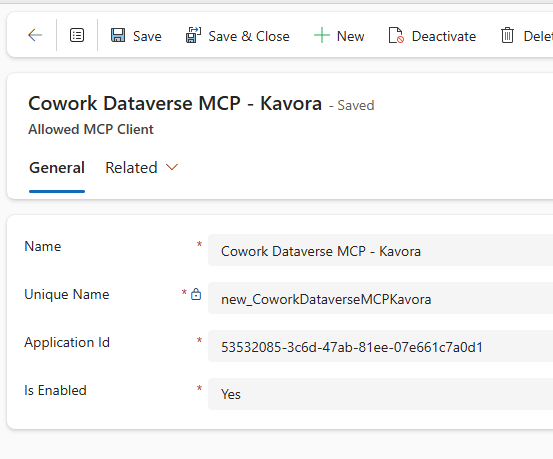
    Now add your Entra Application / Client ID as an allowed MCP client for the environment.

    1. Click “Go to Advanced Settings” link under Step 2
    2. Click +New > fill in the details like this:
      – Name: Cowork Dataverse MCP – <env name>
      – Unique Name: new_CoworkDataverseMCP<envName>
      – Application Id: Paste your application Id from the App Registration you created in section 1
      – Is Enabled: Yes
    3. Click Save & Close

    That part matters.

    The value you add here is the Entra Application / Client ID.

    Also make sure the allowed MCP client is enabled.

    If this step is wrong, the plugin can look fine but still fail when Cowork tries to use Dataverse.

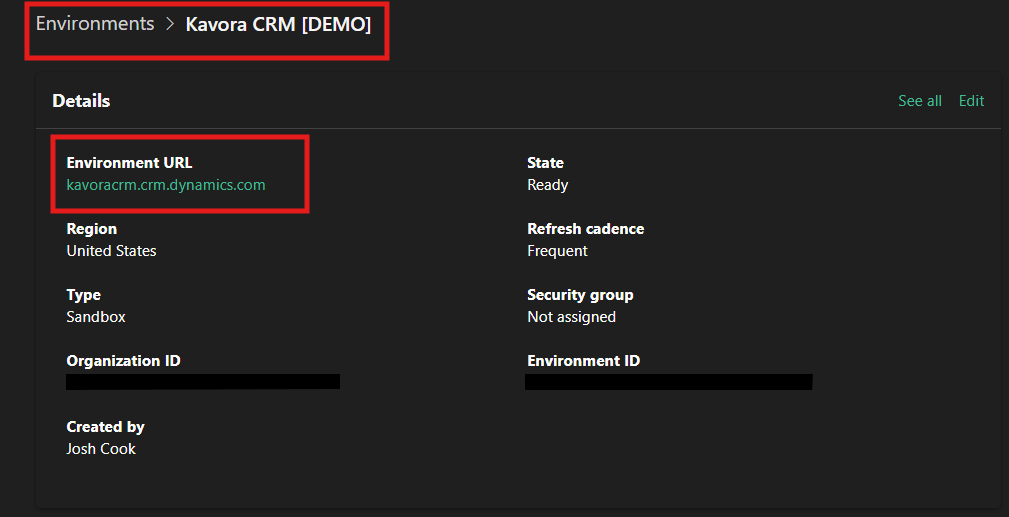
    Before leaving the admin center, grab the Environment URL.

    Capture the Dataverse URL

    You need your Dataverse Org URL

    It looks like this:

    https://yourorg.crm.dynamics.com

    The MCP server URL is the same URL with /api/mcp added to the end.

    https://yourorg.crm.dynamics.com/api/mcp

    Step 3: Create the OAuth registration in Teams Developer Portal

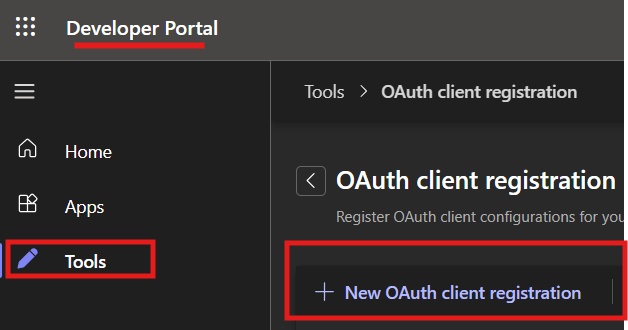
    Now open Teams Developer Portal.
    ( https://dev.teams.microsoft.com/ )

    Create an OAuth client registration for the plugin.

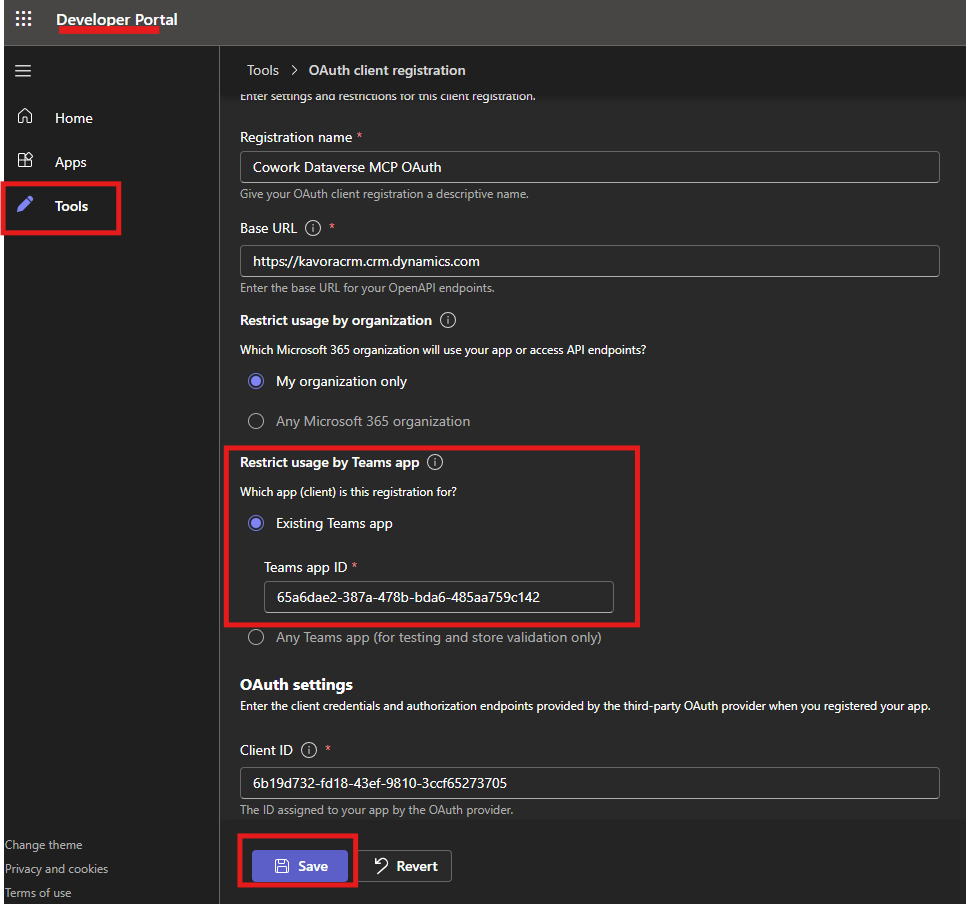
    This registration stores the OAuth configuration and gives you the OAuth registration ID that your plugin manifest will reference.

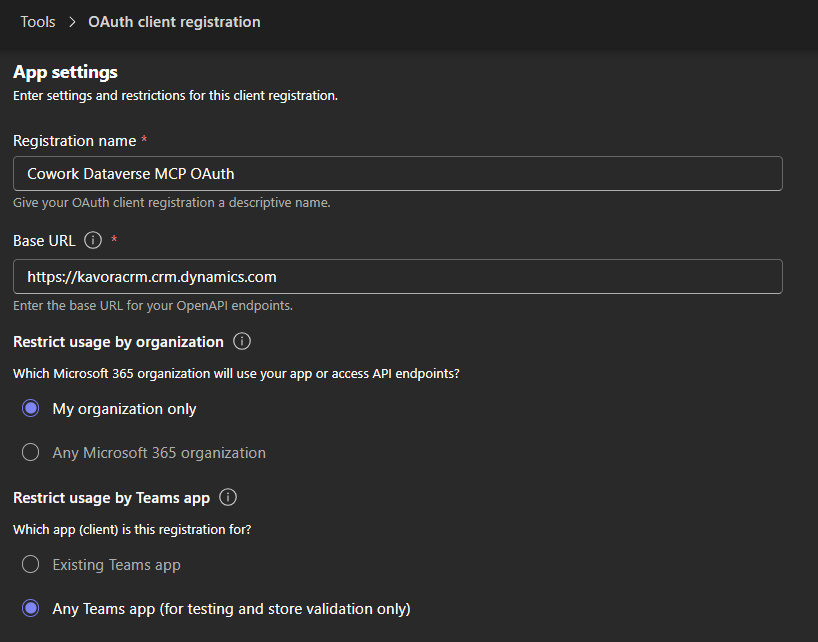
    In the OAuth registration, you will enter values from the Entra app and your Dataverse environment.

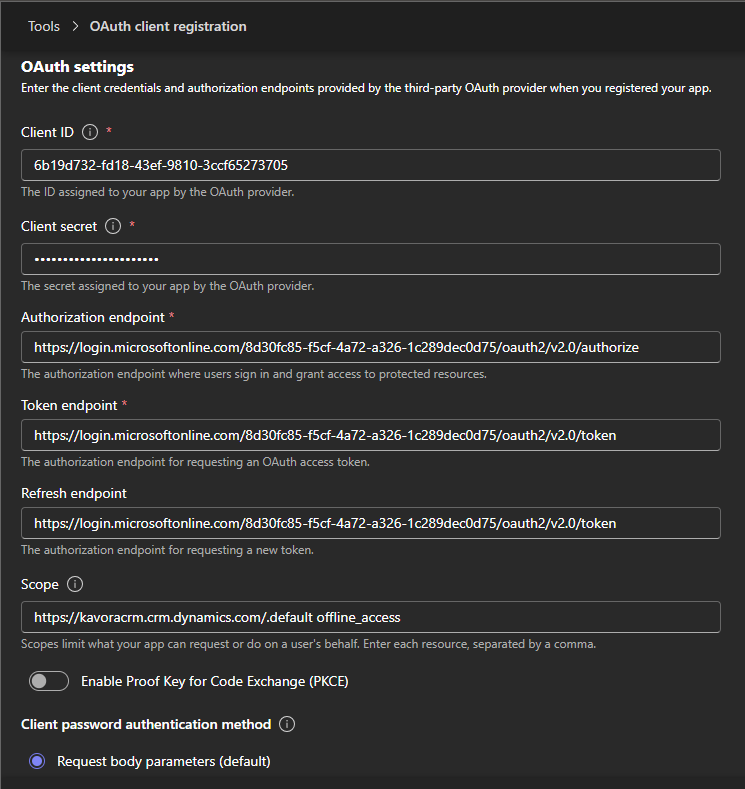
    1. Click Tools > OAuth client registration
    2. + New OAuth client registration

    Base URL

    Use your Power Platform Environment URL

    https://<yourorg>.crm.dynamics.com

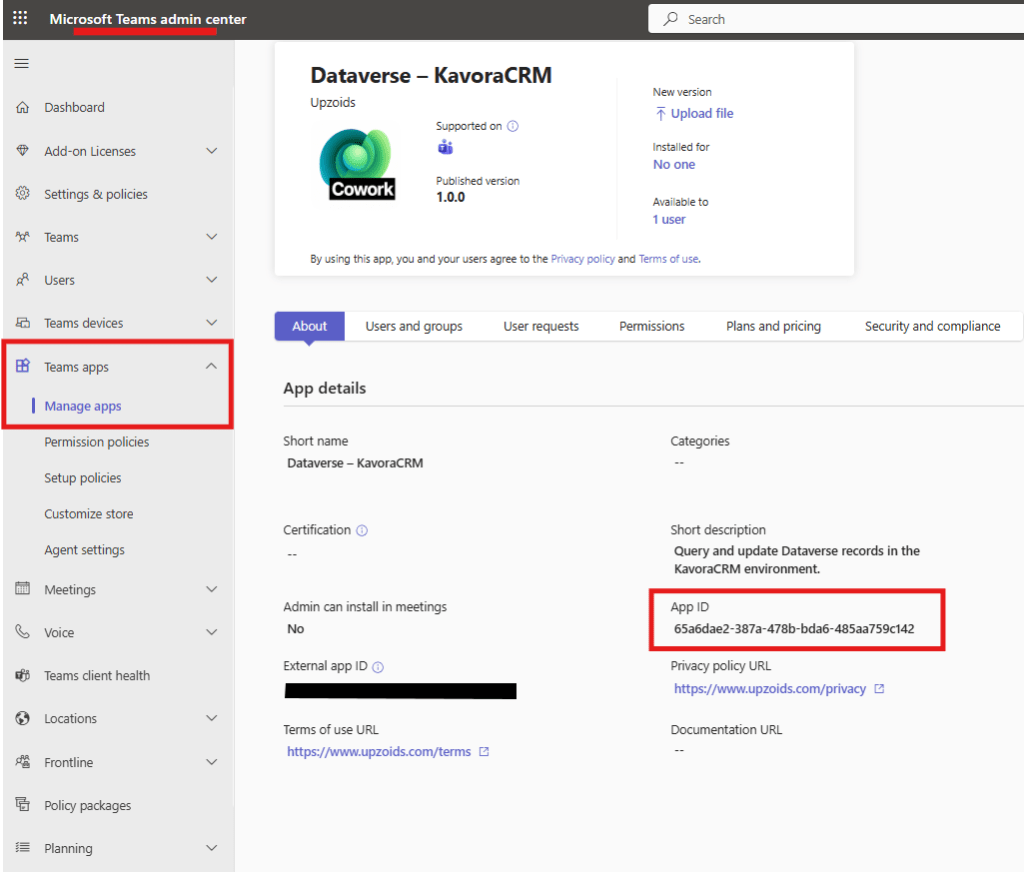
    Restrict usage by Teams app: select Any Teams app (for now, since we don’t have a Teams app ID yet)

    Authorization endpoint

    Use your Tenant ID in this format:

    https://login.microsoftonline.com/{tenantId}/oauth2/v2.0/authorize

    Token endpoint

    Use your Tenant ID in this format:

    https://login.microsoftonline.com/{tenantId}/oauth2/v2.0/token

    Scope

    The scope should use your Dataverse Org URL.

    Use this format:

    https://yourorg.crm.dynamics.com/.default offline_access

    Example:

    https://kavoracrm.crm.dynamics.com/.default offline_access

    Client ID and secret

    Use the Client ID and secret from the Entra app registration you created earlier.

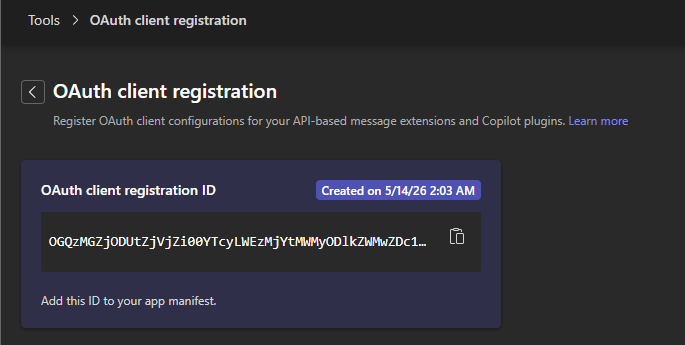
    After saving the OAuth registration, copy the OAuth registration ID.

    You will use that value in the plugin manifest as the connector referenceId.

    Important: the OAuth registration ID goes into the plugin manifest.

    Step 4: Build the plugin

    For this approach, the plugin should stay focused on the Dataverse MCP connector.

    To make this even easier, I created a Cowork-Plugin skill to assist in building the Plugin with a template.

    Import Plugin Builder skill

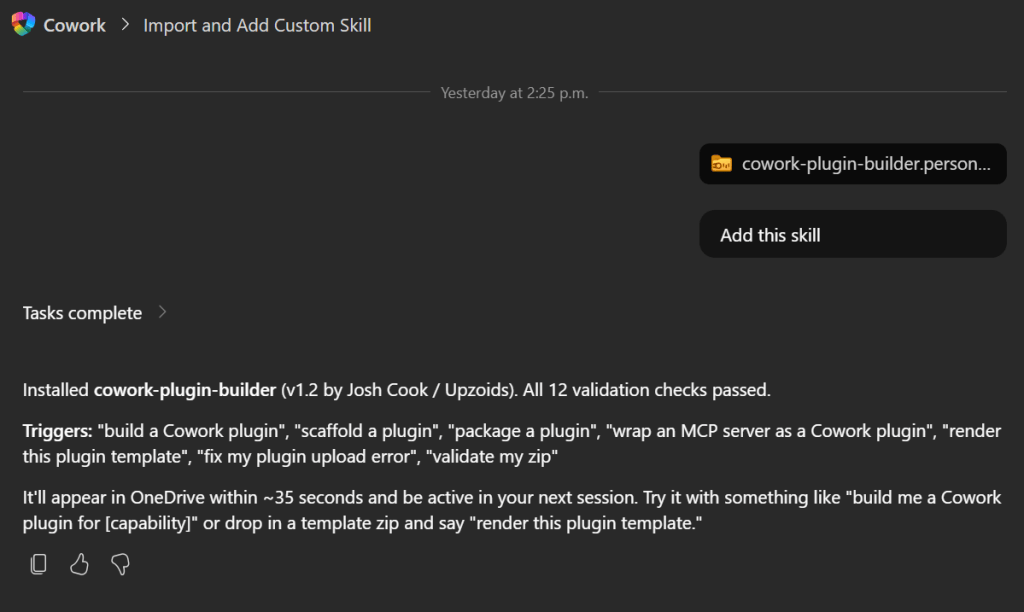
    1. Download my /cowork-plugin-builder skill
    2. In Copilot Cowork > attach the skill and prompt: Add this skill
    3. After import refresh your browser

    Build Dataverse Plugin with Template

    We will use the skill you just imported to help build the plugin.

    1. Inside Copilot Cowork craft a prompt and add the cowork-plugin-builder skill
    2. Add these details or Copilot Cowork will ask you for these values
      (NOTE: If your using the Checklist app I created to track progress, click the Copy setup summary. Paste this into the prompt as well)

    Prompt to use:

    /cowork-plugin-builder to build a Dataverse plugin using this template:‌
    Organization name:
    Connector display name:
    description:
    Tenant ID:
    Client ID:
    Org URL:
    MCP URL:
    OAuth registration ID:
    OAuth scope:
    Connector referenceId:

    Fill in everything you can.

    I created a Dataverse-style icon with a Cowork badge so the plugin is easy to recognize when it appears in Cowork.
    (Included in the template)

    When Copilot Cowork is done, you should receive a zip file.

    Download the zip file.

    Step 5: Deploy the plugin

    After the package is ready, deploy it to a test user or test group first.

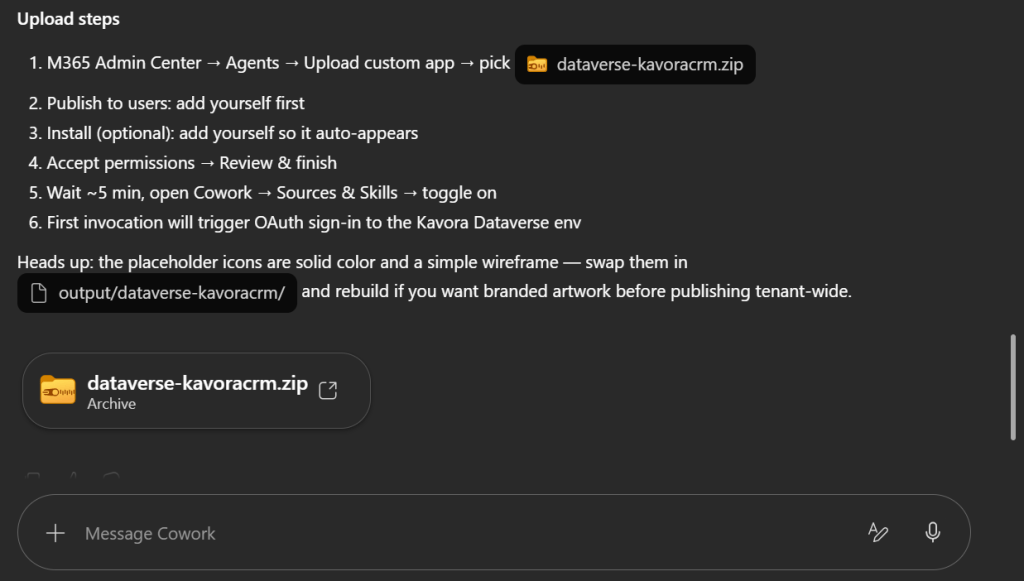
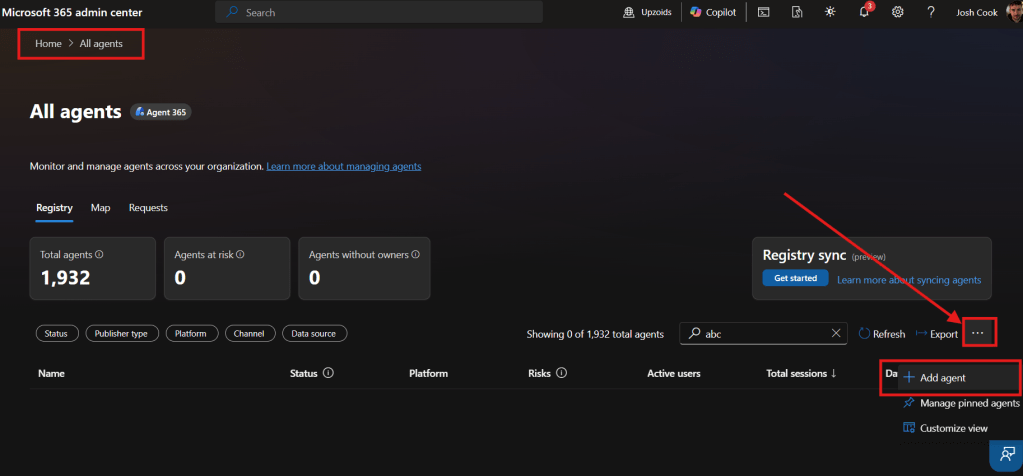
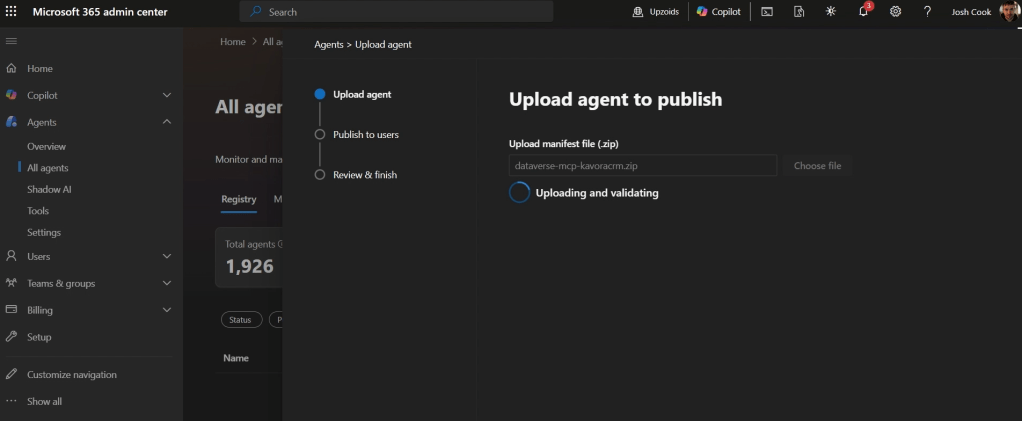
    1. M365 Admin Center > Agents > All agents > Upload custom app > pick dataverse-<pluginname>.zip
    2. Publish to users: add yourself first
    3. Install (optional): add yourself so it auto-appears
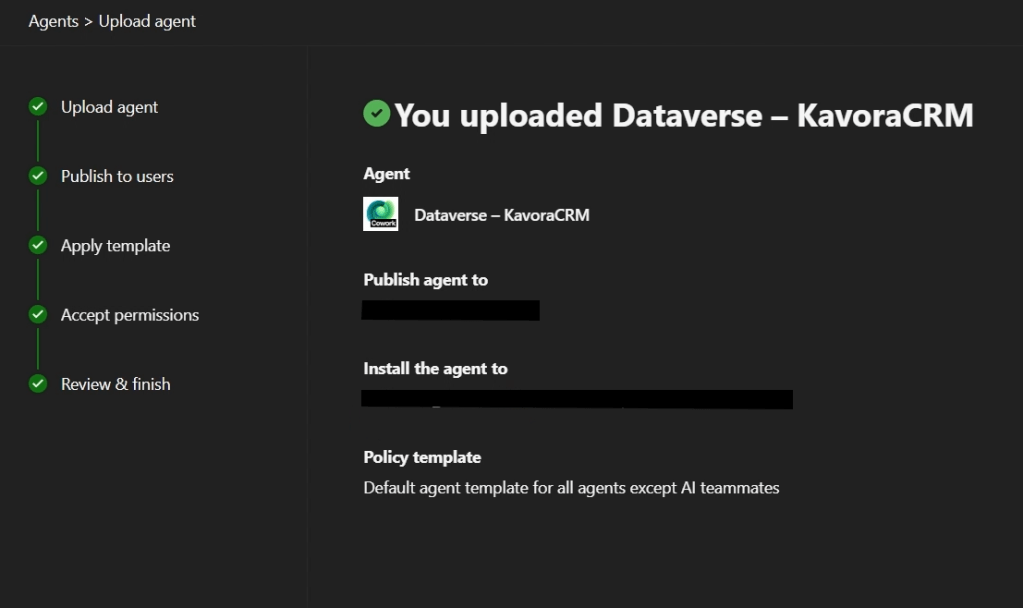
    4. Accept permissions > Review & finish
    • Apply Template (default should be fine)
    • Review Permissions (should be none, since permissions are done through the App registration)
    • Publish

    Keep the first deployment small.

    Connect Plugin

    1. Open a fresh Copilot Cowork session
    2. Click + > Manage Plugins
    3. Click … Browse Plugins
    4. Find the Plugin > Click Add
    5. Scroll down and click Connect

    Start with a simple prompt like this:

    Use the <Plugin name> to confirm you can access the Dataverse MCP server.

    Important: when you change the plugin package, update the version before uploading again.

    Also start a fresh Cowork session after deployment changes.

    Otherwise, you can end up testing against a stale session and thinking the plugin is broken.

    Step 6: Create a schema-aware skill

    This is the step that makes the plugin more useful.

    The plugin gives Cowork access to Dataverse.

    The schema skill helps Cowork understand what to do with that access.

    In the schema skill, give Cowork the details it needs to query your model properly.

    • Table logical names
    • Table purpose
    • Primary columns
    • Lookup columns
    • Relationships between tables
    • Status fields
    • Rules for what matters
    • Data-quality checks
    • Example prompts

    We can use this skill to create a personal skill to query certain tables, etc.

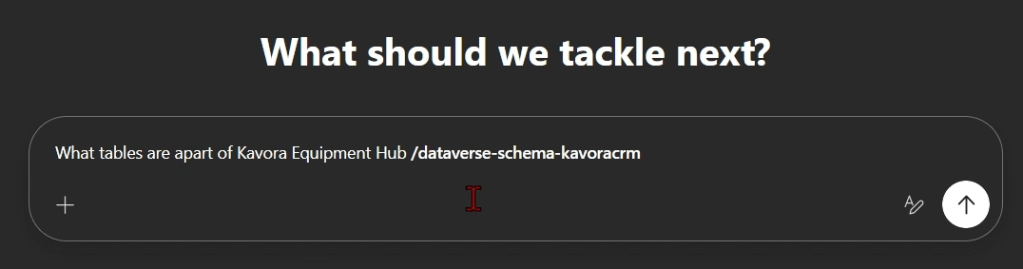
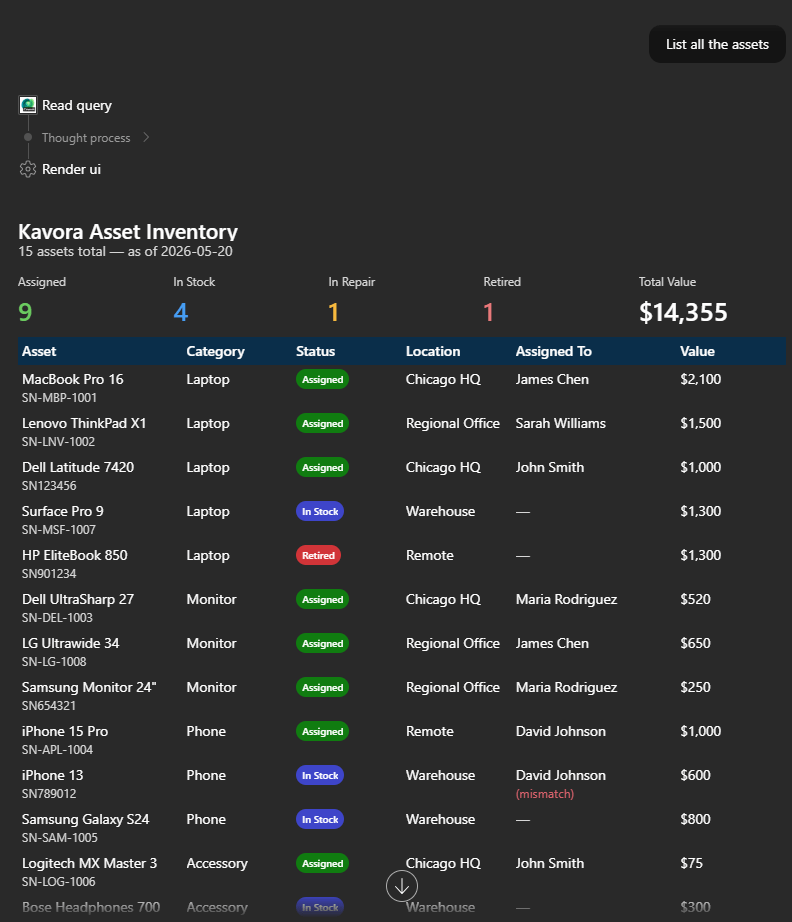
    In the example, I ask Copilot Cowork what tables are used in a certain Model-Driven App.
    Prompt:

    What tables are apart of Kavora Equipment Hub
    /dataverse-schema-

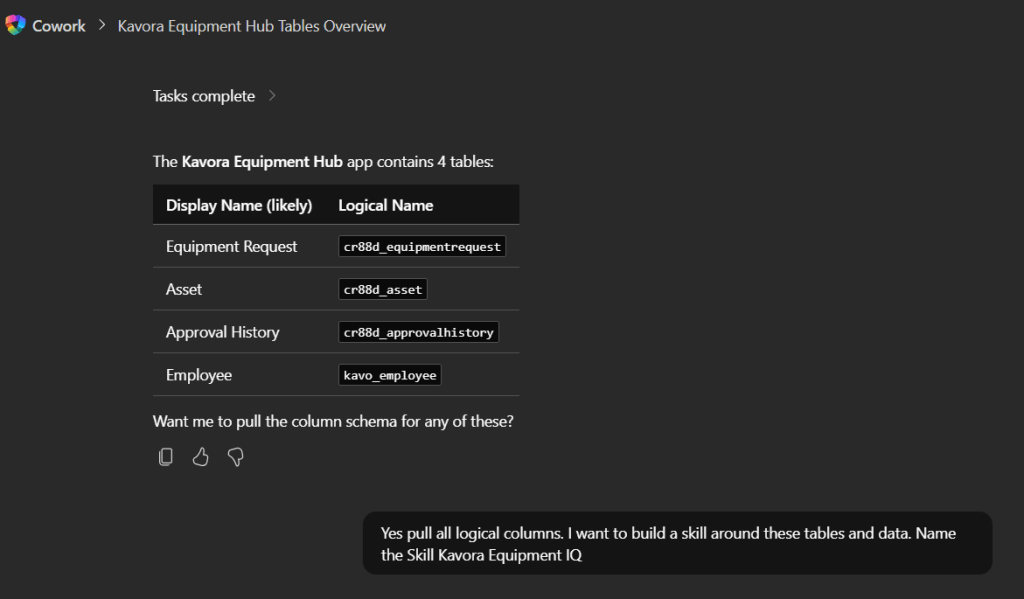
    Copilot Cowork responds with a tables and logical names.
    Next I ask for all the logical columns for those tables.
    (NOTE: This will help Copilot Cowork query your data quicker)

    My follow-up prompt:

    Yes pull all logical columns.
    I want to build a skill around these tables and data.
    Name the Skill Kavora Equipment IQ

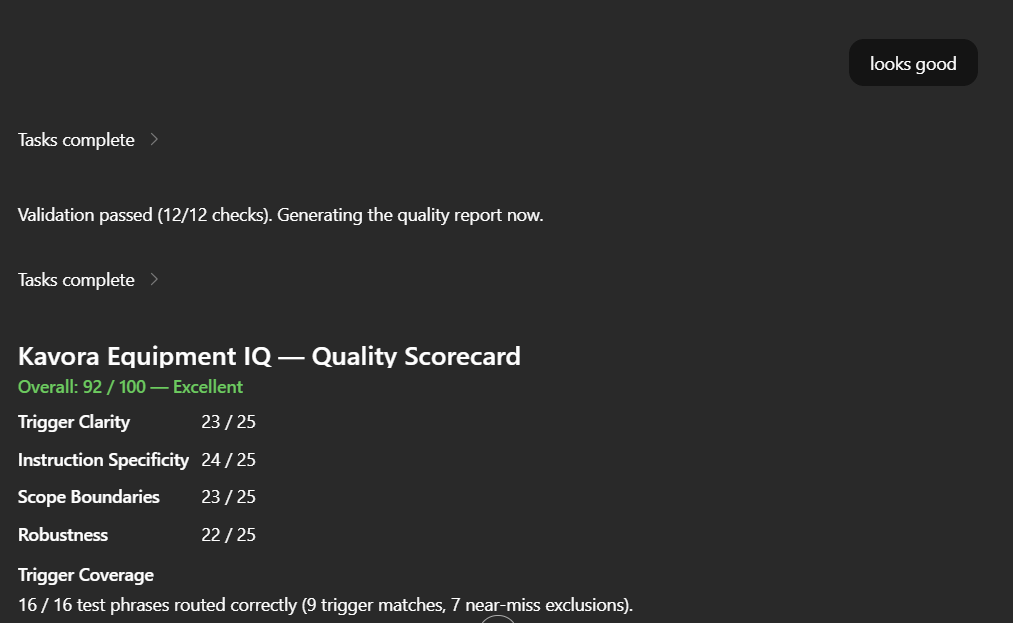
    Then Copilot Cowork drafted the skill for me.
    I reviewed it and said “Looks good”

    Copilot Cowork built the skill

    Step 7: Test with a real scenario

    Now run an actual test.

    Do not only ask Cowork to connect.

    Ask it to use the Dataverse model.

    A good test should include:

    • One known record
    • At least one related table
    • At least one lookup relationship
    • Some output Cowork needs to organize
    • A data-quality check or business rule

    Example prompts:

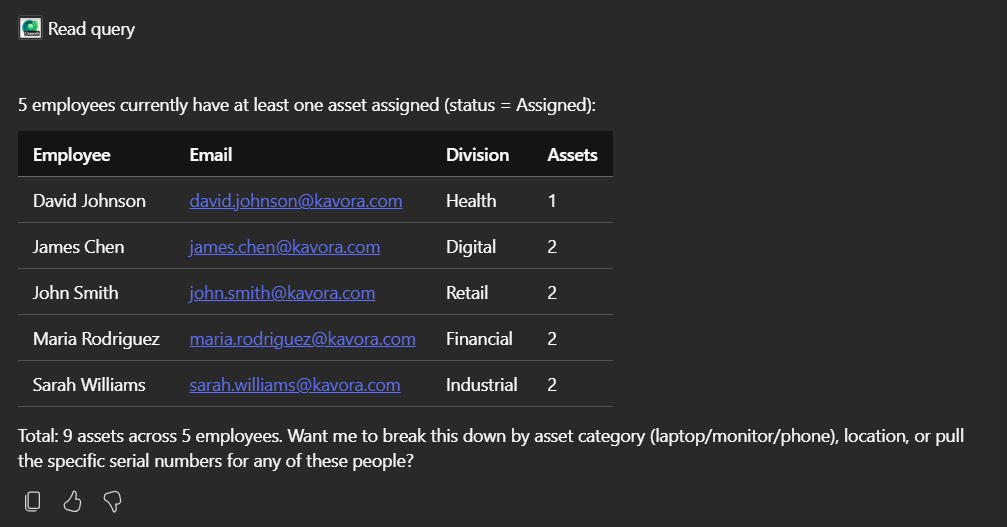
    List records

    use /<skill you just built>
    List all the <table>

    Add records

    use /<skill you just built>
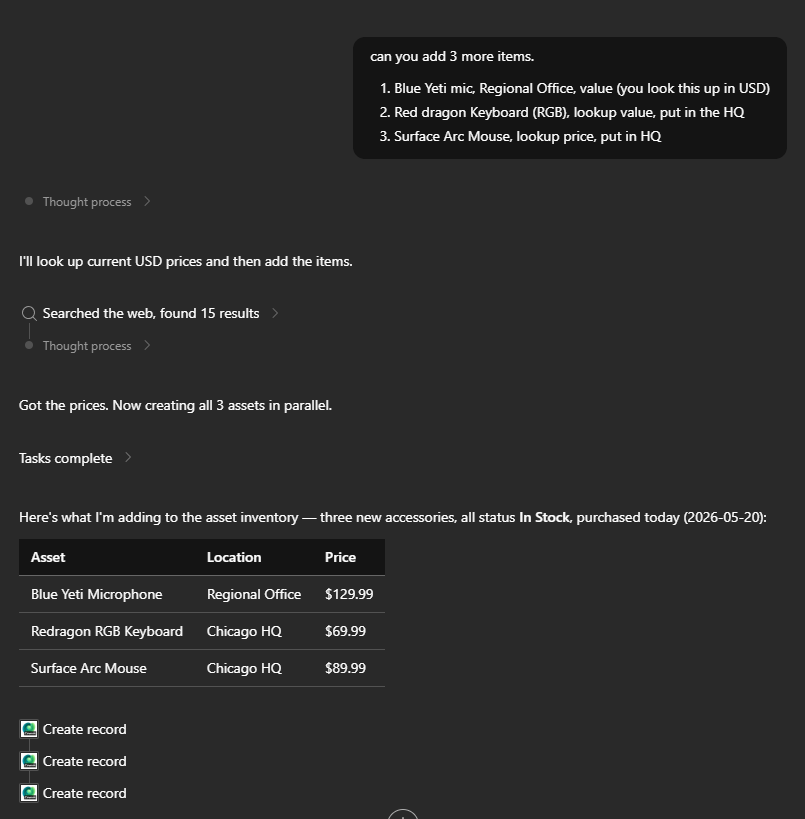
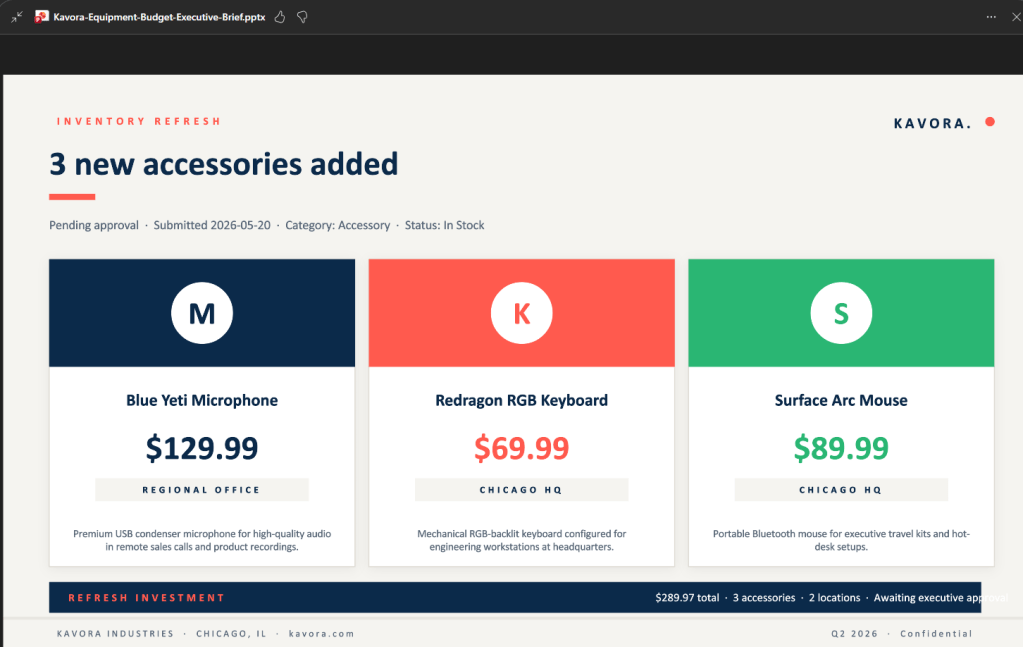
    can you add 3 more <assets>
    1. Blue Yeti mic, Regional Office, value (you look this up in USD)‌
    2. Red dragon Keyboard (RGB), lookup value, put in the HQ
    3. Surface Arc Mouse, lookup price, put in HQ

    Details on a record

    use /<skill you just built>
    list all the <table> who <condition>

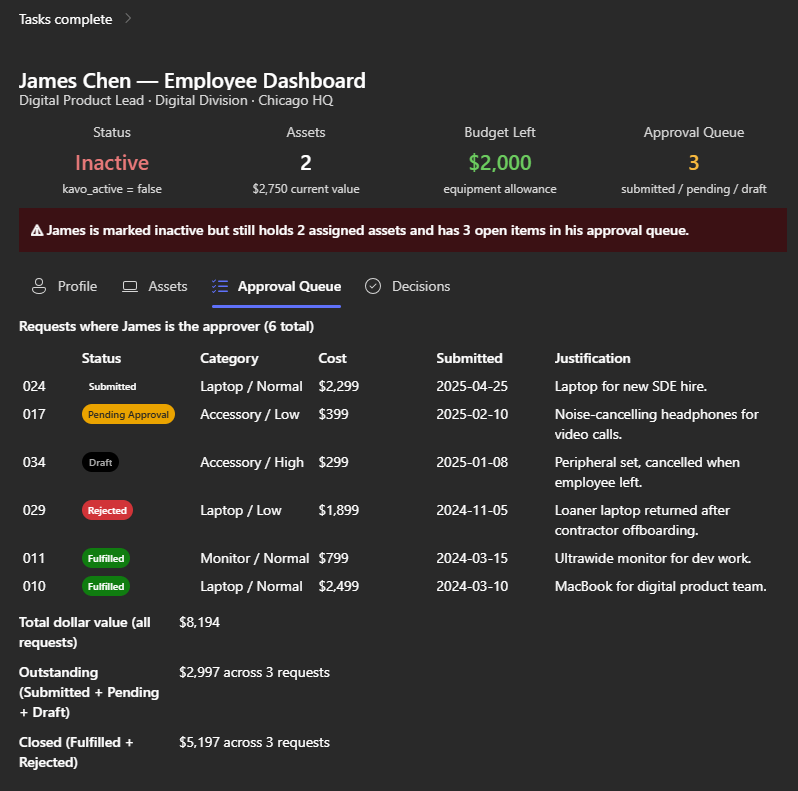
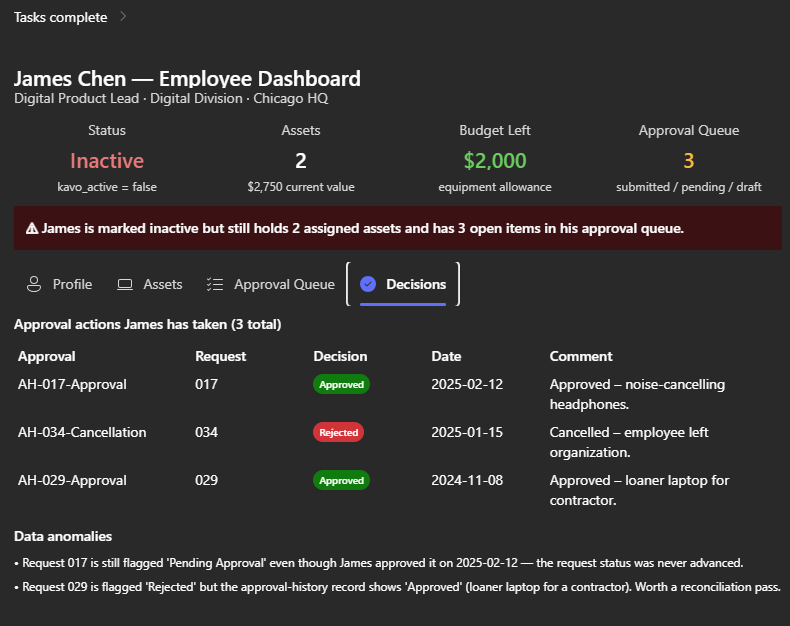
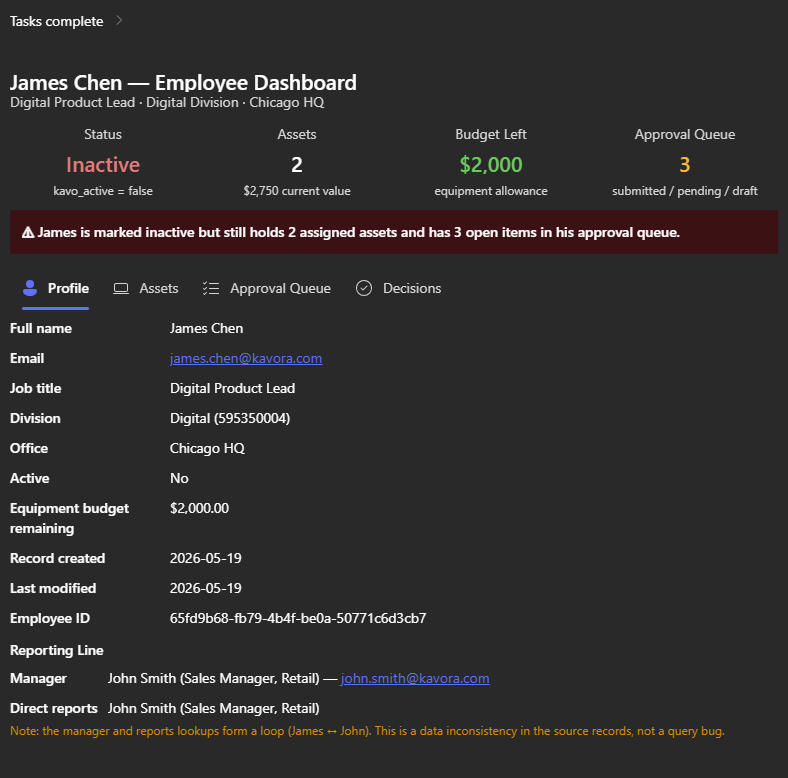
    Build Dashboard

    use /<skill you just built>
    give me a full dashboard of <record>.
    Surface all details relating to <record>

    Create report

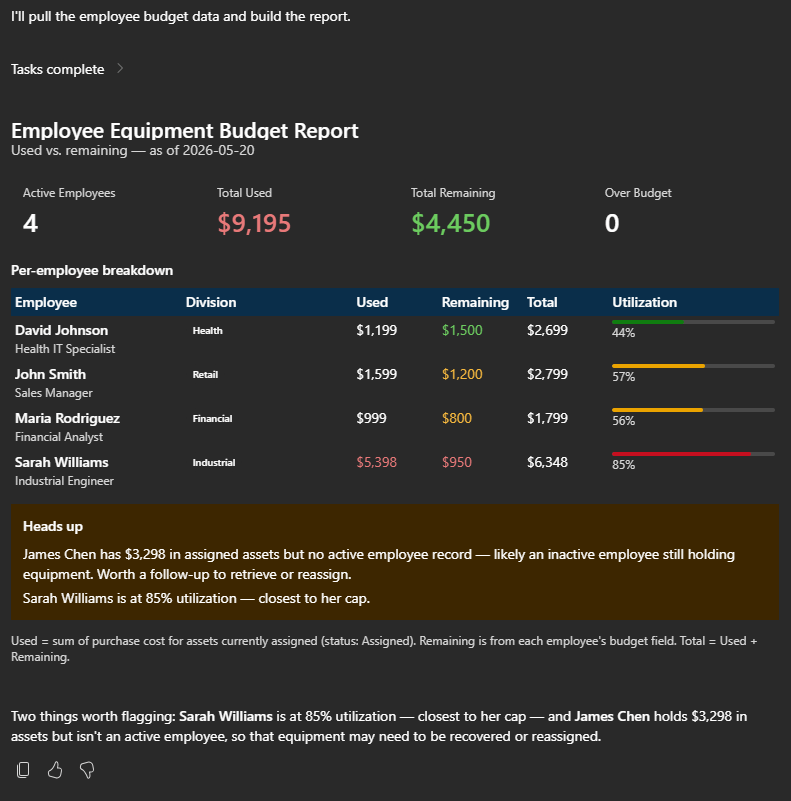
    use /<skill you just built>
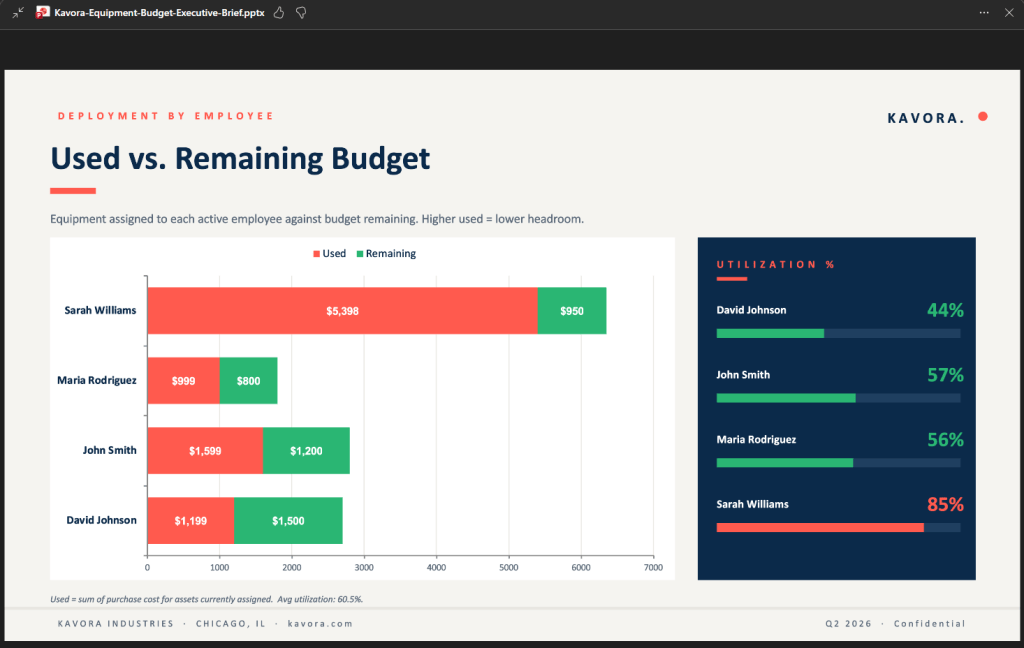
    now create a report with each <Employee>
    on what they have left VS what they have used for budget

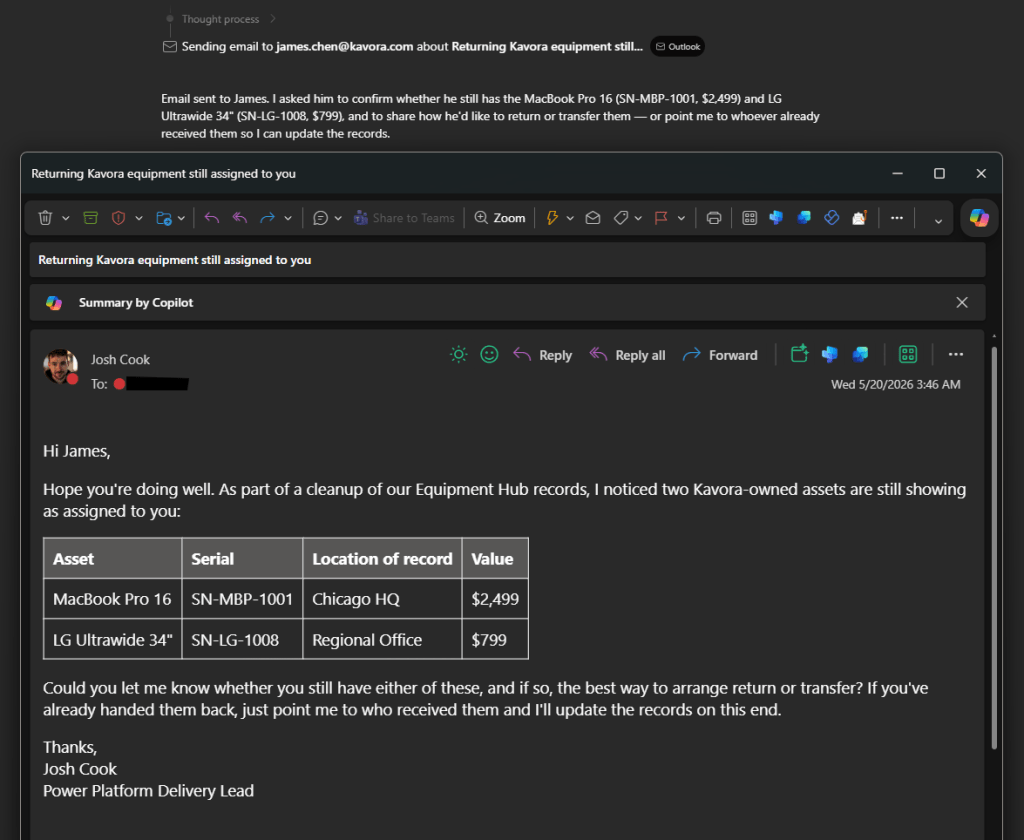
    Send Email with context

    use /<skill you just built>
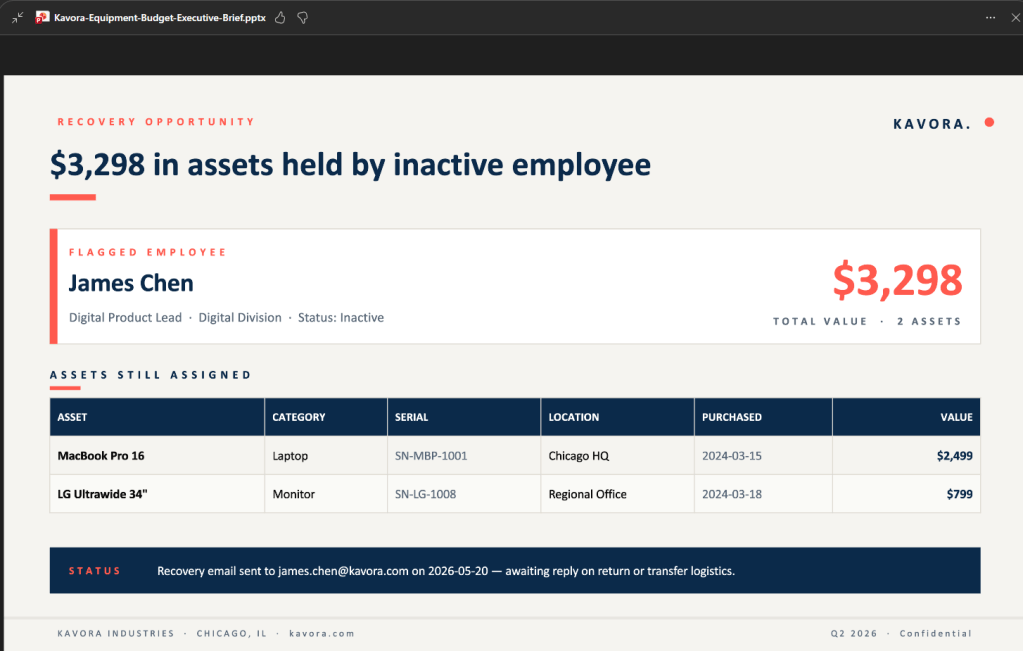
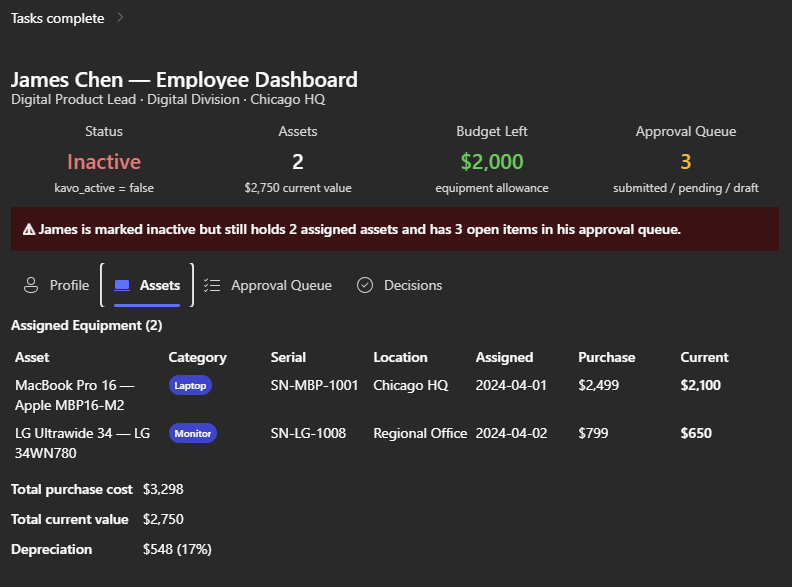
    Email <James chen> asking about the <assets>

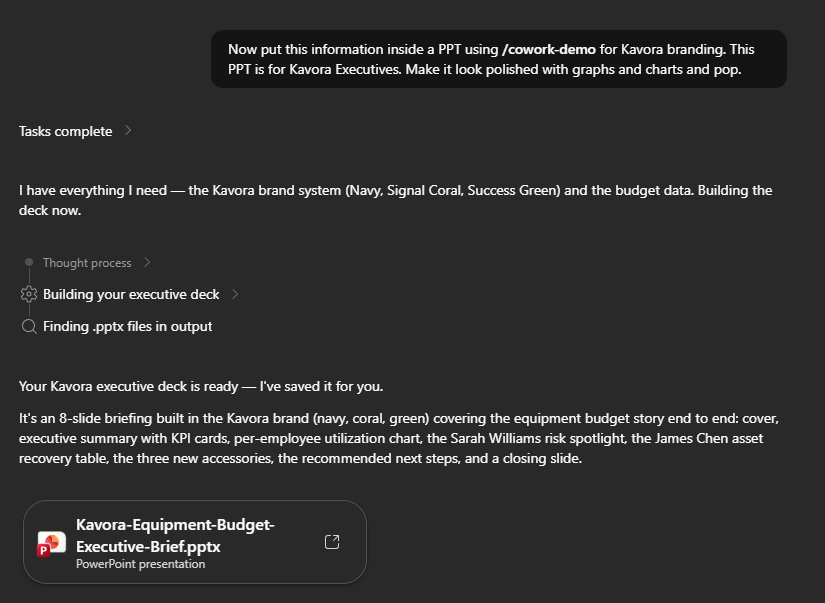
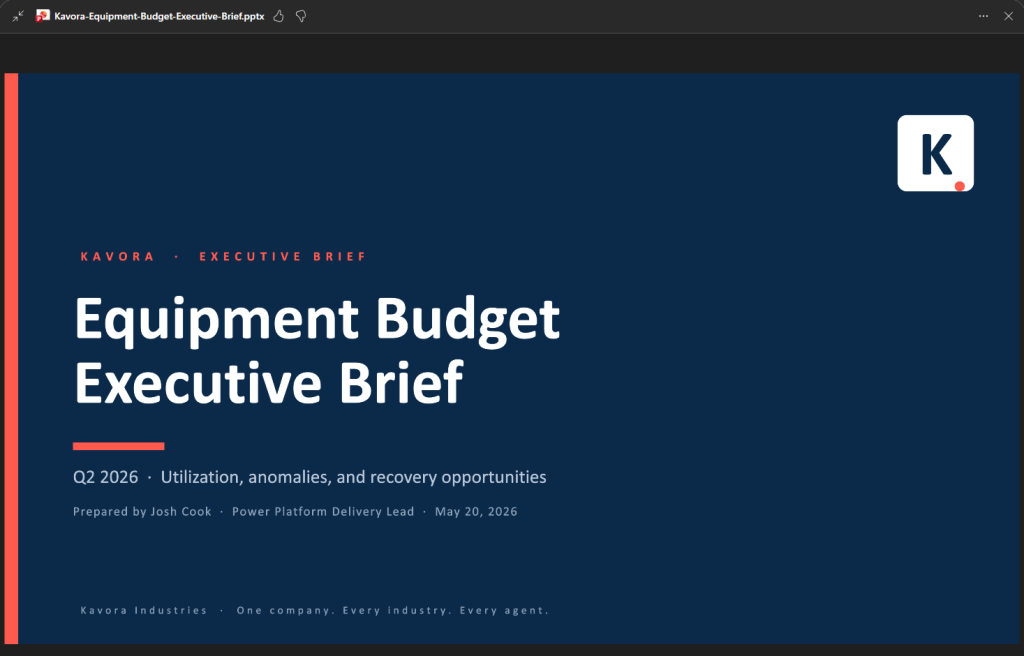
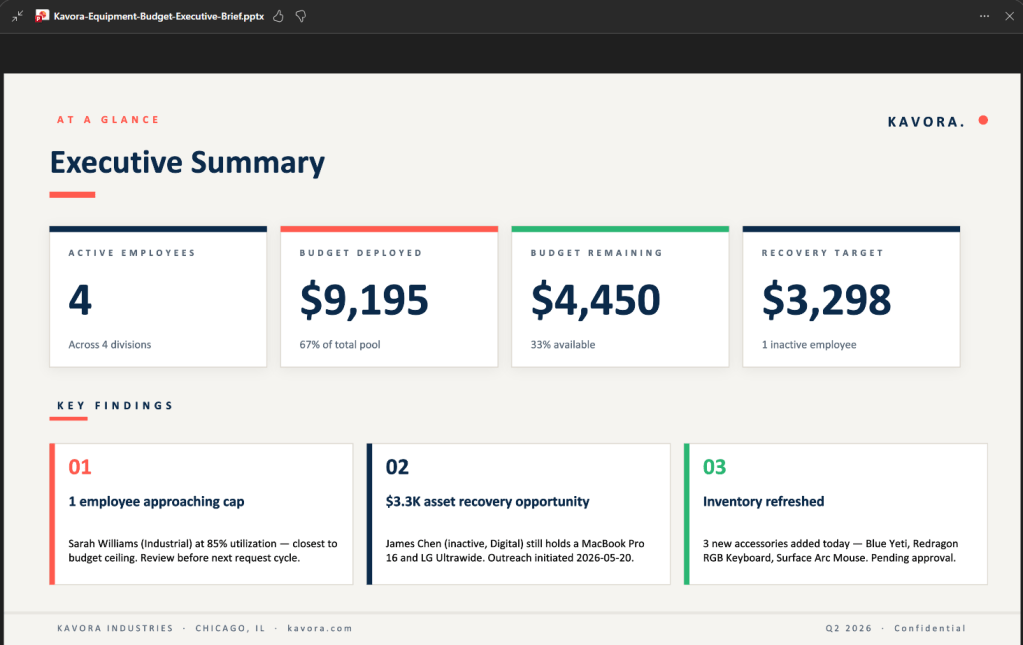
    Create PPT with context + Brand

    (NOTE: the branding is a separate skill not included in the plugin)

    use /<skill you just built>
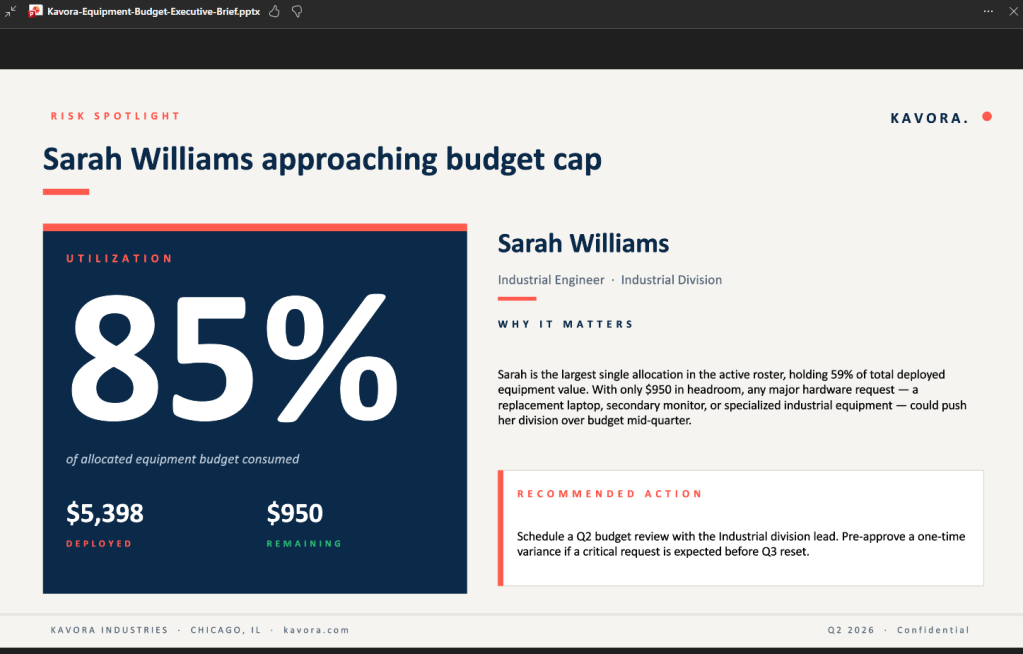
    Now put this information inside a PPT
    using </branding-skill> for Kavora branding.
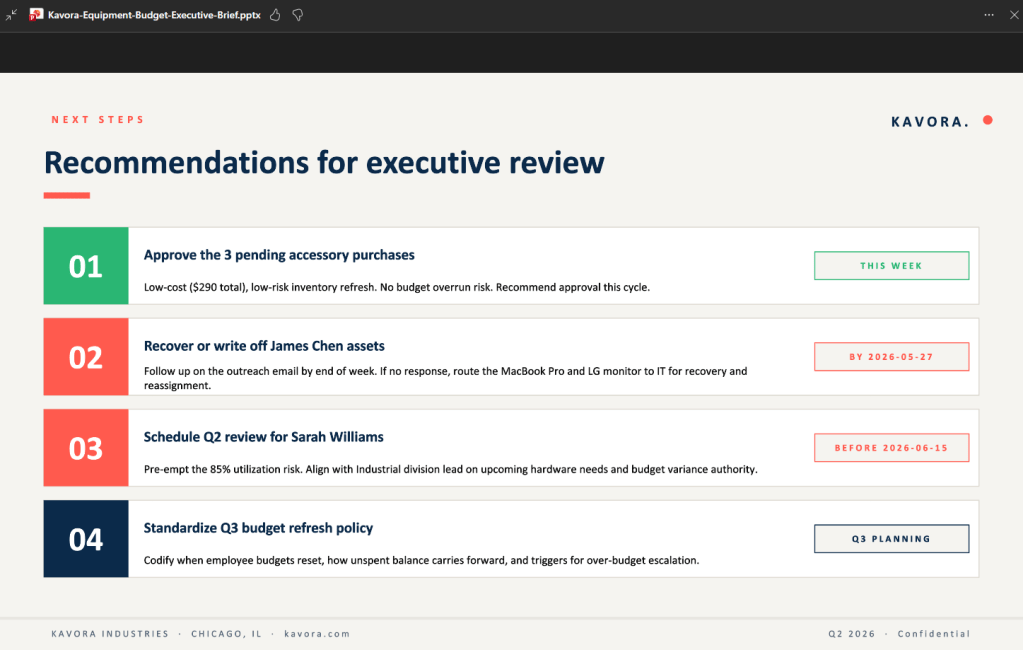
    This PPT is for Kavora Executives.
    Make it look polished with graphs and charts and pop.

    This is where the setup starts paying off.

    Cowork can query the data, follow relationships, and return a useful answer instead of forcing you to manually pull everything together.

    Common mistakes

    Mistake 1: Mixing up the IDs

    There are two important IDs:

    • Entra Application / Client ID: used in Power Platform as the allowed MCP client
    • OAuth Registration ID: used in the plugin manifest as the referenceId

    If you paste the wrong one in the wrong place, the setup will fail.

    Mistake 2: Wrong MCP URL

    The MCP URL should look like this:

    https://yourorg.crm.dynamics.com/api/mcp

    Watch for missing /api/mcp.

    Mistake 3: Wrong OAuth scope

    The scope should use your Dataverse Org URL:

    https://yourorg.crm.dynamics.com/.default offline_access

    Mistake 4: Testing with a user that cannot access the data

    Make sure the user testing the plugin has access to the Dataverse tables you are querying.

    Mistake 5: Re-uploading the same version

    If you change the package, update the version number before uploading again.

    Download the checklist

    I built a simple HTML checklist for this setup.

    It lets you track the values, check off steps, auto-fill the scope from your Dataverse URL, and generate the connector snippet.

    Download the Dataverse MCP Connector for Copilot Cowork setup checklist

    Official docs

    Final take

    NOTE: When you have tested and validated you can connect to Dataverse. You will want to add the Teams App ID from the Agent Plugin we deployed and add it to the Teams Developer OAuth Registration.

    1. Go to Teams Admin center > Teams apps > Manage apps
    2. Find your Plugin you deployed > Copy the App ID
    3. Go back to Teams Developer Portal and open the OAuth registration tool that was created
    4. Paste the App ID into the “Restrict usage by Teams app” field as an Existing Teams app

    This setup is still early, and there are rough edges.

    But once it works, the direction is obvious.

    Dataverse already has the business model.

    Copilot Cowork gives users a work surface.

    The MCP connector connects the two.

    Add a schema-aware skill, and Cowork can start working through real Dataverse data in a way that feels practical for actual business scenarios.

    That is the part worth paying attention to.

    Let me know what other Plugins you want to see in Copilot Cowork.

  • Add the Microsoft Learn Docs MCP Server in Copilot Studio

    Add the Microsoft Learn Docs MCP Server in Copilot Studio

    UPDATE—August 8, 2025: You no longer need to create a custom connector for the Microsoft Learn Docs MCP server. Copilot Studio now includes a native Microsoft Learn Docs MCP Server under Add tool → Model Context Protocol.
    This guide has been updated to show the first-party path. If your tenant doesn’t yet show the native tile, use the Legacy approach at the bottom.

    What changed

    • No YAML or custom connector required
    • Fewer steps, faster setup

    Model Context Protocol (MCP) is the universal “USB-C” port for AI agents. It standardizes how a model discovers tools, streams data, and fires off actions—no bespoke SDKs, no brittle scraping. Add an MCP server and your agent instantly inherits whatever resources, tools, and prompts that server exposes, auto-updating as the backend evolves.

    1. Why you should care
    2. What the Microsoft Learn Docs MCP Server delivers
    3. Prerequisites
    4. Step 1 – Add the native Microsoft Learn Docs MCP Server
    5. Step 2 – Validate
    6. Legacy approach (if the native tile isn’t available)

    Why you should care

    • Zero-integration overhead – connect in a click inside Copilot Studio or VS Code; the protocol handles tool discovery and auth.
    • Future-proof – the spec just hit GA and already ships in Microsoft, GitHub, and open-source stacks.
    • Hallucination killer – answers are grounded in authoritative servers rather than fuzzy internet guesses.

    What the Microsoft Learn Docs MCP Server delivers

    • Tools: microsoft_docs_search – fire a plain-English query and stream back markdown-ready excerpts, links, and code snippets from official docs.
    • Always current – pulls live content from Learn, so your agent cites the newest releases and preview APIs automatically.
    • First-party & fast — add it in seconds from the Model Context Protocol gallery; no OpenAPI import needed.

    Bottom line: MCP turns documentation (or any backend) into a first-class superpower for your agents—and the Learn Docs server is the showcase. Connect once, answer everything.

    Prerequisites

    • Copilot Studio environment with Generative Orchestration (might need early features on)
    • Environment-maker rights
    • Outbound HTTPS to learn.microsoft.com/api/mcp

    Step 1 – Add the native Microsoft Learn Docs MCP Server

    1. Go to Copilot Studio: https://copilotstudio.microsoft.com/
    2. Go to Tools → Add tool.
    3. Select the Model Context Protocol pill.
    4. Click Microsoft Learn Docs MCP Server.
    5. Choose the connection (usually automatic) and click Add to agent.

    6. Confirm the connection status is Connected.
    Copilot Studio Add tool panel showing Model Context Protocol category and Microsoft Learn Docs MCP Server tile highlighted.
    1. The MCP server should now show up in Tools.
    1. Click the Server to verify the tool(s) and to make sure:
      – ✅ Allow agent to decide dynamically when to use this tool
      – Ask the end user before running = No
      – Credentials to use = End user credentials

    Step 2 – Validate

    1. In the Test your agent pane. Turn on Activity map by clicking the wavy map icon:

    2. Now try a prompt like:
      – What MS certs should I look at for Power Platform?
      – How can I extend the Power Platform CoE Starter Kit?
      – What modern controls in Power Apps are GA and which are still in preview? Format as a table

    Use-Case Ideas

    • Internal help-desk bot that cites docs.
    • Learning-path recommender (your pipeline example).
    • Governance bot that checks best-practice-links.

    Troubleshooting Cheat-Sheet

    • Note that currently the Learn Docs MCP server does NOT require authentication. This will most likely change in the future.
    • If Model Context Protocol is not shown in your Tools for Copilot Studio. You may need to create an environment with Early Features turned on.
    • Do NOT reference the MCP server in the agents instructions, you will get a tool error.
    • Check Activity tab for monitoring

    Legacy approach (if the native tile isn’t available)

    Grab the Minimal YAML

    1. Open your favorite code editor or notepad. Copy and paste this YAML to a new file.
    swagger: '2.0'
    info:
      title: Microsoft Docs MCP
      description: Streams Microsoft official documentation to AI agents via Model Context Protocol
      version: 1.0.0
    host: learn.microsoft.com
    basePath: /api
    schemes:
      - https
    paths:
      /mcp:
        post:
          summary: Invoke Microsoft Docs MCP server
          x-ms-agentic-protocol: mcp-streamable-1.0
          operationId: InvokeDocsMcp
          consumes:
            - application/json
          produces:
            - application/json
          responses:
            '200':
              description: Success
    
    1. Save the file with .yaml extension.

    Import a Custom Connector

    Next we need to create a custom connector for the MCP server to connect to. We will do this by importing our yaml file we created in Step 1.

    1. Go to make.powerapps.com > Custom connectors > + New custom connector > Import OpenAPI.

    2. Upload your yaml file eg: ms-docs‑mcp.yaml, using the Import an OpenAPI file option.

    3. General tab: Confirm Host and Base URL.
      Host: learn.microsoft.com
      Base URL: /api
    4. Security tab > No authentication (the Docs MCP server is anonymously readable today).
    5. Definition tab > verify one action named InvokeDocsMcp is present.
      Also add a description.

    6. Click Create connector. Once the connector is created, click the Test tab, and click +New Connection.

      (Note, you may see more than 1 Operation after creating the connector. Don’t worry and continue on)
    7. When you create a connection, you will be navigated away from your custom connector. Verify your Connection is in Connected Status.

      Next we will wire this up to our Agent in Copilot Studio.
  • Creating Navigation Buttons for Different Views in Model-Driven Apps

    Creating Navigation Buttons for Different Views in Model-Driven Apps

    When building model-driven apps, one common frustration is the limitation of adding a single table with only a default view. For example, if you have a Contacts table with a Choice field, and you’ve created a view for each choice, users have to select Contacts first, then navigate to the desired view manually.

    But what if you could streamline this process by adding separate navigation buttons for each view directly in the app’s left-hand navigation bar? This blog post will walk you through how to achieve that using URL-based navigation—no extra coding required.

    1. The Scenario
    2. Setup
      1. Step 1: Create views
      2. Step 2: Get the entitylist ID and view ID
      3. Step 3: Edit model-driven app to add URL

    The Scenario

    This is a small example, but the functionality I am about to show you is very powerful, and can help streamline UX.

    Imagine you have:

    • A Contacts table in Dataverse.
    • A Choice field in the Contacts table called Contact Type with options like Client, Vendor, and Partner.
    • Custom views for each Contact Type, such as Client Contacts, Vendor Contacts, and Partner Contacts.

    By default, when adding the Contacts table to your app, only one button appears on the navigation bar, leading to the default view. Users must manually switch to the other views. This approach isn’t user-friendly for frequent switching between views. Especially when some users only care about certain contact types.

    Setup

    Step 1: Create views

    First you will want to create a view for each button on the navigation. In my case I created a view for Vendor Contacts, and Client Contacts. Each view I added a simple filter to show only that Contact Type

    Example:


    Step 2: Get the entitylist ID and view ID

    Play your model driven app, select the Table and choose the view.
    Now look at the URL, and copy everything after entitylist&etn=

    So in my example the Vendor Contacts view URL is:
    contact&viewid=ee7b9134-7cb2-ef11-a72f-000d3af40ac9&viewType=1039

    Next add this to the beginning of the URL you just copied:
    /main.aspx?pagetype=entitylist&etn=

    So my final URL will be:
    /main.aspx?pagetype=entitylist&etn=contact&viewid=ee7b9134-7cb2-ef11-a72f-000d3af40ac9&viewType=1039

    This will be the URL we use as our navigation link.


    Step 3: Edit model-driven app to add URL

    Edit your model driven app, click +New, and select Navigation link

    Add the URL we built in Step 2, and give it a name, click Add

    NOTE: If you get an error, it means your URL is wrong. Follow Step 2.

    By leveraging this simple yet effective approach, you can elevate the user experience in your model-driven apps, making navigation more intuitive and streamlined for your team.

    Special thanks to Kevin Nguyen for showing me how to do this.

    Let me know how this works for your app or if you have other creative solutions to share!

  • Dataverse Record Level Security

    Dataverse Record Level Security

    The scenario here is to enable row level security within the concepts of Dataverse inside a Model-Driven App. Important to note, this can be applied to Canvas or Model-driven apps.

    For example:
    I have a Sale Commission table which is connected to a Model-Driven App. One of the columns is a choice called Store.

    The concept is; we only want users to see records from their own respective stores. This concept seems straight forward and easy.. After some digging and reading documentation and asking some friends in understanding this model. I found a way to do this. So here it is!

    Video Tutorial

    Prerequisites

    The feature that will help us in this concept is called Matrix data access structure (Modernized Business Units). Click the link to read more into it. But I will articulate what we need to do.

    Enable record ownership across business units (preview)

    First we need to enable this feature on an environment. Follow the steps below to enable this feature.

    1. Sign in to the Power Platform admin center, as an admin (Dynamics 365 admin, Global admin, or Microsoft Power Platform admin).
    2. Select the Environments tab, and then choose the environment that you want to enable this feature for.
    3. Select Settings > Product > Features.
    4. Turn On the Record ownership across business units toggle.
    5. Click Save.
    Record ownership across business units (Preview)

    Setup steps

    This guide is assuming you have your Dataverse tables built.
    We need to setup a few things to get this functionality to work:

    1. Create Business Units
    2. Create security role
    3. Assign security role
    4. Create Business rule

    Create Business Units

    We are creating a Business unit for each “Store” in this example.
    Creating business units in the Power Platform Admin center:

    1. In the Admin center, select your environment.
    2. Select the Settings cog in the top.
    3. Under Users + permissions.
    4. Select Business units.
    Showing step 4. Clicking Business units
    1. Click New, and create as many business units as you need.
    2. In this example, I am creating 3. One for each store.
    Showing all business units that have been created

    Create security role

    We want to create a security role. This is a role to give access to the custom tables we have for Dataverse, as well as privileges for Business unit. This will allow users to append different Business units to new records.

    While still in the Admin center;

    1. Click See all under Security roles.
    Admin center showing the security role option
    1. Click, New role or edit an existing role.
    2. When editing the role click the Custom Entities tab.
    3. Find your table that users will be interacting with. In this example, its Sale Commission table.
    4. Set this table to:
      Read = Business unit
      Create = Parent child business unit
    Showing the Sale commission permission
    1. Next, click the Business Management tab.
    2. Set the Business Unit table to:
      Read = Parent child business unit
      Write = Parent child business unit
      Append To = Parent child business unit
    Showing the Business Unit permissions
    1. Click Save and Close.

    Assign security role

    Now we need to assign the security role to users based on the Business unit. To do that follow the steps:

    While in the Admin center;

    1. Click See all under Users.
    2. Select a user to assign the Business unit role to.
    3. Click Manage roles.

    Notice that we can change the Business unit the Security role can be assigned under.

    Showing the new option to select Security roles under each Business unit

    In this example, I am assigning the role under each Business unit to give permissions.

    1. Select the Business unit and assign the role.
    UserRoles assigned + Business unit
    AdeleSales Contributor in MainStore-BU
    AlexSales Contributor in NorthStore-BU
    Sales Contributor in DowntownStore-BU
    Showing a table of permissions

    Based on the table above.

    • Adele can see all records part of the Main store
    • Alex can see all records in North Store and Downtown Stores
    1. Click Save.

    Create Business rule

    Now that the feature has been enabled and configured, we still need to change the Owning Business Unit field based on the selected store. There are many ways to do this, but for this example, I will be using a Business rule.

    To configure a Business rule;

    1. Navigate to your solution, or where the table (Sale Commission) is in Power Apps.
    2. Select the table, and click Forms.
    3. Select the form that users will be using when creating records.
    4. Once the form is opened, add the Owning Business Unit field, and select it
    5. Once selected, click Business rules on the right pane.
    6. Click New business rule.
    7. Give the rule a meaningful name.
    8. In the default condition, in the properties tab mine looks like this:
    Business rule condition 1

    For the rule, I am going to add a Condition to the “is false” and continue to do this for each Business unit / Store I want to check.
    Here is what mine looks like after adding all the conditions:

    All conditions added to Rule

    Next we need to Set the values of the business unit based on the store.

    1. In the components tab, add a Set Field Value action to all the “Is true” paths.
    2. With the Set Field Value selected, click on the Properties tab.
    3. Select Owning Business Unit for Field and the right Value. Example for the NorthStore:
    Set Field Value properties for North Store
    1. Do this for all the Conditions. Mine looks like this:
    Completed Business Rule
    1. After you’re done, click Validate.
    2. If validation is good, click Save.
    3. After saved, click Activate.

    That’s it. Done!!
    Now when a user selects the Store, it will automatically change the Owning Business Unit.

    Form view of Owning Business Unit changing based on Store selected.
  • Tip For Testing Your Flows In Power Automate

    Tip For Testing Your Flows In Power Automate

    If your like me, you test your Flows over and over again. This results in sending unwanted emails, creating items in SharePoint or Dataverse, Creating files on OneDrive or SharePoint.
    Every time you test your Flow, these actions inside our Flow get executed and cause unwanted behavior when Testing.

    Wouldn’t it be nice if we can Test our Flows without executing these actions? Guess what we can! And its very easy to do. Check this out!

    Scenario

    For example, I have a Flow that Create a new row in Dataverse, and then send an email to the person who created the new row. That is fine, but what happens when we have other actions in our Flow that we want to test to make sure they are correct.
    I may want to test the Flow multiple times if I am doing some data manipulation, but this will result in Creating multiple unwanted rows (records) in Dataverse, as well as send emails every time.

    We can clean up the testing process easily.

    How?

    We can utilize a feature called Static Result.

    First click the 3 dots on the action, and select Static Results.

    Next we can configure the static results. For easy example click the radio button to enable, select your Status, and the Status Code.

    Click Done.

    Now the action will have a yellow beaker, indicating that the action is using Static results.

    Things to note:
    – Static Result are in ‘Preview’ so it could change at any time
    – Not all actions will be able to use them
    – If the option is greyed out, and you’re certain the action is able to use it, save the Flow and re open

    This is only the beginning, as you can create a custom failed response, or create any result you want. This can help troubleshooting and testing certain scenarios.

    REMEMBER!! To turn off static results when you want to execute the actions like normal.

    Examples

    Some examples on when to use static results:

    • Flow runs without sending emails
    • Flow runs without Approvals needed
    • Flow runs that need to test errors on certain actions
    • Flow runs testing different error codes (Advanced) + Custom error codes

    Conclusion

    I have used this feature for awhile now, and noticed not many know about it. It’s so useful in many testing scenarios. Just remember to disable the static results once your done testing!

    If you have any questions or want to add anything please leave a comment and like this post! Thank you!

  • Power Apps Choosing Which Connections To Use Using Power Automate

    Power Apps Choosing Which Connections To Use Using Power Automate

    You may have run into an issue when creating Power Apps that needs to submit data to SharePoint, Dataverse, etc. But did not want to give everyone in the app access to these.
    The problem is, Power Apps uses the connections of the user using the app, meaning if the app writes to a SharePoint List, the user will need Read/Write access.
    The same goes for Power Automate if we try to send the data to Power Automate from Power Apps, it still uses the users connection who triggered the Flow.
    How can we get around this? Read below!

    Table of Contents


    Known Issues

    1. If you block the HTTP Request connector via data loss prevention (DLP), child flows are also blocked because child flows are implemented using the HTTP connector. Work is underway to separate DLP enforcement for child flows so that they are treated like other cloud flows.
    2. You must create the parent flow and all child flows directly in the same solution. If you import a flow into a solution, you will get unexpected results.
      Call Child Flows – Power Automate | Microsoft Docs

    Prerequisites

    1. The Flows must be created inside the same Solution, so a Dataverse database must be configured on the Power Platform Environment

    The Scenario

    In this scenario, I will be showing how a user can use Power Apps to create items in a SharePoint List without being a member of the Site. This will allow us to use a specific Service Account to create the data in SharePoint without giving the user in the app any permission at all!

    First we will build the Child Flow, then Parent Flow, and lastly customize the Power App

    Child Flow

    Inside your Solution create a new Cloud Flow.

    1. For our trigger we use a Manual Button, and add the data we are expecting from Power Apps to put inside our SharePoint List
      (In my example I am only bringing in one field for Title)
    2. Next, I add a Create Item action for my SharePoint List, and add the Parameters from the trigger inside the action.
    3. Lastly, I add a ‘Respond to PowerApp or flow’ action, I create an Output called Success, and some details about what was created.
    Child Flow


    Make sure to use the Connection you want users of the App to use for the SharePoint Create item action.

    Save and go back to the Flow dashboard screen (where you see the Details and run history screen).

    There will be a Card on the right side called ‘Run only users’ click Edit

    Run only users

    Under Connections Used, switch ‘Provided by run-only user’ to the connection you want to be used by users of the App
    (They wont have access to this Connection outside this Flow)

    Run only user

    Click Save,

    Now onto the Parent Flow

    Parent Flow

    Go back to the Solution and Create another Cloud Flow.

    1. For our trigger we use the PowerApps button trigger.
    2. As best practice, create Variables for your data that is coming from Power Apps. Don’t forget to name them, as this will be the parameter name in Power Apps,
      Use the ‘Ask in PowerApps‘ dynamic content for your variable values.
    3. Next we use a action called ‘Run a Child Flow’
      (If you do not see this action, your Flow was not created inside a Solution)
      Add the parameters (these were the input parameters from the last Flow that we just created).
    4. Lastly, add ‘Respond to a PowerApp or flow’ action. For this demo I am adding the parameter ‘Success’ this is from the child Flow.


    Click Save.

    Power App

    Now onto the Power App, I am going to create a simple Power App with 1 TextInput for Title, and a Button to Pass the data to Power Automate.
    Here are my controls for reference:

    TextInput_Title
    Button_SendToFlow

    For the Button:
    1. Add the Flow to the button by clicking on the Button,
    2. Clicking Action tab on top of page,
    3. Clicking Power Automate
    4. Select the Flow


    Next add the parameters for the Flow, in my case I am adding the TextInput_Title.Text

    Now, I want to add a Notification that the Item has been added, which will confirm my Flow has Run correctly. Ill be using the ‘Success’ Output parameter from the Flow for this.

    To add this, I put my Flow run inside a Variable inside Power Apps. Ill call my variable Results, and IO add this to the OnSelect property of the Button where my Flow is:

    Now I use the ‘Notify’ function to notify the user of the item being created, I add this after the semicolon. So my function looks like this in the end:


    So my final code looks like this:

    Set(
        Results,
        'PA-Trigger1'.Run(TextInput_Title.Text)
    );
    Notify(
        Results.success,
        NotificationType.Success
    );
    Reset(TextInput_Title)
    

    Now lets test it!

    Conclusion

    I am using a User called ‘Demo User’ I have shared the App with this user. But they are not part of the SharePoint Site


    Here is the SharePoint Site:

    Now Logged in as the Demo User to test this:

    Logged in as Demo User


    Button Clicked >

    Button Pressed, Flow Completed

    Now to check SharePoint >

    Test Success!!

    Done!
    So this was just a basic example on how we can create data inside a Data Source that the user of the App does not need access too.

  • Using Environment Variables as Parameters for Power Automate Deployments (ALM)

    Using Environment Variables as Parameters for Power Automate Deployments (ALM)

    Summary

    Deploying Power Automate Flows can be a headache if you have to manually change values inside the Flow for each environment. You also run the risk of missing a value.

    This post will go in depth on using Environment variables inside solutions to allow certain values to be used in different environments.
    I will be using Two(2) environments for this demo:
    Dev, and Test

    This demo will utilize the data type ‘JSON’, this will save loads of time.

    Terms / Glossary

    Here are some familiar terms that will help in this post:
    Default Value = The value that you’re expecting after you deploy the Flow.
    This will be our Test environment values

    Current Value = The value that overrides the Default Value.
    This will be our Dev environment values

    Parameters = These are just values. For example 2 + 2. Each 2 is a parameter of the addition expression (+)

    ALM = Application Lifecycle Management
    Documentation on ALM

    Contents

    Prerequisites
    The Scenario
    Getting Parameter Values
    Creating Environment Variables
    Creating The Flow
    Using The Parameters
    Export And Import Deployment
    Conclusion

    Prerequisites

    • Access to Common Data Service
    • Access to create, export, and import Solutions

    ** Note: I Have created this guide to be as simple as possible, If you name everything as I do, you will be able to copy and paste all my expressions directly into your Flow **

    The Scenario

    My Flow posts a message into Microsoft Teams group. When deploying the Flow into different environments, I want to change the Teams content like:

    • Team Name
    • Channel ID
    • Subject

    Usually after deploying, we can go in to the Flow and manually change the values. This can cause errors, especially if we forget to change some values after deploying (I may have done this a few times).

    Getting Parameter Values

    It is important to note that not all Action values can be parameterized. Follow the steps below to see if the values can be parameterized:

    Teams Example:
    My Teams action, I want to parameterize the Team Name, Channel ID, and Subject. For this I add the Action, and select the values as needed.

    Now with the information filled in, click the 3 dots ‘. . .’ on the action, and click ‘Peek Code’.

    Dev Parameters

    In the ‘Peek code’ view, we can see the different parameters and the values that this action uses in the background. Copy these values into notepad or code editor for use later. I have created a simple JSON to be placed in my Environment Variable later on.

    I will be using the Env value for my Subject in the teams message

    For example:
    Team = 1861402b-5d49-4850-a54b-5eda568e7e8b
    Channel = 19:be3759762df64d94a509938aa9962b29@thread.tacv2
    Subject = Message From Dev Environment

    To test that we can use custom values as parameters, we want to grab these values from above and insert them into the ‘Teams Post a message’ action as custom value, than run the Flow

    Mine looks like this now:

    Now run the Flow to make sure everything works as expected using the Custom values

    Now that we know Custom values work for the inputs/parameters for the action. We now want to get the values for the other environment. Remove the custom values from the inputs and choose the correct value that we want to point to when this Flow is deployed to another environment. For example:

    Again we do a ‘Peek code’ to get the parameter IDs that this action uses

    Test Parameters

    Copy these values into notepad or a code editor for use later. Now we have two sets of values, one for Dev, and one for Test. I have created a simple JSON to be placed in my Environment Variable later on.

    I will be using the Env value for my Subject in the teams message

    Make sure the Two(2) JSONs have the same structure. We will be using the data to populate the Environment Variables in the following steps

    Creating Environment Variables

    Environment variables can only be created inside a solution, there are multiple ways you or your organization may want this set up.

    In this demo I have created a Publisher in CDS called ‘param’, this will better define the parameters that we create inside the solution. (this is optional) The default CDS publisher could also be used.

    Create a solution inside Power Automate.
    Click Solutions on the left navigation menu,
    Than click ‘New Solution’ on the top on menu, and fill the information out

    Once the solution is created,
    Click ‘New’ > Environment variable

    Now fill in the information like the screenshot below.

    Note, I will be using the Data Type as JSON. I use this for simplicity, as I have more than one value I want to add. Also we can use the Parse JSON action in Flow to reference each value separately. You can use any Data Type you like

    Now we populate the values we want to use per environment, the way we do this is fill in the Default Value, and the Current Value.


    Default Value = The values we want for the other environment, in this case Test
    Current Value = The values we want to use for this environment, in this case Dev

    Once the values are pasted in click ‘Save’

    Creating The Flow

    I will be creating the Flow inside the solution that the Environment Variable is in from above.
    Inside the solution click ‘New’ > Flow

    For the demo I will use a Manual trigger, than add Two(2) ‘Initialize Variable’ actions

    Initialize variable – Schema Name
    Name: schemaName
    Type: String
    Value: Put the Name of the environment variable in the value (This can be found on the main screen of the solution under Name column)

    Initialize variable – Parameters
    Name: parameters
    Type: String
    Value: Leave blank for now, this variable will store either the Default Value or Current Value, based on which environment we are in

    Next add a ‘Scope’ action to hold all the actions that will get the parameters

    I renamed my ‘Scope’ to Load Parameters.

    NOTE: You can copy and paste my filter query as long as you kept the same name as I did. When you see the @ in Power Automate, this allows you to call expressions without having to go into the expression tab. If you want to build the expression yourself, I will include the syntax under each picture of the List Records actions and on

    Inside the Scope, add Two(2) ‘Common Data Service Current Environment – List Records’ actions.

    1) List records – Parameter Definitions
    Entity name: Environment Variable Definitions
    Filter Query: schemaname eq ‘@{variables(‘schemaName’)}’

    schemaname eq ‘YOUR ENVIRONMENT VARIABLE NAME’

    2) List records – Parameter Current Values
    Entity name: Environment Variable Values
    Filter Query: environmentvariabledefinitionid_value eq ‘@{first(outputs(‘List_records-_Parameter_Definitions’)?[‘body/value’])?[‘environmentvariabledefinitionid’]}’

    @{first(outputs('List_records-_Parameter_Definitions')?['body/value'])?['environmentvariabledefinitionid']}
    first(outputs(‘List_records-_Parameter_Definitions’)?[‘body/value’])?[‘environmentvariabledefinitionid’]

    Now we need to check which value to use, the Default Value, or the Current Value.

    Add an ‘If Condition‘ Build the condition like this:

    If Current Value is empty
    Left Value: @first(outputs(‘List_records_-_Parameter_Current_Values’)?[‘body/value’])?[‘Value’]

    @first(outputs('List_records_-_Parameter_Current_Values')?['body/value'])?['Value']

    is equal to
    Right Value: @null

    @null
    first(outputs(‘List_records_-_Parameter_Current_Values’)?[‘body/value’])?[‘Value’]

    Next in the ‘If yes‘ block add a ‘Set Variable‘

    Set variable – Parameter Default
    Name: parameters
    Value: @{outputs(‘List_records_-_Parameter_Definitions’)?[‘body/value’][0][‘defaultvalue’]}

    @{outputs('List_records_-_Parameter_Definitions')?['body/value'][0]['defaultvalue']}
    outputs(‘List_records_-_Parameter_Definitions’)?[‘body/value’][0][‘defaultvalue’]

    In the ‘If no‘ block add a ‘Set variable‘

    Set variable – Parameter Current
    Name: parameters
    Value: @{outputs(‘List_records_-_Parameter_Current_Values’)?[‘body/value’][0][‘Value’]}

    @{outputs('List_records_-_Parameter_Current_Values')?['body/value'][0]['Value']}
    outputs(‘List_records_-_Parameter_Current_Values’)?[‘body/value’][0][‘Value’]

    Under the ‘If condition‘ add a ‘Parse JSON‘
    Name: Parse JSON – Parameters
    Content: @{variables(‘parameters’)}
    Schema: To generate your schema, Click the ‘Generate from sample’ button, than paste in the JSON that you used for Default Value

    We are done with the parameter scope now..

    Using The Parameters

    I will be adding a Teams Action ‘Post a message‘ I will use the dynamic content from my ‘Parse JSON‘ action.

    Triggering the Flow, I expect the Dev values to be used (Current Value)

    Here is the Teams message:


    Next we will export and import into a different Environment which will use different parameters (Default Value)

    Export And Import – Deployment

    Overview of this sections steps:
    1. Remove Current Value from Environment variable
    2. Publish Solution
    3. Export Solution
    4. Import Solution
    5. Authorize any Connections
    6. Enable Flow
    7. Trigger / Test

    1. Remove Current Value from Environment variable

    Inside the Solution click on the Environment variable, under Current Value click the 3 dots ( . . . ) Select Remove from this solution

    This will only remove the values from this solution. The Current Values will still be in CDS and can also be added back into this solution if needed by clicking Add existing under Current Value
    1. Publish Solution

    Inside your solution, click ‘Publish all customization’

    1. Export Solution

    Once published click ‘Export’

    Export as ‘Managed’ or ‘Unmanaged’ Choose either or based on your needs.

    1. Import Solution

    Switch to your other Environment, and click Solutions tab. Click ‘Import’

    Choose your Zip file from your Export, and follow instructions by clicking ‘Next’

    1. Authorize any Connections

    Once the solution is imported successfully, you may need to authorize any connections inside the Flow. This can be done by clicking on the Flow from inside your solution, and clicking ‘Sign in’ on all actions > Click ‘Save’

    1. Enable Flow

    Now enable / turn on the Flow

    1. Trigger / Test

    Trigger the Flow to confirm the values are coming over as correct (Default Value).

    Test Env – Using Default Value as expected

    Now in Teams our message has been posted in a different team chat, different channel, and with the ‘Test’ text in the subject line

    Conclusion

    After reading this post:
    https://powerapps.microsoft.com/en-us/blog/environment-variables-available-in-preview/
    I wanted to build a step by step guide, that is practical and also beneficial. Since this feature is in ‘Preview’ this could change without notification.

    I hope this guide is able to help you get your ALM for your Power Automate Flows more sustainable.

    Flow Template Download and guide:
    Loading Environment Variables – Template

    Thanks

  • Adding Security Roles and Field Security Profiles to Users in CDS using Power Automate

    Adding Security Roles and Field Security Profiles to Users in CDS using Power Automate

    The Scenario

    We will be adding a Security Role / Field Security Profile to users in CDS. For this demo, our scenario will be grabbing all the users from a Office365 group and assigning them a certain Security Role / Field Security Profile.

    The source of the users can be from anywhere:
    – MS Form
    – SharePoint
    – Array inside the Flow
    – Excel Table
    – AAD Group / Office365 Group

    Prerequisites

    We will be using the Common Data Service Current Environment connector. This means that our Flow, MUST be created inside a Solution.

    You will need appropriate permissions to be able to assign Security Roles and Profiles to

    Steps

    INFORMATION:
    This Flow will work the exact same to add Field Security Profiles instead of Security Roles. The only changes you have to make are in the List records – Get Security Role, and the Relate records – Security Role to User. The changes are listed in the captions of those images.

    We use a Variable to store the name of the Security Role we want to add to the users.
    Than use a List records action on the Entity Security Roles
    In our Filter Query we will use:
    name eq ‘ ‘
    Since we are using a variable to store the name of the Security Role, we pass this into the Filter Query

    Field Security Profile = Change Entity name to Field Security Profile

    Next, add a Compose action, to get the Odata URL. This URL is how we will add the Security Role to the User later on.

    first(outputs('List_records_-_Get_Security_Role')?['body/value'])?['@odata.id']
    

    To build the above expression follow these steps:

    1) Inside the Compose action select Expression tab
    2) Use the expression first()
    3) Click back to Dynamic content tab

    We use first() to get the first value in the CDS List records action. This allows us to bypass the Apply to each loop that Flow creates for us

    4) In the ( ) select the Dynamic content value from the List records action

    TIP: Make sure you see the fx logo in the text box, this indicates we are using an expression

    5) At the end of the expression add:

    ?['@odata.id']
    

    6) Click OK

    7) Confirm the expression saved correctly by hovering your mouse over the expression

    Next, use any data source / connector that meets your needs to get the emails of your users that you want to add – In this example I am using Office365 List group members

    Add an Apply to each loop – So we can loop through each email and assign the Security Role

    Inside the Apply to each loop, add a List records action on the Users entity
    Filter Query = internalemailaddress eq ‘ ‘
    Add your dynamic content that has the email address for the user to add inside the ‘ ‘

    Next, add a Compose action – to store the User ID (Unique ID)
    We use the same technique as mentioned above, using first() and the field name
    Add this to the end of your expression

    ?['systemuserid']
    
    systemuserid = the field name in CDS that stores the Unique value for each user. This value is used as a lookup guid. So we can relate the records to this guid

    Still inside the Loop:
    Add a Relate Records action.. This is one of the actions inside the Common Data Service Current Environment Connector.
    Entity Name: Users
    Item ID: The Compose – Get User ID Outputs
    Relationship: Select ‘Security Role – systemuserroles_association’ from the drop-down
    URL: The Compose – Security Role odata URL

    Field Security Profile = Change Relationship Dropdown to — Field Security Profile – systemuserprofiles_association

    Your action should look like this:

    Conclusion

    Adding Security roles or Field Security Profiles, can be a long and tedious process. You can add this Flow to a MS form and have users fill out what roles they need.

    Thanks for reading!