![Flow Alt Delete – Josh Cook [Microsoft MVP]](https://flowaltdelete.ca/wp-content/uploads/2020/04/cropped-img_0521.jpg)

When building model-driven apps, one common frustration is the limitation of adding a single table with only a default view. For example, if you have a Contacts table with a Choice field, and you’ve created a view for each choice, users have to select Contacts first, then navigate to the desired view manually.
But what if you could streamline this process by adding separate navigation buttons for each view directly in the app’s left-hand navigation bar? This blog post will walk you through how to achieve that using URL-based navigation—no extra coding required.
The Scenario
This is a small example, but the functionality I am about to show you is very powerful, and can help streamline UX.
Imagine you have:
- A Contacts table in Dataverse.
- A Choice field in the Contacts table called
Contact Typewith options like Client, Vendor, and Partner. - Custom views for each Contact Type, such as Client Contacts, Vendor Contacts, and Partner Contacts.
By default, when adding the Contacts table to your app, only one button appears on the navigation bar, leading to the default view. Users must manually switch to the other views. This approach isn’t user-friendly for frequent switching between views. Especially when some users only care about certain contact types.
Setup
Step 1: Create views
First you will want to create a view for each button on the navigation. In my case I created a view for Vendor Contacts, and Client Contacts. Each view I added a simple filter to show only that Contact Type
Example:

Step 2: Get the entitylist ID and view ID
Play your model driven app, select the Table and choose the view.
Now look at the URL, and copy everything after entitylist&etn=

So in my example the Vendor Contacts view URL is:contact&viewid=ee7b9134-7cb2-ef11-a72f-000d3af40ac9&viewType=1039
Next add this to the beginning of the URL you just copied:/main.aspx?pagetype=entitylist&etn=
So my final URL will be:/main.aspx?pagetype=entitylist&etn=contact&viewid=ee7b9134-7cb2-ef11-a72f-000d3af40ac9&viewType=1039
This will be the URL we use as our navigation link.
Step 3: Edit model-driven app to add URL
Edit your model driven app, click +New, and select Navigation link

Add the URL we built in Step 2, and give it a name, click Add
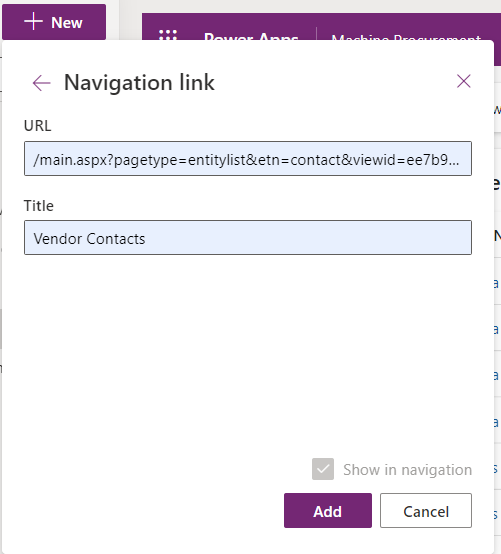
NOTE: If you get an error, it means your URL is wrong. Follow Step 2.
By leveraging this simple yet effective approach, you can elevate the user experience in your model-driven apps, making navigation more intuitive and streamlined for your team.
Special thanks to Kevin Nguyen for showing me how to do this.
Let me know how this works for your app or if you have other creative solutions to share!


Thanks for the amazing post. Can you please guide us how can we make it work if we deploy solution to different environment? I believe view ID will be different in each environment.
LikeLike
Deploy as normal. View ID is same across environments.
LikeLike
Thanks for the great overview, as a followup please could you post an article showing how a specific vendor contacts form can be loaded instead of the default contacts form.
LikeLiked by 1 person
Thank you!
Like changing the default form?
https://learn.microsoft.com/en-us/power-apps/maker/model-driven-apps/create-and-edit-a-model-driven-form?WT.mc_id=DX-MVP-5004029#controlling-access-to-your-forms
LikeLike
More specifically, there is a form for specific form vendor contact, form for supplier contacts and say a specific form for customer contacts (using your example above). Then once we click on any one of the contacts, the correct form (specific to that type of contact) loads automcatically.
I was thinking this needs to be a javascript code / web resource loaded when there is an event handler on the “OnLoad” event. The function would check the “account type” and then load the correct form associated with that contact type whether vendor, supplier, customer.
However it would be great to hear your thoughts?
LikeLike
You can assign different security roles to different forms.
Vendors only see a certain form and etc. so you would also want to create some security roles based on those customer types::
https://learn.microsoft.com/en-us/power-apps/maker/model-driven-apps/control-access-forms
LikeLike