Adding Security Roles and Field Security Profiles to Users in CDS using Power Automate

The Scenario

We will be adding a Security Role / Field Security Profile to users in CDS. For this demo, our scenario will be grabbing all the users from a Office365 group and assigning them a certain Security Role / Field Security Profile.

The source of the users can be from anywhere:
– MS Form
– SharePoint
– Array inside the Flow
– Excel Table
– AAD Group / Office365 Group

Prerequisites

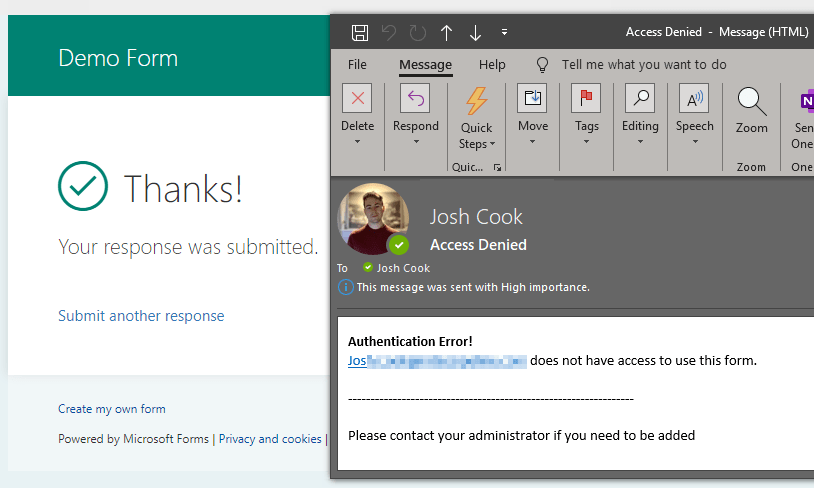
We will be using the Common Data Service Current Environment connector. This means that our Flow, MUST be created inside a Solution.

You will need appropriate permissions to be able to assign Security Roles and Profiles to

Steps

INFORMATION:
This Flow will work the exact same to add Field Security Profiles instead of Security Roles. The only changes you have to make are in the List records – Get Security Role, and the Relate records – Security Role to User. The changes are listed in the captions of those images.

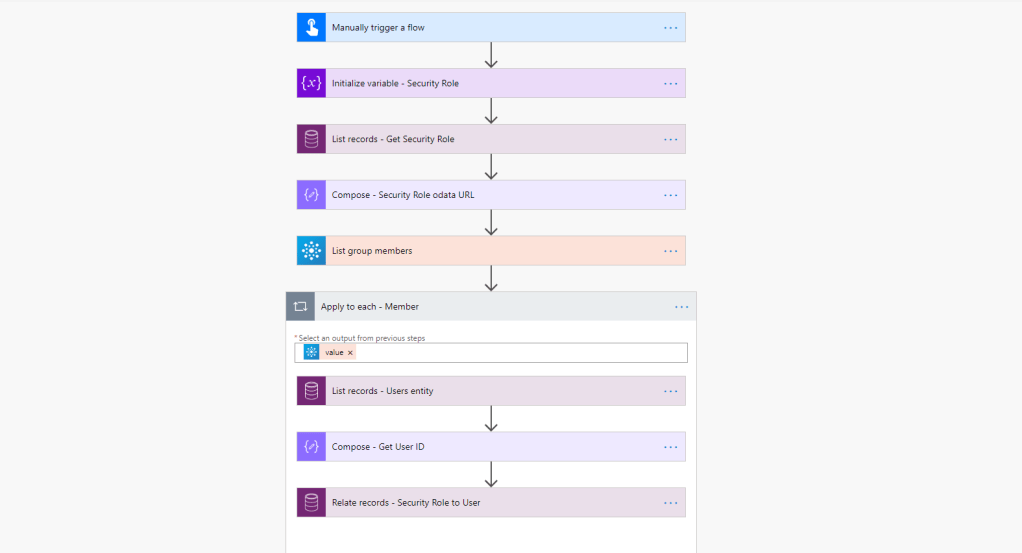
We use a Variable to store the name of the Security Role we want to add to the users.
Than use a List records action on the Entity Security Roles
In our Filter Query we will use:
name eq ‘ ‘
Since we are using a variable to store the name of the Security Role, we pass this into the Filter Query

Field Security Profile = Change Entity name to Field Security Profile

Next, add a Compose action, to get the Odata URL. This URL is how we will add the Security Role to the User later on.

first(outputs('List_records_-_Get_Security_Role')?['body/value'])?['@odata.id']

To build the above expression follow these steps:

1) Inside the Compose action select Expression tab
2) Use the expression first()
3) Click back to Dynamic content tab

We use first() to get the first value in the CDS List records action. This allows us to bypass the Apply to each loop that Flow creates for us

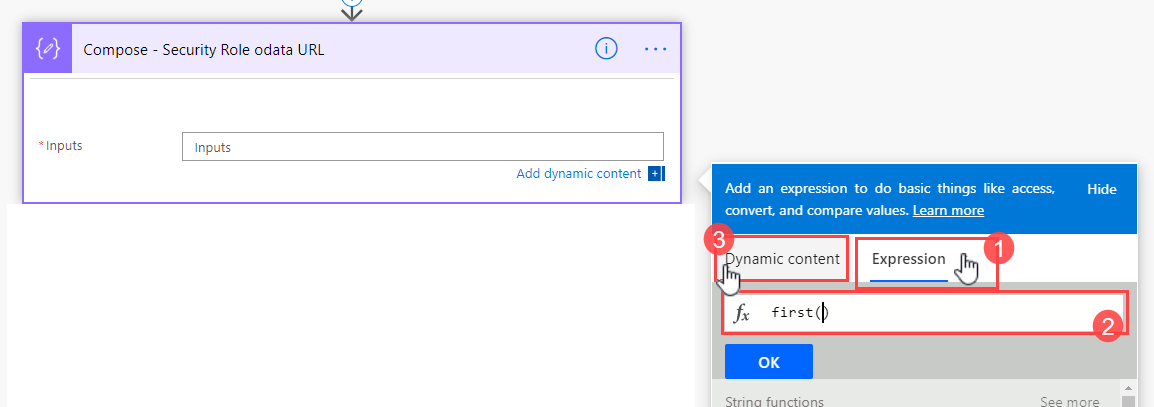
4) In the ( ) select the Dynamic content value from the List records action

TIP: Make sure you see the fx logo in the text box, this indicates we are using an expression

5) At the end of the expression add:

?['@odata.id']

6) Click OK

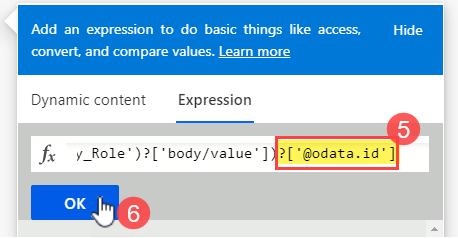
7) Confirm the expression saved correctly by hovering your mouse over the expression

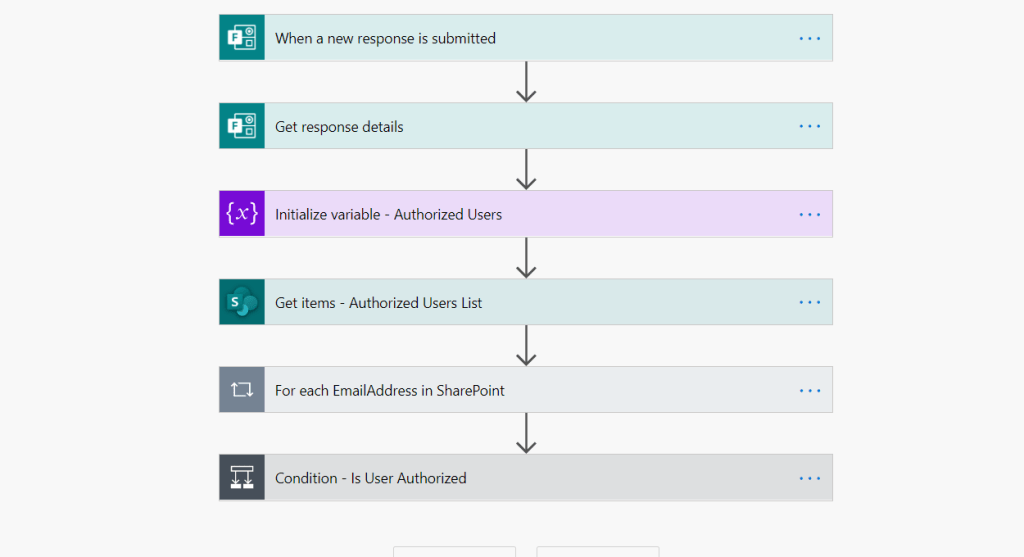
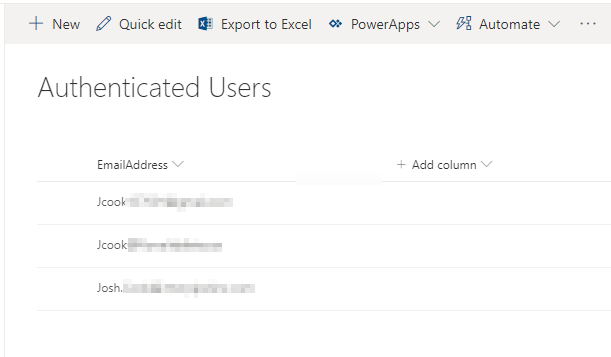
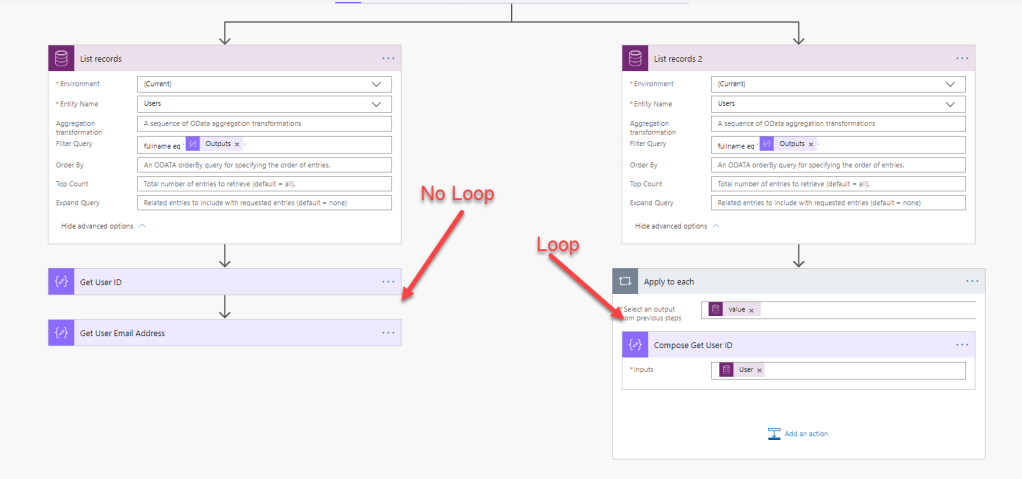
Next, use any data source / connector that meets your needs to get the emails of your users that you want to add – In this example I am using Office365 List group members

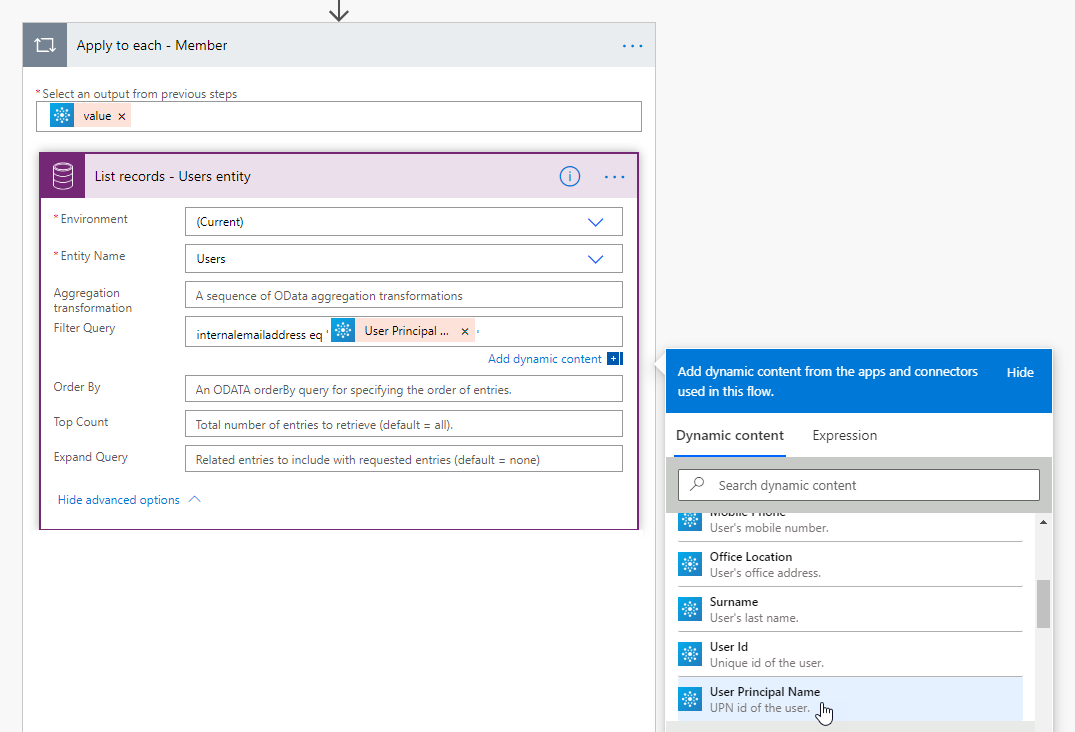
Add an Apply to each loop – So we can loop through each email and assign the Security Role

Inside the Apply to each loop, add a List records action on the Users entity
Filter Query = internalemailaddress eq ‘ ‘
Add your dynamic content that has the email address for the user to add inside the ‘ ‘

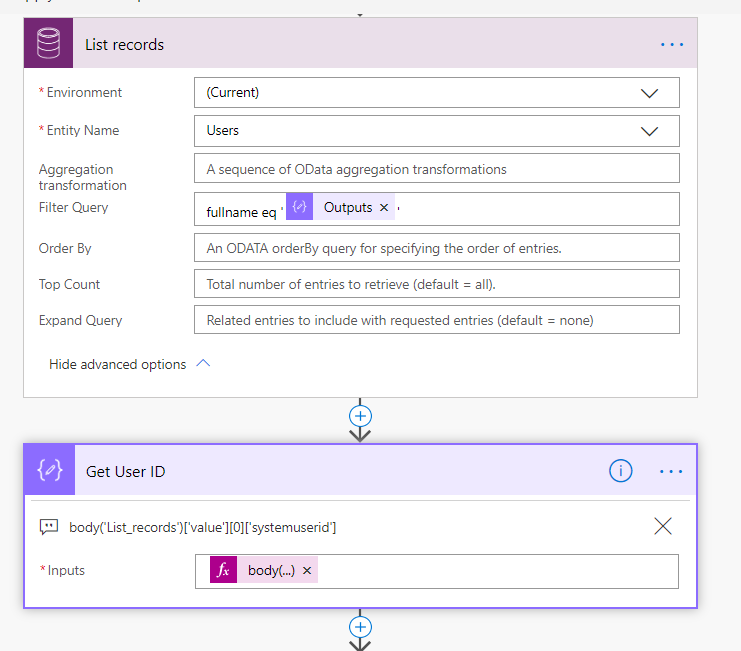
Next, add a Compose action – to store the User ID (Unique ID)
We use the same technique as mentioned above, using first() and the field name
Add this to the end of your expression

?['systemuserid']
systemuserid = the field name in CDS that stores the Unique value for each user. This value is used as a lookup guid. So we can relate the records to this guid

Still inside the Loop:
Add a Relate Records action.. This is one of the actions inside the Common Data Service Current Environment Connector.
Entity Name: Users
Item ID: The Compose – Get User ID Outputs
Relationship: Select ‘Security Role – systemuserroles_association’ from the drop-down
URL: The Compose – Security Role odata URL

Field Security Profile = Change Relationship Dropdown to — Field Security Profile – systemuserprofiles_association

Your action should look like this:

Conclusion

Adding Security roles or Field Security Profiles, can be a long and tedious process. You can add this Flow to a MS form and have users fill out what roles they need.

Thanks for reading!

Throw an Exception Easily (Error)

Basically, we want to be able to control if we want an error. At this time Flow does not let you easily throw an error.

There is a Terminate action which is awesome, I use it in every Flow or Logic App I create.
The Terminate Action will terminate the Run immediately. Terminate will not allow other actions to execute, even if the ‘Configure Run After’ is set to Failed, Skipped.

This can be a headache trying to implement a way to easily Fail an action. While allowing the Flow to continue running the ‘Configure Run After’.

Setup

We will use a Try – Catch method. Basically we will use ‘Scope’ actions to house different parts of our actions. You can think of ‘Scopes’ like a way to organize your Flow.
Add them into your Flow just like any other Action.

Try – Where your original flow design will be placed.
Catch – This is where we ‘Catch’ – Meaning we will only run this Scope if the above Scope has a Failed Action

First add a ‘Initialize variable‘, define the type as Boolean, and call this variable Exception.
Next add two(2) ‘Scopes’

Next we want to only run the Catch Scope, if the Try scope has failed.
To do this, simply click the Three(3) dots on the Action and click ‘Configure run after’

Now deselect ‘is successful’ and select the ‘has failed’, and ‘has skipped’ checkbox. Click Done

Next, to trigger an error in the Try Scope, add a ‘Set Variable‘, and select the Boolean from above.

Now, inside the value use the expression null.

The Set Variable should look like this now:

Since our Catch block will run if Try fails, our run will show as Successful. We can change this by adding a ‘Terminate’ action

Add any other error handling you wish inside the Catch scope, some examples include:

  • Email to Support that Flow has failed
  • Different type of business processing
    • Delete a record
    • Rename a record
  • Service Bus – dead lettering

TIP: When adding other actions inside the Catch scope make sure to make the Terminate action last

Here is a Test run:

Conclusion

This is a great method for executing an error, Its fast and simple, and can be used many times in the same Flow.
Thanks for reading!


Authentication on Microsoft Forms

Microsoft Forms is great for many use cases. However, with some use cases you may not want the whole organization to have access to this form.

Summary

In short, we want to setup a way to allow certain users to fill out a MS form.
How can we achieve this?
My Flow below will show how to take a list from SharePoint that has users emails, to only allow them to process the Form.

** Note – You do not have to use SharePoint, you can use any means necessary. **

Setup

First you will need to have a Microsoft Form created – Any MS Form will work

Next, we setup our List of ‘Authenticated’ Emails. Again in this demo I am using SharePoint
I created a simple SharePoint List with a single text field to store email addresses

Steps

In the Flow, we create as normal with a Microsoft Form Trigger and action to get the Details
Trigger – When a new response is submitted
Action – Get response details
Next add a Variable, we make the Type an Array
Under the Variable, add Get items action, and choose our Authenticated users list that we created above

Next, add an Apply to each loop. Select the value from the Get items action.
Inside the loop, add a Append to array variable, select the variable that we initialized above. Value = the column name that stores the email Address in our SharePoint List

** Note – Make sure the Initialize variable is type Array **

Outside the loop – Add a Condition
Select the Array on the left side – Contains – Responder on the right

— We use Contains to check if the User filling out the form is in this Array of emails —

If the user who is filling out the form does not belong to the ‘Authenticated’ list, we Send an Email letting the user know they are unauthorized to fill out this form.
Under the Send an email action, add a Terminate action with Status of Success, this is to ensure the flow stops running, while not throwing an unwanted Failed run

Here is what a User will see when they do not have access

Conclusion

I am sure there are a million ways to add your own intuitive Authentication methods.
I hope my method helps or inspires someone else!
Thanks for reading


Bypass Apply to each Loop

Have you ever noticed that Power Automate will sneak in that ‘Apply to each loop’ even though you are only expecting a single value.
For example this can happen whenever you are using a Action that ‘Lists’ items, folders, fields, etc.
In this example I will be showing how to get a User ID in CDS with the users Full Name.

The Problem

Power Automate creates a ‘Apply to each’ loop when selecting dynamic content from a action that Lists items, folder, or anything. In most cases this is awesome and creates a nice smooth workflow.

However, what about when you know exactly what you want to look for and you know its only going to be 1 record, item, whatever is going to be returned. Power Automate will still make you use the ‘Apply to each’ loop.

This may not be a such a terrible thing, but if you need to do multiple things underneath that action, you will have to put them in the loop as well (if you need any data or reference to that action)

The Solution

On to the magic..
In my example Flow I will be using:

  • ‘Compose’ action to have my Full Name stored.
  • ‘List records’ CDS action to list records from the default Users table entity.
    ** Note – This can be done with any connector. **
  • ODATA filter on the ‘List records’ which I am using to filter ‘fullname’
  • Under the ‘List records’ I use a ‘Compose’ action to store the users ID(Primary Key from CDS) and the users Email Address

Step 1 – I am using CDS List records for my example, with a Odata filter

My List Records with my Odata filter

Step 2 – Adding Compose action to use the Expression to bypass the loop

Add a Compose action below the List action. And select Expression

Type anything, this is to keep us in Expression mode when we switch back to Dynamic Content tab

If you see the fx Logo in the Dynamic Content Tab, you have done this correctly

Remove what you had, and Click the Value of the action you want to bypass the loop with

Remove the ? and add [0] This is saying we want the first record only. Since this returns an array we say 0 as this is the first record in an array

after the [0] we type what the field name is, in this format: [‘feildname’]

Click OK.. I usually like to put the Expression in a Comment

This is the exact expression I used in my Compose action

body('List_records')['value'][0]['systemuserid']

DONE!


Limitations:

The only thing you have to watch out for is when there is a empty record. This will cause an error if the record is empty.
This can easily be fixed using a Condition If block before the Compose to check if value is empty using the empty() expression.
OR
If you want to avoid the error altogether, you can use the expression first() instead of body()

I hope anyone finds this useful. This boosts performance greatly when you only need one record since you wont need a Apply to each loop.

Thank you for reading

Excel Filtering on Columns With a Space

Using the Filter or the Select Query in Excel is very easy to use. However the issues come up when there is a space in the column you are trying to Query, which results in a Bad Request error.

The Problem

Using the Filter or the Select Query can be limited on the Excel connector. The issues come up when there is a space in the column you are trying to Query, which results in a Bad Request error.

The Solution

A relatively easy fix would be to change the column name to have no spaces. Sometimes this is not viable or possible due to many systems talking to each other. Or perhaps a third party is supplying the Excel doc.

The fix in my example shows how to use the Select, and Filter array actions in Power Automate.
Select is used to select certain columns to output.
Filter Array is used to filter on certain conditions and values.

Step 1 – Add the Select action under the Excel List rows present in table action

The Map section is used by naming the column on the left, and selecting the column on the right

Step 2 – Add Filter array action under the Excel List rows present in table action

The Filter array action can be used for all types of Odata like filters

Conclusion

Some Actions have a limitation on the Odata filter and Select queries. Some examples include:

  • When filtering on Names with special characters
    • James O’ Henry
  • Columns with spaces

Thank you for reading.