Add the Microsoft Learn Docs MCP Server in Copilot Studio

Add Microsoft’s Learn Docs MCP server in Copilot Studio, verify the tool, and query official docs—fast, first-party, step-by-step.

UPDATE—August 8, 2025: You no longer need to create a custom connector for the Microsoft Learn Docs MCP server. Copilot Studio now includes a native Microsoft Learn Docs MCP Server under Add tool → Model Context Protocol.
This guide has been updated to show the first-party path. If your tenant doesn’t yet show the native tile, use the Legacy approach at the bottom.

What changed

  • No YAML or custom connector required
  • Fewer steps, faster setup

Model Context Protocol (MCP) is the universal “USB-C” port for AI agents. It standardizes how a model discovers tools, streams data, and fires off actions—no bespoke SDKs, no brittle scraping. Add an MCP server and your agent instantly inherits whatever resources, tools, and prompts that server exposes, auto-updating as the backend evolves.

  1. Why you should care
  2. What the Microsoft Learn Docs MCP Server delivers
  3. Prerequisites
  4. Step 1 – Add the native Microsoft Learn Docs MCP Server
  5. Step 2 – Validate
  6. Legacy approach (if the native tile isn’t available)

Why you should care

  • Zero-integration overhead – connect in a click inside Copilot Studio or VS Code; the protocol handles tool discovery and auth.
  • Future-proof – the spec just hit GA and already ships in Microsoft, GitHub, and open-source stacks.
  • Hallucination killer – answers are grounded in authoritative servers rather than fuzzy internet guesses.

What the Microsoft Learn Docs MCP Server delivers

  • Tools: microsoft_docs_search – fire a plain-English query and stream back markdown-ready excerpts, links, and code snippets from official docs.
  • Always current – pulls live content from Learn, so your agent cites the newest releases and preview APIs automatically.
  • First-party & fast — add it in seconds from the Model Context Protocol gallery; no OpenAPI import needed.

Bottom line: MCP turns documentation (or any backend) into a first-class superpower for your agents—and the Learn Docs server is the showcase. Connect once, answer everything.

Prerequisites

  • Copilot Studio environment with Generative Orchestration (might need early features on)
  • Environment-maker rights
  • Outbound HTTPS to learn.microsoft.com/api/mcp

Step 1 – Add the native Microsoft Learn Docs MCP Server

  1. Go to Copilot Studio: https://copilotstudio.microsoft.com/
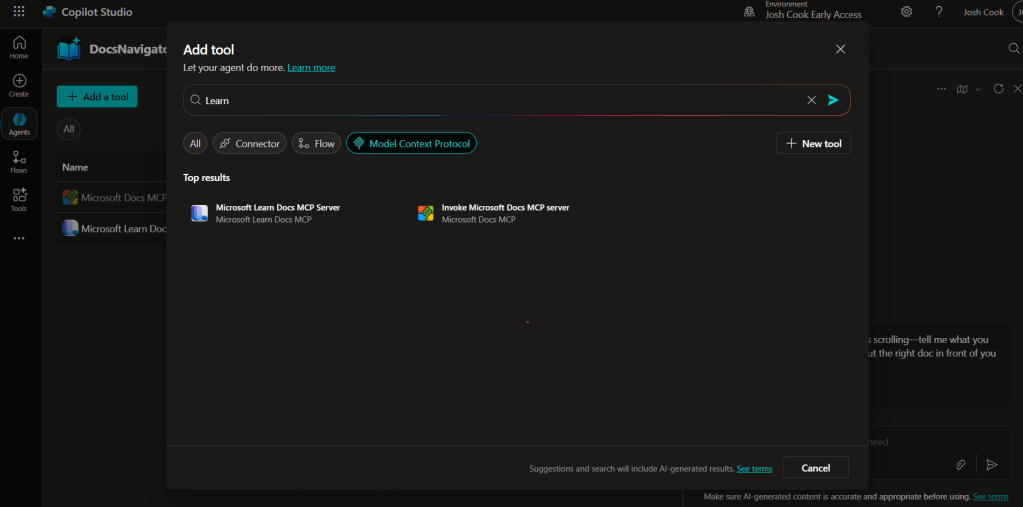
  2. Go to Tools → Add tool.
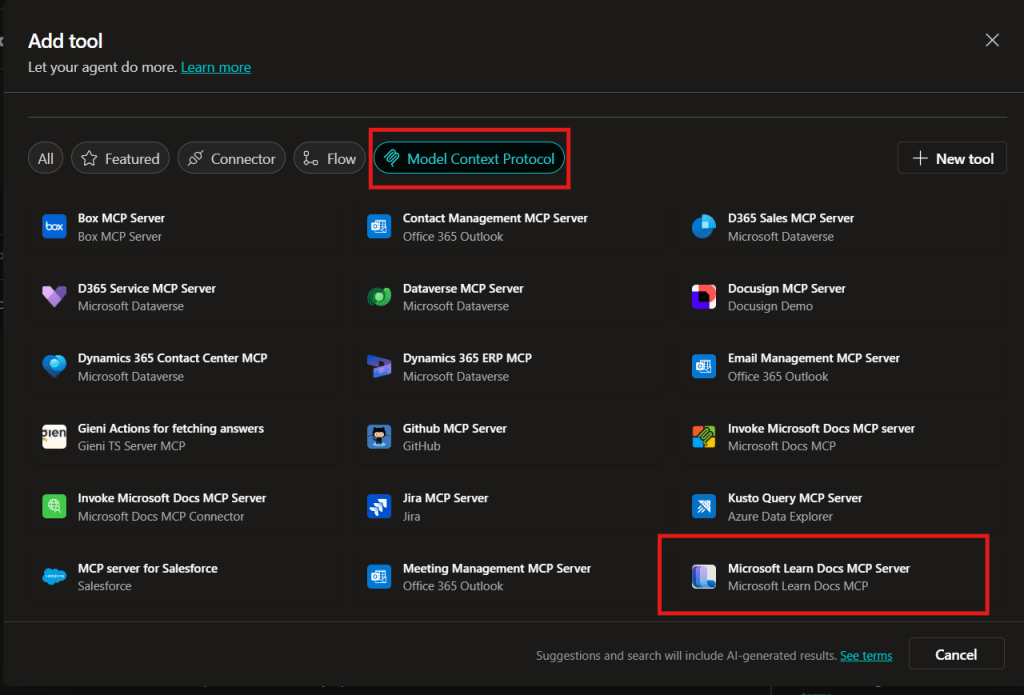
  3. Select the Model Context Protocol pill.
  4. Click Microsoft Learn Docs MCP Server.
  5. Choose the connection (usually automatic) and click Add to agent.
  6. Confirm the connection status is Connected.
Copilot Studio Add tool panel showing Model Context Protocol category and Microsoft Learn Docs MCP Server tile highlighted.
  1. The MCP server should now show up in Tools.
  1. Click the Server to verify the tool(s) and to make sure:
    – ✅ Allow agent to decide dynamically when to use this tool
    – Ask the end user before running = No
    – Credentials to use = End user credentials

Step 2 – Validate

  1. In the Test your agent pane. Turn on Activity map by clicking the wavy map icon:

  2. Now try a prompt like:
    What MS certs should I look at for Power Platform?
    How can I extend the Power Platform CoE Starter Kit?
    What modern controls in Power Apps are GA and which are still in preview? Format as a table

Use-Case Ideas

  • Internal help-desk bot that cites docs.
  • Learning-path recommender (your pipeline example).
  • Governance bot that checks best-practice-links.

Troubleshooting Cheat-Sheet

  • Note that currently the Learn Docs MCP server does NOT require authentication. This will most likely change in the future.
  • If Model Context Protocol is not shown in your Tools for Copilot Studio. You may need to create an environment with Early Features turned on.
  • Do NOT reference the MCP server in the agents instructions, you will get a tool error.
  • Check Activity tab for monitoring

Legacy approach (if the native tile isn’t available)

Grab the Minimal YAML

  1. Open your favorite code editor or notepad. Copy and paste this YAML to a new file.
swagger: '2.0'
info:
  title: Microsoft Docs MCP
  description: Streams Microsoft official documentation to AI agents via Model Context Protocol
  version: 1.0.0
host: learn.microsoft.com
basePath: /api
schemes:
  - https
paths:
  /mcp:
    post:
      summary: Invoke Microsoft Docs MCP server
      x-ms-agentic-protocol: mcp-streamable-1.0
      operationId: InvokeDocsMcp
      consumes:
        - application/json
      produces:
        - application/json
      responses:
        '200':
          description: Success
  1. Save the file with .yaml extension.

Import a Custom Connector

Next we need to create a custom connector for the MCP server to connect to. We will do this by importing our yaml file we created in Step 1.

  1. Go to make.powerapps.com > Custom connectors > + New custom connector > Import OpenAPI.

  2. Upload your yaml file eg: ms-docs‑mcp.yaml, using the Import an OpenAPI file option.

  3. General tab: Confirm Host and Base URL.
    Host: learn.microsoft.com
    Base URL: /api
  4. Security tab > No authentication (the Docs MCP server is anonymously readable today).
  5. Definition tab > verify one action named InvokeDocsMcp is present.
    Also add a description.

  6. Click Create connector. Once the connector is created, click the Test tab, and click +New Connection.

    (Note, you may see more than 1 Operation after creating the connector. Don’t worry and continue on)
  7. When you create a connection, you will be navigated away from your custom connector. Verify your Connection is in Connected Status.

    Next we will wire this up to our Agent in Copilot Studio.

How to Use Regular Expressions in Microsoft Power Virtual Agents With Examples

Have you used RegEx in your PVA bots? Check out this post where I give patterns to the most common validations.

Regular Expressions in Power Virtual Agents? Sounds like a pretty advanced topic. But it’s actually not that difficult and can save you hours of time if you’re trying to validate user input for things such as credit card numbers, tracking IDs, custom invoice numbers or even IP addresses. In this post we’ll cover some of the basics of Regular Expression syntax so you can get started using them inside Power Virtual Agents.

Summary

To utilize regular expressions inside Power Virtual Agents, we must first create a new entity.
This can be be done by clicking the Entities tab > New entity.

Now select Regular expression (Regex)

PVA does a great job in providing some general use case examples.

The syntax is based on .NET


RegEx Examples in PVA

Below you will find some examples you can copy and paste directly into the Pattern for your Regular Expression:

PatternDescription
^(?:(?:25[0-5]|2[0-4][0-9]|[01]?[0-9][0-9]?).){3}(?:25[0-5]|2[0-4][0-9]|[01]?[0-9][0-9]?)$IP Address
– Looks for X.X.X.X format
– Each X range in 0-255
– X length 0-3
^4[0-9]{12}(?:[0-9]{3})?$Visa Credit Card numbers
– Start with a 4
– Old cards use 13 digits
– New cards use 16 digits
^3[47][0-9]{13}$American Express
– Starts with 34 OR 37
– All have 15 digits
 ^(?:5[1-5][0-9]{2}|222[1-9]|22[3-9][0-9]|2[3-6][0-9]{2}|27[01][0-9]|2720)[0-9]{12}$Mastercard
Starts with either:
51-55 OR 2221-2720
– All have 16 digits
^(?!0{3})(?!6{3})[0-8]\d{2}-(?!0{2})\d{2}-(?!0{4})\d{4}$Social Security Number
– SSN are 9 digits
– Looks for XXX-XX-XXXX format
– Cannot contain all zeros
– Cannot begin with 666 OR 900-999
^[a-fA-F0-9]{2}(:[a-fA-F0-9]{2}){5}$Mac Address
– 6 byte hex separated by colon “:” OR dash “-”
^((6553[0-5])|(655[0-2][0-9])|(65[0-4][0-9]{2})|(6[0-4][0-9]{3})|([1-5][0-9]{4})|([0-5]{0,5})|([0-9]{1,4}))$Port Number
– Matches valid port number in computer network
– 16 bit
– Ranges from 0-65535
[A-Z]{2,}-\d+Jira Ticket Number
– Looks for format Hyphen-separated Jira project key and ticket issue number
^(bc1|[13])[a-zA-HJ-NP-Z0-9]{25,39}$Bitcoin Address
26-35 alphanumeric characters
– Start with 1 OR 3 OR bc1
^[0-9a-fA-F]{8}\b-[0-9a-fA-F]{4}\b-[0-9a-fA-F]{4}\b-[0-9a-fA-F]{4}\b-[0-9a-fA-F]{12}$UUID / {guid}
– 36 characters
– 128 bit, represented in 16 octets
– Looks for format form of  8-4-4-4-12

Using them in PVA

Once we create the Entity, and define the pattern for our RegEx. We can now use this validation inside our PVA chat.

For example, I will test the IP Address pattern

^(?:(?:25[0-5]|2[0-4][0-9]|[01]?[0-9][0-9]?).){3}(?:25[0-5]|2[0-4][0-9]|[01]?[0-9][0-9]?)$

I have created a topic for testing my RegEx.

To use the newly created entity, Add a Question, under Identify select your Custom Entity

Under this, I add a message to confirm its valid.
(Note, the bot will automatically let the user know if the validation does not match)

Testing the RegEx

Okay, drumroll….
The values I will be testing are

User InputValid?
192.168.1.1Valid ✔
127.0.0.1Valid ✔
999.55.1.5Not Valid ✖
Not A IP AddressNot Valid ✖

Conclusion

Being able to use Regular Expressions inside Power Virtual Agents can be extremely powerful. And with the above list of common patterns, I hope you find value in this post.

Thank you, and have a great day!

Where Are My Flows When Building Power Virtual Agents In Teams

You added a Flow in Power Virtual Agents in Teams, you now want to edit that Flow. Where is it? Come check out the answer!

Overview

Building Power Virtual Agents (PVA) in Microsoft Teams is fast, easy, fun, and powerful, especially when we add Power Automate to the mix. A couple questions come up:

1. After the bot is build, how do we edit the Flows? Do we have to go into the PVA bot inside of Microsoft Teams?

2. Where are the Flows stored?

The Answer

The answer to the above questions, can be simplified into one response.

All Flows built inside the Teams environment for PVA chatbots are stored in the Teams environment under the Default Solution.
Now.. How do we get there?

Navigate to the Power Automate Web Portal
Power Automate | Microsoft Power Platform

Sign in, and select the environments menu in the top right and choose the Environment that correlates to your Teams name where you built the Bot.
My Microsoft Team name is ‘POC – Teams

Next navigate to the Solutions tab on the left, and select ‘Default Solution


Once inside the ‘Default Solution‘ we can see many different types of artifacts. To narrow this list down:
On the top right of the page there is a dropdown with different types. Select ‘Flow

That’s it. Now we can see all the Flows inside this Teams Environment.

Want to learn how to get user info from Office365 to use in Power Virtual Agents? Check out my blog on the flow you see above
Get User Info

Limitations

There are some limitations:
– There is no way to import a Flow into this Environment

– When using the Save As feature, the Flow is saved outside of the Solution, thus cannot be used for your PVA Bot in Teams

– When modifying the Flows Inputs and Outputs you will have to remove the Flow action inside of PVA to properly refresh.

Conclusion

If you need help with anything Power Platform related, check out the community sites:

Power Virtual Agents Community – Power Platform Community (microsoft.com)

Power Automate community (microsoft.com)

Power Apps community (microsoft.com)

Home – Microsoft Power BI Community