Tag: Microsoft

  • Copilot Cowork Is Coming: Here’s How to Get Your Tenant Ready on Day 1

    Copilot Cowork Is Coming: Here’s How to Get Your Tenant Ready on Day 1

    Get Your Tenant Ready for Day 1: Joining Microsoft 365 Frontier for Copilot Cowork

    If you’ve been following the buzz around Copilot Cowork, you already know it’s going to change how we work inside Microsoft 365. But here’s the thing — Day 1 readiness doesn’t happen on Day 1. It happens now.

    In this post, I’ll walk you through exactly how to get your tenant set up: the right licenses, how to join the Frontier program, enabling the Anthropic sub-processor, configuring pilot groups, and locking down governance before you open the floodgates.

    Copilot Cowork is expected to be available for Frontier customers late March or later.


    Step 1: Make Sure You Have the Right Licenses

    Before you can enable anything, your tenant needs the right foundation.

    RequirementDetails
    Microsoft 365 Copilot licenseRequired for all end users who will access Copilot Cowork. Available as an add-on on E3, E5, Business Standard, and Business Premium plans.
    AI Administrator roleRequired to make changes in the Copilot settings area of the Admin Center.
    Microsoft Entra ID P1 or P2Needed for group-based access control and conditional access (P1 minimum).
    SharePoint OnlineIncluded in most M365 plans — required for Cowork’s document grounding.

    Admin tip: Before you go further, run a license audit. In the Microsoft 365 Admin Center, go to Billing > Licenses and confirm Copilot licenses are assigned — unassigned licenses won’t show up in Frontier eligibility checks.


    Step 2: Join Microsoft 365 Frontier

    Microsoft 365 Frontier is the early adopter program that gives your tenant access to upcoming Copilot features before general availability — including Copilot Cowork.

    What you’ll need first

    You must have AI Administrator access to complete this setup. If you don’t have this role, work with your Global Admin to get it assigned before you start.

    How to join Frontier

    1. Start from office.com and open the Admin Center.
    2. Navigate to Copilot → Settings → Frontier.
    3. On the Frontier settings page, enable early access.
    4. Under Web Apps, select the users who should be included.
    5. Click Save.

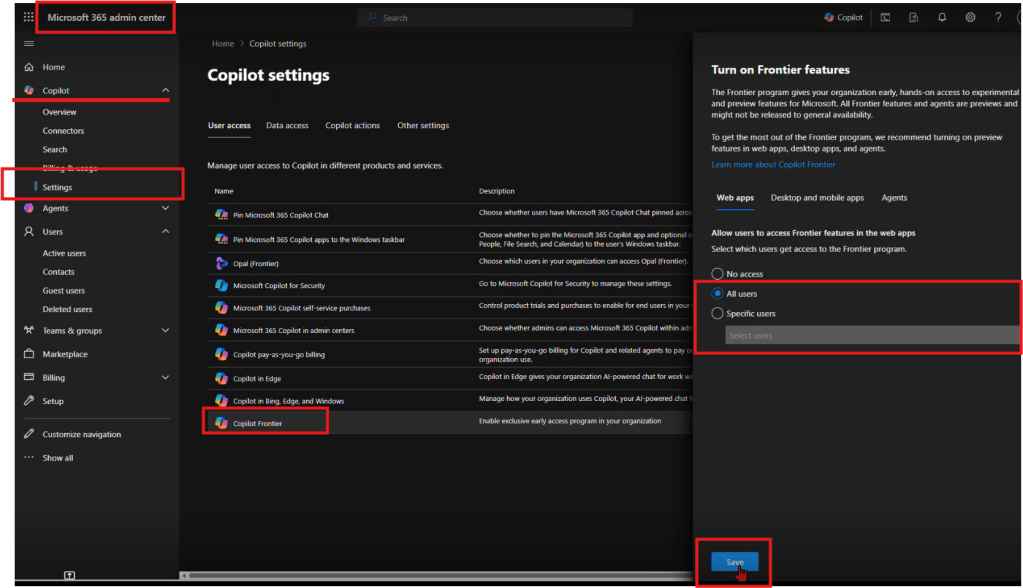
    That’s it — your tenant is now enrolled in Frontier.


    Step 3: Enable Anthropic as an AI Provider

    After Frontier is enabled, you need to turn on the AI providers that power the new Copilot experiences. This is the step most admins don’t realize is required.

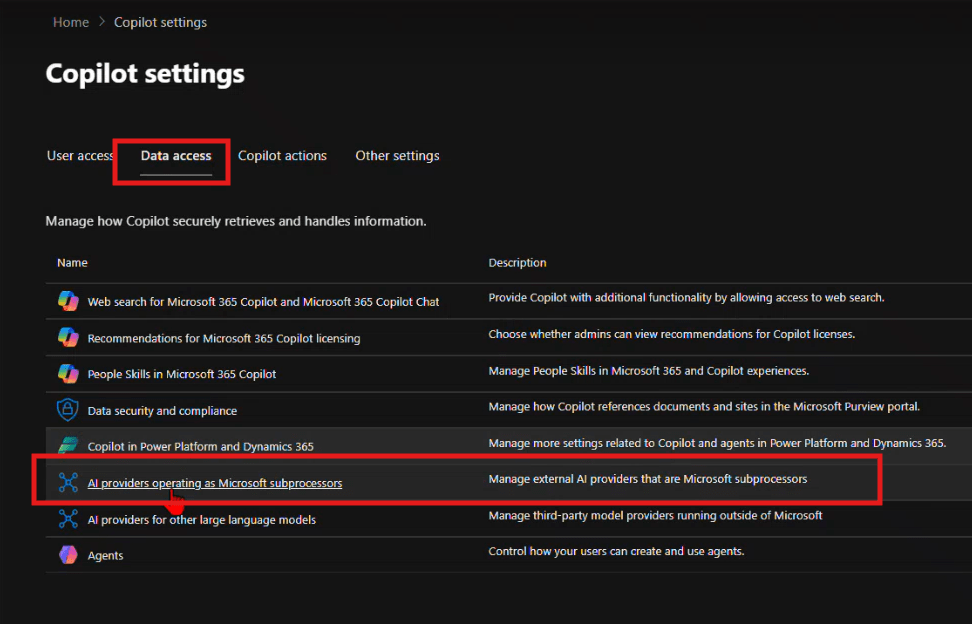
    How to enable Anthropic

    1. From the same Copilot settings area, navigate to Data access.
    2. Enable the available AI providers — the recommendation is to enable as many as possible.
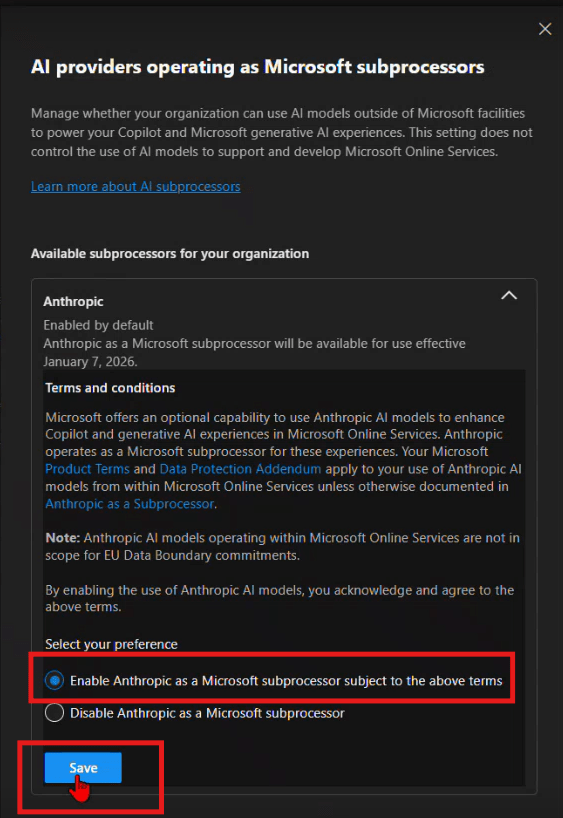
    3. Specifically, find Anthropic and enable it for Copilot.


    Step 4: Set Up Pilot Groups (Optional)

    Don’t roll Frontier out to your entire organization on Day 1. A phased pilot protects your environment and gives you time to validate the experience before broad deployment.

    Recommended pilot structure

    PhaseGroupPurpose
    Wave 1 — Champions5–10 power users (IT, Copilot champions)Validate setup, surface issues early
    Wave 2 — Early Adopters50–100 users across key departmentsReal-world workflow testing
    Wave 3 — Broad RolloutAll licensed usersFull deployment

    How to configure

    1. Create security groups in Microsoft Entra ID — for example, SG-CopilotCowork-Wave1 and SG-CopilotCowork-Wave2.
    2. In the Frontier settings from Step 2, assign early access to your Wave 1 group first using the Web Apps user selection.
    3. Expand to Wave 2 once Wave 1 has validated the experience.

    Pro tip: Set up a Microsoft Teams channel for your pilot group — something like #cowork-pilot-feedback — so you have a central place to collect issues and wins before you scale.


    Step 5: Governance — Lock Down Oversharing Before You Start

    This is the step most organizations skip — and regret. When Copilot can surface content from across your tenant, oversharing becomes a data exposure risk, not just a governance annoyance. Lock this down before you enable Cowork broadly.

    Key controls to review

    ControlWhere to set itRecommendation
    External sharingSharePoint Admin Center → Policies → SharingSet to “Existing guests only” or “Only people in your org” during Frontier rollout
    Default sharing linksSharePoint Admin Center → Policies → SharingChange from “Anyone with the link” to “People in your organization”
    Site-level permissionsIndividual site settingsAudit “Everyone except external users” — this is the #1 oversharing culprit
    Sensitivity labelsMicrosoft PurviewApply labels to classify and restrict access to confidential content
    Guest access expirationEntra ID → External collaboration settingsSet guest access to expire after 90 days

    SharePoint Admin Agent Prompt: Oversharing Audit

    Use this prompt directly with the SharePoint Admin agent in the Microsoft 365 Admin Center to get a fast, prioritized oversharing assessment:

    Review my SharePoint environment for oversharing risks before a Copilot rollout. Specifically:
    1. Identify all sites that have 'Everyone' or 'Everyone except external users' granted any level of access.
     2. List sites where external sharing is enabled but shouldn't be (e.g., HR, Finance, Legal).
     3. Show me any files or folders shared via 'Anyone with the link' in the last 90 days.
     4. Flag any sites with more than 500 unique permissions (permission explosion).
     5. Recommend which sites should have sensitivity labels applied but currently don't.
    Format results as a prioritized remediation list — highest risk first.
    

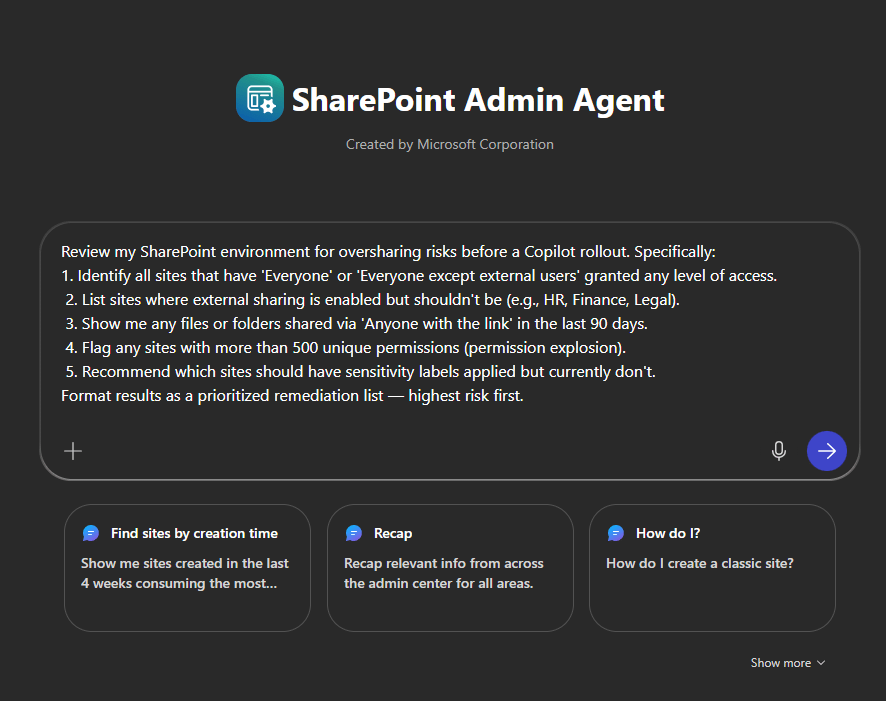
    This gives you an actionable list to work through before any end user asks Copilot Cowork a question about a document they shouldn’t be able to see.


    Your Day 1 Readiness Checklist

    • [ ] M365 Copilot licenses assigned to target users
    • [ ] AI Administrator role confirmed
    • [ ] Tenant enrolled in Frontier (Copilot → Settings → Frontier)
    • [ ] Early access enabled and Web Apps users selected
    • [ ] Anthropic enabled under Data access → AI providers
    • [ ] Pilot security groups created (Wave 1, 2, 3)
    • [ ] SharePoint oversharing audit completed using Admin agent prompt
    • [ ] External sharing policies tightened
    • [ ] Sensitivity labels deployed for confidential content
    • [ ] Pilot feedback channel set up in Teams

    Final Thought

    Copilot Cowork is a new way of working. The organizations that will get the most out of Day 1 are the ones doing this prep work right now. Join Frontier, enable Anthropic, run your oversharing audit, and start small with a tight pilot group.

    The foundation is simple: Frontier starts with admin enablement and provider access. Once that’s in place, you’re ready for everything that comes next.

  • Build Your Agent Factory: 10 Moves That Ship Fast (and Scale)

    Build Your Agent Factory: 10 Moves That Ship Fast (and Scale)

    Build Your Agent Factory: 10 Moves That Ship Fast (and Scale)

    Agents at scale. Not POCs.

    Here’s the playbook I’d hand any exec or builder who wants working agents in production—without turning the org into a science fair.

    1) Stand up an AI Agents Workforce

    What it is: A small cross-functional crew with authority to hunt repetitive work and ship agents.

    Who’s in:

    • 1 product owner
    • 1 engineer (Copilot Studio/Power Automate)
    • 1 data person
    • 1 security/governance lead
    • 1 domain SME.

    Ship this week: Write a one-page charter with scope, decision rights, and a 30-day roadmap (first 5 agents + metrics).

    2) Win with horizontals first, then go vertical

    Horizontals (1-hour wins): drafting, summarizing, policy Q&A, meeting notes to actions, form-fill helpers.

    Verticals (outsized ROI): pick 1–2 per business unit where there’s money, risk, or SLA pain.

    Guardrail: don’t start with the hardest workflow; start where you can close the loop and measure value inside two weeks.

    3) Make an Agents Directory the front door

    Why: Ideas die in email. A directory turns “we should build X” into spec and governance.

    Minimum intake fields:

    • use case name
    • goal
    • users
    • decision rights
    • data sources + who owns it
    • tools
    • PII/sensitivity
    • KPIs
    • business owner
    • risk level
    • rollout plan.

    Outcome: Every request auto-generates a lightweight PRD (goal, inputs, outputs, metrics, guardrails) and a yes/no gate.

    4) Create the 1-Hour Agent template

    Template anatomy:

    Goal + success criteria Input schema (what the user provides) Tools (actions/connectors) and permissions Knowledge sources (files, sites, indexes) Safety rules (allowed/blocked actions, escalation) Evaluation set (10–20 test prompts with expected outcomes) Deploy script (Dev → Test → Prod)

    Rule: If a use case can’t fit this page, it’s not a 1-hour agent—park it for later.

    5) Tie every agent to a visible scorecard

    Metrics to publish: time saved, cost avoided, error rate, CO₂/efficiency (where relevant), user satisfaction.

    Simple formula: monthly users × average minutes saved × loaded cost = value.

    Make it public internally: green/red status, owner, last review, next improvement.

    6) Run on a secure, managed agent runtime

    Non-negotiables: identity passthrough, content safety, audit logs, tool call restrictions, data boundary controls, environment isolation.

    Practical tip: standardize a “sensitive sources” policy and block tools by default; allow case-by-case.

    7) Split the stack to move fast without breaking things

    Experience layer: Copilot Studio for UX, channels, and connectors.

    Agent runtime/orchestration: managed agent service for threads, tool calls, safety, and evaluations.

    Why it works: builders ship quickly at the edge; platform team keeps shared guardrails, monitoring, and upgrades stable.

    8) Mix knowledge + action (or you’ll stall)

    Knowledge: structured grounding (SharePoint/Fabric/Search), doc versioning, citations-on by default.

    Action: flows/Logic Apps, Graph, line-of-business APIs; always ship with a dry-run mode first.

    Design pattern: Answer → show sources → propose actions → execute on approval. When confidence is high and stakes are low, allow auto-execute.

    9) Keep humans in the loop—by design

    HITL patterns that work:

    Shadow mode (observe only) → suggest mode → execute with approval → auto-execute.

    Confidence thresholds where low confidence routes to a human. Escalation logic when guardrails trip or data is missing.

    UX rule: one click to approve, one click to undo.

    10) Plan to scale on day one

    Pipelines: Dev → Test → Prod with approvals and rollback.

    Evals: pre-ship test set per agent; weekly drift checks; quarterly red-team.

    Ops: central logging, cost dashboards, incident playbook.

    Program ritual: a quarterly “Agent Backlog Day” to harvest new ideas and retire underperformers.

    Starter Architecture (fast and boring)

    Experience: Copilot Studio (web, Teams, M365, chat, plugins)

    Actions: Power Automate/Logic Apps + custom APIs

    Knowledge: SharePoint/Fabric/AI Search with retrieval policies

    Runtime: managed agent service for tool orchestration, identity, safety

    Observability: evaluations, telemetry, and a simple agent scorecard per app

    Security: Entra ID RBAC, private endpoints, DLP, approval gates

    Prompts and policies that save you pain

    Prompt contract (keep it in the repo): role, goals, inputs, allowed tools, forbidden actions, decision rights, escalation, output format, citation rules.

    Data contract: what sources are permitted, freshness expectations, sensitivity tags.

    Failure modes: what the agent must do when unsure (ask for clarification, route to human, or stop).

    Anti-patterns I keep seeing

    • Starting with an “AI strategy deck” instead of shipping 3 agents.
    • Agents that answer but can’t act—users stop coming back.
    • No owner, no scorecard, no sunset date.
    • Canary-testing in production without a rollback plan.
    • Letting one giant use case block 20 small wins.

    Your first week mapped

    Day 1: Form the team and publish the charter.

    Day 2: Launch the Agents Directory (intake + PRD autogeneration).

    Day 3–4: Build two 1-hour agents (drafting + policy Q&A) with eval sets.

    Day 5: Ship to a pilot group with scorecards visible. Book the first backlog day.


  • Add the Microsoft Learn Docs MCP Server in Copilot Studio

    Add the Microsoft Learn Docs MCP Server in Copilot Studio

    UPDATE—August 8, 2025: You no longer need to create a custom connector for the Microsoft Learn Docs MCP server. Copilot Studio now includes a native Microsoft Learn Docs MCP Server under Add tool → Model Context Protocol.
    This guide has been updated to show the first-party path. If your tenant doesn’t yet show the native tile, use the Legacy approach at the bottom.

    What changed

    • No YAML or custom connector required
    • Fewer steps, faster setup

    Model Context Protocol (MCP) is the universal “USB-C” port for AI agents. It standardizes how a model discovers tools, streams data, and fires off actions—no bespoke SDKs, no brittle scraping. Add an MCP server and your agent instantly inherits whatever resources, tools, and prompts that server exposes, auto-updating as the backend evolves.

    1. Why you should care
    2. What the Microsoft Learn Docs MCP Server delivers
    3. Prerequisites
    4. Step 1 – Add the native Microsoft Learn Docs MCP Server
    5. Step 2 – Validate
    6. Legacy approach (if the native tile isn’t available)

    Why you should care

    • Zero-integration overhead – connect in a click inside Copilot Studio or VS Code; the protocol handles tool discovery and auth.
    • Future-proof – the spec just hit GA and already ships in Microsoft, GitHub, and open-source stacks.
    • Hallucination killer – answers are grounded in authoritative servers rather than fuzzy internet guesses.

    What the Microsoft Learn Docs MCP Server delivers

    • Tools: microsoft_docs_search – fire a plain-English query and stream back markdown-ready excerpts, links, and code snippets from official docs.
    • Always current – pulls live content from Learn, so your agent cites the newest releases and preview APIs automatically.
    • First-party & fast — add it in seconds from the Model Context Protocol gallery; no OpenAPI import needed.

    Bottom line: MCP turns documentation (or any backend) into a first-class superpower for your agents—and the Learn Docs server is the showcase. Connect once, answer everything.

    Prerequisites

    • Copilot Studio environment with Generative Orchestration (might need early features on)
    • Environment-maker rights
    • Outbound HTTPS to learn.microsoft.com/api/mcp

    Step 1 – Add the native Microsoft Learn Docs MCP Server

    1. Go to Copilot Studio: https://copilotstudio.microsoft.com/
    2. Go to Tools → Add tool.
    3. Select the Model Context Protocol pill.
    4. Click Microsoft Learn Docs MCP Server.
    5. Choose the connection (usually automatic) and click Add to agent.
    6. Confirm the connection status is Connected.
    Copilot Studio Add tool panel showing Model Context Protocol category and Microsoft Learn Docs MCP Server tile highlighted.
    1. The MCP server should now show up in Tools.
    1. Click the Server to verify the tool(s) and to make sure:
      – ✅ Allow agent to decide dynamically when to use this tool
      – Ask the end user before running = No
      – Credentials to use = End user credentials

    Step 2 – Validate

    1. In the Test your agent pane. Turn on Activity map by clicking the wavy map icon:

    2. Now try a prompt like:
      What MS certs should I look at for Power Platform?
      How can I extend the Power Platform CoE Starter Kit?
      What modern controls in Power Apps are GA and which are still in preview? Format as a table

    Use-Case Ideas

    • Internal help-desk bot that cites docs.
    • Learning-path recommender (your pipeline example).
    • Governance bot that checks best-practice-links.

    Troubleshooting Cheat-Sheet

    • Note that currently the Learn Docs MCP server does NOT require authentication. This will most likely change in the future.
    • If Model Context Protocol is not shown in your Tools for Copilot Studio. You may need to create an environment with Early Features turned on.
    • Do NOT reference the MCP server in the agents instructions, you will get a tool error.
    • Check Activity tab for monitoring

    Legacy approach (if the native tile isn’t available)

    Grab the Minimal YAML

    1. Open your favorite code editor or notepad. Copy and paste this YAML to a new file.
    swagger: '2.0'
    info:
      title: Microsoft Docs MCP
      description: Streams Microsoft official documentation to AI agents via Model Context Protocol
      version: 1.0.0
    host: learn.microsoft.com
    basePath: /api
    schemes:
      - https
    paths:
      /mcp:
        post:
          summary: Invoke Microsoft Docs MCP server
          x-ms-agentic-protocol: mcp-streamable-1.0
          operationId: InvokeDocsMcp
          consumes:
            - application/json
          produces:
            - application/json
          responses:
            '200':
              description: Success
    
    1. Save the file with .yaml extension.

    Import a Custom Connector

    Next we need to create a custom connector for the MCP server to connect to. We will do this by importing our yaml file we created in Step 1.

    1. Go to make.powerapps.com > Custom connectors > + New custom connector > Import OpenAPI.

    2. Upload your yaml file eg: ms-docs‑mcp.yaml, using the Import an OpenAPI file option.

    3. General tab: Confirm Host and Base URL.
      Host: learn.microsoft.com
      Base URL: /api
    4. Security tab > No authentication (the Docs MCP server is anonymously readable today).
    5. Definition tab > verify one action named InvokeDocsMcp is present.
      Also add a description.

    6. Click Create connector. Once the connector is created, click the Test tab, and click +New Connection.

      (Note, you may see more than 1 Operation after creating the connector. Don’t worry and continue on)
    7. When you create a connection, you will be navigated away from your custom connector. Verify your Connection is in Connected Status.

      Next we will wire this up to our Agent in Copilot Studio.
  • Get the difference between two dates (Updated 2025)

    Get the difference between two dates (Updated 2025)

    Many Power Automate users encounter issues with the dateDifference() function when calculating the difference between two dates. The problem arises when the output format varies depending on the duration, causing errors in extracting Days, Hours, Minutes, and Seconds.

    This blog provides a robust and easy-to-implement solution that works seamlessly in all scenarios, including durations less than a day. Learn how to use a single expression with conditional logic to avoid these common pitfalls and ensure your date calculations are accurate every time. This is your ultimate fix for handling dateDifference() errors!

    1. The Flow
      1. dateDifference expression
        1. How it works
      2. Steps to Access Each Value
    2. Download my Flow
      1. Classic designer
      2. New designer
    3. Conclusion

    The Flow

    1. Compose action: named StartDate = 2024-12-10T15:58:28
    2. Compose action: named EndDate = 2024-12-10T19:22:20
    3. Compose action: uses dateDifference() expression. see below

    Below is the expression used in the ‘Date Difference’ compose action. It dynamically handles all scenarios—when days are included and when they are not (same with hours and minutes).

    dateDifference expression

    Create a compose action for StartDate and EndDate

    if(
       contains(
         dateDifference(outputs('StartDate'), outputs('EndDate')), 
         '.'
       ),
       json(
         concat(
           '{"Days":', string(int(split(dateDifference(outputs('StartDate'), outputs('EndDate')), '.')[0])),
           ',"Hours":', string(int(split(split(dateDifference(outputs('StartDate'), outputs('EndDate')), '.')[1], ':')[0])),
           ',"Minutes":', string(int(split(split(dateDifference(outputs('StartDate'), outputs('EndDate')), '.')[1], ':')[1])),
           ',"Seconds":', string(int(split(split(dateDifference(outputs('StartDate'), outputs('EndDate')), '.')[1], ':')[2])),
           '}'
         )
       ),
       json(
         concat(
           '{"Days":0',
           ',"Hours":', string(int(split(dateDifference(outputs('StartDate'), outputs('EndDate')), ':')[0])),
           ',"Minutes":', string(int(split(dateDifference(outputs('StartDate'), outputs('EndDate')), ':')[1])),
           ',"Seconds":', string(int(split(dateDifference(outputs('StartDate'), outputs('EndDate')), ':')[2])),
           '}'
         )
       )
    )

    How it works

    • The if() function checks if the dateDifference() result contains a . (dot).
    • If it does, it means the result has a days component (e.g., 1268.04:15:30), so we parse out Days, Hours, Minutes, and Seconds accordingly.
    • If it does not, it means the result is less than a day (e.g., 12:57:47.2544602), so we treat Days as 0 and parse Hours, Minutes, and Seconds directly from the string.

    Result:

    This will produce a JSON object like:
    {
    "Days": 1268,
    "Hours": 4,
    "Minutes": 15,
    "Seconds": 30
    }

    Or
    {
    "Days": 0,
    "Hours": 12,
    "Minutes": 57,
    "Seconds": 47
    }

    Steps to Access Each Value

    If you use the fixed expression directly in a Compose action (e.g., named Date_Difference), you can reference the fields like this:

    • Days: outputs('Date_Difference')?['Days']
    • Hours: outputs('Date_Difference')?['Hours']
    • Minutes: outputs('Date_Difference')?['Minutes']
    • Seconds: outputs('Date_Difference')?['Seconds']

    Use these expressions in subsequent actions (like another Compose, a Condition, or Apply to Each) to reference the specific values.

    Download my Flow

    You can easily copy and paste actions in Power Automate. Allowing you to copy and paste my example.

    1. Classic designer
    2. New designer

    Classic designer

    Step 1: Copy the code snippet

    {"id":"b6b531e2-b7b5-4a9e-86bd-7e2a069529a0","brandColor":"#8C3900","connectionReferences":{},"connectorDisplayName":"Control","icon":"data:image/svg+xml;base64,PHN2ZyB3aWR0aD0iMzIiIGhlaWdodD0iMzIiIHZlcnNpb249IjEuMSIgdmlld0JveD0iMCAwIDMyIDMyIiB4bWxucz0iaHR0cDovL3d3dy53My5vcmcvMjAwMC9zdmciPg0KIDxwYXRoIGQ9Im0wIDBoMzJ2MzJoLTMyeiIgZmlsbD0iIzhDMzkwMCIvPg0KIDxwYXRoIGQ9Im04IDEwaDE2djEyaC0xNnptMTUgMTF2LTEwaC0xNHYxMHptLTItOHY2aC0xMHYtNnptLTEgNXYtNGgtOHY0eiIgZmlsbD0iI2ZmZiIvPg0KPC9zdmc+DQo=","isTrigger":false,"operationName":"Get_date_difference_object","operationDefinition":{"type":"Scope","actions":{"StartDate":{"type":"Compose","inputs":"2024-12-10T15:58:28","runAfter":{}},"EndDate":{"type":"Compose","inputs":"2024-12-10T19:22:20","runAfter":{"StartDate":["Succeeded"]}},"Date_Difference":{"type":"Compose","inputs":"@if(\r\n   contains(\r\n     dateDifference(outputs('StartDate'), outputs('EndDate')), \r\n     '.'\r\n   ),\r\n   json(\r\n     concat(\r\n       '{\"Days\":', string(int(split(dateDifference(outputs('StartDate'), outputs('EndDate')), '.')[0])),\r\n       ',\"Hours\":', string(int(split(split(dateDifference(outputs('StartDate'), outputs('EndDate')), '.')[1], ':')[0])),\r\n       ',\"Minutes\":', string(int(split(split(dateDifference(outputs('StartDate'), outputs('EndDate')), '.')[1], ':')[1])),\r\n       ',\"Seconds\":', string(int(split(split(dateDifference(outputs('StartDate'), outputs('EndDate')), '.')[1], ':')[2])),\r\n       '}'\r\n     )\r\n   ),\r\n   json(\r\n     concat(\r\n       '{\"Days\":0',\r\n       ',\"Hours\":', string(int(split(dateDifference(outputs('StartDate'), outputs('EndDate')), ':')[0])),\r\n       ',\"Minutes\":', string(int(split(dateDifference(outputs('StartDate'), outputs('EndDate')), ':')[1])),\r\n       ',\"Seconds\":', string(int(split(dateDifference(outputs('StartDate'), outputs('EndDate')), ':')[2])),\r\n       '}'\r\n     )\r\n   )\r\n)","runAfter":{"EndDate":["Succeeded"]},"metadata":{"operationMetadataId":"03c8d578-576a-41a3-8d63-609a15ce594b"}}},"runAfter":{"Add_to_time":["Succeeded"]}}}

    Step 2: In Power Automate when adding a new action click My clipboard .

    Step 3: Ctrl + V


    New designer

    Step 1: Copy the code snippet

    {"nodeId":"Get_date_difference_object-copy","serializedOperation":{"type":"Scope","actions":{"StartDate":{"type":"Compose","inputs":"2024-12-10T15:58:28"},"EndDate":{"type":"Compose","inputs":"2024-12-10T19:22:20","runAfter":{"StartDate":["Succeeded"]}},"Date_Difference":{"type":"Compose","inputs":"@if(\r\n   contains(\r\n     dateDifference(outputs('StartDate'), outputs('EndDate')), \r\n     '.'\r\n   ),\r\n   json(\r\n     concat(\r\n       '{\"Days\":', string(int(split(dateDifference(outputs('StartDate'), outputs('EndDate')), '.')[0])),\r\n       ',\"Hours\":', string(int(split(split(dateDifference(outputs('StartDate'), outputs('EndDate')), '.')[1], ':')[0])),\r\n       ',\"Minutes\":', string(int(split(split(dateDifference(outputs('StartDate'), outputs('EndDate')), '.')[1], ':')[1])),\r\n       ',\"Seconds\":', string(int(split(split(dateDifference(outputs('StartDate'), outputs('EndDate')), '.')[1], ':')[2])),\r\n       '}'\r\n     )\r\n   ),\r\n   json(\r\n     concat(\r\n       '{\"Days\":0',\r\n       ',\"Hours\":', string(int(split(dateDifference(outputs('StartDate'), outputs('EndDate')), ':')[0])),\r\n       ',\"Minutes\":', string(int(split(dateDifference(outputs('StartDate'), outputs('EndDate')), ':')[1])),\r\n       ',\"Seconds\":', string(int(split(dateDifference(outputs('StartDate'), outputs('EndDate')), ':')[2])),\r\n       '}'\r\n     )\r\n   )\r\n)","runAfter":{"EndDate":["Succeeded"]},"metadata":{"operationMetadataId":"03c8d578-576a-41a3-8d63-609a15ce594b"}}},"runAfter":{"Add_to_time":["Succeeded"]}},"allConnectionData":{},"staticResults":{},"isScopeNode":true,"mslaNode":true}

    Step 2: In Power Automate click the + to add an action. Click Paste an action

    Conclusion

    That’s it! pretty easy right? if you encounter any issues, comment below!

  • Power Automate Substring and Text Positions Made Easy

    Power Automate Substring and Text Positions Made Easy

    Expressions can be confusing when starting out in Power Automate. Luckily the product team makes things easier each day. I will be showing how to grab an email address Josh.Cook@flowaltdelete.ca and transforming it to Josh Cook

    The Scenario

    For this demo, we will be formatting an email address and removing everything after the ‘@‘ symbol, to form a first name and last name.

    We will be using Substring to achieve this. However we wont be using the expression Substring, we will be using a Action called Substring, this action can be found in the ‘Text Functions‘ connector.

    The Flow

    In my Flow I will use a Compose action to store an email address, this can be any data source or action that fits your needs.

    In this example, we want to remove the At sign and everything after. To do this we could use an expression. But.. The Power Automate team has put together some actions that make Text Functions more easy.

    At this time there is Two(2) Text Function action we can utilize.
    1. Find text position
    2. Substring
    We will you both in this example

    First we will add the ‘Find text position‘ action. This action has Two(2) parameters to fill in:
    Text – The text we want to use, in this case we use the dynamic content of our Compose with the email
    Search text – This is the text we want to find the position of

    In the string Josh.Cook@flowaltdelete.ca the ‘@’ sign is in position 9. This is because in indexing values we count the first value as index 0

    Next we add the ‘Substring‘ action. This action has three(3) parameters.
    1. Text – The string of text to extract the substring from
    2. Starting position – since we want to extract ‘Josh.Cook‘ our position will be 0
    3. Length – This is how long the substring will be, so this is where we use the dynamic value from Text Position action (Which is 9)

    Now when we run the Flow, we should take the value:
    Josh.Cook@flowaltdelete.ca‘ And output ‘Josh.Cook

    Mhm.. Not bad, now all that is needed is getting rid of the ‘.’ This can easily be done by using the replace() expression.
    replace(<Dynamic Substring Body>,’.’,’ ‘)
    The replace expression is replacing the ‘.’ with a white space char

    replace(outputs('Substring')?['body'],'.',' ')
    

    Now when we run the flow:

    Conclusion

    These new Text Function actions in Power Automate makes expressions even easier. I cannot wait to see what the Product group adds to these.
    Thanks for reading, and as always please reach out to me on Twitter with any questions you may have. Thanks again!